
Various Electrical Problems - 83 KZ1000
- gaillarry
-
 Topic Author
- Offline
- User
-

Registered
- Posts: 82
- Thanks: 0
Various Electrical Problems - 83 KZ1000
20 Aug 2012 16:00
Bringing an 83 KZ1000 back to life. Got some electrical problems, most common being no start.
1. New, fully charged battery.
2. When I turn the ign key on it takes about 10 seconds for the oil/neutral light to turn on.
3. Hit the starter button, lights go out, no response from the starter but sometimes the lights will turn back on and the starter will turn over.
4. When the starter does turn over, there's no spark but there's battery voltage at the ignition coils !
Any suggestions where to start looking to solve these probems?
1977 KZ1000
1985 Gpz750
1985 Gpz750
Please Log in or Create an account to join the conversation.
- gaillarry
-
Topic Author
- Offline
- User
-
Registered
- Posts: 82
- Thanks: 0
Re: Various Electrical Problems - 83 KZ1000
20 Aug 2012 18:41
This is getting weirder, cleaned all the electrical connections, including the main ground wire to the engine block. With the ground wire off the engine block, the bike still powers on. Noticed a black/yellow stripe wire attached to the neg on the battery. With this disconnected and the ground to the block disconnected power shuts off.
With the power on checked the voltage at the fuses, the battery reads 12.9 volts but all the fuses are below 1 volt ??
With the power on checked the voltage at the fuses, the battery reads 12.9 volts but all the fuses are below 1 volt ??
1977 KZ1000
1985 Gpz750
1985 Gpz750
Please Log in or Create an account to join the conversation.
- MFolks
-

- Offline
- User
-
Registered
- Posts: 6650
- Thanks: 541
Re: Various Electrical Problems - 83 KZ1000
20 Aug 2012 18:41
Do this first:
Cleaning Motorcycle Electrics
1. Get some of the De-Oxit electrical contact cleaner and figure on spending a good day going from the front of the bike to the back. It’s a plastic safe cleaner/preservative. www.deoxit.com is their website. It can be purchased at most Radio Shack Stores or any electronic supply places. Or use any plastic safe electrical contact cleaner(NOT WD-40 !).
2. On the older Kawasaki's, a majority of electrical connectors are inside the headlight housing requiring removal of the headlight, then the fun begins.
3. Do one set of electrical connectors at a time to avoid mixing up what connects to where. Usually disconnecting, spraying with De-Oxit and reconnecting is about all you'll need.
4. However, when encountering the green crud of corrosion, a brass wire brush may be needed on the pins you can reach. Some 400-600 grit wet and dry sandpaper strips rolled into a tube should reach the male and female pins in the more difficult to clean connectors.
5. Smoker’s pipe cleaners, cotton swabs and wooden toothpicks work as cleaning aids.
6. Really small electrical connectors may require the use of a welders tip cleaning tool assortment.
7. Most pins in the connectors are coated with a thin plating of tin, and others may be nothing more than copper or brass.
8. If moisture is added, the resulting corrosion lowers the voltage/current being carried causing dim lights, slow engine cranking, slow turn signal responce and lower input voltage to the ignition coils resulting in weak spark.
9. The left and right handlebar switch pods will need attention too as they have circuit functions like turn, horn, run/stop, and start. The older Kawasaki’s have reports of the soldered connections crumbling, if your bike has this problem, just ask, as I’ve got a repair procedure for this.
10. Usually a spritz or two with actuation of the switch is about all needed for these switches unless corrosion is detected and then careful disassembly is required.
11. The ignition switch may or may be not sealed to allow spraying the internal contacts. I urge caution if attempting to open this up as springs, and ball bearings may fly out never to be seen again!
12. If your bike has the older style glass tubed fuses, I suggest replacing them as vibration can cause internal failure. AGX is the type used, and most auto parts stores can get them for you, along with boating supply stores.
13. Clean the fuse holder clips, looking for signs of overheating(discolored insulation, signs of melting). I use metal polish on a cotton swab, followed by spraying another clean swab with the De-Oxit and then rubbing the inside of the fuse clip.
14. All battery cables must be clean and tight for maximum current transfer. Check the cables going from the Negative(-) battery terminal/post to the engine mounting bolt
15. Also the one going from the Positive(+) terminal to the starter solenoid and from there to the starter motor.
16. If any battery cable feels ”Crunchy” when flexed, replace it as possible corrosion is inside the insulation. Inspect all heavy duty battery cables and the smaller wire terminations(Bullet Connectors), for failed crimps, and those used in the electrical connectors, as they can fail over time.
17. Each "Bullet Connector" will have to be sprayed to ensure good connectivity, especially the ones going to the energizing coil of the starter solenoid.
18. The alternator output “Bullet Connectors” are usually behind the engine sprocket cover and will need inspecting and cleaning too.
20. The turn signal light sockets will benefit from a spritz from the contact cleaner along with the tail light/brake light socket.
21. Some brake light switches can be sprayed on the actuating rod, with the spray running down inside to the electrical contacts, others may be sealed requiring replacement if the switch is intermittent in operation.
22. Some people put the Di-Electric Grease on cleaned terminations/connectors, I don’t, as I’ve read/heard it can cause problems when it gets hot, actually insulating the connections, so the choice is yours to use or not.
I think I've covered about all of the electrical systems on the bike.........
“I spent a weekend going through every electrical connection and switch on the bike with a little scotchbrite pad and DeOxit - what a difference! Everything was brighter, gauge backlights, indicator lights, turn signals, I was getting a nicer spark, it fired up quicker, etc. Well worth my time. WELL worth it! “
From a forum member at www.kzrider.com
Why WD-40 Should Not Be Used On Motorcycle Electrical Items.
For many years, I was proponent of the use of WD-40 on fuse clips, fuses, switches and connectors. After hearing of other peoples experience with intermittent and sporadic activity, I shrugged it off as maybe they did something wrong in the application of the product.
It wasn’t until the time I rode my 1982 GPz1100 B2 model to downtown San Diego that I encountered the problems others had gone through.
After concluding my business downtown, I walked to where my bike was parked, turned the key to unlock the forks, and prepared to start the engine. The key was in the "On" position, yet I had no lights in the dash panel, the fuel pump was not running(I have FI), and the horn and tail light were not working.
Puzzled as to why nothing electrical was happening, I remember my earlier conversations about how WD-40 will over time become a non-conductor(more like an insulator). I had some pieces of 400 and 600 grit sandpaper in my tool kit and with them was able to scratch away the coating from the WD-40 on the fuses and clips.
After removing the insulating film, the bike started and ran like it should. Since that time, I’ve told people about the problem with WD-40. If you must use a contact cleaner, I recommend getting some "De-oxit" from Radio Shack Stores or any good electronic supply store.
1982 GPZ1100 B2
General Dynamics/Convair 1983-1993
GLCM BGM-109 Tomahawk, AGM-129A Advanced Cruise Missile (ACM)
General Dynamics/Convair 1983-1993
GLCM BGM-109 Tomahawk, AGM-129A Advanced Cruise Missile (ACM)
Please Log in or Create an account to join the conversation.
- MFolks
-
- Offline
- User
-
Registered
- Posts: 6650
- Thanks: 541
Re: Various Electrical Problems - 83 KZ1000
20 Aug 2012 18:46
Throughly clean all switches and electrical connectors, and post back. The majority of the problems sound to me like just dirty/corroded connections on the switches & connectors.
If you do encounter failed or failing solder joints on the handlebar switches, here's a repair procedure:
Read this for a primer on hand soldering: technologyinterface.nmsu.edu/fall97/electronics/solder.html
Repairing Motorcycle Soldered Connections on the older bikes:
When repairing soldered wires on motorcycle switches or light bulbs sockets, have the following on hand:
1. A 25 Watt soldering iron or one that the wattage can be adjusted.
2. Rosin core solder of 60/40 type. SN60 or SN63 is preferred.
3. Rosin flux or soldering paste (Never use solder or soldering paste designed for plumbing work, as it contains an acid that will corrode the electrical joint, ruining it).
4. 91% rubbing Alcohol, or 70%. The lower percentage will clean up flux residue, but not as good as the higher percentage stuff. Acetone does a good job of removing excess solder flux too.
5. A cut down ½” paint brush, or acid brush for scrubbing the repaired solder joint.
6. Clean rags or paper towels
7. A damp sponge to keep the soldering iron tip clean.
8. Some “Solder Wick” a braided bare copper wire designed to collect heated excess solder, aiding in joint preperation, available at electronic supply stores.
9. Some wooden toothpicks.
10. Small Hemostats or clip on heatsinks.
A. Before soldering, “Tin” the soldering iron tip by plugging it in or turning the iron on, allowing it to get to operating temperature(2-3 minutes).
B. Unroll about 3” of solder from the roll of rosin core solder & then using a clean rag or paper towel moistened with Alcohol, wipe the unrolled solder, removing the finger print oils that will create a poor solder joint.
C. Apply a small amount of solder to the now heated soldering iron tip, wiping the excess off with the wet sponge, keeping a thin layer on the soldering iron.
D. The soldering iron is now ready for use, but before applying the heated tip to a wire, wipe the tip on the damp sponge, this removes any oxidized solder and makes for a much better connection.
E. If the joint to be repaired is grey in color or appears “Crumbled”, apply some rosin soldering paste or flux to the joint with a small toothpick or screwdriver, and then apply the soldering iron tip for a few seconds.
G. The fluxed joint should clean up, allowing for a better connection. If no luck, use the solder wick to remove all traces of the old solder by apply in it between the soldering iron tip and the bad joint.
H. Hemostats and clip on heatsinks will be used to prevent the wire insulation from burning, overheating & pulling away from the connection.
I. Apply a small amount of flux to the joint to be repaired & then a very short duration of heated soldering iron tip & solder(like a few seconds or so).
J. Clean off the repaired joint with the brush & rubbing Alcohol or Acetone, the newly repaired joint should appear clean and bright, almost as if it were polished, with no voids or holes.
K. When repairing the bad or "Cold Solder Joints" (as the Electronics industry calls them), it takes really no special skills, just patience, and a place to work(along with the mentioned tools. You've got to be sober, and not stoned, as the soldering tool can be at 700 F, possibly giving the impaired bike owner severe burns.
L. If you have fine muscle control problems, have a friend do the soldering for you. Moving a wire before the electrical joint has properly set up, can create "Cold Joints" too. If possible, practice on the bench top with some scrap wires before attempting repairs on the bike.
M. This information comes from years of missile test cable and equipment assembly, when I worked at General Dynamics/Convair Division in San Diego California, on the BGM-109 Tomahawk and later on the AGM-129 Advanced Cruise Missile. This was from 1983-1993. The company had a week long soldering school, where you learned to solder meeting “Mil-Spec” standards.
1982 GPZ1100 B2
General Dynamics/Convair 1983-1993
GLCM BGM-109 Tomahawk, AGM-129A Advanced Cruise Missile (ACM)
General Dynamics/Convair 1983-1993
GLCM BGM-109 Tomahawk, AGM-129A Advanced Cruise Missile (ACM)
Please Log in or Create an account to join the conversation.
- gaillarry
-
Topic Author
- Offline
- User
-
Registered
- Posts: 82
- Thanks: 0
Re: Various Electrical Problems - 83 KZ1000
20 Aug 2012 18:51
Thanks for the tips, I'll have a full day tomorrow cleaning the connections.
1977 KZ1000
1985 Gpz750
1985 Gpz750
Please Log in or Create an account to join the conversation.
- 650ed
-

- Offline
- User
-
Registered
- Posts: 15333
- Thanks: 2833
Re: Various Electrical Problems - 83 KZ1000
20 Aug 2012 18:57
You need to find a wiring diagram for your bike. Do you have the FSM? If so, it should have the diagram in the back. Also, trace that black / yellow wire from the neg. battery terminal to see where it goes. Ed
1977 KZ650-C1 Original Owner - Stock (with additional invisible FIAMM horn)
Please Log in or Create an account to join the conversation.
- MFolks
-
- Offline
- User
-
Registered
- Posts: 6650
- Thanks: 541
Re: Various Electrical Problems - 83 KZ1000
20 Aug 2012 19:06
Do you have the factory shop manual? If not,here's a PDF:
www.kawiworld.com/index.php?option=com_c...icle&id=77&Itemid=99
It does have two (2) incorrect torque values:
1. The first is the camshaft bearing cap bolt torque, it should be 66 Inch Pounds(8 Foot Pounds) instead of 12 Foot Pounds. Anything more than 8 FT Pounds will strip out the threaded holes in the head, requiring either Heli-Coil or Timesert repair.
2. The second incorrect torque value, is for the two(2) M6 X 1 cylinder head bolts, as they should be tightened to 96 inch pounds instead of 104 inch pounds
1982 GPZ1100 B2
General Dynamics/Convair 1983-1993
GLCM BGM-109 Tomahawk, AGM-129A Advanced Cruise Missile (ACM)
General Dynamics/Convair 1983-1993
GLCM BGM-109 Tomahawk, AGM-129A Advanced Cruise Missile (ACM)
Please Log in or Create an account to join the conversation.
- gaillarry
-
Topic Author
- Offline
- User
-
Registered
- Posts: 82
- Thanks: 0
Re: Various Electrical Problems - 83 KZ1000
20 Aug 2012 19:15
Have the manual and diagram, its on my to-do list for tomorrow, thanks.
1977 KZ1000
1985 Gpz750
1985 Gpz750
Please Log in or Create an account to join the conversation.
- gaillarry
-
Topic Author
- Offline
- User
-
Registered
- Posts: 82
- Thanks: 0
Re: Various Electrical Problems - 83 KZ1000
04 Sep 2012 13:27 - 04 Sep 2012 13:28
Cleaned all the connections, replaced some, now the engine will turn over, but no spark. Clutch lever safety switch works, got 12.5 volts to the ignition coils but no spark?
1977 KZ1000
1985 Gpz750
1985 Gpz750
Last edit: 04 Sep 2012 13:28 by gaillarry.
Please Log in or Create an account to join the conversation.
- Patton
-

- Offline
- KZr Legend
-

Registered
- Posts: 18568
- Thanks: 2101
Re: Various Electrical Problems - 83 KZ1000
04 Sep 2012 13:52 - 04 Sep 2012 17:17
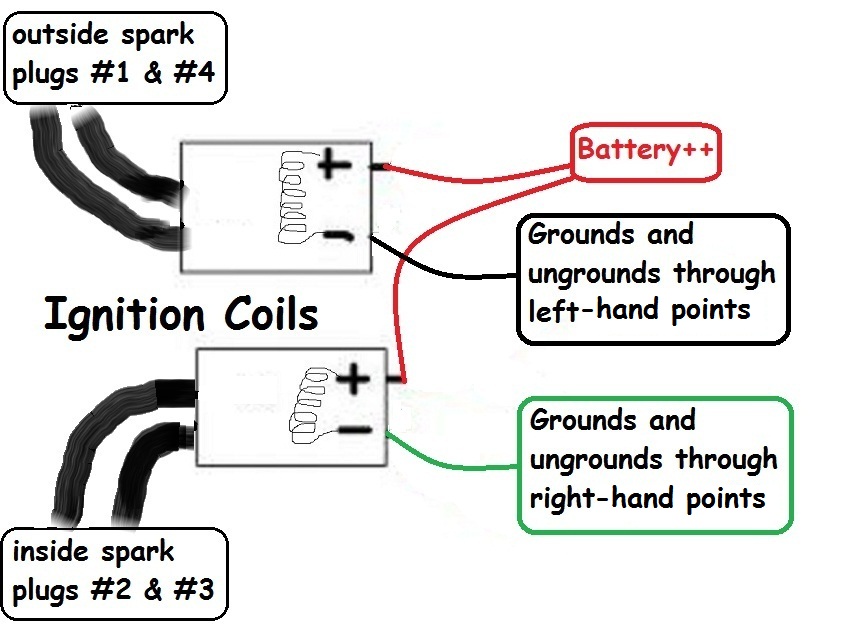
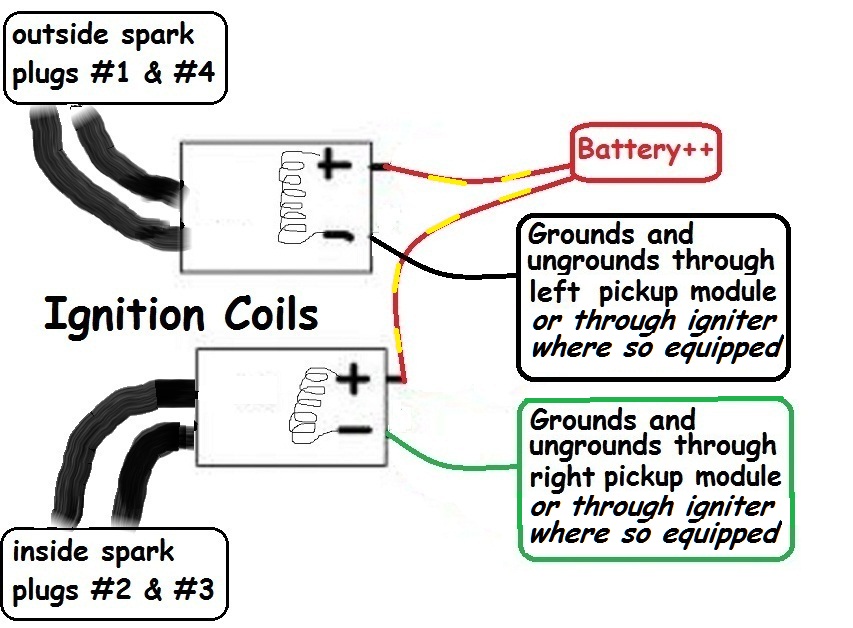
Where an ignition coil is receiving adequate voltage, lack of spark might possibly result from a failure to become ungrounded when the points open.
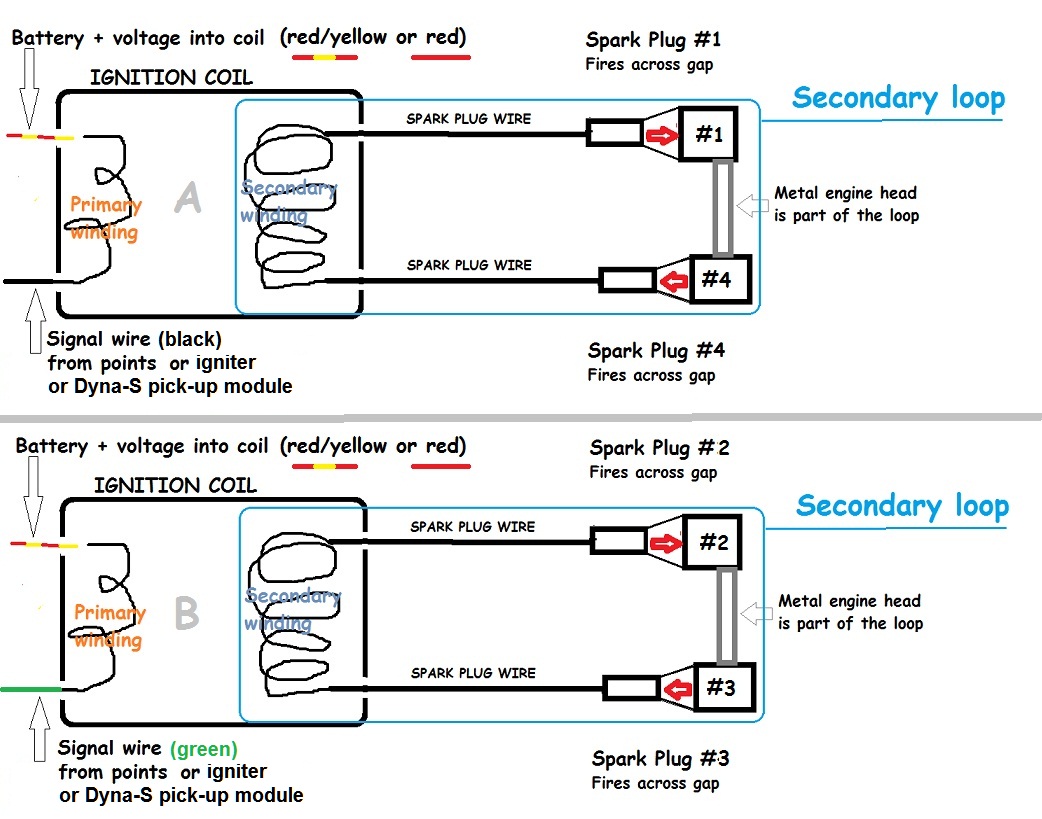
Spark failure could also result from various causes related to the secondary loop.
Good Fortune!")
EDIT -- The following diagram is added to clarify that the Kawasaki electronic ignition uses modules (under the points cover) together with an igniter to ground and unground the ignition coil (in the same fashion as closed and opening points grounds and ungrounds the ignition coil). Same for Dyna-S ignition without an igniter. The critical function remains the same with points or non-points ignition, being to provide ground for the ignition coil primary winding (during which time the coil charges), and then to unground the ignition coil primary winding, which ungrounding causes the coil to fire through the secondary loop.
Spark failure could also result from various causes related to the secondary loop.
Good Fortune!
EDIT -- The following diagram is added to clarify that the Kawasaki electronic ignition uses modules (under the points cover) together with an igniter to ground and unground the ignition coil (in the same fashion as closed and opening points grounds and ungrounds the ignition coil). Same for Dyna-S ignition without an igniter. The critical function remains the same with points or non-points ignition, being to provide ground for the ignition coil primary winding (during which time the coil charges), and then to unground the ignition coil primary winding, which ungrounding causes the coil to fire through the secondary loop.
1973 Z1
KZ900 LTD
KZ900 LTD
Attachments:
Last edit: 04 Sep 2012 17:17 by Patton.
Please Log in or Create an account to join the conversation.
- Patton
-
- Offline
- KZr Legend
-
Registered
- Posts: 18568
- Thanks: 2101
Re: Various Electrical Problems - 83 KZ1000
04 Sep 2012 13:54
Also check to assure that the OFF-RUN-OFF switch (aka kill switch) is in the RUN or ON position.
Good Fortune!
Good Fortune!
1973 Z1
KZ900 LTD
KZ900 LTD
Please Log in or Create an account to join the conversation.
- gaillarry
-
Topic Author
- Offline
- User
-
Registered
- Posts: 82
- Thanks: 0
Re: Various Electrical Problems - 83 KZ1000
04 Sep 2012 14:35 - 04 Sep 2012 14:37
Off-Run-Off switch is working properly, won't turn over in OFF position only in RUN.
No points, only Ignitor box - I'll check the signal wires from the ignitor to the ign coil.
No points, only Ignitor box - I'll check the signal wires from the ignitor to the ign coil.
1977 KZ1000
1985 Gpz750
1985 Gpz750
Last edit: 04 Sep 2012 14:37 by gaillarry.
Please Log in or Create an account to join the conversation.
Moderators: Street Fighter LTD