
Timing 1978 kz650 - test light method
- muddytailgate
-
 Topic Author
- Offline
- User
-

Registered
- Posts: 37
- Thanks: 1
Timing 1978 kz650 - test light method
11 Jul 2011 22:32
Hi Everybody,
I am trying to set timing using a test light. As i have read:
Rotate backwards past 1-4 marks.
With test light hooked to points spring, rotate forward until test lamp lights up on "F" mark and then repeat with 2-3
Try as I might I cannot get both sides to match up i.e. I can get 1-4 on the F marks but not 2-3 or vise versa, because I run out of adjustment.
Tomorrow I am going to pick up an ohm meter and move points until meter fluctualtes, but won't I have the same results?
Thank you,
1976 KZ 750b
Please Log in or Create an account to join the conversation.
- 650ed
-

- Offline
- User
-
Registered
- Posts: 15339
- Thanks: 2833
Re: Timing 1978 kz650 - test light method
11 Jul 2011 23:34muddytailgate wrote: Hi Everybody,
I am trying to set timing using a test light. As i have read:
Rotate backwards past 1-4 marks.
With test light hooked to points spring, rotate forward until test lamp lights up on "F" mark and then repeat with 2-3
Try as I might I cannot get both sides to match up i.e. I can get 1-4 on the F marks but not 2-3 or vise versa, because I run out of adjustment.
Tomorrow I am going to pick up an ohm meter and move points until meter fluctualtes, but won't I have the same results?
Thank you,
That's not how you set the points. Please take a look at the following:
OK. The manual has several pages of instructions, pictures, etc. on how to set the timing using the static method plus timing light, plus dwell meter. I can give you a fairly easy way that will get you in a pretty close ballpark without a timing light or dwell meter, but you will need a 0.35 mm feeler gauge and a multi-meter or other device to test continuity. To be very precise, the timing light and dwell meter will be needed.
Remove the points cover on the right side of engine. Under it you will see 2 sets of points. The set on the left fires cylinders 1 & 4; the set on the right fires 2 & 3. When replacing points observe carefully how the little bits and pieces are arranged where the wires attach. Some of those pieces are actually insulators and if you leave any of them out or put them back in the wrong place the points will be grounded and won’t work. Take a very close look at the contact surfaces of the points. If they are pitted you really should replace them. You can sand down pitted points, but they will quickly pit again. Replace one set of points at a time so you can look at the other set in case you get the little bits confused.
Use a 17 mm wrench to turn the nut NEAR the end of the crankshaft clockwise while looking in the hole above that nut. (Do NOT use a wrench on the smaller bolt on the very end of the crankshaft to turn the engine.) Inside that hole you will see a vertical pointer cast into the casing. As you turn the 17 mm nut you will see a 1 & 4 and F and T roll by and then you’ll see a 2 & 3 and F and T roll by. Each F and T has a line next to it.
Here’s the method I use for static timing. To make my life easier, I turn OFF the ignition. I disconnect the green wire near one coil and the black wire near the other coil. (This is not in the book, but it makes checking continuity much easier for me.) After installing the new points or cleaning up the old ones, turn the 17 mm nut while watching the points. When points set 1&4 are at their widest gap adjust them (by loosening the 2 screws that hold the points to the backplate) so the gap equals 0.35 mm. Turn the 17 mm nut clockwise through a full revolution again and double check this gap. Then repeat this for points set 3&4. Now set your meter to test continuity and clip one wire to the leaf spring on points set 1&4 and clip the other wire to ground. Turn the 17 mm nut clockwise until the 1&4 “F” mark aligns with the pointer mentioned above. You want the continuity across point set 1&4 to just break when the F mark aligns with the pointer. The idea is that when the continuity just fails is when the points will fire their respective coil and cylinders. In order to adjust the point at which continuity fails you loosen the 3 screws that hold the backplate to the engine and slightly turn the backplate until the meter shows a break in continuity. On the newer KZ650 models there is no separate timing adjustment for each points set, so once you have the 1&4 set timed properly you can check the 2&3 set to make sure they break when the 2&3 F mark aligns with the pointer. Don’t forget to plug in the green and black coil wires when you’re done.
Sorry this is so long. It’s not as difficult as it sounds. Ed
1977 KZ650-C1 Original Owner - Stock (with additional invisible FIAMM horn)
Please Log in or Create an account to join the conversation.
- Patton
-

- Offline
- KZr Legend
-

Registered
- Posts: 18568
- Thanks: 2102
Re: Timing 1978 kz650 - test light method
12 Jul 2011 01:37 - 12 Jul 2011 01:48
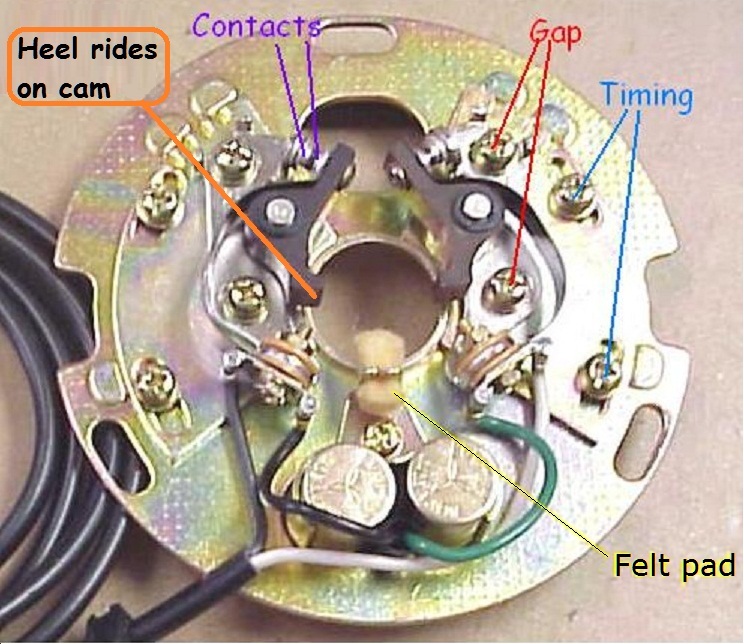
Supposed to dress the contact surfaces as needed and then adjust the gaps before setting the timing.
Here's a large four's points plate for comparison.
Good Fortune!")
Here's a large four's points plate for comparison.
Good Fortune!
1973 Z1
KZ900 LTD
KZ900 LTD
Attachments:
Last edit: 12 Jul 2011 01:48 by Patton.
Please Log in or Create an account to join the conversation.
- 650ed
-
- Offline
- User
-
Registered
- Posts: 15339
- Thanks: 2833
Re: Timing 1978 kz650 - test light method
12 Jul 2011 09:04Patton wrote: Supposed to dress the contact surfaces as needed and then adjust the gaps before setting the timing.
Here's a large four's points plate for comparison.
Good Fortune!
That's the same type points plate that my '77 KZ650 has. Some of the later models don't have the individual timing adjustments. They are set up so you must turn the whole plate to adjust the timing of 1 set of points and the other set is 180* away so they should set as the same time. (see pic) In either case, the instructions I listed should get you very close, and as pointed out, do things in the exact order listed - that is adjust the gap before setting the timing. Once completed it is best to check and make any minute adjustments as described in the manual using a timing light and dwell meter if available.
Attachment Newpoints.jpg not found
1977 KZ650-C1 Original Owner - Stock (with additional invisible FIAMM horn)
Attachments:
Please Log in or Create an account to join the conversation.
- muddytailgate
-
Topic Author
- Offline
- User
-
Registered
- Posts: 37
- Thanks: 1
Re: Timing 1978 kz650 - test light method
12 Jul 2011 10:47
Thank you for the quick reply. I am anxious to try this after work with a new multi meter. My '78 does have individual adjustments but I suppose if I cannot get continuity-break to match with "f" then adjust backing plate slightly. Thanks again!
1976 KZ 750b
Please Log in or Create an account to join the conversation.
- muddytailgate
-
Topic Author
- Offline
- User
-
Registered
- Posts: 37
- Thanks: 1
Re: Timing 1978 kz650 - test light method
12 Jul 2011 21:06
So...
Disconnected coils and set connectivity to drop at both F-marks. FUnny thing is that connectivity drops on 1-4 just a crumb before F but I am completely out of travel. Points are rotated as far counter clockwise as is backing plate. i could not get connectivity to fluctuate with coils hooked up.
Bike is still breaking up bad at about 7K.
Before messing with the timing, bike was sluggish and breaking up closer to redline. I have since cleaned out carbs.
I did notice while messing with timing, Carb #2 (from left) is leaking fuel from overflow. I am guessing float-needle is sticking. Plug on that cyl looks a little richer but not much.
A couple weeks ago, bike was running strong.
These points have about 4K miles on them but did dress them with sand paper/ clean with alcohol. I did notice them seem to be sparking a bit though.
1976 KZ 750b
Please Log in or Create an account to join the conversation.
- Patton
-
- Offline
- KZr Legend
-
Registered
- Posts: 18568
- Thanks: 2102
Re: Timing 1978 kz650 - test light method
12 Jul 2011 21:51
If not already done, would assure that the timing advancer arms and pivots are clean and lubed, are not hanging or sticking, and are fully closing at idle rpm or whenever the engine isn't running. And that the springs are functional and not stretched or damaged.
Good Fortune!
Good Fortune!
1973 Z1
KZ900 LTD
KZ900 LTD
Please Log in or Create an account to join the conversation.
- Patton
-
- Offline
- KZr Legend
-
Registered
- Posts: 18568
- Thanks: 2102
Re: Timing 1978 kz650 - test light method
12 Jul 2011 22:00
Imo, dynamic timing (engine running) with a strobe-type light is superior to the static method (engine not running). And affords the additional advantage of being able to observe and confirm that the advancer is rapidly moving backward and forward as rpm is varied by blipping the throttle.
Good Fortune!
Good Fortune!
1973 Z1
KZ900 LTD
KZ900 LTD
Please Log in or Create an account to join the conversation.
- muddytailgate
-
Topic Author
- Offline
- User
-
Registered
- Posts: 37
- Thanks: 1
Re: Timing 1978 kz650 - test light method
12 Jul 2011 22:01
Advancer seems to operate freely.
1976 KZ 750b
Please Log in or Create an account to join the conversation.
- 650ed
-
- Offline
- User
-
Registered
- Posts: 15339
- Thanks: 2833
Re: Timing 1978 kz650 - test light method
12 Jul 2011 23:29Patton wrote: Imo, dynamic timing (engine running) with a strobe-type light is superior to the static method (engine not running). And affords the additional advantage of being able to observe and confirm that the advancer is rapidly moving backward and forward as rpm is varied by blipping the throttle.
Good Fortune!
I agree 1000%. The static method should get you very close, but to be spot on you need the timing light and dwell meter. Also, as you point out, you can watch the timing advance and ensure that it advances so the pair of lines to the right of the "3" or "4" align with the timing mark at the correct rpm. If they don't something is amiss with the advancer. The specs for this are provided in the Kawasaki service manual. Ed
1977 KZ650-C1 Original Owner - Stock (with additional invisible FIAMM horn)
Please Log in or Create an account to join the conversation.
- muddytailgate
-
Topic Author
- Offline
- User
-
Registered
- Posts: 37
- Thanks: 1
Re: Timing 1978 kz650 - test light method
13 Jul 2011 08:51
I will need to find a timing light.
1. What do you guys think about "running out of adjustment". do you see this?
2. I also looked at these points are they are pitted pretty bad. how do points behave when bad?
3. Also, how long do points typically last?
1. What do you guys think about "running out of adjustment". do you see this?
2. I also looked at these points are they are pitted pretty bad. how do points behave when bad?
3. Also, how long do points typically last?
1976 KZ 750b
Please Log in or Create an account to join the conversation.
- 650ed
-
- Offline
- User
-
Registered
- Posts: 15339
- Thanks: 2833
Re: Timing 1978 kz650 - test light method
13 Jul 2011 09:02 - 13 Jul 2011 09:03
1. You shouldn't run out of adjustment with new points. It may be a problem with worn rubbing blocks. Be sure to put a little points cam lube, or a reasonable substitute, on the cam felt.
2. Pitted points behave like crap. Filing or sanding them is a very temporary fix - replace them.
3. Properly adjusted points connected to good condensers should last 6 to 10,000 miles before they start to show deterioration. Bad condensers may cause pitting to happen quickly. It's best practice to replace the condensers when you replace the points.
1977 KZ650-C1 Original Owner - Stock (with additional invisible FIAMM horn)
Last edit: 13 Jul 2011 09:03 by 650ed.
Please Log in or Create an account to join the conversation.
Moderators: Street Fighter LTD