
I cant get my ignition timing to the "F" mark?????
- baby4arm
-
 Topic Author
- Offline
- User
-

Registered
- Posts: 4
- Thanks: 0
I cant get my ignition timing to the "F" mark?????
12 Apr 2011 16:25
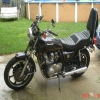
I recently purchased a 1979 KZ1000 LTD and am knee deep in getting her ridable. I installed the dyna 3 ohm coils with new wires and plugs. Spark is great, but I cant adjust the timing far enough to reach the "F" mark. The base plate and points plates are all the way clockwise. Is my crank twisted, I hope not. Maybe I need a new timing cam? I am planning on uprading to the electronic ignition, but want to know what the deal is first. I am doing a carb rebuild, rejet and float level adjust this week to try and narrow it down. I recently rebuilt the head, and set all the valve clearances. Will check compression soon. Thanks.
Attachments:
Please Log in or Create an account to join the conversation.
- sparkn
-
- Offline
- User
-
Registered
- Posts: 93
- Thanks: 0
Re: I cant get my ignition timing to the "F" mark?????
12 Apr 2011 16:45
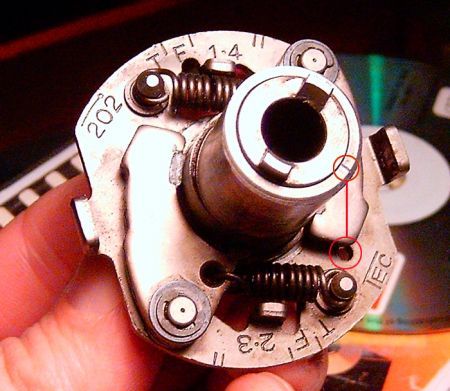
New points fixed the problem for me. The only thing I surmised was that the phenolic surface that actually makes contact with the lobe wore down. The felt lubricating piece is missing, too. That helps keep the phenolic from grinding itself down. The felt piece installs at the 6 o'clock position just above the condensers and likes a couple drops of 3 in 1 from time to time.
1979 KZ650 SR
Please Log in or Create an account to join the conversation.
- TeK9iNe
-
- Offline
- User
-
Registered
- What did you do!?!
- Posts: 2436
- Thanks: 28
Re: I cant get my ignition timing to the "F" mark?????
12 Apr 2011 17:33 - 12 Apr 2011 17:37
Set your dwell correctly first.
Good luck.
")
Whoa boy, OK. I just looked at your pictures. Get yourself a new set of points and condensors, yours look terrible.
Dont for forget to pull everything apart and make sure the advance mechanism is returning completely to the stop (all the way counter-clockwise).
")
Good luck.
Whoa boy, OK. I just looked at your pictures. Get yourself a new set of points and condensors, yours look terrible.
Dont for forget to pull everything apart and make sure the advance mechanism is returning completely to the stop (all the way counter-clockwise).
Motorcycle Shop Owner/Operator
79 Kawie Z1000 LTD
81 Kawie Z1000 CSR
83 Honda VT750C A
85 Kawie GPZ900 A2
86 Zukie GS1150 EG
93 Yamie XV1100 E
Lucky to have rolled many old bikes through my doors")
79 Kawie Z1000 LTD
81 Kawie Z1000 CSR
83 Honda VT750C A
85 Kawie GPZ900 A2
86 Zukie GS1150 EG
93 Yamie XV1100 E
Lucky to have rolled many old bikes through my doors
Last edit: 12 Apr 2011 17:37 by TeK9iNe.
Please Log in or Create an account to join the conversation.
- Patton
-

- Offline
- KZr Legend
-

Registered
- Posts: 18568
- Thanks: 2101
Re: I cant get my ignition timing to the "F" mark?????
12 Apr 2011 17:43
If not already done, would double-check to assure the points cam isn't installed 180° out.
Good Fortune!
Good Fortune!
1973 Z1
KZ900 LTD
KZ900 LTD
Attachments:
Please Log in or Create an account to join the conversation.
- Patton
-
- Offline
- KZr Legend
-
Registered
- Posts: 18568
- Thanks: 2101
Re: I cant get my ignition timing to the "F" mark?????
12 Apr 2011 17:52 - 12 Apr 2011 21:44
Try rotating the timing plate counter-clockwise.
Good Fortune!
Good Fortune!
1973 Z1
KZ900 LTD
KZ900 LTD
Last edit: 12 Apr 2011 21:44 by Patton.
Please Log in or Create an account to join the conversation.
- baby4arm
-
Topic Author
- Offline
- User
-
Registered
- Posts: 4
- Thanks: 0
Re: I cant get my ignition timing to the "F" mark?????
12 Apr 2011 19:41
Wow, great response with this forum!!!! Okay, so I took the mechanical advance off and it apears to be working and "idiot proof". It installs on the shaft with a single pin. I did not take the cam off of the mechanical advance, I guess I can try that. If the cam was on 180 out then the other coil would be firing right? I can assume that the cylinders fire 90 degrees off from one another. Like 1, then 3, then 2, then 4. And the points, upon close inspection their appears to be a raised plus sign on the spring and a "female" plus sign on the stationary point. I think they might be very new. And spark is good. I did try rotating the timing plate counter clockwise and the timing got further off. Thanks for the replies, I am gonna check into my project over the week.
Please Log in or Create an account to join the conversation.
- MFolks
-

- Offline
- User
-
Registered
- Posts: 6650
- Thanks: 541
Re: I cant get my ignition timing to the "F" mark?????
12 Apr 2011 19:57
Ignition Coil Primary And Secondary Wiring
Ignition coils on the 80’s Kz1000,Kz1100’s and Gpz1100’s are wired the same, that is as you sit on the bike, the LEFT ignition coil primary(small wires) are two wires, RED and BLACK. The secondary (or sparkplug wires) go to #1 and #4 sparkplugs(your primary wiring may be different).
The cylinders are numbered left to right as you sit on the seat; #1,#2,#3, and #4.
For the RIGHT ignition coil, the primary wires, again are two wires, RED and GREEN, with the secondary going to #2 and #3.
The RED wire gets it’s voltage from the run/stop switch on the right handlebar switch pod.
The BLACK and GREEN wires connect to the IC Igniter(if the bike has the Kawasaki supplied electronic ignition) it actually gives the coils their grounds to fire the sparkplugs.
Primary(small wires) side of the coils will read between 1.8 to 3.0 ohms.
Secondary(sparkplug wire ports)side of the coil will read between 10.4K to 15.6K ohms. These ports are wired together, so it makes no difference which is used, as long as the correct coil to sparkplug configuration is followed.
The sparkplug caps should read 5K OHMS, any higher, or a reading of infinity means new caps should be ordered.
To stress the ignition coils, take a hair dryer, heat the coils and see if the ohm readings change from cold to hot . If they do, it’s time to buy new coils.
Keep in mind, the wiring is reversed for the 550’s 650‘s and 750‘s, that is the RIGHT coil primary will be two wires, RED and BLACK with the secondary(sparkplugs) going to #1 and #4.
The LEFT coils primary wiring would be again two wires, RED and GREEN, with the secondary(sparkplugs) going to #2 and #3.
These engines have what is known as a “Wasted Spark” that is, a sparkplug will fire during an exhaust stroke. It does no damage and many other motorcycle engines have this design.
1982 GPZ1100 B2
General Dynamics/Convair 1983-1993
GLCM BGM-109 Tomahawk, AGM-129A Advanced Cruise Missile (ACM)
General Dynamics/Convair 1983-1993
GLCM BGM-109 Tomahawk, AGM-129A Advanced Cruise Missile (ACM)
The following user(s) said Thank You: kzrider
Please Log in or Create an account to join the conversation.
- MFolks
-
- Offline
- User
-
Registered
- Posts: 6650
- Thanks: 541
Re: I cant get my ignition timing to the "F" mark?????
12 Apr 2011 19:58
And:
Starter Solenoid/Motor Checkout Procedure
Some simple steps to determine what is working and what's not:
1.Fully charge and test the battery(most bike shops can load test the battery, and then use a floating ball hydrometer to check specific gravity in the charged cells).
2.Clean all battery terminals of corrosion.
3.Tighten all starting related connections(Positive RED(+) battery terminal, Negative BLACK(-)terminal) and from the terminal to the engine case. All connections must be clean and tight.
4.Clean the cable from the starter solenoid to the starter motor.
5.Clean and check the "bullet connectors" going to the coil side of the starter solenoid.
6.Try again to start the bike, keep in mind some Kawasaki’s have a clutch interlock to prevent cranking the engine while it’s in gear, so the clutch lever must be squeezed.
7.If no luck, go to step #8
8.Wearing eye protection, bridge with pliers or a screwdriver the two heavy duty(large)terminals on the solenoid. If the bike cranks, your solenoid may be bad.
9. If the starter won’t turn over, one of several things has happened; The starter motor has seized due to brushes binding up, lack of lubrication in the bushings of the motor, the battery is weak , the engine has seized or it could be a combination of any of the above. Some websites for starter motor rebuild kits are:
A. www.mawonline.com/newsite/rick_s_motorsp...-starter_brushes.htm
B. www.cyclewareables.com/pages/street_star...kits/startmtrkit.htm (not sure if the website is still viable)
C. www.psep.biz/store/mitsuba_starter_motors_page_2.htm
10.The dealer may want $$$ for a new solenoid, but take your old one along and visit the nearest riding lawn mower shop. They have solenoids for about $15 that with a little work will fit. Be aware that the new solenoid from the lawn mower shop may require a ground wire for it to work.
11. I’d recommend upgrading from the existing battery cables to at least 6 gauge welding cables.
They are available in two colors(RED and BLACK) have more flexibility due to being constructed with finer conductors, and will fit in tighter areas.
12. The welding cable is sold by the foot, so take careful measurements or bring your old cables along. Most battery shops might be able to supply the cable too, so call to find out. The battery shop should be able to crimp/swage on the end of the welding cable the terminal ends or lugs using either a dedicated crimping machine or a tool that looks like a bolt cutter that has special dies to terminate the cable.
1982 GPZ1100 B2
General Dynamics/Convair 1983-1993
GLCM BGM-109 Tomahawk, AGM-129A Advanced Cruise Missile (ACM)
General Dynamics/Convair 1983-1993
GLCM BGM-109 Tomahawk, AGM-129A Advanced Cruise Missile (ACM)
Please Log in or Create an account to join the conversation.
- MFolks
-
- Offline
- User
-
Registered
- Posts: 6650
- Thanks: 541
Re: I cant get my ignition timing to the "F" mark?????
12 Apr 2011 20:01
Cleaning Motorcycle Electrics
Get some of the De-Oxit electrical contact cleaner and figure on spending a good day going from the front of the bike to the back. It’s a plastic safe cleaner/preservative. www.deoxit.com is their website.
On the older Kawasaki's, a majority of electrical connectors are inside the headlight housing requiring removal of the headlight, then the fun begins.
Do one set of electrical connectors at a time to avoid mixing up what connects to where. Usually disconnecting, spraying with De-Oxit and reconnecting is about all you'll need.
However, when encountering the green crud of corrosion, a brass wire brush may be needed on the pins you can reach.
Some 400-600 grit wet and dry sandpaper strips rolled into a tube should reach the male and female pins in the more difficult to clean connectors.
Smoker’s pipe cleaners, cotton swabs and wooden toothpicks work as cleaning aids.
Really small electrical connectors may require the use of a welders tip cleaning tool assortment.
Most pins in the connectors are coated with a thin plating of tin, and others may be nothing more than copper or brass.
If moisture is added, the resulting corrosion lowers the voltage/current being carried causing dim lights, slow engine cranking, slow turn signal responce and lower input voltage to the ignition coils resulting in weak spark.
The left and right handlebar switch pods will need attention too as they have circuit functions like turn, horn, run/stop, and start.
Usually a spritz or two with actuation of the switch is about all needed for these switches unless corrosion is detected and then careful disassembly is required.
The ignition switch may or may be not sealed to allow spraying the internal contacts. I urge caution if attempting to open this up as springs, and ball bearings may fly out never to be seen again!
If your bike has the older style glass tubed fuses, I suggest replacing them as vibration can cause internal failure. AGX is the type used, and most auto parts stores can get them for you.
Clean the fuse holder clips, looking for signs of overheating(discolored insulation, signs of melting).
I use metal polish on a cotton swab, followed by spraying another clean swab with the De-Oxit and then rubbing the inside of the fuse clip.
Each "Bullet Connector" will have to be sprayed to ensure good connectivity, especially the ones going to the energizing coil of the starter solenoid.
The alternator output “Bullet Connectors” are usually behind the engine sprocket cover and will need inspecting and cleaning too.
The turn signal light sockets will benefit from a spritz from the contact cleaner along with the tail light/brake light socket.
Some brake light switches can be sprayed on the actuating rod, with the spray running down inside to the electrical contacts, others may be sealed requiring replacement if the switch is intermittent in operation.
I think I've covered about all of the electrical systems on the bike.........
1982 GPZ1100 B2
General Dynamics/Convair 1983-1993
GLCM BGM-109 Tomahawk, AGM-129A Advanced Cruise Missile (ACM)
General Dynamics/Convair 1983-1993
GLCM BGM-109 Tomahawk, AGM-129A Advanced Cruise Missile (ACM)
Please Log in or Create an account to join the conversation.
- Patton
-
- Offline
- KZr Legend
-
Registered
- Posts: 18568
- Thanks: 2101
Re: I cant get my ignition timing to the "F" mark?????
12 Apr 2011 21:49
From the pics, it looks like the heel is broken off or worn down on the left set of points.
The heel on the right set of points looks okay.
Good Fortune!
The heel on the right set of points looks okay.
Good Fortune!
1973 Z1
KZ900 LTD
KZ900 LTD
Please Log in or Create an account to join the conversation.
- Old Man Rock
-
- Offline
- User
-
Registered
- Posts: 6074
- Thanks: 225
Re: I cant get my ignition timing to the "F" mark?????
12 Apr 2011 23:29
If you can swing the addtional $$$... Switch over to EI... Dyna-S ~ $120... worth every bit of the extra coin....
1976 KZ900-A4
MTC 1075cc.
Camshafts: Kawi GPZ-1100 .375 lift
Head: P&P via Larry Cavanaugh
ZX636 suspension
MIKUNI, RS-34'S...
Kerker 4-1, 1.5" comp baffle.
Dyna-S E.I.
Earls 10 row Oil Cooler
Acewell 2802 Series Speedo/Tach
Innovate LC1 Wideband 02 AFR meter
Phoenix, Az
MTC 1075cc.
Camshafts: Kawi GPZ-1100 .375 lift
Head: P&P via Larry Cavanaugh
ZX636 suspension
MIKUNI, RS-34'S...
Kerker 4-1, 1.5" comp baffle.
Dyna-S E.I.
Earls 10 row Oil Cooler
Acewell 2802 Series Speedo/Tach
Innovate LC1 Wideband 02 AFR meter
Phoenix, Az
Please Log in or Create an account to join the conversation.
- baby4arm
-
Topic Author
- Offline
- User
-
Registered
- Posts: 4
- Thanks: 0
Re: I cant get my ignition timing to the "F" mark?????
16 Apr 2011 20:36
Okay, so I checked my ignition rotor and it is on correct, looks just like the picture. I am going to try timing the 2/3 cylinders and see if they are off too? I am rebuilding the carbs today and checking the float levels. One size bigger main jets and a needle adjustment. I will try running with the air bleeds closed. Wish me luck.
Please Log in or Create an account to join the conversation.
Moderators: Street Fighter LTD