
My CV36 project: restore & upgrade
- quantity
-
 Topic Author
- Offline
- User
-

Registered
- Posts: 36
- Thanks: 16
My CV36 project: restore & upgrade
28 Oct 2026 15:26
I restored a pair of Keihin CV36 carburetors for my KZ400/440 build and am really happy with how it turned out so I'm going to share it here along with info for some of the parts I used.
They weren't in great condition but they were complete. I bought them for $50 so if they were somehow unusable at least I get a full set of parts without feeling like I got ripped off. The first thing I noticed after opening them up was the grey residue all over the inside of the bowl. It was most likely Permatex or something that they tried using as a float bowl gasket instead of a rubber seal. That's my best guess anyway. After lots of cleaning and a nice vapor blast the carb bodies looked awesome.
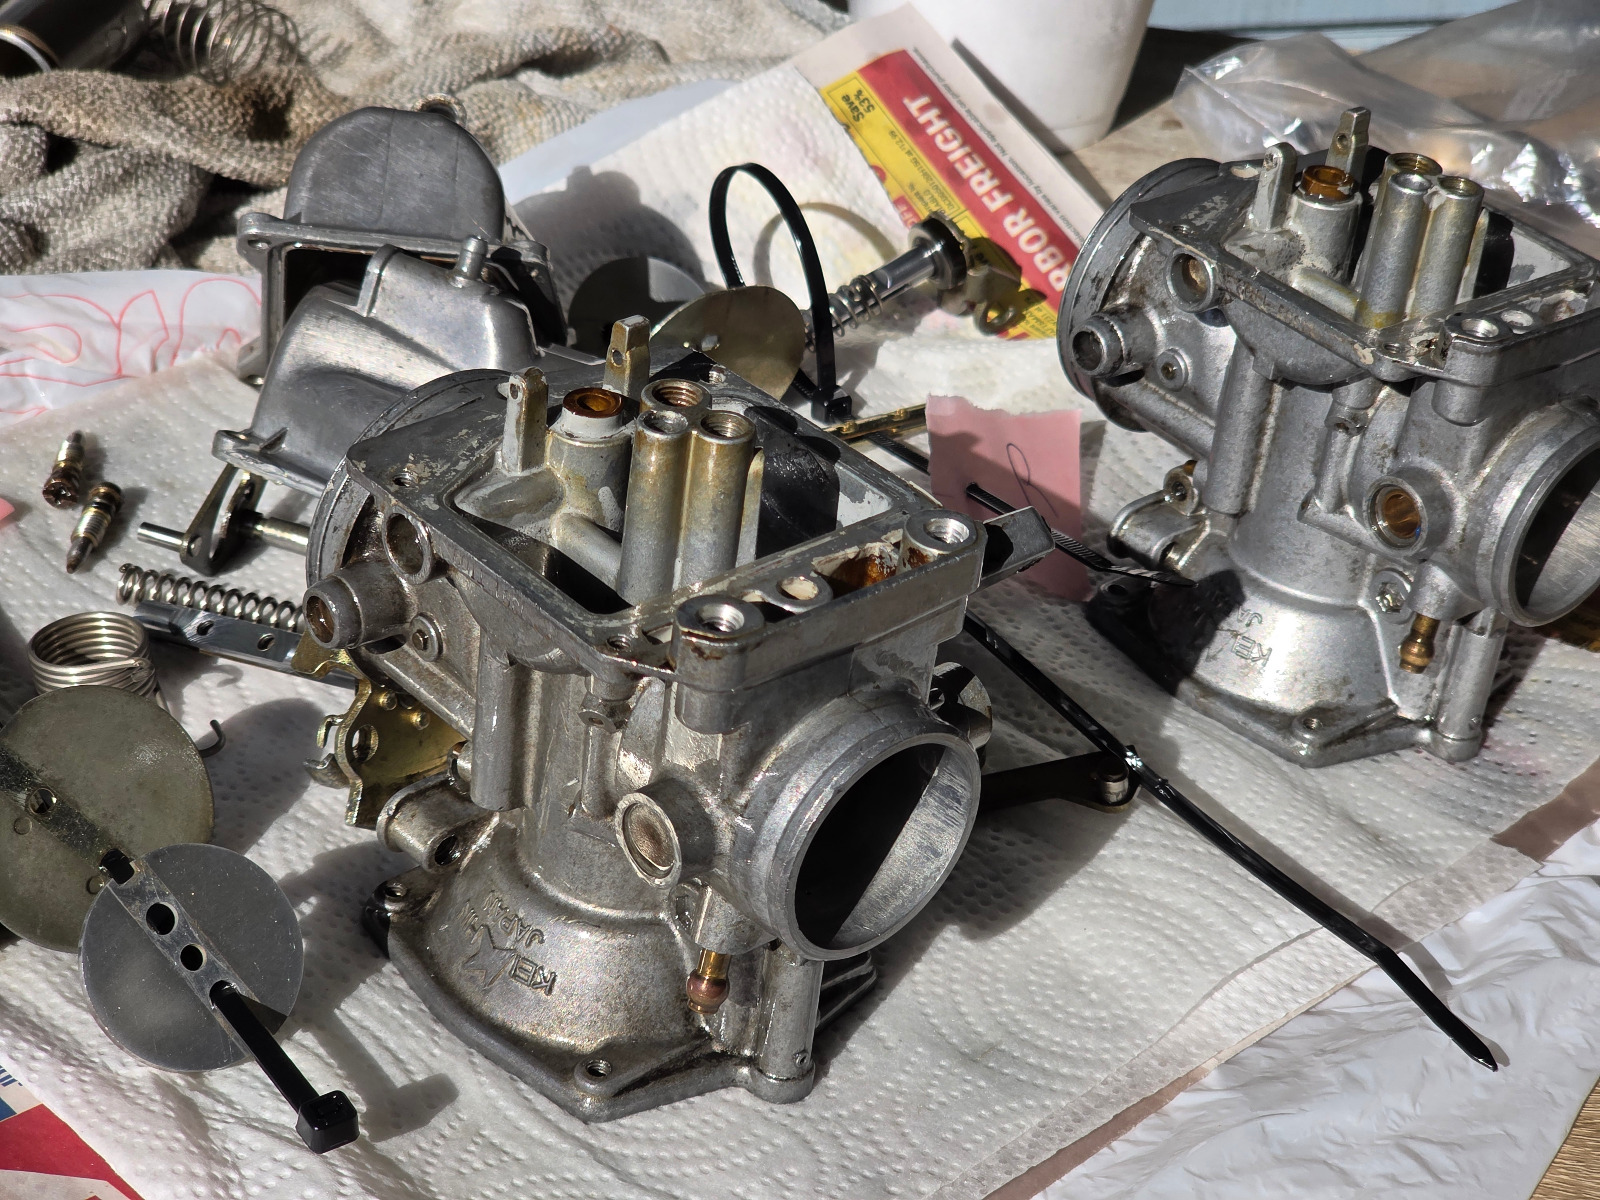
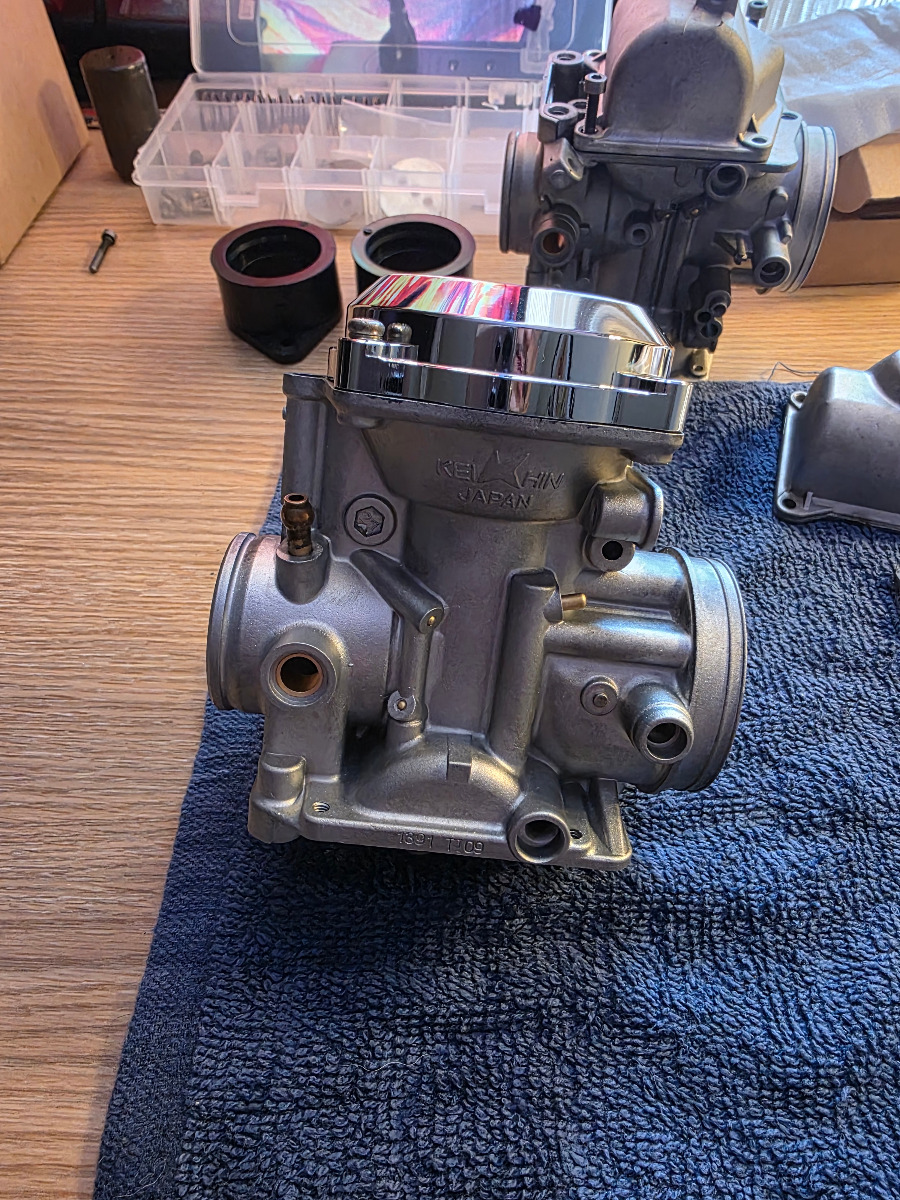
I polished the slide interface with 1000 then 1500 grit and was happy to find someone who makes new improved diaphragms. Chrome tops from ebay, cleaned up the float bowls a little bit with some 1000 grit and a polishing wheel, then finished it with stainless hardware.
The diaphragms are from jbmindustries.com part K-71. Shown to fit CV32 and CV34 they also fit my CV36 perfectly.
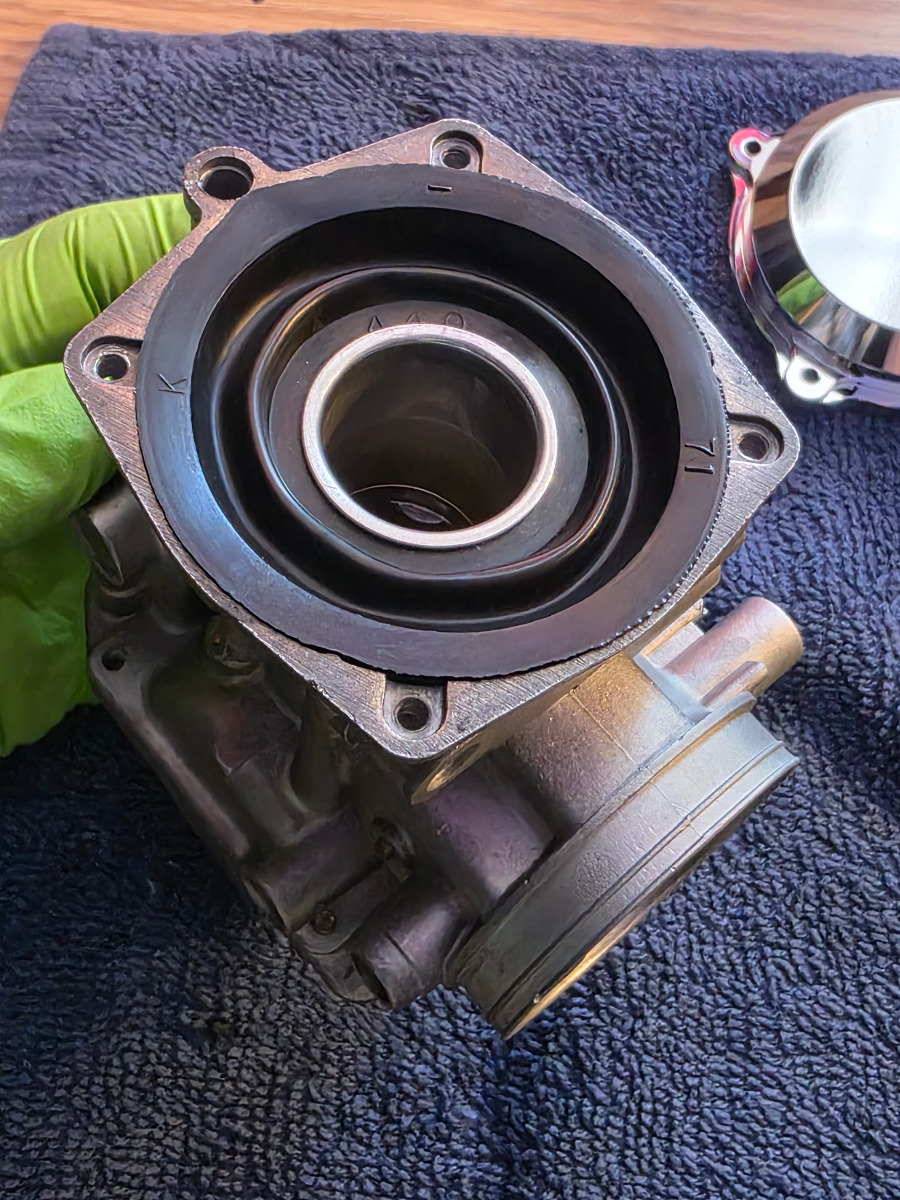
The carb tops are from ebay and the listed application was for a Harley CV40. They fit perfectly and I know the CV32 uses the same top as the CV36, so they can most likely be used on many Keihin carbs if anyone wants an easy appearance upgrade. The pair cost me about $30 shipped. Compared to some other ones I found that's a great deal and I've been running them for a few months now with zero issues. Just search ebay for CV40 chrome top and pick one.
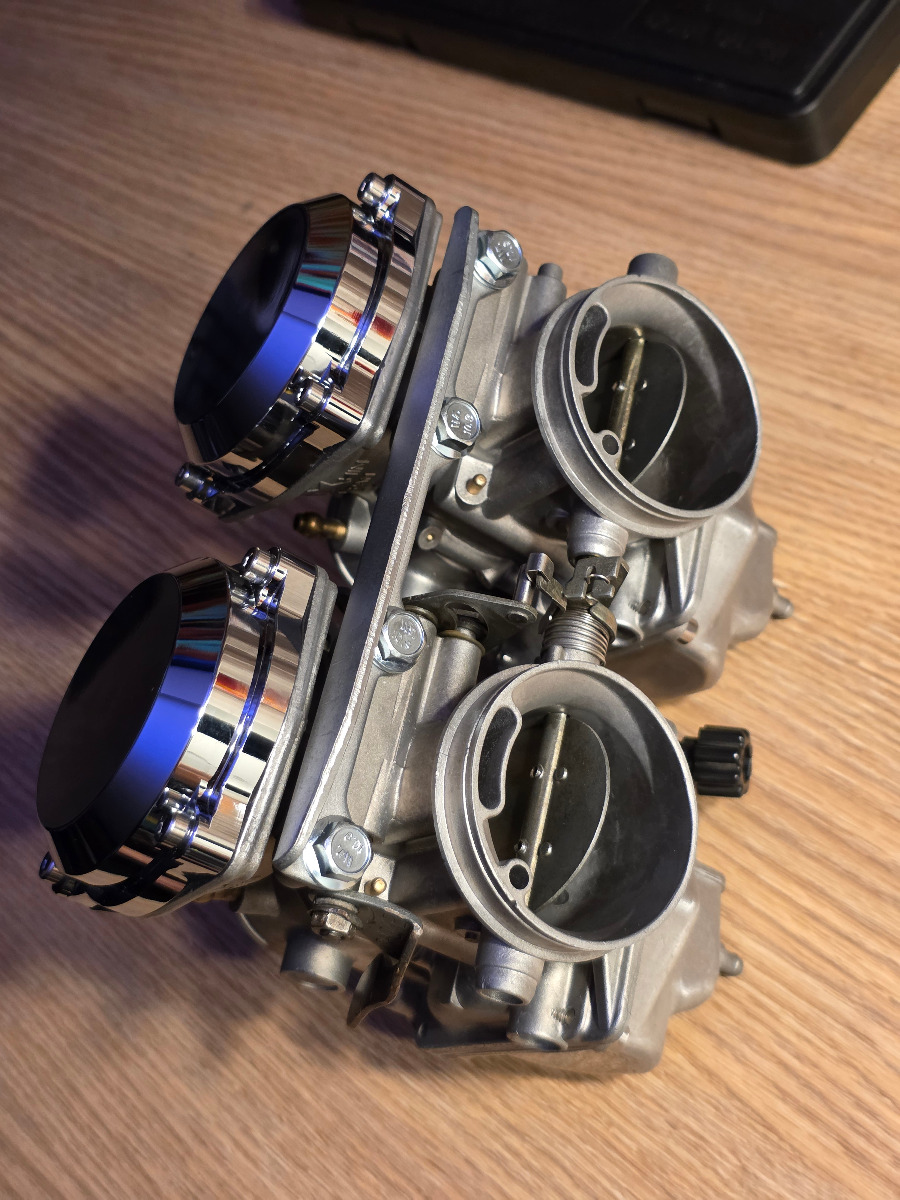
The stock 440 uses 68/90 jets so I tried that as my starting point. Those were so lean the bike barely ran above idle. After swapping jets a few times I found 75 primary main and 98 second main worked well. Decided the 98 was a little rich so down to a 95 and it's been solid. I used the stock 74 airbox, paper filter element replaced with foam and I heated up the boots to make them fit over the larger inlet. Had to grind one of the support brackets holding the carbs together so it would fit in the frame. The first time I opened it up and let it spin it still had power past 11k so I am really happy with the work I did to this twin cylinder menace.
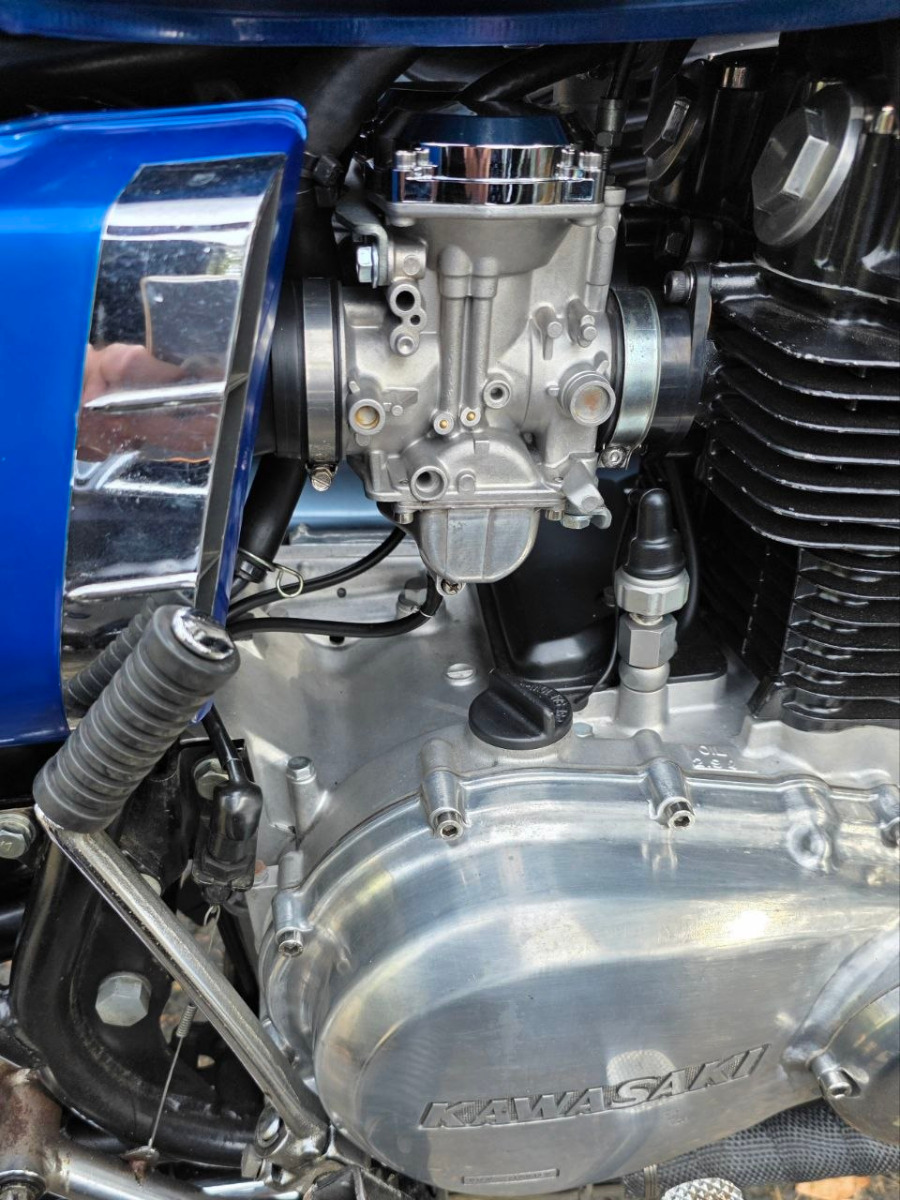
They weren't in great condition but they were complete. I bought them for $50 so if they were somehow unusable at least I get a full set of parts without feeling like I got ripped off. The first thing I noticed after opening them up was the grey residue all over the inside of the bowl. It was most likely Permatex or something that they tried using as a float bowl gasket instead of a rubber seal. That's my best guess anyway. After lots of cleaning and a nice vapor blast the carb bodies looked awesome.
I polished the slide interface with 1000 then 1500 grit and was happy to find someone who makes new improved diaphragms. Chrome tops from ebay, cleaned up the float bowls a little bit with some 1000 grit and a polishing wheel, then finished it with stainless hardware.
The diaphragms are from jbmindustries.com part K-71. Shown to fit CV32 and CV34 they also fit my CV36 perfectly.
The carb tops are from ebay and the listed application was for a Harley CV40. They fit perfectly and I know the CV32 uses the same top as the CV36, so they can most likely be used on many Keihin carbs if anyone wants an easy appearance upgrade. The pair cost me about $30 shipped. Compared to some other ones I found that's a great deal and I've been running them for a few months now with zero issues. Just search ebay for CV40 chrome top and pick one.
The stock 440 uses 68/90 jets so I tried that as my starting point. Those were so lean the bike barely ran above idle. After swapping jets a few times I found 75 primary main and 98 second main worked well. Decided the 98 was a little rich so down to a 95 and it's been solid. I used the stock 74 airbox, paper filter element replaced with foam and I heated up the boots to make them fit over the larger inlet. Had to grind one of the support brackets holding the carbs together so it would fit in the frame. The first time I opened it up and let it spin it still had power past 11k so I am really happy with the work I did to this twin cylinder menace.
74 KZ400 - 446cc
The following user(s) said Thank You: Nessism, MFP-Joe, chopper1963, Wookie58
Please Log in or Create an account to join the conversation.
- rickysnicker
-

- Offline
- User
-
Registered
- Posts: 106
- Thanks: 34
The following user(s) said Thank You: quantity
Please Log in or Create an account to join the conversation.
- quantity
-
Topic Author
- Offline
- User
-
Registered
- Posts: 36
- Thanks: 16
Re: My CV36 project: restore & upgrade
28 Oct 2026 15:34Thanks!Nice job!!!

74 KZ400 - 446cc
Please Log in or Create an account to join the conversation.
- TexasKZ
-

- Offline
- Platinum Member
-

Registered
- Posts: 8416
- Thanks: 2801
Re: My CV36 project: restore & upgrade
28 Oct 2026 18:11
Well done.
1982 KZ1000 LTD parts donor
1981 KZ1000 LTD slowly moving toward resurrection
2000 ZRX1100 not ridden enough
www.kzrider.com/forum/11-projects/620336...amateur-build-thread
1981 KZ1000 LTD slowly moving toward resurrection
2000 ZRX1100 not ridden enough
www.kzrider.com/forum/11-projects/620336...amateur-build-thread
The following user(s) said Thank You: quantity
Please Log in or Create an account to join the conversation.
- Nessism
-
- Offline
- Platinum Member
-
Registered
- Posts: 8219
- Thanks: 3586
Re: My CV36 project: restore & upgrade
29 Oct 2026 06:07 - 29 Oct 2026 06:10
Nice work! The next level will be achieved by zinc-plating the steel parts, along with a yellow chromate dip!

When I restore carbs like these, I use red loctite on the butterfly screws, so they don't come loose. For the choke plate screws, the screws are cored out on the end, and are designed to be "upset" using a tool, which flares the ends. I made my own flaring tool out of some high-leverage pliers and a steel nub made from a file. Only nutcases like me do this crap. Actually, Kawasaki used to sell a flaring tool and service kits with new screws. All that stuff is long gone now, though.
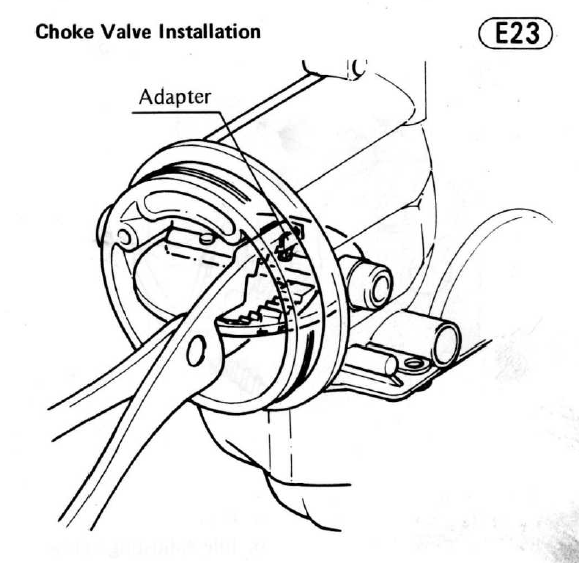
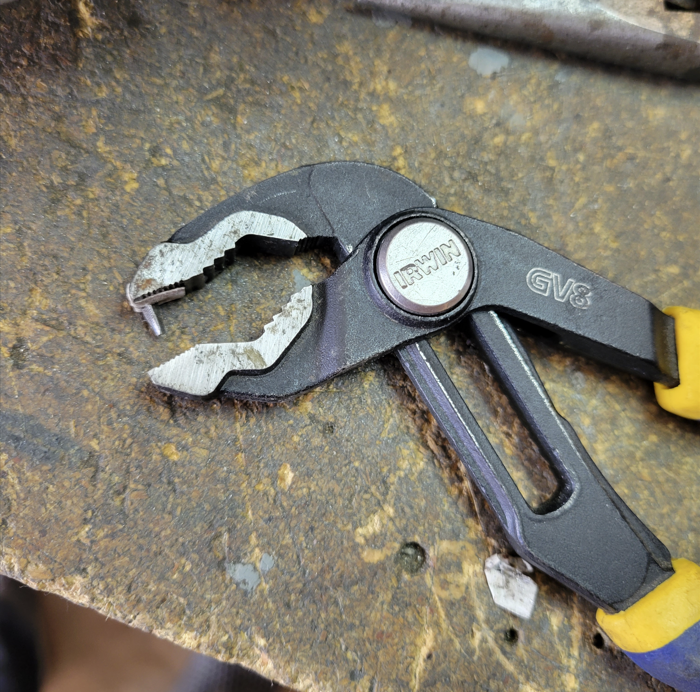
When I restore carbs like these, I use red loctite on the butterfly screws, so they don't come loose. For the choke plate screws, the screws are cored out on the end, and are designed to be "upset" using a tool, which flares the ends. I made my own flaring tool out of some high-leverage pliers and a steel nub made from a file. Only nutcases like me do this crap. Actually, Kawasaki used to sell a flaring tool and service kits with new screws. All that stuff is long gone now, though.
Ed
Carb O-ring Kits : www.kzrider.com/forum/14-vendor-forum/62...rburetor-o-ring-kits
www.kzrider.com/forum/faq-wiki/618026-new-owner-things-to-know
1981 KZ750E2
www.kzrider.com/forum/11-projects/604901...z750e-project-thread
Carb O-ring Kits : www.kzrider.com/forum/14-vendor-forum/62...rburetor-o-ring-kits
www.kzrider.com/forum/faq-wiki/618026-new-owner-things-to-know
1981 KZ750E2
www.kzrider.com/forum/11-projects/604901...z750e-project-thread
Last edit: 29 Oct 2026 06:10 by Nessism.
The following user(s) said Thank You: chopper1963, quantity
Please Log in or Create an account to join the conversation.
- chopper1963
-
- Offline
- User
-
Registered
- Posts: 438
- Thanks: 94
Please Log in or Create an account to join the conversation.
- quantity
-
Topic Author
- Offline
- User
-
Registered
- Posts: 36
- Thanks: 16
Re: My CV36 project: restore & upgrade
29 Oct 2026 22:02Going all in to make everything right I appreciate your attention to detailNice work! The next level will be achieved by zinc-plating the steel parts, along with a yellow chromate dip!
When I restore carbs like these, I use red loctite on the butterfly screws, so they don't come loose. For the choke plate screws, the screws are cored out on the end, and are designed to be "upset" using a tool, which flares the ends. I made my own flaring tool out of some high-leverage pliers and a steel nub made from a file. Only nutcases like me do this crap. Actually, Kawasaki used to sell a flaring tool and service kits with new screws. All that stuff is long gone now, though.

I like the bare aluminum finish unfortunately it's a magnet for corrosion. The steel plugs on the side of the carbs, especially the right side, have been showing some surface rust and it's bothering me enough where I'm going to meticulously apply painter's tape and paint those parts black sometime.
74 KZ400 - 446cc
Please Log in or Create an account to join the conversation.
- quantity
-
Topic Author
- Offline
- User
-
Registered
- Posts: 36
- Thanks: 16
Re: My CV36 project: restore & upgrade
29 Oct 2026 22:11 - 29 Oct 2026 23:07For sure, here it is. I like coming up with ways to improve it so a few things have changed since I took this but nothing major.Lets see the whole bike.
Edit: here's a more recent photo
74 KZ400 - 446cc
Last edit: 29 Oct 2026 23:07 by quantity.
The following user(s) said Thank You: bound
Please Log in or Create an account to join the conversation.
- quantity
-
Topic Author
- Offline
- User
-
Registered
- Posts: 36
- Thanks: 16
Re: My CV36 project: restore & upgrade
02 Nov 2026 22:23
I've been chasing a slight stumble at part throttle when transitioning from the pilot to main and took the slides out this weekend to check out the jet needles. The profile is really steep it's almost ridiculous imo. I think that explains the problem I'm having. Spent some time looking for different ones that I could swap in and it looks like the Harley N65 needle might work. The Honda Magna also uses Keihin carbs and the jet needle from those also looks like it could work for me. Both have a much smoother profile as the needle tapers. Not sure what other jet needles would work but I do know the CV32 needles I have are about 10mm shorter. Thoughts?
Picture for comparison: left is Honda Magna jet needle, center is Harley N65, right is the stock KZ440
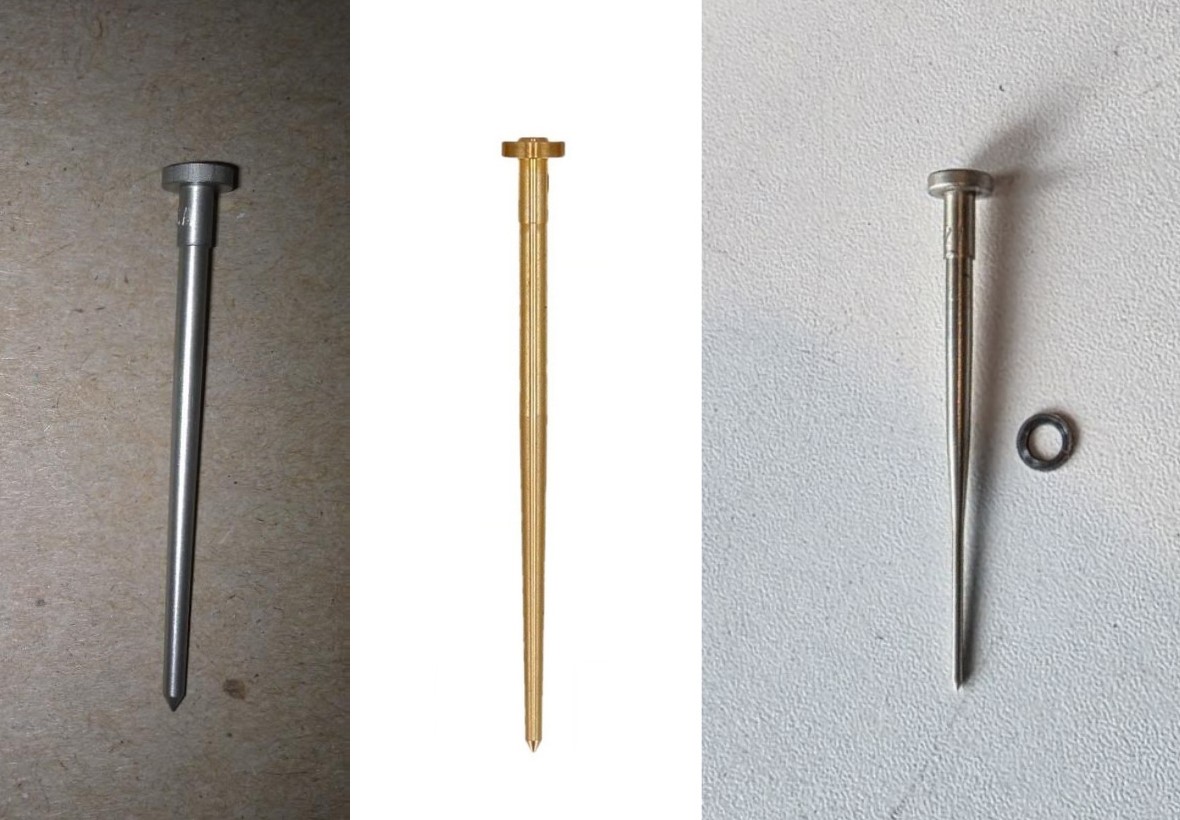
Picture for comparison: left is Honda Magna jet needle, center is Harley N65, right is the stock KZ440
74 KZ400 - 446cc
Please Log in or Create an account to join the conversation.
- Nessism
-
- Offline
- Platinum Member
-
Registered
- Posts: 8219
- Thanks: 3586
Re: My CV36 project: restore & upgrade
03 Nov 2026 04:28
Stay stock. Thinner means richer. Maybe see if you can shim the needle up a mm or two. That will richen the mixture a little.
Ed
Carb O-ring Kits : www.kzrider.com/forum/14-vendor-forum/62...rburetor-o-ring-kits
www.kzrider.com/forum/faq-wiki/618026-new-owner-things-to-know
1981 KZ750E2
www.kzrider.com/forum/11-projects/604901...z750e-project-thread
Carb O-ring Kits : www.kzrider.com/forum/14-vendor-forum/62...rburetor-o-ring-kits
www.kzrider.com/forum/faq-wiki/618026-new-owner-things-to-know
1981 KZ750E2
www.kzrider.com/forum/11-projects/604901...z750e-project-thread
The following user(s) said Thank You: asphalt900
Please Log in or Create an account to join the conversation.
- asphalt900
-
- Offline
- Sustaining Member
-
Registered
- Posts: 1957
- Thanks: 1317
Re: My CV36 project: restore & upgrade
04 Nov 2026 07:41
Totally agree with Ness!! The combination of Jet Needle and Needle Jet is a crude but yet very precise engineered design with thousands of hours spent refining the best production values for average of states altitude. Magna "honda" came in different variations, 30/45/65 displacements. Harley, pedestrian Keihin CV needle. If it's a slight stumble, can you verify if it's too much fuel or too little? If too lean or rich you can also play around with the diaphragm spring tension. Didn't see that one coming did ya ha.
Please Log in or Create an account to join the conversation.
Moderators: Street Fighter LTD