
LTD 1100 Project
- tobeerortobike
-
 Topic Author
- Offline
- User
-

Registered
- Posts: 40
- Thanks: 4
LTD 1100 Project
31 Aug 2023 16:20
Hi all,
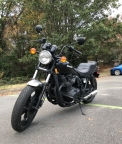
I recently picked up a 1985 LTD 1100 as a project bike. I've been working on sealing up the fuel tank, and am preparing to re-mount it to the bike. I've done my research, and everything seems very simple - but I'm confused at what looks like a small nipple/tube running out from the bottom of the tank. It's leaked fluid in my sealing of the tank, so I am very nervous about just leaving it open. I have two vacuum lines (one for the petcock), so I was assuming that this was some kind of breather line or something of that nature. I just want to make sure that I am not making a massive mistake by hooking this up to a vacuum line.
I've attached an image below, all help is appreciated as I am relatively new to working on bikes.
Thanks!
Attachment not found
To be, rather than to seem.
1985 ZN1100 LTD
1989 GL1500 Goldwing
2000 Ducati ST4
1985 ZN1100 LTD
1989 GL1500 Goldwing
2000 Ducati ST4
Please Log in or Create an account to join the conversation.
- tobeerortobike
-
Topic Author
- Offline
- User
-
Registered
- Posts: 40
- Thanks: 4
Re: LTD 1100 Project
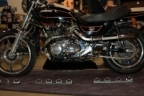
31 Aug 2023 17:20Picture didn't upload - Did this work?
To be, rather than to seem.
1985 ZN1100 LTD
1989 GL1500 Goldwing
2000 Ducati ST4
1985 ZN1100 LTD
1989 GL1500 Goldwing
2000 Ducati ST4
Please Log in or Create an account to join the conversation.
- Street Fighter LTD
-
- Offline
- Moderator
-

Registered
- TURBO, Its Better to be Blown than Injected
- Posts: 5060
- Thanks: 2270
Re: LTD 1100 Project
31 Aug 2023 17:40
Can you show another picture that is not so close to the tank
Welcome to KZRider
Dave
Welcome to KZRider
Dave
Original owner 78 1000 LTD
Mr Turbo Race Kit, MTC 1075 Turbo pistons by PitStop Performance , Falicon Ultra Lite Super Crank, APE everything. Les Holt @ PDM's Billet Goodies . Frame by Chuck Kurzawa @ Logghe Chassis . Deep sump 5qt oil pan. RIP Bill Hahn
Please Log in or Create an account to join the conversation.
- TexasKZ
-

- Offline
- Platinum Member
-

Registered
- Posts: 8144
- Thanks: 2649
Re: LTD 1100 Project
31 Aug 2023 18:46
Isn’t that the vent? It should come from the filler cap area, but if fluid came out, it may have rusted through, and will have to be repaired or it will leak fuel.
Parts diagram seems to show a pair of them.
www.partzilla.com/catalog/kawasaki/motor...-zn1100-b2/fuel-tank
Parts diagram seems to show a pair of them.
www.partzilla.com/catalog/kawasaki/motor...-zn1100-b2/fuel-tank
1982 KZ1000 LTD parts donor
1981 KZ1000 LTD awaiting resurrection
2000 ZRX1100 not ridden enough
www.kzrider.com/11-projects/620336-anoth...uild-thread?start=24
1981 KZ1000 LTD awaiting resurrection
2000 ZRX1100 not ridden enough
www.kzrider.com/11-projects/620336-anoth...uild-thread?start=24
The following user(s) said Thank You: Nessism
Please Log in or Create an account to join the conversation.
- tobeerortobike
-
Topic Author
- Offline
- User
-
Registered
- Posts: 40
- Thanks: 4
Re: LTD 1100 Project
17 Sep 2023 18:59
Hey All!
Sorry for the delayed response. What I thought was fluid leaking from the vent, was from me spraying water down the vent while degreasing the inside of the tank. I've got the tank sealed up and on the bike now, but I've hit a new problem.
When I bought the bike, it was running and idling fine, but it was only running off of a gasoline-filled water bottle. This was because the fuel tank was totally shot. I have a video of the bike running then, and it seems to idle and rev normally. According to the seller, he cleaned out the carburetors and replaced the spark plugs. Because of all the fuel tank work that had to be done, the bike pretty much sat in my backyard from mid-July to now. I installed a brand new Petcock (with fresh vacuum lines) and went to get the bike started up this past weekend.
My results were ... mixed.
The bike cranks over and starts, but seems really unhappy. It only seems to want to run in the 'Prime' setting on the petcock, but this results in (I think) flooding the engine and gasoline dripping from the airbox drain. The best I could do was 'priming' the bike for a few seconds, and then switch to RES, which would result in the bike running, but it would only stay running with additional throttle input or choke. Removing either would result in the bike stuttering and dying.
I think it's some kind of carburation issue, but I want to check off every possible box before I go down that route, especially because the bike seemed to run and idle just fine several months ago.
I'll be pulling and inspecting the spark plugs tomorrow or the next day, as well as adding a set of hose clamps on either end of the Petcock vacuum line. I will update you with my results.
I have both a video of the bike running before I bought it and it 'running' now. I'll see if I can find a way to upload or link them here. Any and all advice is welcomed. I would like to avoid bringing the bike or the carburetors to the shop if at all possible.
Thank you all in advance.
To be, rather than to seem.
1985 ZN1100 LTD
1989 GL1500 Goldwing
2000 Ducati ST4
1985 ZN1100 LTD
1989 GL1500 Goldwing
2000 Ducati ST4
Please Log in or Create an account to join the conversation.
- tobeerortobike
-
Topic Author
- Offline
- User
-
Registered
- Posts: 40
- Thanks: 4
Re: LTD 1100 Project
17 Sep 2023 19:19
drive.google.com/drive/folders/1JKbgev-V...YUMzzvSk?usp=sharing
There's a link to the videos I have of the bike running. The pre-purchase video was sent to me before I bought the bike. The second video, labeled prime_petcock, is from when I got the bike running this past weekend. In that video, I had the Petcock set to prime, but cut the video and turned the bike off when I saw fuel leaking from the airbox 'drain'. I will try to add a better start-up video next time I get a chance to work on the bike.
There's a link to the videos I have of the bike running. The pre-purchase video was sent to me before I bought the bike. The second video, labeled prime_petcock, is from when I got the bike running this past weekend. In that video, I had the Petcock set to prime, but cut the video and turned the bike off when I saw fuel leaking from the airbox 'drain'. I will try to add a better start-up video next time I get a chance to work on the bike.
To be, rather than to seem.
1985 ZN1100 LTD
1989 GL1500 Goldwing
2000 Ducati ST4
1985 ZN1100 LTD
1989 GL1500 Goldwing
2000 Ducati ST4
Please Log in or Create an account to join the conversation.
- TexasKZ
-
- Offline
- Platinum Member
-
Registered
- Posts: 8144
- Thanks: 2649
Re: LTD 1100 Project
18 Sep 2023 05:16 - 18 Sep 2023 05:17
I would bet real money that the carbs are clogged with dried fuel. The pilot circuit, which dominates the fuel mixture at small throttle openings, consists of some very tiny passageways that are easily clogged. The overflowing and flooding are likely from stuck or failed float valves. A complete disassembly and thorough cleaning of every tiny passageway is the only way to insure proper cleanliness. There are no shortcuts when it comes to carburetors.
There are some tutorials here at KZR. With your factory shop manual, the tutorials, and help from the membership, you can get them sparkling clean again.
Also, avoid carburetor kits. They are very often a waste of money, and some of them provide inferior parts. Unless somebody has damaged something, the metal parts of the carburetors should be fine, and a careful cleaning will bring them back to perfection. What you do need to replace are all of the orings and gaskets. It would also be a good idea to carefully inspect the seals on the choke plungers. If they are hard, they may leak just enough to drive you bonkers trying to get the carburetors adjusted.
Carburetors seem like some kind of black magic to many folks, but they are not as complicated as most people think.
1982 KZ1000 LTD parts donor
1981 KZ1000 LTD awaiting resurrection
2000 ZRX1100 not ridden enough
www.kzrider.com/11-projects/620336-anoth...uild-thread?start=24
1981 KZ1000 LTD awaiting resurrection
2000 ZRX1100 not ridden enough
www.kzrider.com/11-projects/620336-anoth...uild-thread?start=24
Last edit: 18 Sep 2023 05:17 by TexasKZ.
The following user(s) said Thank You: tobeerortobike
Please Log in or Create an account to join the conversation.
- tobeerortobike
-
Topic Author
- Offline
- User
-
Registered
- Posts: 40
- Thanks: 4
Re: LTD 1100 Project
18 Sep 2023 07:16
Thanks for the quick response. If I'm reading you right my to-do list should look something like:
-Order new gaskets, O-Rings etc. (Everything rubber on the parts diagram I'm assuming)
-Remove the carbs from the bike
-Disassemble and deep clean everything with Carb Cleaner
-Replace gaskets, O-rings, etc. (Again, everything rubber)
-Inspect seals on the choke plunger
-Reassemble and reinstall on the bike
-Tune/Adjust carbs to get a smooth idle
The previous seller did say that he cleaned the carbs, and the bike seemed to run fine when he had it. Is there something I could have done wrong in storing the bike to dirty the carbs again? It did sit outdoors, but I had plastic bags covering the fuel hose.
Also, is SeaFoam or a similar product worth trying? I've heard people have great results with that kind of stuff, but I'm not sure if it would help with the problem you're describing. I have a repair manual and good internet, so I'm definitely able to get these apart and cleaned - but if I don't have to, I'd rather not.
Thanks again for your help.
To be, rather than to seem.
1985 ZN1100 LTD
1989 GL1500 Goldwing
2000 Ducati ST4
1985 ZN1100 LTD
1989 GL1500 Goldwing
2000 Ducati ST4
Please Log in or Create an account to join the conversation.
- Nessism
-

- Offline
- Sustaining Member
-
Registered
- Posts: 8064
- Thanks: 3451
Re: LTD 1100 Project
18 Sep 2023 07:33 - 18 Sep 2023 07:37
This rebuild tutorial will help guide you. It's similar, but not exactly the same, as your carbs. Main differences between this tutorial's carbs (Suzuki GS carbs) and yours, are the type of pilot screws, and the choke actuation mechanism. Be very careful when removing the choke mechanism to assure the tiny ball bearing and springs, which create the detent mechanism, don't get lost.
As mentioned by TexasKZ, don't buy "carb kits". They are typically filled with inferior aftermarket parts. An O-ring kit and float bowl gaskets are typically all that you need. One possible exception is the float valves. Inspect the needle tips closely, and if there is a deep groove in the tip, replace those with either real Mikuni parts, or Keyster brand float valves. Oh, and never mix and match the needle and seats. They are a matched set, and wear in together with use.
I sell an O-ring kit for your carbs, that is much cheaper than buying the O-rings from a dealership source. If you are interested in purchasing, I'll provide my contact info.
gsarchive.bwringer.com/mtsac/~cliff/stor...Rebuild_Tutorial.pdf
Ed
Carb O-ring Kits : www.kzrider.com/forum/14-vendor-forum/62...rburetor-o-ring-kits
www.kzrider.com/forum/faq-wiki/618026-new-owner-things-to-know
1981 KZ750E2
www.kzrider.com/forum/11-projects/604901...z750e-project-thread
Carb O-ring Kits : www.kzrider.com/forum/14-vendor-forum/62...rburetor-o-ring-kits
www.kzrider.com/forum/faq-wiki/618026-new-owner-things-to-know
1981 KZ750E2
www.kzrider.com/forum/11-projects/604901...z750e-project-thread
Last edit: 18 Sep 2023 07:37 by Nessism.
The following user(s) said Thank You: tobeerortobike
Please Log in or Create an account to join the conversation.
- Mikaw
-
- Offline
- Sustaining Member
-
Registered
- Posts: 4825
- Thanks: 1852
Re: LTD 1100 Project
18 Sep 2023 07:53
Tex is all over it. I bet if you checked the exhaust pipes, at least one will be cooler or cold. The engine is not running on all 4. Not sure SeaFoam will make any difference, the blocked passageways are above the fuel level and the chemical will not get sucked up because the jet is plugged.
1976 KZ 900 A4
kzrider.com/forum/11-projects/613548-1976-kz-900-a4
1976 KZ 900 B1 LTD
1978 KZ 1000 B2 LTD
1980 KZ 750 E1
Kowledge Speaks, But Wisdom Listens.
Jimi Hendrix.
1976 KZ 900 B1 LTD
1978 KZ 1000 B2 LTD
1980 KZ 750 E1
Kowledge Speaks, But Wisdom Listens.
Jimi Hendrix.
The following user(s) said Thank You: tobeerortobike
Please Log in or Create an account to join the conversation.
- tobeerortobike
-
Topic Author
- Offline
- User
-
Registered
- Posts: 40
- Thanks: 4
Re: LTD 1100 Project
18 Sep 2023 08:07
Got it. Steeling myself to rebuild my first set of carbs.
Nessism, I'm very interested in buying the O-ring kit from you - what's the shipping situation?
Does that include the float bowl gaskets or do I need those separately?
I need a set of JIS screwdrivers, any recommendations on where to purchase a set?
I'm not going to bother with Sea Foam, the engine won't stay running long enough for it to have any real effect.
Carb rebuild seems like a couple-hour job at best (and I'm the type of person that turns a 30-minute job into a two-hour one), so it will probably have to get done this Saturday at the earliest. If there are any other parts I need to order, please advise as I would love to have everything in before the weekend so I can get the bike running properly.
To be, rather than to seem.
1985 ZN1100 LTD
1989 GL1500 Goldwing
2000 Ducati ST4
1985 ZN1100 LTD
1989 GL1500 Goldwing
2000 Ducati ST4
Please Log in or Create an account to join the conversation.
- Nessism
-
- Offline
- Sustaining Member
-
Registered
- Posts: 8064
- Thanks: 3451
Re: LTD 1100 Project
18 Sep 2023 10:02 - 18 Sep 2023 10:06email me at Nessism AT SBC glo bal DOT net (remove spaces)Got it. Steeling myself to rebuild my first set of carbs.
Nessism, I'm very interested in buying the O-ring kit from you - what's the shipping situation?
Does that include the float bowl gaskets or do I need those separately?
I need a set of JIS screwdrivers, any recommendations on where to purchase a set?
I'm not going to bother with Sea Foam, the engine won't stay running long enough for it to have any real effect.
Carb rebuild seems like a couple-hour job at best (and I'm the type of person that turns a 30-minute job into a two-hour one), so it will probably have to get done this Saturday at the earliest. If there are any other parts I need to order, please advise as I would love to have everything in before the weekend so I can get the bike running properly.
I ship quickly, after payment is received. Float bowl gaskets are not included. Sorry.
I recommend Vessel Megadora screwdrivers. The silver handle Impacta jobbies are awesome for removing stuck screws. I have a #2 & #3 in both the regular green handle version, and the Impacta's. Amazon sells them for good prices.
Regarding cleaning a full set of carbs in two hours, that's unrealistic. You should plan two days, considering this is your first set. Some carb dip is highly recommended. Berryman's is good. And you will also need a couple of cans of spray carb cleaner, so you can shoot through all the passages, after soaking in the dip first. The trick is to shoot in all the various openings, and verify the passages are open by watching where the spray comes out.
Ed
Carb O-ring Kits : www.kzrider.com/forum/14-vendor-forum/62...rburetor-o-ring-kits
www.kzrider.com/forum/faq-wiki/618026-new-owner-things-to-know
1981 KZ750E2
www.kzrider.com/forum/11-projects/604901...z750e-project-thread
Carb O-ring Kits : www.kzrider.com/forum/14-vendor-forum/62...rburetor-o-ring-kits
www.kzrider.com/forum/faq-wiki/618026-new-owner-things-to-know
1981 KZ750E2
www.kzrider.com/forum/11-projects/604901...z750e-project-thread
Last edit: 18 Sep 2023 10:06 by Nessism.
The following user(s) said Thank You: howardhb, tobeerortobike
Please Log in or Create an account to join the conversation.
Moderators: Street Fighter LTD