
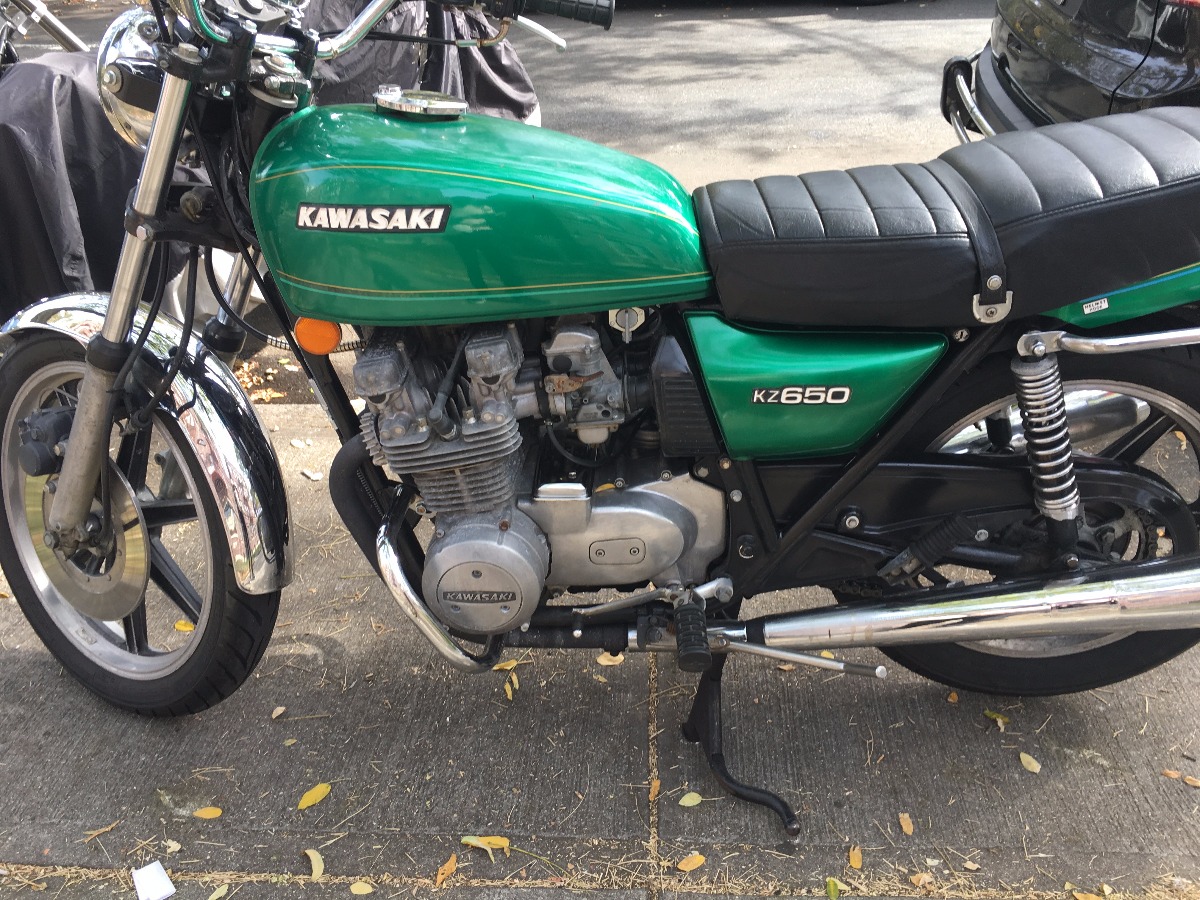
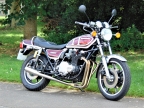
I brought Home my '77 KZ650 *VIDEO AND PICS*
- JWKZ750
-
 Topic Author
- User
-

Public
- Thanks: 0
I brought Home my '77 KZ650 *VIDEO AND PICS*
07 Oct 2017 17:59 - 08 Oct 2017 12:39
Drove 300+ plus miles at 1am to get it from a seller 2 states away.
All I can say is WOW. Kawasaki clearly wanted to spite Honda by making the 650. It does EXACTLY what the CB750 does
(I have one (CB750) and can tell you the two bikes feel EXACTLY the same, only the 650 feels stronger)
and is an amazing bike.
Here is video of us loading it in the wee hours:
Video of when I cleaned it up a litte:
Video of me and my friend before a ride:
Me on it:
Questions.
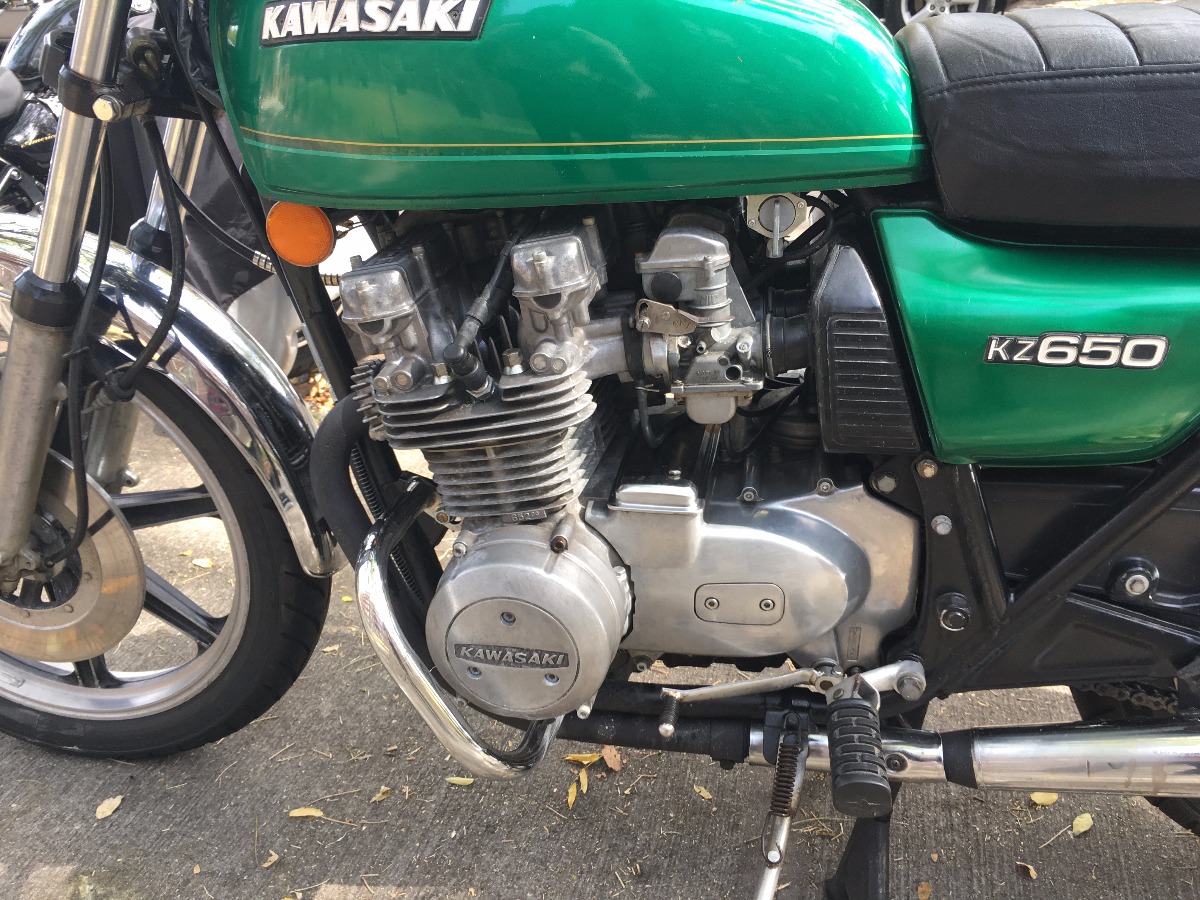
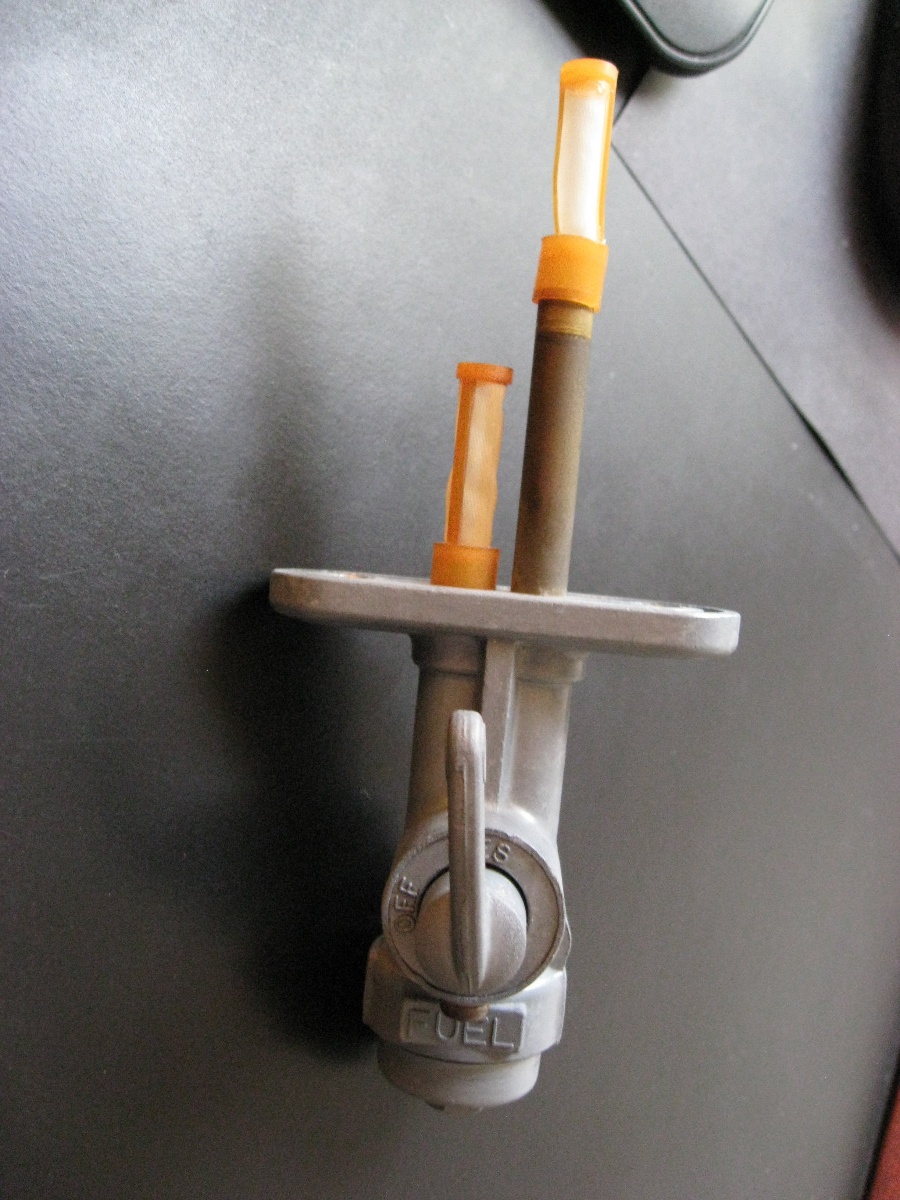
What position should the petcock be on when parked? On, Off or PRIME? Today the carbs flooded when I stopped a few times at a light and it was hard to start. I think I had it on "PRIME"
All I can say is WOW. Kawasaki clearly wanted to spite Honda by making the 650. It does EXACTLY what the CB750 does
(I have one (CB750) and can tell you the two bikes feel EXACTLY the same, only the 650 feels stronger)
and is an amazing bike.
Here is video of us loading it in the wee hours:
Video of when I cleaned it up a litte:
Video of me and my friend before a ride:
Me on it:
Questions.
What position should the petcock be on when parked? On, Off or PRIME? Today the carbs flooded when I stopped a few times at a light and it was hard to start. I think I had it on "PRIME"
Attachments:
Last edit: 08 Oct 2017 12:39 by JWKZ750.
Please Log in or Create an account to join the conversation.
- 650ed
-

- Offline
- User
-
Registered
- Posts: 15339
- Thanks: 2833
Re: I brought Home my '77 KZ650 *VIDEO AND PICS*
07 Oct 2017 18:16
That’s not the original petcock, but I would turn it to “OFF” when the bike is not running. However, no matter what position the petcock is in the carbs definitely should not flood. If they do it indicates one of the 3 issues shown below may be present. Ed
Fuel coming out of the overflow hose (the little hose on the bottom of the carb) is the common symptom of the 3 possible problems described below. Remember - NO SMOKING or other activities that could ignite the fuel while working on carbs!
The float valve is not sealing. This may be (and probably is) just a matter of some minor dirt in the float valve and is very simple to remedy and can be done with the carbs still on the bike. Turn off fuel; drain carb by loosening big brass screw near bottom; and remove the 4 little screws on the bottom of the carb bowl. This will enable you to remove the carb bowl. You will then see the float. If you carefully remove the float you will see a stubby little needle that mates with a brass orifice; together, these two pieces are the float valve. Assuming there is no obvious damage to the needle or seat, use a Q-tip and some carb cleaner to clean the seat of the orifice and the needle. Be careful not to bend the tang that is attached to the float. This tang is the piece that the bottom of the float valve needle rests upon, and it determines the fuel level in the bowl, so bending it will change the fuel level. With the float valve cleaned it should no longer leak. To prevent a re-occurrence a quality inline fuel filter should be installed between the fuel tank and carbs. If there was damage the needle and seat should be replaced as a set; they are available.
The brass overflow tube inside the carb bowl is damaged. When you remove the carb bowl you will see a brass tube attached inside and rising toward the top of the bowl. This is the overflow tube and it leads directly to the overflow nipple on the bottom of the carb. Normally, the fuel level within the bowl rises somewhat close to the top of this tube. If the tube becomes cracked or separates from the bottom of the carb bowl fuel will flow through it and out through the overflow hose. Checking the condition of the tube is very easy after you have removed the carb bowl from the carb. Simply hold the bowl level and fill it up near the top of the tube with water or alcohol and see if it leaks. A slight crack in the brass overflow tube can be difficult to find. You can connect a rubber tube to the overflow nipple, fill the bowl with water, put finger over the open end of the brass overflow tube and blow in the rubber end and look for bubbles. If it does the best remedy is to replace it although some folks have found creative ways to repair them.
The fuel level is set too high. This condition occurs when someone has bent the float tang as mentioned above. This condition can be checked using what is referred to as the "clear tube test." The test involves attaching one end of a clear piece of flexible tubing to the carb drain hole and holding the other end of the tube above the bowl/carb joint. When the fuel is turned on it should rise in the tube to a level 2.5 - 4.5 mm below the bowl/carb joint. If the fuel rises higher than that level it may run into the cylinders or over the upper end of the brass overflow inside the carb bowl (mentioned above) in which case it will run out the overflow hose. This condition is corrected by removing the float and gently bending the tang to raise the float valve needle position. Doing this may take several tries before achieving the desired fuel level.
Correcting each of these three conditions involves removing the carb bowl. This task can be made easier if a short screwdriver bit is used, and depending on which carb you are fixing a mirror may help you locate the screws on the bottom of the carb bowl. Also, it is not a bad idea to have a new carb bowl gasket available in case the old gasket is damaged while removing the carb bowl.
Here's a picture of the original 1977 KZ650 petcock. It was made differently than the one on your bike and it had 3 positions - ON; OFF, RES (reserve). Ed
1977 KZ650-C1 Original Owner - Stock (with additional invisible FIAMM horn)
Attachments:
Please Log in or Create an account to join the conversation.
- JWKZ750
-
Topic Author
- User
-
Public
- Thanks: 0
Re: I brought Home my '77 KZ650 *VIDEO AND PICS*
07 Oct 2017 18:25650ed wrote: That’s not the original petcock, but I would turn it to “OFF” when the bike is not running. However, no matter what position the petcock is in the carbs definitely should not flood. If they do it indicates one of the 3 issues shown below may be present. Ed
Fuel coming out of the overflow hose (the little hose on the bottom of the carb) is the common symptom of the 3 possible problems described below. Remember - NO SMOKING or other activities that could ignite the fuel while working on carbs!
The float valve is not sealing. This may be (and probably is) just a matter of some minor dirt in the float valve and is very simple to remedy and can be done with the carbs still on the bike. Turn off fuel; drain carb by loosening big brass screw near bottom; and remove the 4 little screws on the bottom of the carb bowl. This will enable you to remove the carb bowl. You will then see the float. If you carefully remove the float you will see a stubby little needle that mates with a brass orifice; together, these two pieces are the float valve. Assuming there is no obvious damage to the needle or seat, use a Q-tip and some carb cleaner to clean the seat of the orifice and the needle. Be careful not to bend the tang that is attached to the float. This tang is the piece that the bottom of the float valve needle rests upon, and it determines the fuel level in the bowl, so bending it will change the fuel level. With the float valve cleaned it should no longer leak. To prevent a re-occurrence a quality inline fuel filter should be installed between the fuel tank and carbs. If there was damage the needle and seat should be replaced as a set; they are available.
The brass overflow tube inside the carb bowl is damaged. When you remove the carb bowl you will see a brass tube attached inside and rising toward the top of the bowl. This is the overflow tube and it leads directly to the overflow nipple on the bottom of the carb. Normally, the fuel level within the bowl rises somewhat close to the top of this tube. If the tube becomes cracked or separates from the bottom of the carb bowl fuel will flow through it and out through the overflow hose. Checking the condition of the tube is very easy after you have removed the carb bowl from the carb. Simply hold the bowl level and fill it up near the top of the tube with water or alcohol and see if it leaks. A slight crack in the brass overflow tube can be difficult to find. You can connect a rubber tube to the overflow nipple, fill the bowl with water, put finger over the open end of the brass overflow tube and blow in the rubber end and look for bubbles. If it does the best remedy is to replace it although some folks have found creative ways to repair them.
The fuel level is set too high. This condition occurs when someone has bent the float tang as mentioned above. This condition can be checked using what is referred to as the "clear tube test." The test involves attaching one end of a clear piece of flexible tubing to the carb drain hole and holding the other end of the tube above the bowl/carb joint. When the fuel is turned on it should rise in the tube to a level 2.5 - 4.5 mm below the bowl/carb joint. If the fuel rises higher than that level it may run into the cylinders or over the upper end of the brass overflow inside the carb bowl (mentioned above) in which case it will run out the overflow hose. This condition is corrected by removing the float and gently bending the tang to raise the float valve needle position. Doing this may take several tries before achieving the desired fuel level.
Correcting each of these three conditions involves removing the carb bowl. This task can be made easier if a short screwdriver bit is used, and depending on which carb you are fixing a mirror may help you locate the screws on the bottom of the carb bowl. Also, it is not a bad idea to have a new carb bowl gasket available in case the old gasket is damaged while removing the carb bowl.
Here's a picture of the original 1977 KZ650 petcock. It was made differently than the one on your bike and it had 3 positions - ON; OFF, RES (reserve). Ed
I see. I currently dont have a petcock with and off position. So what should it be put at when parked according to my petcock? On Prime or RES
Please Log in or Create an account to join the conversation.
- M_a_t_t
-
- Offline
- Sustaining Member
-

Registered
- Posts: 254
- Thanks: 41
Re: I brought Home my '77 KZ650 *VIDEO AND PICS*
07 Oct 2017 18:35
You want it on "on". Petcocks that dont have an off position are vacuum operated. Prime just opens the petcock for full flow. On and reserve are vacuum actuated so it will "shutoff" when the engine is stopped.
83 KZ1100A (shaft)
17 Versys X 300 abs
81 kz650h1
81 kz750e2
90 Honda CBR600F (brother's)
17 Versys X 300 abs
81 kz650h1
81 kz750e2
90 Honda CBR600F (brother's)
Please Log in or Create an account to join the conversation.
- JWKZ750
-
Topic Author
- User
-
Public
- Thanks: 0
Re: I brought Home my '77 KZ650 *VIDEO AND PICS*
07 Oct 2017 18:39M_a_t_t wrote: You want it on "on". Petcocks that dont have an off position are vacuum operated. Prime just opens the petcock for full flow. On and reserve are vacuum actuated so it will "shutoff" when the engine is stopped.
Ah thanks so much. Thats probably why it flooded
Please Log in or Create an account to join the conversation.
- 650ed
-
- Offline
- User
-
Registered
- Posts: 15339
- Thanks: 2833
Re: I brought Home my '77 KZ650 *VIDEO AND PICS*
07 Oct 2017 18:51
In general there are two types of petcocks.
The first type is the one I have (see photo) that has "RUN; OFF; and RES (reserve) positions. This petcock has a single fuel hose that connects to a center "T" fitting between the #2 and #3 carbs. When the bike is parked it is best to put that type in the "OFF" position. When running the engine the petcock should be in the RUN position, and when very low on fuel it should be switched to RESERVE.
The second petcock type is vacuum actuated. It has 2 hoses. The fuel delivery hose connects to a center "T" fitting between the #2 and #3 carbs, and the other hose which is for vacuum connects to the nipple on the #2 carb toward the front of the carb. This type petcock has RUN; PRI (prime); and RES (reserve) positions. This type petcock relies on vacuum from the #2 cylinder/carb to pull on a diaphragm inside the carb and permit fuel to flow when the engine is running when the petcock is in the RUN position. When the engine is off the lack of vacuum lets the diaphragm relax and this in turn shuts off fuel flow (unless the diaphragm has a problem). The RESERVE setting is used when the bike is low on fuel, and the PRIME setting is used if the bike has been sitting for an extended period and there is not enough fuel in the carbs to start the engine.
If your petcock is the second type where does the vacuum hose attach at the carbs? The 1977 Mikuni carbs did not have the nipple for the vacuum type petcock, but it is my understanding that some folks who wanted to use a vacuum operated petcock on the early carbs hooked the vacuum hose to a nipple on one of the carb holders. I wouldn't do that; I would just buy the correct petcock. Ed
1977 KZ650-C1 Original Owner - Stock (with additional invisible FIAMM horn)
Please Log in or Create an account to join the conversation.
- 650ed
-
- Offline
- User
-
Registered
- Posts: 15339
- Thanks: 2833
Re: I brought Home my '77 KZ650 *VIDEO AND PICS*
07 Oct 2017 18:56JWKZ750 wrote:M_a_t_t wrote: You want it on "on". Petcocks that dont have an off position are vacuum operated. Prime just opens the petcock for full flow. On and reserve are vacuum actuated so it will "shutoff" when the engine is stopped.
Ah thanks so much. Thats probably why it flooded
I don't know that the above advice is true or not for your particular bike. The 1977 KZ650 came with Mikuni VM24SS carbs that do NOT have the vacuum nipple for attaching the vacuum operated petcock. If your petcock is the vacuum operated type where is the vacuum hose attached at the carbs? If your petcock is the later vacuum operated type did someone install later carbs; did they attach the vacuum line to a different nipple; or what? Ed
1977 KZ650-C1 Original Owner - Stock (with additional invisible FIAMM horn)
Please Log in or Create an account to join the conversation.
- JWKZ750
-
Topic Author
- User
-
Public
- Thanks: 0
Re: I brought Home my '77 KZ650 *VIDEO AND PICS*
07 Oct 2017 19:03650ed wrote:JWKZ750 wrote:M_a_t_t wrote: You want it on "on". Petcocks that dont have an off position are vacuum operated. Prime just opens the petcock for full flow. On and reserve are vacuum actuated so it will "shutoff" when the engine is stopped.
Ah thanks so much. Thats probably why it flooded
I don't know that the above advice is true or not for your particular bike. The 1977 KZ650 came with Mikuni VM24SS carbs that do NOT have the vacuum nipple for attaching the vacuum operated petcock. If your petcock is the vacuum operated type where is the vacuum hose attached at the carbs? If your petcock is the later vacuum operated type did someone install later carbs; did they attach the vacuum line to a different nipple; or what? Ed
No idea on all this. Too tired. Its been a long day and I will investigate during the week
Please Log in or Create an account to join the conversation.
- JWKZ750
-
Topic Author
- User
-
Public
- Thanks: 0
Re: I brought Home my '77 KZ650 *VIDEO AND PICS*
07 Oct 2017 19:07650ed wrote:JWKZ750 wrote:M_a_t_t wrote: You want it on "on". Petcocks that dont have an off position are vacuum operated. Prime just opens the petcock for full flow. On and reserve are vacuum actuated so it will "shutoff" when the engine is stopped.
Ah thanks so much. Thats probably why it flooded
I don't know that the above advice is true or not for your particular bike. The 1977 KZ650 came with Mikuni VM24SS carbs that do NOT have the vacuum nipple for attaching the vacuum operated petcock. If your petcock is the vacuum operated type where is the vacuum hose attached at the carbs? If your petcock is the later vacuum operated type did someone install later carbs; did they attach the vacuum line to a different nipple; or what? Ed
BTW Z1 lists the KZ65-B1 petcock (which I have) as OEM vacuum operated.
Please Log in or Create an account to join the conversation.
- kevski
-
- Offline
- User
-
Registered
- Posts: 438
- Thanks: 166
Re: I brought Home my '77 KZ650 *VIDEO AND PICS*
08 Oct 2017 02:43
I uploaded the last photo and zoomed in on the carbs, previous owner has
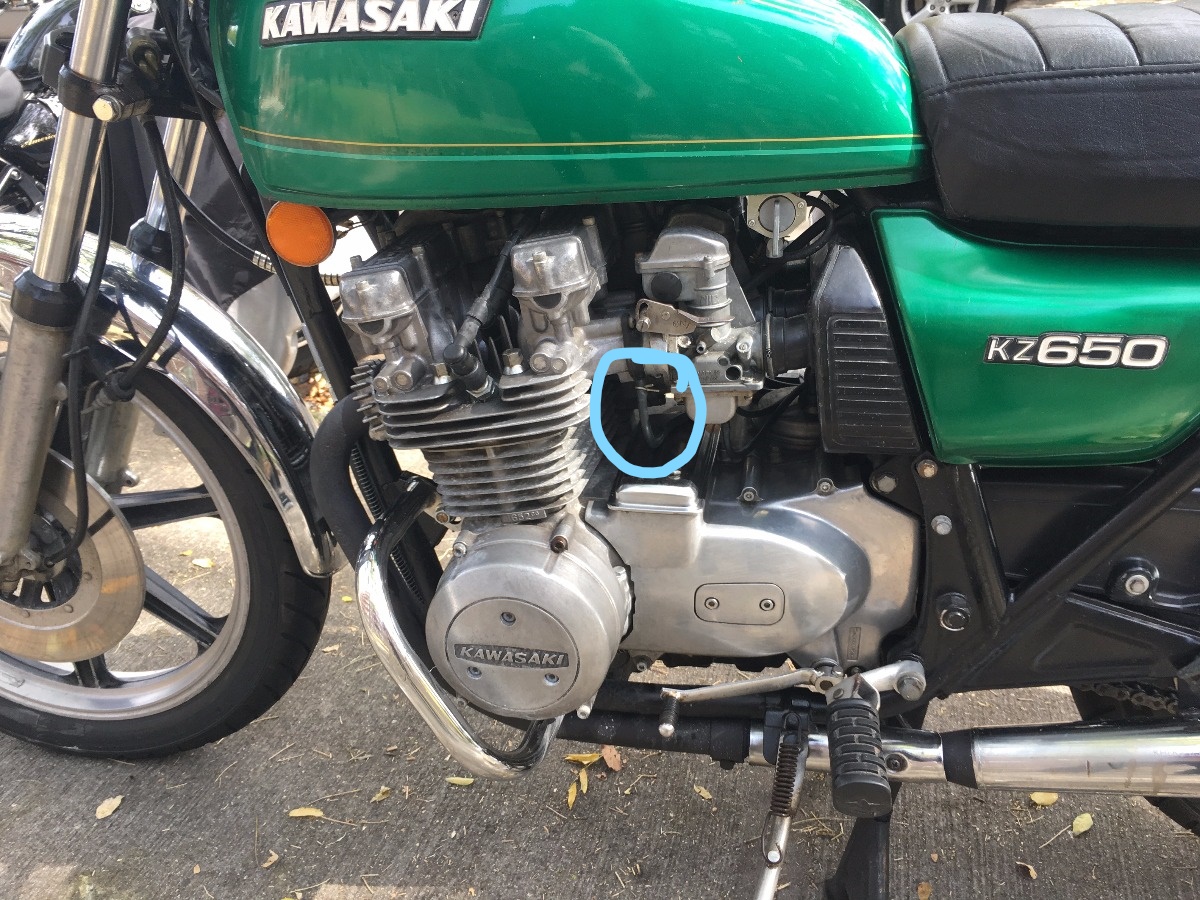 attached a vacuum pipe to number one carb inlet stub there is nothing wrong with this set up, Zephyrs are done the same way, the overflow problem is probably down to a little bit of rubbish getting in the float valves, i would remove carbs sonic clean them reset the float levels whilst carbs are set up on the bench using the proper kawasaki tool, i would then install an inline filter upon re-installing the carbs, a few hours work to save a lot of grief is a fair trade off.
Attachments:
Please Log in or Create an account to join the conversation.
- 650ed
-
- Offline
- User
-
Registered
- Posts: 15339
- Thanks: 2833
Re: I brought Home my '77 KZ650 *VIDEO AND PICS*
08 Oct 2017 05:35JWKZ750 wrote:
BTW Z1 lists the KZ65-B1 petcock (which I have) as OEM vacuum operated.
If that is true then the Z1 website is showing bogus information. The KZ650-B1 did NOT come with a vacuum operated petcock. Take a look at #10 in the link below if you doubt me. Ed
www.powersportswarehouse.com/p/Kawasaki#...50-B1-1977/070076F-8
1977 KZ650-C1 Original Owner - Stock (with additional invisible FIAMM horn)
Please Log in or Create an account to join the conversation.
- bluej58
-
- Offline
- Sustaining Member
-
Registered
- The chrome don't get you home
- Posts: 2481
- Thanks: 511
Re: I brought Home my '77 KZ650 *VIDEO AND PICS*
08 Oct 2017 05:54
I use a mild abrasive on a Q-tip to polish the inside of the valve seats #43 and a cloth and polish to clean the valve needles # 44
Then check the float levels.
That is a nice looking bike and I am assuming that it is lower miles so I'm pretty sure that they are still in good shape just dirty.

Then check the float levels.
That is a nice looking bike and I am assuming that it is lower miles so I'm pretty sure that they are still in good shape just dirty.
78 KZ1000 A2A
Attachments:
Please Log in or Create an account to join the conversation.
Moderators: Street Fighter LTD