
1983 GPz550/KZ550 won't start and I'm flummoxed!
- loudhvx
-

- Offline
- KZr Legend
-

Registered
- Posts: 10863
- Thanks: 1622
Re: 1983 GPz550/KZ550 won't start and I'm flummoxed!
16 Sep 2017 09:35 - 16 Sep 2017 13:19
When cyl 1 and 4 are near their F mark (just before TDC), the ignition rotor should point toward the pickup with the black and blue wires. This appears to be how you have it, generally speaking. To be more precise, the pointer should be just barely passed the pickup center (rotor spins clockwise as you look at it). Your pointer seems to be pointed right at the center of the pickup. Your timing plate appears to be very slightly retarded. That is, the timing plate should be slightly more counter clockwise from where it is. But that little bit of difference should not matter at all as far as starting the motor.
More troubling is the compression test results. Those are pretty bad numbers. On the recent Kz550H I tested, all of the numbers were above 175, but more importantly, they were all within 10psi of each other. (I assume your numbers are cold, so the 170 should be ok, but the rest are pretty low.)
As mentioned, there is a jet below those nylon caps. The caps have orings on them. All of that needs to be inspected.
I believe the butterfly valve needs to be very slightly open at idle. Notice there are "timed" openings at the edge of the butterfly plate on the carb throat. They come into effect as the plate is opened slightly.
I hope the diaphragms were removed before the dunking.
If you removed the choke rod, be aware, there is a detent ball and spring inside the #3 diaphragm chamber. If you just simply pulled the rid, the ball bearing likely shot out into the diaphragm chamber. It can then fall out through the #3 diaphragm vent port on the intake side. Without the ball, there is nothing to keep pressure on the choke rod to keep the enricher valves closed during normal operation, ending up with an overly rich mixture, and possibly preventing the slides from moving up properly.
1981 KZ550 D1 gpz.
Kz550 valve train warning.
Other links.
Kz550 valve train warning.
Other links.
Last edit: 16 Sep 2017 13:19 by loudhvx.
The following user(s) said Thank You: MayerMatthewR
Please Log in or Create an account to join the conversation.
- MayerMatthewR
-
 Topic Author
- Offline
- User
-

Registered
- Posts: 53
- Thanks: 4
Re: 1983 GPz550/KZ550 won't start and I'm flummoxed!
17 Sep 2017 06:12Scirocco wrote: You have to separate the carbs for a better cleaning result. Never put brass,steel and aluminum together in a chemical dip!!!
Have you look under this plugs? Maybe some uncleaned jets. I could be wrong but i have to read something about this plugs/jets..
This is my kind of carb cleaning chemicals, i have best results with it.
Haha! I knew I was going to get called out on that faux pas! I had good reason though, I promise. I actually couldn't get the those things apart because of all the damage/varnish all over in the inside. I don't have pictures of the before, but the interiors of the carbs were completely covered. I wasn't able to disassemble without damaging until I did that soak.
I did pull the plugs after that photo and cleaned the jets under them and replaced the o-rings.
Where are you located? Those chemicals you use don't look to be US-type...
Please Log in or Create an account to join the conversation.
- MayerMatthewR
-
Topic Author
- Offline
- User
-
Registered
- Posts: 53
- Thanks: 4
Re: 1983 GPz550/KZ550 won't start and I'm flummoxed!
17 Sep 2017 06:31loudhvx wrote: When cyl 1 and 4 are near their F mark (just before TDC), the ignition rotor should point toward the pickup with the black and blue wires. This appears to be how you have it, generally speaking. To be more precise, the pointer should be just barely passed the pickup center (rotor spins clockwise as you look at it). Your pointer seems to be pointed right at the center of the pickup. Your timing plate appears to be very slightly retarded. That is, the timing plate should be slightly more counter clockwise from where it is. But that little bit of difference should not matter at all as far as starting the motor.
More troubling is the compression test results. Those are pretty bad numbers. On the recent Kz550H I tested, all of the numbers were above 175, but more importantly, they were all within 10psi of each other. (I assume your numbers are cold, so the 170 should be ok, but the rest are pretty low.)
As mentioned, there is a jet below those nylon caps. The caps have orings on them. All of that needs to be inspected.
I believe the butterfly valve needs to be very slightly open at idle. Notice there are "timed" openings at the edge of the butterfly plate on the carb throat. They come into effect as the plate is opened slightly.
I hope the diaphragms were removed before the dunking.
If you removed the choke rod, be aware, there is a detent ball and spring inside the #3 diaphragm chamber. If you just simply pulled the rid, the ball bearing likely shot out into the diaphragm chamber. It can then fall out through the #3 diaphragm vent port on the intake side. Without the ball, there is nothing to keep pressure on the choke rod to keep the enricher valves closed during normal operation, ending up with an overly rich mixture, and possibly preventing the slides from moving up properly.
Thanks Lou, I went out and advanced the ignition to the limit that it would let me (ie, not much).
I'm with you on the compression numbers - definitely not good. I'm not planning on keeping the bike in this state. I just want to get it running, even if it's just on 2-3 cylinders. I also figured that the rings may be stuck and that a couple of heat cycles may loosen them and I could see some improvement...worth a shot at least?
I did remove the nylon caps and clean under them after that photo.
So last night I did go out and use the clear tube method to check the level in the bowls. 2 were correct and 2 were a little low.
After that, I pulled the carburetors and found the ports you were referring to. I used them to dial the carbs in (mechanically) closer together. I've also gone through and reset the float levels to the known good carbs, but I'll retest after I get them filled again.
Additionally, went through the rest of the carbs one jet at a time and did find a couple of little bits that looked like they could have been obscuring a hole or two in the various tubes. I don't *believe* that it would have been enough to cause the problems I'm seeing...but hey, they're cleaned again!
To answer you previous point, no the diaphragms were *not* in there during the soak process. They were one of the few things I was actually able to remove.
Lastly, THANK YOU for telling me about the detent ball/spring in #3! I thought that something felt "off" about the choke lever pull but couldn't figure it out. Luckily the spring was still in the port, but the ball was no where to be found. I vaguely remember a steel ball in my carb parts egg crate, but it's long gone.
So then I figured I may have to McGuyver it; I measured the hole and it was 3.3mm...I scoured my whole garage looking for broken stuff that might have small ball bearings in it and nadda. Then I looked up and saw my work light pull string. Wouldn't you know it, but they were the PERFECT size. So long story short...my choke rod now has a detent ball again.
I finished up kind of late last night, so I didn't put the carbs back on it. I'm hoping I'll get to it today, but I have some flooring to lay in the nursery and I'm thinking it may be a little later.
Please Log in or Create an account to join the conversation.
- loudhvx
-
- Offline
- KZr Legend
-
Registered
- Posts: 10863
- Thanks: 1622
Re: 1983 GPz550/KZ550 won't start and I'm flummoxed!
17 Sep 2017 07:24
The worklight chain string balls are hollow, no? Even if solid, they are not likely very round. You can go to most bike shops and buy ball bearings individually.
I used a .117" ball bearing. I think it was an undersized 1/8" (3.175mm) ball bearing. That is a common bearing size in bicycles, especially old bicycles. They are often found inside the steering stem. You can tear apart a non working bicycle, but like I said, most bike shops will carry them. If you only need one, they probably won't charge you.
I used a .117" ball bearing. I think it was an undersized 1/8" (3.175mm) ball bearing. That is a common bearing size in bicycles, especially old bicycles. They are often found inside the steering stem. You can tear apart a non working bicycle, but like I said, most bike shops will carry them. If you only need one, they probably won't charge you.
1981 KZ550 D1 gpz.
Kz550 valve train warning.
Other links.
Kz550 valve train warning.
Other links.
Please Log in or Create an account to join the conversation.
- MayerMatthewR
-
Topic Author
- Offline
- User
-
Registered
- Posts: 53
- Thanks: 4
Re: 1983 GPz550/KZ550 won't start and I'm flummoxed!
17 Sep 2017 18:15loudhvx wrote: The worklight chain string balls are hollow, no? Even if solid, they are not likely very round. You can go to most bike shops and buy ball bearings individually.
I used a .117" ball bearing. I think it was an undersized 1/8" (3.175mm) ball bearing. That is a common bearing size in bicycles, especially old bicycles. They are often found inside the steering stem. You can tear apart a non working bicycle, but like I said, most bike shops will carry them. If you only need one, they probably won't charge you.
Lou,
You're correct on both accounts - they are hollow, but they are quite sturdy. I even tried to crush one with a pair of pliers for that very reason as I was concerned it could collapse. Suffice it to say, I think it's quite unlikely that actuating the choke shaft will damage it. It's also not perfectly spherical, but pretty darn close. At the very least, it'll hold until I can locate a real bearing!
Please Log in or Create an account to join the conversation.
- MayerMatthewR
-
Topic Author
- Offline
- User
-
Registered
- Posts: 53
- Thanks: 4
Re: 1983 GPz550/KZ550 won't start and I'm flummoxed!
17 Sep 2017 18:38
Ok so I did get some time to go out there and fiddle with the darn thing about today.
First I completely tore the carbs down a second time (last night and then again this afternoon). I was thinking about the different passages and everything and I couldn't remember if I completely purged all of the ports with air before, so while they were out I decided it was prudent to do it again - especially considering the troubles I'm having.
I tore them down completely again, every bit and piece was removed and cleaned a second time. I also blew them out and all the ports as well. I also when through and double checked that the little idler ports were just barely visible at idle. Surprisingly, and y'all are going to start to wonder if I'm a fool, but I did find some more crud in a couple of the jets...I mean even since last night and I never even put them on the darn bike. I don't know where it's coming from at this point.
Anyway, after I meticulously cleaned the damn things again, I re-installed them and attached the fuel line. Also, remember I slightly advanced the ignition as suggested by Loudhvx last night. I primed the carbs and checked the fuel levels using the clear tube method. All good this time. I thumbed the starter annnnnndddd....still nothing. Damn thing didn't burble to life.
That said, I did get a couple of little backfires, but only when I sprayed some starter fluid up into to carb throats. I'm really starting to think I may be terrible at rebuilding carbs. That or I have the ignition 180 degrees out. Anyone able to tell me how to check for that? Left coil is for #2 and #3 right? Right coil #1 and #4?
Also, I managed to break the clutch cable tonight too, however, luckily....I guess....for me, the starter still turns over as it broke when it was pulled in and apparently is stuck in the "engaged" position. I did remove the side cover to try to inspect where the break was and I did notice that the clutch shaft doesn't seem to push in...it'll slide out (I didn't pull it out very far, just to see if it was seized). I'm assuming that the clutch basket is probably seized together. Here's to another set of crossed fingers to hope that once running and warmed up, that it'll loosen/break free. I've got another clutch cable on order.
Alright, so I'm thinking my last resort is one of two possibilities: My carbs are bad and I'm just not getting fuel into the engine OR the engine is out of time, somehow, which I'll only know by removing the cam cover and taking a look.
Gah this is frustrating!
Please Log in or Create an account to join the conversation.
- MayerMatthewR
-
Topic Author
- Offline
- User
-
Registered
- Posts: 53
- Thanks: 4
Re: 1983 GPz550/KZ550 won't start and I'm flummoxed!
17 Sep 2017 19:48
Alright, regarding the 180 degrees out...I was just too damn curious...and I'm not sure if this is the right method, but I went out and just reversed the mechanical advance cam (ie, when #1 & #4 are on the "F" mark, the cam is now pointing at the #2 pickup coil).
Anyway, when I pressed the starter, the engine quickly backfired and smoked a bit out #2. Anyway, I quickly realized this wasn't the boon I was hoping for, so I reversed the procedure annnnnd I'm back to square one.
I'm thinking I need to pull the cam cover and look at the darn timing.
Anyway, when I pressed the starter, the engine quickly backfired and smoked a bit out #2. Anyway, I quickly realized this wasn't the boon I was hoping for, so I reversed the procedure annnnnd I'm back to square one.
I'm thinking I need to pull the cam cover and look at the darn timing.
Please Log in or Create an account to join the conversation.
- loudhvx
-
- Offline
- KZr Legend
-
Registered
- Posts: 10863
- Thanks: 1622
Re: 1983 GPz550/KZ550 won't start and I'm flummoxed!
17 Sep 2017 19:54
Yeah, if you are using starter fluid and not getting more than a few pops, I'd say it's time to look at the ignition.
Here is the whole sequence of order from the factory. Any of the items can be swapped causing a 180 out situation, but then if another thing is swapped, it will be right again. But for piece of mind, it's probably best to go with how it came from the factory.
Pistons 1 and 4 are near TDC when the ignition rotor is pointing backwards toward the pickup with the black and blue wires.
The pickup with the black and blue wires go to the igniter circuit which controls the black wire to the coils.
The pickup with the red and yellow wires go to the igniter circuit which controls the green wire to the coils.
The black wire to the coils goes to the right hand coil as you sit on the bike.
The green wire to the coils goes to the left hand coil as you sit on the bike.
The right hand coil fires cylinders 1 and 4.
The left hand coil fires cylinders 2 and 3.
The cylinders are numbered 1 to 4 from left to right as you sit on the bike.
When you check for spark, make sure to check both plug wires on a given coil. One wire won't fire if the other one can't fire, and that situation can destroy the coil or the igniter.
Make sure the T mark lines up when the 1 and 4 pistons are actually at TDC. You can put a feeler rod in through the spark plug hole on #4 to confirm this.
Are you sure you have spark?
Is there any chance the cam timing is incorrect?
1981 KZ550 D1 gpz.
Kz550 valve train warning.
Other links.
Kz550 valve train warning.
Other links.
Please Log in or Create an account to join the conversation.
- MayerMatthewR
-
Topic Author
- Offline
- User
-
Registered
- Posts: 53
- Thanks: 4
Re: 1983 GPz550/KZ550 won't start and I'm flummoxed!
18 Sep 2017 06:17loudhvx wrote: Yeah, if you are using starter fluid and not getting more than a few pops, I'd say it's time to look at the ignition.
Here is the whole sequence of order from the factory. Any of the items can be swapped causing a 180 out situation, but then if another thing is swapped, it will be right again. But for piece of mind, it's probably best to go with how it came from the factory.
Yes, I'm thinking you are right. But just for clarification's sake; when you say 180* out do you mean that cylinder 2/3 are firing when 1/4 are at TDC or that cylinder 1 is firing when cylinder 4 should be firing? I thought this was a wasted spark ignition...so I don't *think* the later could be the case?
loudhvx wrote: Pistons 1 and 4 are near TDC when the ignition rotor is pointing backwards toward the pickup with the black and blue wires.
Check.
loudhvx wrote: The pickup with the black and blue wires go to the igniter circuit which controls the black wire to the coils.
Check.
loudhvx wrote: The pickup with the red and yellow wires go to the igniter circuit which controls the green wire to the coils.
Check.
loudhvx wrote: The black wire to the coils goes to the right hand coil as you sit on the bike.
Check.
loudhvx wrote: The green wire to the coils goes to the left hand coil as you sit on the bike.
Check.
loudhvx wrote: The right hand coil fires cylinders 1 and 4.
Check.
loudhvx wrote: The left hand coil fires cylinders 2 and 3.
Check.
loudhvx wrote: The cylinders are numbered 1 to 4 from left to right as you sit on the bike.
Check. And labeled on the plug wires. PS, what diameter are the plug wires? 5mm?
loudhvx wrote: When you check for spark, make sure to check both plug wires on a given coil. One wire won't fire if the other one can't fire, and that situation can destroy the coil or the igniter.
I need to double check this again, but before when I was sorting out the whole missing pickup coil situation I know for a fact that both were sparking (from the same coil).
loudhvx wrote: Make sure the T mark lines up when the 1 and 4 pistons are actually at TDC. You can put a feeler rod in through the spark plug hole on #4 to confirm this.
I will *verify* this tonight. Visually, I'd say they sure look like they are at TDC, but I'll put my dial indicator on it tonight. I was actually starting to wonder if perhaps someone *has* been in this engine before and maybe bored it out or played with it in some other fashion and maybe it requires an advanced or retarded ignition to fire.
loudhvx wrote: Are you sure you have spark?
I am sure I have spark. Visually confirmed, multiple times on all cylinders both with the plug removed and grounded and with a spark plug light.
loudhvx wrote: Is there any chance the cam timing is incorrect?
Again, I'm beginning to wonder about this myself. I've broken into a fair number of motorcycle engines and usually one can tell if someone else has been in there before; gouges from prying pieces apart, crappy resealing jobs, etc. From my inspections of the engine, I really don't think that's the case with this engine, unless whoever did it knew what they were doing and didn't damage it. So again, it's possible...I feel I may be looking at the cams here in the near future so I might be able to signs when I'm in there...especially if the timing is screwed up. But it got 5,xxx miles on it somehow, so it was running at some point.
Thanks again Lou/all!
-Matt
Please Log in or Create an account to join the conversation.
- loudhvx
-
- Offline
- KZr Legend
-
Registered
- Posts: 10863
- Thanks: 1622
Re: 1983 GPz550/KZ550 won't start and I'm flummoxed!
18 Sep 2017 07:33
1 and 4 are 360 deg apart... aka 0 deg apart.
2 and 3 are 180 out from 1 and 4.
So when the spark is "180 out", it means 1 and 4 are sparking when 2 and 3 should be sparking and vice versa, (as you suspected it meant).
Other much more rare possibilities:
There is a chance the roll-pin on the crankshaft has been sheared at the ignition advancer unit. This can cause the timing to be way off. That is why you need to confirm the T mark coincides with the pistons actually reaching the top of their stroke by +/- 1 deg or so.
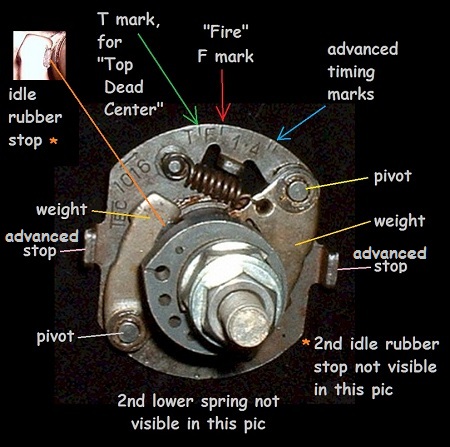
Another check, once the timing plate is off, is that the pointer of the advancer rotor should be pointing to side with the "Tec" logo on the 1016 advancer unit. I'll add a photo.
Another rare possibility is that the wiring for the ignition is crossed. Make sure the pickup wires stay with the correct color when it plugs into the igniter plug. Same goes for the other igniter plug. The wire colors should not be different on either side of the plug, with the only exception being the positive 12v wire. It may be red or yellow with a red stripe or possibly just yellow. It is the larger wiring plug. The smaller pickup plug should always have the same colors on either side.
2 and 3 are 180 out from 1 and 4.
So when the spark is "180 out", it means 1 and 4 are sparking when 2 and 3 should be sparking and vice versa, (as you suspected it meant).
Other much more rare possibilities:
There is a chance the roll-pin on the crankshaft has been sheared at the ignition advancer unit. This can cause the timing to be way off. That is why you need to confirm the T mark coincides with the pistons actually reaching the top of their stroke by +/- 1 deg or so.
Another check, once the timing plate is off, is that the pointer of the advancer rotor should be pointing to side with the "Tec" logo on the 1016 advancer unit. I'll add a photo.
Another rare possibility is that the wiring for the ignition is crossed. Make sure the pickup wires stay with the correct color when it plugs into the igniter plug. Same goes for the other igniter plug. The wire colors should not be different on either side of the plug, with the only exception being the positive 12v wire. It may be red or yellow with a red stripe or possibly just yellow. It is the larger wiring plug. The smaller pickup plug should always have the same colors on either side.
1981 KZ550 D1 gpz.
Kz550 valve train warning.
Other links.
Kz550 valve train warning.
Other links.
Please Log in or Create an account to join the conversation.
- MayerMatthewR
-
Topic Author
- Offline
- User
-
Registered
- Posts: 53
- Thanks: 4
Re: 1983 GPz550/KZ550 won't start and I'm flummoxed!
18 Sep 2017 08:17 - 18 Sep 2017 08:18Fantastic, I really was wondering about that. Thank you.loudhvx wrote: 1 and 4 are 360 deg apart... aka 0 deg apart.
2 and 3 are 180 out from 1 and 4.
So when the spark is "180 out", it means 1 and 4 are sparking when 2 and 3 should be sparking and vice versa, (as you suspected it meant).
Ah, makes sense...and with the knowledge that it's been in a wreck and downed on that side it makes it all the more likely that it could be something like this. I will verify this tonight!loudhvx wrote: Other much more rare possibilities:
There is a chance the roll-pin on the crankshaft has been sheared at the ignition advancer unit. This can cause the timing to be way off. That is why you need to confirm the T mark coincides with the pistons actually reaching the top of their stroke by +/- 1 deg or so.
99% sure it is, but I will check and verify this evening.loudhvx wrote: Another check, once the timing plate is off, is that the pointer of the advancer rotor should be pointing to side with the "Tec" logo on the 1016 advancer unit. I'll add a photo.
So this is another head slapper...I had to get a new ignitor since it was missing the one it came with. I actually got a couple and though the one I used had the correct female plug for the one on the bike, I cannot recall if I paid the time to mind that the wires didn't swap around. Again, I will verify this tonight as well!loudhvx wrote: Another rare possibility is that the wiring for the ignition is crossed. Make sure the pickup wires stay with the correct color when it plugs into the igniter plug. Same goes for the other igniter plug. The wire colors should not be different on either side of the plug, with the only exception being the positive 12v wire. It may be red or yellow with a red stripe or possibly just yellow. It is the larger wiring plug. The smaller pickup plug should always have the same colors on either side.
Thanks Lou!
Last edit: 18 Sep 2017 08:18 by MayerMatthewR.
Please Log in or Create an account to join the conversation.
- MayerMatthewR
-
Topic Author
- Offline
- User
-
Registered
- Posts: 53
- Thanks: 4
Re: 1983 GPz550/KZ550 won't start and I'm flummoxed!
18 Sep 2017 17:31ok, so this evening I checked with a dial indicator and the "T" is properly TDC for the #4 piston. When I set the dial indicator to "0" on the T Mark moving clockwise or counterclockwise results in the piston dropping.loudhvx wrote: There is a chance the roll-pin on the crankshaft has been sheared at the ignition advancer unit. This can cause the timing to be way off. That is why you need to confirm the T mark coincides with the pistons actually reaching the top of their stroke by +/- 1 deg or so.
I also checked this and it does, indeed, point at the Tec logo.loudhvx wrote: Another check, once the timing plate is off, is that the pointer of the advancer rotor should be pointing to side with the "Tec" logo on the 1016 advancer unit. I'll add a photo.
I also traced the wires and visually inspected that each color wire does meet up at its counterpart color wire on the other side of the connector. Unless the Ignitor is malfunctioning or the green/black wires switch colors on the way up the harness, then it's hooked up properly.loudhvx wrote: Another rare possibility is that the wiring for the ignition is crossed. Make sure the pickup wires stay with the correct color when it plugs into the igniter plug. Same goes for the other igniter plug. The wire colors should not be different on either side of the plug, with the only exception being the positive 12v wire. It may be red or yellow with a red stripe or possibly just yellow. It is the larger wiring plug. The smaller pickup plug should always have the same colors on either side.
Please Log in or Create an account to join the conversation.
Moderators: Street Fighter LTD