
- Posts: 25
- Thank you received: 0
yup...small stumble.
- CDNTX650
- Topic Author
- Offline
- User
Less
More
14 Apr 2013 22:30 - 14 Apr 2013 22:36 #582344
by CDNTX650
yup...small stumble. was created by CDNTX650
Okay, Let me begin. I bought this 1978 KZ650b2 from a friend for a steal. He had pods with no jetting changes made. I hate them so i put airbox back on and it still has stock exhaust. I have so far done New coils, with non resistor boots, BR7es plugs, set float height and checked with tube method. New carb rubbers on head and filter side, new air filter, new 15 pilots just to make sure the old ones werent reamed larger when cleaning. carb sync. Points cleaned up and timing set with light. Coils are relayed.
So far, The bike runs like a champ from idle to red line, But if i cruise at about 3000 to 3500 rpm it has a small stumble when cruising and when i accelerate out of it. The bike will pull cleanly through it if i am ripping from a stand still or below that or if i dont go to hard on the gas.
I have the what i assume are VM24ss carbs with only the airscrews on the side. I set them at 2.5 out as any less and the idle slows down, and up to 3 seems to slow a bit too.
on my to do list, Valve lash next summer (bike has 135psi across the board so i left it for this summer) and i just ordered condensers to make sure as i dont know when they were changed. I have cleaned these carbies myself and prior to this with air and carb cleaner and i always run sea foam and non ethanol fuel.
So, i have tried to rule out alot and right now...i am not sure what else to check. Any ideas??? I cant tell if its rich, lean or points related. It does seem worse at richer pilot screw settings...but i cant see needing one size down on the pilots..
It isnt really that bad, so at this point it can wait till next winter when i have 6 months of crap to check the lash etc...but with stock stuff on the bike its really driving me nuts.
Last edit: 14 Apr 2013 22:36 by CDNTX650.
Please Log in or Create an account to join the conversation.
- CDNTX650
- Topic Author
- Offline
- User
Less
More
- Posts: 25
- Thank you received: 0
14 Apr 2013 22:43 - 14 Apr 2013 22:44 #582349
by CDNTX650
Replied by CDNTX650 on topic yup...small stumble.
also, 2.5 to 3 out on screws makes not much difference and i dont want to go more than 3 out. I almost want to try a smaller pilot.
Last edit: 14 Apr 2013 22:44 by CDNTX650.
Please Log in or Create an account to join the conversation.
- 650ed
-

- Offline
- User
Less
More
- Posts: 15344
- Thank you received: 2829
14 Apr 2013 23:36 #582366
by 650ed
1977 KZ650-C1 Original Owner - Stock (with additional invisible FIAMM horn)
Replied by 650ed on topic yup...small stumble.
Assuming the carbs still have stock jetting don't mess with them. The stock jetting should be perfect for the stock airbox/filter & exhaust. I would start by replacing the points and condensers. Be sure to get the timing spot-on using a timing light and dwell meter and the Kawasaki Service Manual. If you need help getting the timing in the ballpark let us know and I'll post instructions on how to get very close before using the light and dwell meter. While you are in there, clean and lube the timing advancer and make sure it operates freely. Also, I would replace the spark plugs with non-resistor types. The bike specs do not call for resistor B7ES (or my preference ND W22ES-U) plugs. Ed
1977 KZ650-C1 Original Owner - Stock (with additional invisible FIAMM horn)
Please Log in or Create an account to join the conversation.
- CDNTX650
- Topic Author
- Offline
- User
Less
More
- Posts: 25
- Thank you received: 0
14 Apr 2013 23:57 #582376
by CDNTX650
Replied by CDNTX650 on topic yup...small stumble.
Do they not have resistor caps though from factory? Cause i dont have resistor boots anymore so i figured resistor plugs wouldnt hurt then.
Thats all we have here is those damn resistor plugs. Ill have to order a set then and try.
Timing has been set with a timing gun. Never set the dwell as i have no meter. Just made the gaps set at a spec i found. (cant remember what that is) but i dont think it is to large from what i remember. I did clean and lube the advancer already prior to setting the timing and verified it works with the timing light.
Parts n more was out of points, so ill try again. Condensers are on the way.
Stock jetting last time i had the carbs apart, i verfied it with a search on here.
Please Log in or Create an account to join the conversation.
- Patton
-

- Offline
- KZr Legend
Less
More
- Posts: 18640
- Thank you received: 2098
15 Apr 2013 00:49 #582393
by Patton
Good Fortune!")
1973 Z1
KZ900 LTD
Replied by Patton on topic yup...small stumble.
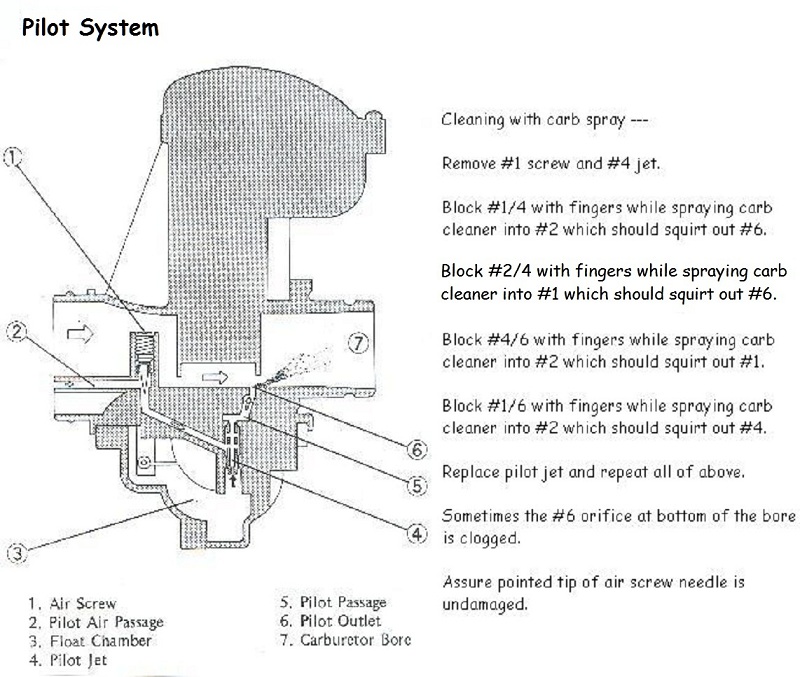
Would guess imperfectly clean carb pilot circuits.CDNTX650 wrote: ...if i cruise at about 3000 to 3500 rpm it has a small stumble when cruising and when i accelerate out of it. The bike will pull cleanly through it if i am ripping from a stand still or below that or if i dont go to hard on the gas....
Good Fortune!
1973 Z1
KZ900 LTD
Please Log in or Create an account to join the conversation.
- 650ed
-
- Offline
- User
Less
More
- Posts: 15344
- Thank you received: 2829
15 Apr 2013 00:50 #582394
by 650ed
1977 KZ650-C1 Original Owner - Stock (with additional invisible FIAMM horn)
Replied by 650ed on topic yup...small stumble.
The manual has several pages of instructions, pictures, etc. on how to set the timing using the static method plus timing light, plus dwell meter. I can give you a fairly easy way that will get you in a pretty close ballpark without a timing light or dwell meter, but you will need a 0.35 mm feeler gauge and a multi-meter or other device to test continuity. To be very precise, the timing light and dwell meter will be needed.
Remove the points cover on the right side of engine. Under it you will see 2 sets of points. The set on the left fires cylinders 1 & 4; the set on the right fires 2 & 3. When replacing points observe carefully how the little bits and pieces are arranged where the wires attach. Some of those pieces are actually insulators and if you leave any of them out or put them back in the wrong place the points will be grounded and won’t work. Take a very close look at the contact surfaces of the points. If they are pitted you really should replace them. You can sand down pitted points, but they will quickly pit again. Replace one set of points at a time so you can look at the other set in case you get the little bits confused.
Use a 17 mm wrench to turn the nut NEAR the end of the crankshaft clockwise while looking in the hole above that nut. (Do NOT use a wrench on the smaller bolt on the very end of the crankshaft to turn the engine.) Inside that hole you will see a vertical pointer cast into the casing. As you turn the 17 mm nut you will see a 1 & 4 and F and T roll by and then you’ll see a 2 & 3 and F and T roll by. Each F and T has a line next to it.
Here’s the method I use for static timing. I turn OFF the ignition. I disconnect the green wire near one coil and the black wire near the other coil. (This is not in the book, but it makes checking continuity much easier for me.) After installing the new points or cleaning up the old ones, turn the 17 mm nut while watching the points. When points set 1&4 are at their widest gap adjust them (by loosening the 2 screws that hold the points to the backplate) so the gap equals 0.35 mm. Turn the 17 mm nut clockwise through a full revolution again and double check this gap. Then repeat this for points set 3&4. Now set your meter to test continuity and clip one wire to the leaf spring on points set 1&4 and clip the other wire to ground. Turn the 17 mm nut clockwise until the 1&4 “F” mark aligns with the pointer mentioned above. You want the continuity across point set 1&4 to just break when the F mark aligns with the pointer. The idea is that when the continuity just fails is when the points will fire their respective coil and cylinders. In order to adjust the point at which continuity fails you loosen the 3 screws that hold the backplate to the engine and slightly turn the backplate until the meter shows a break in continuity. Once you have the 1&4 set timed properly you can check the 2&3 set to make sure they break when the 2&3 F mark aligns with the pointer (they should or something is not right). Don’t forget to plug in the green and black coil wires when you are done, and put a little grease on the rubbing block felt. Assuming you are using new points of the correct type this should enable you to get the timing very close. Trying this with old points may give poor results, especially if the points are pitted and/or the rubbing blocks are worn.
After you have set the gap (which in effect sets the dwell) and the timing using the method above you can use a dwell meter and timing light to fine tune dwell and timing. If you have followed the above procedure carefully, very little if any fine tuning will be needed.
Sorry this is so long. It’s not as difficult as it sounds. Ed
1977 KZ650-C1 Original Owner - Stock (with additional invisible FIAMM horn)
Please Log in or Create an account to join the conversation.
- CDNTX650
- Topic Author
- Offline
- User
Less
More
- Posts: 25
- Thank you received: 0
15 Apr 2013 09:08 #582427
by CDNTX650
Replied by CDNTX650 on topic yup...small stumble.
Alright ed, ill order new points too asap too, then do my dwell. Im pretty sure carbies are clean as a whistle. i did the spray through pilot passages and made sure it came out every hole with air and cleaner.
Please Log in or Create an account to join the conversation.
- Patton
-
- Offline
- KZr Legend
Less
More
- Posts: 18640
- Thank you received: 2098
- CDNTX650
- Topic Author
- Offline
- User
Less
More
- Posts: 25
- Thank you received: 0
15 Apr 2013 11:23 #582453
by CDNTX650
Replied by CDNTX650 on topic yup...small stumble.
Sooty. But it was a choke and run till warm with a 15 minute drive yesterday...to cold. Probably wont clean off till i can get some miles on it. Plugs were pretty good last year. im gonna put a boyer on it next winter..but i want it to run as good as can be for summer.
Please Log in or Create an account to join the conversation.
- Patton
-
- Offline
- KZr Legend
Less
More
- Posts: 18640
- Thank you received: 2098
15 Apr 2013 13:01 - 15 Apr 2013 13:03 #582467
by Patton
1973 Z1
KZ900 LTD
Replied by Patton on topic yup...small stumble.
If not already done, would assure fresh free-flowing unobstructed air filter, and the air intake not partially blocked by anything stored under the seat such as gloves, shop rag, etc.
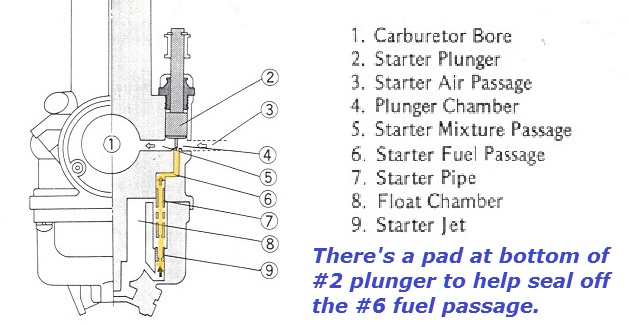
And that the choke plungers are fully closing when the choke is supposed to be OFF. And that the choke mechanism is functioning correctly.
Another possibility could be worn pads on the choke plungers.
In this diagram, the choke is ON (plunger in raised position).
Would also visually inspect for fat blue spark on brand new spark plugs, install the new plugs, test-run for several miles in the stumble throttle range, followed by throttle chop and plug reading.
Carry along a short length of hose that fits snugly onto a spark plug, which enables removal at roadside without burning fingers.
Good Fortune!
1973 Z1
KZ900 LTD
Last edit: 15 Apr 2013 13:03 by Patton.
Please Log in or Create an account to join the conversation.
- CDNTX650
- Topic Author
- Offline
- User
Less
More
- Posts: 25
- Thank you received: 0
15 Apr 2013 13:08 #582468
by CDNTX650
Replied by CDNTX650 on topic yup...small stumble.
Airbox is free of gloves. New filter. I did think of tje choke pads. I tried handle jiggle and spraying a ton contact cleaner around all the choke plungers with no change in rpm...but it got me thinking. i only sprayed at idle maybe low vacuum isnt leaking. Ill set the idle high and try again.
Please Log in or Create an account to join the conversation.
- CDNTX650
- Topic Author
- Offline
- User
Less
More
- Posts: 25
- Thank you received: 0
15 Apr 2013 20:31 #582545
by CDNTX650
Replied by CDNTX650 on topic yup...small stumble.
Okay, pulled out a choke pad (4). Soft, very little indent. even the caps on the top are soft. So ill over rule that for now till i get the tank off to check them all. I did look at the points, definetly pitted even after i filed them and cleaned them the first time. So points and condensers are on top o the list.
Please Log in or Create an account to join the conversation.