
- Posts: 112
- Thank you received: 2
Leaking CV34
- kz750saskatoon
-
 Topic Author
- Offline
- User
Less
More
27 Jul 2010 19:40 #386409
by kz750saskatoon
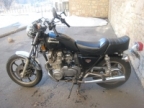
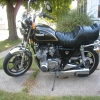
1981 KZ750-H2
Saskatoon, SK
Leaking CV34 was created by kz750saskatoon
This is an offshoot of an earlier thread I had. Wanted to separate this problem out however.
There is a constant drip of fuel out of the overflow tube on carb #4. If I set the petcock to ON (petcock is ON-PRIME-RES type) and leave the bike overnight, when I come to it in the morning if I take the #4 overflow tube out of the airbox it is filled with fuel.
Things I have done/tried:
1) float bowl gasket is new as is float needle and drain screw o-ring
2) I used the clear-tube method to check fuel level and it is approximately 4mm below the float bowl gasket.
3) Used a spare float bowl with same drain screw
4) Used same float bowl but swapped drain screws between carbs. Carb #4 still leaks.
5) Held float bowl up to carb body as I turned petcock to prime. After a minute or so (wanted to make sure it filled) I turned the petcock back to ON and carefully removed the float bowl. It was nowhere near the top of the overflow tube. I held up the float bowl at eye level and there was a drip out of the overflow/drain nipple
6) Brought float bowl up to house and put water into it until just below the top of the bowl. No drip out the bottom
7) Inspected tip of float needle for imperfections and there were none visible
") Cleaned out seat of float needle by a) cotton swab and b) putting bowl below carb and opening fuel wide open
Cleaned out seat of float needle by a) cotton swab and b) putting bowl below carb and opening fuel wide open
#5 would lead me to believe the float needle is working properly. #4 leads me to believe it is not a problem with the drain screw. #3 leads me to believe it is not a problem such as cracked overflow tube.
I am completely stumped. I feel like I have exhausted every possibility yet I still have an issue. Any ideas?
There is a constant drip of fuel out of the overflow tube on carb #4. If I set the petcock to ON (petcock is ON-PRIME-RES type) and leave the bike overnight, when I come to it in the morning if I take the #4 overflow tube out of the airbox it is filled with fuel.
Things I have done/tried:
1) float bowl gasket is new as is float needle and drain screw o-ring
2) I used the clear-tube method to check fuel level and it is approximately 4mm below the float bowl gasket.
3) Used a spare float bowl with same drain screw
4) Used same float bowl but swapped drain screws between carbs. Carb #4 still leaks.
5) Held float bowl up to carb body as I turned petcock to prime. After a minute or so (wanted to make sure it filled) I turned the petcock back to ON and carefully removed the float bowl. It was nowhere near the top of the overflow tube. I held up the float bowl at eye level and there was a drip out of the overflow/drain nipple
6) Brought float bowl up to house and put water into it until just below the top of the bowl. No drip out the bottom
7) Inspected tip of float needle for imperfections and there were none visible
Cleaned out seat of float needle by a) cotton swab and b) putting bowl below carb and opening fuel wide open#5 would lead me to believe the float needle is working properly. #4 leads me to believe it is not a problem with the drain screw. #3 leads me to believe it is not a problem such as cracked overflow tube.
I am completely stumped. I feel like I have exhausted every possibility yet I still have an issue. Any ideas?
1981 KZ750-H2
Saskatoon, SK
Please Log in or Create an account to join the conversation.
- Patton
-

- Offline
- KZr Legend
Less
More
- Posts: 18640
- Thank you received: 2098
27 Jul 2010 23:16 #386451
by Patton
1973 Z1
KZ900 LTD
Replied by Patton on topic Leaking CV34
kz750saskatoon wrote:
Are the correct drain screw 0-rings fitted, and in good condition?
...if I take the #4 overflow tube out of the airbox it is filled with fuel.... :huh:
Am thinking the carb drain hoses are routed from the float bowl nipples to exit underneath the bike, and without going into the airbox.
Good Fortune!")
...There is a constant drip of fuel out of the overflow tube on carb #4. If I set the petcock to ON (petcock is ON-PRIME-RES type) and leave the bike overnight, when I come to it in the morning if I take the #4 overflow tube out of the airbox it is filled with fuel...
5)...was nowhere near the top of the overflow tube...was a drip out of the overflow/drain nipple.
Are the correct drain screw 0-rings fitted, and in good condition?
...if I take the #4 overflow tube out of the airbox it is filled with fuel.... :huh:
Am thinking the carb drain hoses are routed from the float bowl nipples to exit underneath the bike, and without going into the airbox.
Good Fortune!
1973 Z1
KZ900 LTD
Please Log in or Create an account to join the conversation.
- JR
-
- Offline
- Sustaining Member
Less
More
- Posts: 2940
- Thank you received: 449
28 Jul 2010 05:48 #386468
by JR
1980 kz750E1, Delkevic exhaust
Replied by JR on topic Leaking CV34
If its a very slow leak it may not be immeadiately obvious.
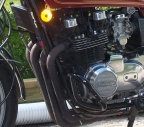
On the CV34 the drain screw and the overflow tube are connected and gas comes out the nipple on the bottom.
My suggestion. Take the bowl off. Connect a clear tube to the nipple. Fill the bowl with water. Put your finger over the top of the brass overflow tube and blow into the clear tube. I've done this . This would be the equivalent of looking for a slow puncture in a bicycle inner tube. If you get bubbles then you can narrow it down to the screw or brass tube.
If no bubbles then it has to be the float vavle or seat. To clean the brass seat (they are not replaceable on the CV34) use a cotton Q tip dipped in carb cleaner or better yet Brasso and then carb cleaner. Put the float and valve back on. Turn the carbs upside down and blow into the fuel line to check the operation of the valve. float valve tips and seats can look good but ot only takes a microscopic piece of dirt to screw it up... which reminds me - you do have a fuel filter ?
Best of luck. You'll get it figured out and it will be worth it in the end.
1980 kz750E1, Delkevic exhaust
Please Log in or Create an account to join the conversation.
- apbling
-
- Offline
- User
Less
More
- Posts: 999
- Thank you received: 12
28 Jul 2010 06:13 - 28 Jul 2010 06:15 #386473
by apbling
Replied by apbling on topic Leaking CV34
+1. I had the same issue. I put mothers polish on my q-tip, put it in a drill and shined my seats up. I was in the same position a year ago thinking there is no way there can be any dirt left in there! Well, there was. I've also heard of other people with hairline cracks in the brass tubes that cause the leak, but since you swapped bowls that would lead my to suspect the seat/needle. Have you tried swapping the needle from #4 with another one to see if the leak moves? You said your float and needle were both NEW, or new to you?
As a side note, I bought new, longer drain lines for my bike. I didn't like the idea of the overflow going into the airbox, where it would take me longer to discover an issue. I just routed them all out the back like my 550.
As a side note, I bought new, longer drain lines for my bike. I didn't like the idea of the overflow going into the airbox, where it would take me longer to discover an issue. I just routed them all out the back like my 550.
Last edit: 28 Jul 2010 06:15 by apbling.
Please Log in or Create an account to join the conversation.
- kz750saskatoon
-
Topic Author
- Offline
- User
Less
More
- Posts: 112
- Thank you received: 2
28 Jul 2010 07:19 #386489
by kz750saskatoon
1981 KZ750-H2
Saskatoon, SK
Replied by kz750saskatoon on topic Leaking CV34
Patton:
I used the O-rings form the carb kit sold at Z1. The rest of the O-Rings were pretty obvious as far as where they went so I am pretty sure I got these ones right. I put the same o-rings on all 4 drain screws and its only #4 that leaks.
Also, on the KZ750 the overflow tubes are routed to a Y which fits into a grommet on the bottom of the airbox.
JR:
Checking by blowing into the bowl is perfect. I was trying to think of how to accomplish something like that. Brain was blocked by frustration. One question though. If I do put the whole carb together and flip it over as you suggest, wouldn't I still get air movement due to all the jets and such? I guess it will just be far more restricted flow.
apbling:
I will give that a try I guess if the above doesn't get it fixed. The float needle is new new. The floats themselves are not.
I'm real confused about this all. When I removed the float bowl after letting it fill up, the fuel level was nowhere near the top of the overflow tube.
Oh well, more testing. Thanks guys. I'll have an update this evening.
1981 KZ750-H2
Saskatoon, SK
Please Log in or Create an account to join the conversation.
- kz750saskatoon
-
Topic Author
- Offline
- User
Less
More
- Posts: 112
- Thank you received: 2
28 Jul 2010 07:22 - 28 Jul 2010 07:22 #386491
by kz750saskatoon
1981 KZ750-H2
Saskatoon, SK
Replied by kz750saskatoon on topic Leaking CV34
Well that was quick and easy. Filled the bowl with water and put a tube on the overflow. When I blew into it I got bubbles. Damn. I wonder if that second bowl I tested just happened to have the same problem.
I guess the brass tube has a hairline crack. What are my options then?
I guess the brass tube has a hairline crack. What are my options then?
1981 KZ750-H2
Saskatoon, SK
Last edit: 28 Jul 2010 07:22 by kz750saskatoon.
Please Log in or Create an account to join the conversation.
- apbling
-
- Offline
- User
Less
More
- Posts: 999
- Thank you received: 12
28 Jul 2010 07:46 #386500
by apbling
Replied by apbling on topic Leaking CV34
Well, that was easy! I think people used JB weld on them. Maybe you could solder them? Or maybe scour ebay for a new bowl, but then you never know if you're just buying more broken stuff. So...does it sound like you need two bowls? I have a set of parts carbs I could help you out for a bowl or two... but I think you might be better off finding an entire set like I did. I just posted a WTB add on craigslist, and some guy sold me his set (complete with the ever elusive diaphragms!) for $25. I nearly had a heart attack.
Please Log in or Create an account to join the conversation.
- kz750saskatoon
-
Topic Author
- Offline
- User
Less
More
- Posts: 112
- Thank you received: 2
28 Jul 2010 07:53 #386506
by kz750saskatoon
1981 KZ750-H2
Saskatoon, SK
Replied by kz750saskatoon on topic Leaking CV34
I actually have a spare set that I grabbed the second bowl off of.
I had a mishap with a seized mixture screw that resulted in the tower they screw into cracking in half. Found a farmer near here with a barn filled with 80s Japanese bike parts. Found a full set of CV34s in about 10 minutes.
I have a soldering iron for electronics work. I was wondering if I could just solder it but JB Weld sounds easier. Anybody else with suggestions?
Also, once I knew where to look on the tube it was easy to see the hairline crack. Damn thing!
1981 KZ750-H2
Saskatoon, SK
Please Log in or Create an account to join the conversation.
- apbling
-
- Offline
- User
Less
More
- Posts: 999
- Thank you received: 12
28 Jul 2010 08:47 - 28 Jul 2010 08:50 #386524
by apbling
Replied by apbling on topic Leaking CV34
You at least have the most frustrating thing figured out...once you find the damn issue, fixing it is usually the easier part, in my opinion.
If you are good at soldering, I bet that would be the way to go. I just can't solder to save my life, so I wouldn't have even considered it for me!
If you are good at soldering, I bet that would be the way to go. I just can't solder to save my life, so I wouldn't have even considered it for me!
Last edit: 28 Jul 2010 08:50 by apbling.
Please Log in or Create an account to join the conversation.
- Patton
-
- Offline
- KZr Legend
Less
More
- Posts: 18640
- Thank you received: 2098
28 Jul 2010 10:59 #386573
by Patton
1973 Z1
KZ900 LTD
Replied by Patton on topic Leaking CV34
Some options for repairing cracked overflow tube include:
JBWeld;
Solder;
Snug fitting flexible tube over cracked tube;
Close fitting brass tube (from hobby shop store) fitted over cracked overflow tube, and soldered in position;
Heat-shrink tubing over cracked overflow tube.
Good Fortune!
JBWeld;
Solder;
Snug fitting flexible tube over cracked tube;
Close fitting brass tube (from hobby shop store) fitted over cracked overflow tube, and soldered in position;
Heat-shrink tubing over cracked overflow tube.
Good Fortune!
1973 Z1
KZ900 LTD
Please Log in or Create an account to join the conversation.
- JR
-
- Offline
- Sustaining Member
Less
More
- Posts: 2940
- Thank you received: 449
28 Jul 2010 17:32 - 28 Jul 2010 17:43 #386652
by JR
1980 kz750E1, Delkevic exhaust
Replied by JR on topic Leaking CV34
Great
You're getting there !
Options - I used JB Weld on one cracked overflow tube. Just make sure you let it cure overnight or better yet 24 hours.
On another. I went to a hobby shop with bowl in hand and found thin brass tubing with an internal diameter which would just slip over the overflow tube and soldered it at the bottom where it met the bowl body.
Whatever you end up doing check that the repair does not interfere with the operation of the float before you reassemble the carb
No. When you blow into the fuel line the air has to go via the float valve. With the carb upside down and the float valve seating correctly you will find there is a surprising resistance to blowing. Try it
Good luck
You're getting there !
Options - I used JB Weld on one cracked overflow tube. Just make sure you let it cure overnight or better yet 24 hours.
On another. I went to a hobby shop with bowl in hand and found thin brass tubing with an internal diameter which would just slip over the overflow tube and soldered it at the bottom where it met the bowl body.
Whatever you end up doing check that the repair does not interfere with the operation of the float before you reassemble the carb
JR:
If I do put the whole carb together and flip it over as you suggest, wouldn't I still get air movement due to all the jets and such? I guess it will just be far more restricted flow.
No. When you blow into the fuel line the air has to go via the float valve. With the carb upside down and the float valve seating correctly you will find there is a surprising resistance to blowing. Try it
Good luck
1980 kz750E1, Delkevic exhaust
Last edit: 28 Jul 2010 17:43 by JR.
Please Log in or Create an account to join the conversation.
- kz750saskatoon
-
Topic Author
- Offline
- User
Less
More
- Posts: 112
- Thank you received: 2
28 Jul 2010 22:02 #386717
by kz750saskatoon
1981 KZ750-H2
Saskatoon, SK
Replied by kz750saskatoon on topic Leaking CV34
Next time I have the rack off the bike I will. I've had them on and off so many times recently I never want to take them off again! haha
About 5 hours ago I put some JB Weld over the crack. Tube says to let it cure for 16-24 hours. I am tempted to put it back on tomorrow morning. I think I will run a water and blow (sounds dirty...) test in the morning and see how it goes.
About 5 hours ago I put some JB Weld over the crack. Tube says to let it cure for 16-24 hours. I am tempted to put it back on tomorrow morning. I think I will run a water and blow (sounds dirty...) test in the morning and see how it goes.
1981 KZ750-H2
Saskatoon, SK
Please Log in or Create an account to join the conversation.