
- Posts: 17
- Thank you received: 0
Want to rebuild carbs
- KZ900A4
-
 Topic Author
- Offline
- User
Less
More
07 Jun 2010 21:37 - 07 Jun 2010 21:44 #374306
by KZ900A4
76 KZ900A4
Want to rebuild carbs was created by KZ900A4
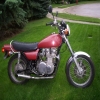
My carbs have been sitting on a self in my garage for three years while my bike sat in pieces in the corner. Fuel flows like a river from the overflow on #3, and they're filthy on the outside. Not sure what they look like on the inside.
I'm told rebuilding carbs is simple enough, however, I don't know what any of this means.
26mm (VM26SS) KZ900A4 & A5
Main Jet 115
Air Jet 1.0
Needle Jet O-6
Jet Needle 5DL31-3 (last number is the clip position)
Throttle valve (slide) 1.5mm cutaway
Pilot Jet 17.5
Air Screw setting 1 3/8 turns out
When the previous owner bought the bike in 76, he had a performance package put on (pods, and exhaust pipes converted to 2-1 on both sides). As a result something in the specifications had to change, but I've lost contact with him since he moved, hence, I don't know what they are.
When I got the bike, I had to have the carbs cleaned do to gumming from sitting around. The shop that did the work (this was 3 years ago) said they needed to rejet with bigger jets (never said which ones). The bike idles at 1500 RPM's, shop said this was the best it would ever be, I declare BS.
I'm planning on buying this rebuild kit. (I know I need 4 of them)

Should I also replace the Float Assembly Pins as well?
Any suggestions on what specs to change in the carbs?
I'm told rebuilding carbs is simple enough, however, I don't know what any of this means.
26mm (VM26SS) KZ900A4 & A5
Main Jet 115
Air Jet 1.0
Needle Jet O-6
Jet Needle 5DL31-3 (last number is the clip position)
Throttle valve (slide) 1.5mm cutaway
Pilot Jet 17.5
Air Screw setting 1 3/8 turns out
When the previous owner bought the bike in 76, he had a performance package put on (pods, and exhaust pipes converted to 2-1 on both sides). As a result something in the specifications had to change, but I've lost contact with him since he moved, hence, I don't know what they are.
When I got the bike, I had to have the carbs cleaned do to gumming from sitting around. The shop that did the work (this was 3 years ago) said they needed to rejet with bigger jets (never said which ones). The bike idles at 1500 RPM's, shop said this was the best it would ever be, I declare BS.
I'm planning on buying this rebuild kit. (I know I need 4 of them)
Should I also replace the Float Assembly Pins as well?
Any suggestions on what specs to change in the carbs?
76 KZ900A4
Attachments:
Last edit: 07 Jun 2010 21:44 by KZ900A4. Reason: Left out some info.
Please Log in or Create an account to join the conversation.
- bountyhunter
-

- Offline
- User
Less
More
- Posts: 7246
- Thank you received: 337
08 Jun 2010 00:05 - 08 Jun 2010 00:06 #374324
by bountyhunter
1979 KZ-750 Twin
Replied by bountyhunter on topic Want to rebuild carbs
If he added pods and pipes, bigger main jets are almost certainly necessary. Pilots maybe, maybe not.
If you are puddling gas from the overflow tubes, you need to change the brass seats and float needles and set the gas levels in the bowls with a clear tube. That's the parts all the way to the left in the picture above.
If you are puddling gas from the overflow tubes, you need to change the brass seats and float needles and set the gas levels in the bowls with a clear tube. That's the parts all the way to the left in the picture above.
1979 KZ-750 Twin
Last edit: 08 Jun 2010 00:06 by bountyhunter.
Please Log in or Create an account to join the conversation.
- MFolks
-

- Offline
- User
Less
More
- Posts: 6650
- Thank you received: 540
08 Jun 2010 18:23 #374489
by MFolks
1982 GPZ1100 B2
General Dynamics/Convair 1983-1993
GLCM BGM-109 Tomahawk, AGM-129A Advanced Cruise Missile (ACM)
Replied by MFolks on topic Want to rebuild carbs
Carb Cleaning 102
Written by MShively
Most carburetor problems seem to come after the motorcycle was stored or not started for a while. If it won't start or only runs with the choke lever pulled out, you have one or more jets obstructed by gummed or varnished fuel. Notice the enrichening lever...most of the motorcycle carbs have enrichening passages inside the carburetor that WHEN THE THROTTLE IS CLOSED, provide the rich air/fuel mixture to start the engine. If you open the throttle any at all it cuts this enrichening out of the system. So if you are having trouble starting and everything looks ok, see if closing the throttle helps. This does not apply to carbs with a butterfly choke.
To access the jets you will have to take the carbs off the engine. A service manual will be very helpful here for specifications, images of the carburetor, and procedures. Take a float bowl off and remove the jets. Sometimes removing the jets can be difficult because the fuel has gummed or varnished over the parts. If so, clear as much of the gum out as possible. Use carb cleaner and compressed air to aid removal. Before soaking carbs in a dip tank or powerful cleaner, look for rubber seals, O'rings, and other parts that may be damaged by the cleaners. Remove any rubber parts prior to cleaning. Look closely, sometimes these parts are hard to see. If they are there and you can't get them, you will have to clean the carb body carefully by hand and not soak it.
Before you remove the fuel/air screw, gently turn it in until it seats. Count and record the number of "turns in." After cleaning and when you replace it, set it at this setting. Most carbs have a rubber o-ring and steel washer under the fuel/air screw spring. Look for them and remove them with a piece of wire or suitable fabricated tool BEFORE you spray carb cleaner in there. The fuel/air screw may be covered by a tamper cap or plug. You will have to remove this plug to access it. Upon reassembly and after cleaning, a base setting for the fuel/air screws of 1.25 turns out is good to start if you don't have the factory specs or forgot to record the turns out earlier. When the engine is warm, turn the screw in until the engine stumbles, then out until it stumbles, and leave it at half way in between. Adjust the idle with the throttle stop screw as needed.
You will need to remove the main jet and the needle jet. The main jet is usually larger and screwed onto the lower end of the needle jet, locking it into the emulsion tower and carb body. Remove the main jet and tap out the needle jet. Do this very carefully. It is soft brass and may break or damage very easily. Sometimes the needle jet will have an O-ring. Remove the O-ring and soak both main jet and needle jet in carb cleaner. Upon reassembly, there may be a locator pin in the emulsion tower/carb body that fits in a grove on the needle jet. Make sure they align properly.
You will need to remove the pilot jet. Pilot jets may be located similar as the main jet, covered by a rubber plug, deep inside an emulsion tower, or other. Be careful not to strip or break the small pilot jet when you try to remove it. It may be necessary to grind the end of a small screwdriver to fit the jet just right. Even after soaking, the jet may still be plugged. Use a small "E" guitar string and push it through the jet. (A wire strand out of a wire brush may work. The wire brush should measure about .013" in diameter.) The smallest jet drill you can get is #80, which has a diameter of .0135". You can use the wire and not enlarge the hole, at least not by much. Yes, some manuals say not to insert any wire jet cleaning tools into the jets. However, Honda and other manufacturers produce them as special tools for the dealer technicians.
Use compressed air with spray cleaner and the wire to clean jets. Spray carb cleaner into the carb passages, and then follow with compressed air. Watch for cleaner to exit from other passage ways and openings, and ensure that those small idle passages are clear. The smallest tubes, passageways, and openings are critical to the operation of the carburetor. EVERY PINHOLE IS IMPORTANT. Make certain that your see and hear air and cleaner pass freely through every opening. Wear goggles and don't get so close that you get carb spray in your eyes.
Sometimes the pins or rods that hold the floats can be gummed. Spray a bit of carb cleaner and let it set awhile. Repeat and try to gently move the float. Eventually, the pin will loosen enough so that you can drive out the pin with a very small punch. If necessary, tap on the punch very gently with the handle of a small screwdriver or similar tool. Penetrating oil also works good to free up gummed float pins and stuck throttle slides. If the slides have a rubber diaphragm on them, spray carb cleaner on a rag and wipe the slide clean. Do not get carb cleaner on the rubber diaphragms. It will ruin them. While you have the Diaphragm out, inspect it for holes. If you have an engine that has good compression and starts well, but just has no power and revs up ever so slowly, check that rubber diaphragm. It may have a hole or tear. The throttle slide will not rise if it is damaged.
When you put the float valve or needle valve back in place, put a drop of light oil on it so it will move freely in its seat and not stick before the gas first starts to fill the bowl.
Don't clean the outside of constant velocity (CV) carbs with spray carb cleaner unless you are sure they are not the rubber diaphragm type. Carb cleaner will ruin the rubber. There is a piston type of CV carburetor, but it's still not a good idea to use the spray because of rubber float bowl gaskets (O'rings).
If you turn on the fuel petcock and gas pours out the overflow tubes, tap lightly on the carb body with a suitable tool. That will vibrate the float valves loose. Same thing if there is dirt holding the valves open. If it doesn't work you need a new float valve & seat. The tips of the float valves can be steel or rubber. Tips with a groove worn in them should be replaced. The float pin springs often become gummed by fuel and cause the pins to stick. Test with your finger. They should be free moving - no resistance. Replace all if you feel any sticking. If they first stuck, but you worked them free, try and use them. They may fail when gasoline gets into the spring again.
Floats control the fuel level in the float bowls. Adjustable tangs on the floats rest on the float valve pins. When level is low, the float lowers and the valve follows. More fuel enters the bowl. Similarly, shutting fuel flow off when it replenishes supply. If the tang is metal, you can adjust the float level by bending the tang up or down. If it is plastic, it is non-adjustable. Float levels are different for each bike and are found in the bikes shop manual. If you don't have the float setting and can't find it anywhere, set it so the fuel level is a bit below the top of the float bowl. Make sure no gas comes out of the float overflow tubes or hoses. The float overflow tube is at the bottom or side of each float bowl. There are many styles of floats: copper, brass, bronze, plastic, urethane, tin, cork, and maybe other materials. Brass and plastic are the most common.
If the rubber ducts that connect the carb and air cleaner housing are hard and dry-rotted, you should replace them. Replace rubber intake manifolds if necessary, too.
On the side of some carbs is another diaphragm that temporarily closes the pilot or slow speed jet air passage when the throttle is closed. This richens the fuel mixture to reduce backfiring when coming to a stop. Check the diaphragm for holes and tears.
At the bottom of some carbs is an accelerator pump to pump extra fuel when the throttle is opened. The pump is attached or connected to one float bowl. Check the pump's diaphragm for holes or tears. A rubber coating called "Plasti-Dip" has been used to fix diaphragms. I have never used it but I hear it works. Get it from NAPA part #765-2527.
Adjustments that you can make from outside the carburetor:
1) Synchronizer screws balance the carburetors for smooth performance and idling. 2) Idle screw (throttle stop screw) adjusts the speed of the idle. 3) The idle fuel/air screw adjusts the idle mixture. This is only at idle and does not effect anything above idle. Another method to adjust it: turn the fuel/air screw in and out until you get the highest idle speed. Then lower the idle speed with the idle screw and do it again until you get the best idle. The air screw can be located in a variety of places on the carb. If you have a 1980 or newer machine, it may have a cover over it to keep you from messing with it. You will have to drill it and then pry it out using the hole you made. It may be illegal for you to do this, depending on where you live.
If you can't get it to idle, or rather the idle stays real high then drops off and dies, check for an air leak. Spray starting fluid, WD40, brake cleaner, carb cleaner, etc... on the manifold, carbs, air box, vacuum hoses, and petcock to see if the revs change. If they do, you have a leak. If your valve clearances are too tight, it will also effect the idle.
You can make your air/fuel mixture a bit richer or leaner by moving the carburetor needle clip up or down. Move the clip down a notch to raise the needle, to richen the mixture. Move the clip up to lower the needle, to lean out the mixture. The needle is located in the throttle slide.
1982 GPZ1100 B2
General Dynamics/Convair 1983-1993
GLCM BGM-109 Tomahawk, AGM-129A Advanced Cruise Missile (ACM)
Please Log in or Create an account to join the conversation.
- Patton
-

- Offline
- KZr Legend
Less
More
- Posts: 18640
- Thank you received: 2098
08 Jun 2010 18:41 #374495
by Patton
1973 Z1
KZ900 LTD
Replied by Patton on topic Want to rebuild carbs
Wear goggles! ")
Good Fortune!")
[Click on image to improve view.]

Good Fortune!
[Click on image to improve view.]
1973 Z1
KZ900 LTD
Attachments:
Please Log in or Create an account to join the conversation.
- GPZPDX
-
- Offline
- User
Less
More
- Posts: 30
- Thank you received: 0
08 Jun 2010 22:38 #374542
by GPZPDX
1981 GPZ 550
1978 GS 1000 (x3)
1970 450 Mk IIID
Replied by GPZPDX on topic Want to rebuild carbs
1981 GPZ 550
1978 GS 1000 (x3)
1970 450 Mk IIID
Please Log in or Create an account to join the conversation.
- KZ900A4
-
Topic Author
- Offline
- User
Less
More
- Posts: 17
- Thank you received: 0
11 Jun 2010 22:37 #375207
by KZ900A4
76 KZ900A4
Replied by KZ900A4 on topic Want to rebuild carbs
Thanks for the information, hopefully I can get to them next week.
76 KZ900A4
Please Log in or Create an account to join the conversation.
- Old Man Rock
-

- Offline
- User
Less
More
- Posts: 6224
- Thank you received: 225
12 Jun 2010 04:08 #375226
by Old Man Rock
1976 KZ900-A4
MTC 1075cc.
Camshafts: Kawi GPZ-1100 .375 lift
Head: P&P via Larry Cavanaugh
ZX636 suspension
MIKUNI, RS-34'S...
Kerker 4-1, 1.5" comp baffle.
Dyna-S E.I.
Earls 10 row Oil Cooler
Acewell 2802 Series Speedo/Tach
Innovate LC1 Wideband 02 AFR meter
Phoenix, Az
Replied by Old Man Rock on topic Want to rebuild carbs
"I don't know what any of this means."....
This should help you out...")
kzrider.com/index.php?option=com_docman&...d&gid=461&Itemid=108
OMR
This should help you out...
kzrider.com/index.php?option=com_docman&...d&gid=461&Itemid=108
OMR
1976 KZ900-A4
MTC 1075cc.
Camshafts: Kawi GPZ-1100 .375 lift
Head: P&P via Larry Cavanaugh
ZX636 suspension
MIKUNI, RS-34'S...
Kerker 4-1, 1.5" comp baffle.
Dyna-S E.I.
Earls 10 row Oil Cooler
Acewell 2802 Series Speedo/Tach
Innovate LC1 Wideband 02 AFR meter
Phoenix, Az
Please Log in or Create an account to join the conversation.
- KZ900A4
-
Topic Author
- Offline
- User
Less
More
- Posts: 17
- Thank you received: 0
23 Jun 2010 22:04 #377883
by KZ900A4
76 KZ900A4
Replied by KZ900A4 on topic Want to rebuild carbs
Do to the 4 inch overs, the previous owner took off the center-stand, and it didn't come with the bike.
I want to vacuum sync the carbs, and was wondering with the bike on the kick-stand and leaning, does this affect the idle enough to screw up the adjustment?
I want to vacuum sync the carbs, and was wondering with the bike on the kick-stand and leaning, does this affect the idle enough to screw up the adjustment?
76 KZ900A4
Please Log in or Create an account to join the conversation.