
- Posts: 27
- Thank you received: 0
Carb Air Screw and Pilot Screw
- WMKZ900
-
 Topic Author
- Offline
- User
Less
More
24 Apr 2010 05:52 #362786
by WMKZ900
Have and Running
66 Honda S90
71 Honda CB350
71 Kawasaki H1 500
73 Kawasaki H2 750
76 Kawasaki KZ900
06 Kawasaki Concours
Had
65 Honda S65
68 Honda CL 175
71 Honda CB 450
72 Kawasaki H2 750
74 Kawasaki H2 750
Carb Air Screw and Pilot Screw was created by WMKZ900
I purchased my KZ900 in 1995, so I don't know the complete mechanical history. The carbs may not be the original, I don't know for sure. They are 26s, I am sure of that.
The problem is these carbs have both the standard air screws I am familiar with and the pilot screws on the under side of the carbs between the bowl and the intake boot.
My Kawaski Clymer manual gives the carb specs on the models 1973 through 1979. According to the manual, no carbs have both air screws and pilot screws and the starting adjustments if you have both.
Any thoughts are appreciated.
Have and Running
66 Honda S90
71 Honda CB350
71 Kawasaki H1 500
73 Kawasaki H2 750
76 Kawasaki KZ900
06 Kawasaki Concours
Had
65 Honda S65
68 Honda CL 175
71 Honda CB 450
72 Kawasaki H2 750
74 Kawasaki H2 750
Please Log in or Create an account to join the conversation.
- moneypit
-
- Offline
- User
Less
More
- Posts: 390
- Thank you received: 35
24 Apr 2010 10:25 #362825
by moneypit
2-76 kz900
St Paul MN
Replied by moneypit on topic Carb Air Screw and Pilot Screw
Pics would definatly help
2-76 kz900
St Paul MN
Please Log in or Create an account to join the conversation.
- Patton
-

- Offline
- KZr Legend
Less
More
- Posts: 18640
- Thank you received: 2098
24 Apr 2010 11:29 - 24 Apr 2010 11:32 #362840
by Patton
1973 Z1
KZ900 LTD
Replied by Patton on topic Carb Air Screw and Pilot Screw
WMKZ900 wrote:
Stock KZ900 carbs have only side-located pilot air adjustment screws.
Have heard of but am unfamiliar with carbs having both style pilot adjustment screws. But have also heard that tuning their pilot circuits is by closing the mixture screws and using the air screws in the normal manner. Seems logical to me.
Good Fortune!")
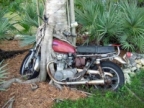
[Click on image to enlarge view.]

I purchased my KZ900 in 1995, so I don't know the complete mechanical history. The carbs may not be the original, I don't know for sure. They are 26s, I am sure of that.
The problem is these carbs have both the standard air screws I am familiar with and the pilot screws on the under side of the carbs between the bowl and the intake boot.
My Kawaski Clymer manual gives the carb specs on the models 1973 through 1979. According to the manual, no carbs have both air screws and pilot screws and the starting adjustments if you have both.
Any thoughts are appreciated.
Stock KZ900 carbs have only side-located pilot air adjustment screws.
Have heard of but am unfamiliar with carbs having both style pilot adjustment screws. But have also heard that tuning their pilot circuits is by closing the mixture screws and using the air screws in the normal manner. Seems logical to me.
Good Fortune!
[Click on image to enlarge view.]
1973 Z1
KZ900 LTD
Attachments:
Last edit: 24 Apr 2010 11:32 by Patton.
Please Log in or Create an account to join the conversation.
- TeK9iNe
-
- Offline
- User
- What did you do!?!
Less
More
- Posts: 2440
- Thank you received: 28
25 Apr 2010 06:41 - 25 Apr 2010 06:44 #363009
by TeK9iNe
Motorcycle Shop Owner/Operator
79 Kawie Z1000 LTD
81 Kawie Z1000 CSR
83 Honda VT750C A
85 Kawie GPZ900 A2
86 Zukie GS1150 EG
93 Yamie XV1100 E
Lucky to have rolled many old bikes through my doors")
Replied by TeK9iNe on topic Carb Air Screw and Pilot Screw
Its the same adjustment as single screws, just more difficult! :blink:
Set them all to 1.5 turns out from lightly seated.
Ride the bike for about 15mins in order to have it come up to proper operating temp.
Point a BIG fan at the engine/headers while you do this, and be careful not to burn yourself.
Run the bike.
The air screws (closest to airbox/pods) should be adjusted first.
It is easiest to use a good vacuum guage or external tachometer (for visual confirmation), but it can be done by ear.
Turn the screw 1/4 turn at a time in, until you see/hear the engine rpm drop. Then turn the screw out 1/4 turn per say 3 seconds, (Count the number of turns!) till the rpm drops again. Then turn the screw back in to the middle/half the number of turns you counted, between the two rpm drop points.
Do this for all the air screws, then do the same for all the mixture screws (closest to engine side of carb), and your done.
Remember to return the bike to proper idle rpm via main idle control after you are satisfied with screw setting, per carb.
Dont let the bike overheat! It will take quite a while, but you should stop and let the bike cool 1 hour if your adjusting for more than 15 minutes. USE BIG FAN, and you can continue to adjust for as long as you like.
Good luck!
")
Set them all to 1.5 turns out from lightly seated.
Ride the bike for about 15mins in order to have it come up to proper operating temp.
Point a BIG fan at the engine/headers while you do this, and be careful not to burn yourself.
Run the bike.
The air screws (closest to airbox/pods) should be adjusted first.
It is easiest to use a good vacuum guage or external tachometer (for visual confirmation), but it can be done by ear.
Turn the screw 1/4 turn at a time in, until you see/hear the engine rpm drop. Then turn the screw out 1/4 turn per say 3 seconds, (Count the number of turns!) till the rpm drops again. Then turn the screw back in to the middle/half the number of turns you counted, between the two rpm drop points.
Do this for all the air screws, then do the same for all the mixture screws (closest to engine side of carb), and your done.
Remember to return the bike to proper idle rpm via main idle control after you are satisfied with screw setting, per carb.
Dont let the bike overheat! It will take quite a while, but you should stop and let the bike cool 1 hour if your adjusting for more than 15 minutes. USE BIG FAN, and you can continue to adjust for as long as you like.
Good luck!
Motorcycle Shop Owner/Operator
79 Kawie Z1000 LTD
81 Kawie Z1000 CSR
83 Honda VT750C A
85 Kawie GPZ900 A2
86 Zukie GS1150 EG
93 Yamie XV1100 E
Lucky to have rolled many old bikes through my doors
Last edit: 25 Apr 2010 06:44 by TeK9iNe.
Please Log in or Create an account to join the conversation.