I wanted to provide some more details about this, in hopes of expanding the conversation about it, and maybe drumming up some interest. As I've said above, I'm really not making any money on this, it's just something I want to do, and I'd like it to be affordable. Perhaps if everything is successful I might consider another batch down the line as well.
Fitment/Compatibility
While I am primarily focused on making sure it fits the Zephyr 550 model, I believe there are other bikes these custom triples will fit. It is my understanding that the other Zephyr models, 750 and 1100cc models, all use the same steering stem, and should therefore be compatible. Additionally the ZRX1100/1200 models are also supposed to use the same stem. Clearly those are all bigger bikes that you might not want to use forks from a 600cc model on. However the triples will fit basically any fork with a 50mm top, and 52mm lower diameter. Granted this isn't the most common size, but I believe there are other forks out there that match that spec, including those from the first gen Z1000 (
at least according to some
).
It should also be possible to extrapolate additional compatible models using
the AllBalls fork swap finder
. For example I just ran a quick search for the 1980 KZ650F1, and found that they have bearings to fit the ZR550 Zephyr front end, which leads me to believe that with a Zeph stem, and the triples I'm designing, you could fit ZX6R forks to that bike. Granted I'm sure all of this is easier said than done. But I feel confident that my research is sound, and with a little patience and elbow grease these things are possible.
Stem
Since I already brought it up, it's worth discussing the stem. My design reuses the stock Zephyr 550 stem, which must be separated from the stock lower triple. Because it is welded in, you must grind off the welds, and then press out the stem. Early in the project I had a friend do this for me. I had removed, and subsequently ruined the lower bearing to do this. However now that I am more intimately familiar with these parts, I believe it is possible and actually preferable to not remove the lower bearing. After grinding or filing off the welds, you would press the stem out from the bottom up (likely upside down in reality). The part of the stem left below the bearing is about 23mm, and this length bottoms out in the lower triple of my design, when pressed in.
I have waffled back and forth about whether to make the press-fit part a true perfect tight fit, where a hydraulic press would likely be necessary, or making it 0.1mm oversize in the triple, which allows for a "slide-in with no wiggle room" fit. While looking for a good method to secure the stem to the lower triple, I found that a bicycle stem "star nut" could be installed in the stem, and using a bicycle top cap, the stem is bolted to the lower triple. Any decent bicycle shop should be able to install one of these nuts, though it should be noted that it requires the less common 1" size and not the very common 1-1/8" size. Currently this is how my design works, but I am open to making the adjustment for a regular press-fit if that's what potential buyers prefer.
Headlight and Gauges Brackets
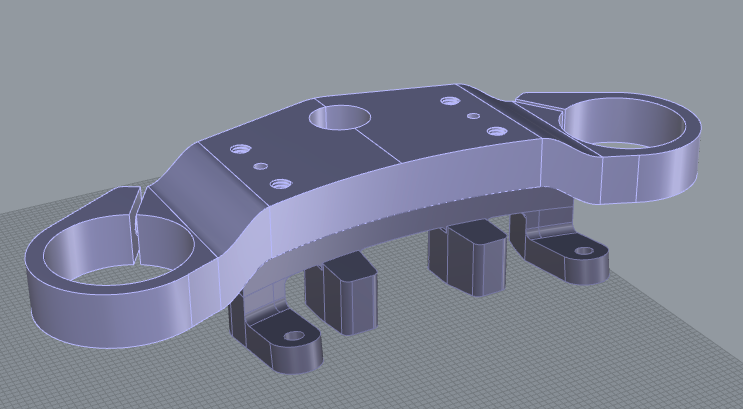
This is going to be a long section, so buckle up. Because I am trying to retain so many stock components I have designed in all of the mounting points so that virtually everything can be used. I have two concepts I am experimenting with for this. The lower triple stays the same for both concepts, but the upper triple varies. In the first concept the upper triple is one solid piece. In the second concept, it consists of two pieces, the actual clamp which could be considered "universal" and a second piece which is bolted or glued to the first piece and holds the mounts for the gauges, ignition column, and headlight bracket.
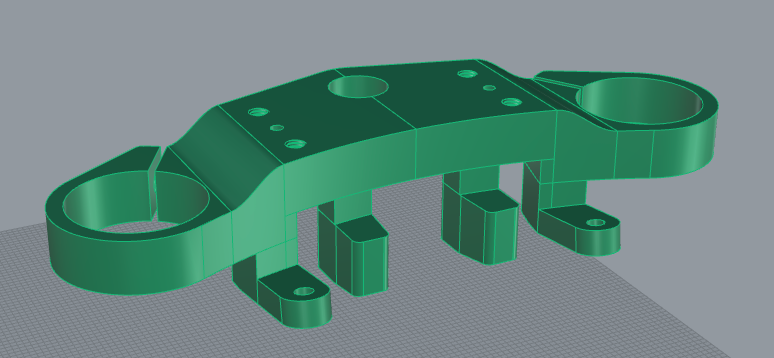

These photos represent concept 1 (green). As you can see, it is similar in many respects to the stock upper triple, it's basically "plug and play." Obviously that is the major advantage of this concept, however the downside is increased manufacturing costs. I do not have exact figures on that yet, but again this thread is about gauging interest. If enough people want to go in on this together, maybe we can afford to go "plug and play" all the way.
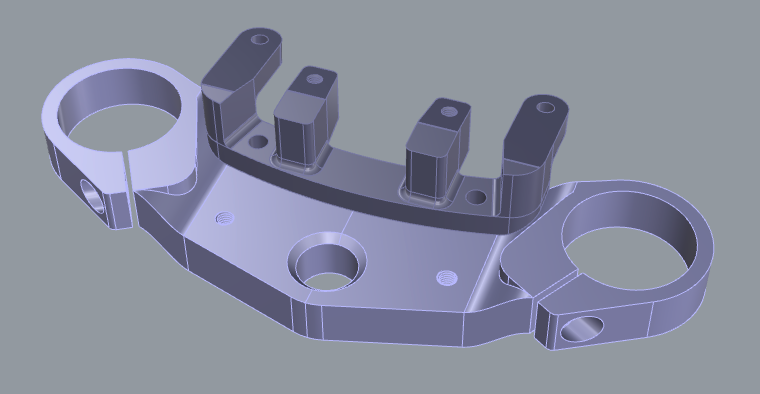
These photos represent concept 2 (purple). The main actual triple clamp is a lighter shade of purple than the attachment piece. It is intended to be made with a CNC machined primary clamp, and 3D printed, or fiberglass/carbon fiber molded attachment. They could be joined together by either running a longer bolt through the handlebar clamps and affixing a nylock nut to the underside, or using a high strength adhesive. The first advantage of this concept is that with a "universal" top clamp, you wouldn't be locked in to only using the stock gauges and brackets. Custom 3D-printed attachments could be designed for mounting virtually anything, or the clamp could be used with nothing else attached at all, for a very clean look. Clamp a Quad Lock to your handlebars, use your phone as a speedo, and really go full minimalist. The other advantage to this design is that the cost to make the main clamp should be lessened. The attachment piece would be an additional cost, but 3D printing can be pretty cheap these days. And finally, the downside to this concept is that attaching the two pieces together by any means is not quite as nice and convenient as the "plug and play" ability of the first concept. I personally would prefer the first concept for my bikes, but I'm just trying to find ways of making this affordable for everyone.
One thing you'll notice about both concepts is a 10mm drop at the clamp. I wanted to make sure that the fork top caps do not touch the handlebars. As a bonus, this helps correct the steering geometry for a closer to stock feel, however extending the forks an additional 20mm is recommended for a full steering correction. You can see how to do that elsewhere on this forum.
Lastly, I want to mention that the lower triple has a single mounting point for the Zephyr headlight bracket, but does not have a place to mount the stock brake hose splitter. Because the whole conversion requires the use of alternative brake calipers, you'll be running all new brake lines anyway, which means you won't need it. The headlight also needs a bracket fabricated for the angle adjustment. This is one detail I am still working out, but my guess is that if you are mechanically inclined enough to take on a conversion like this anyway, you will probably be able to figure that one out. I'll be sure to post about what I end up doing.
Wheel/Rotors/Speedometer Drive
For me, I'm trying to use my stock wheel, rotors, and retain the speedo drive, so there are a number of things to consider there. I have axle spacers, disc spacers, GSXR rotor bolts, and I still don't honestly have any idea how I'm gonna actually keep the speedo drive from trying to rotate on it's own. But those are all my problems to deal with and I won't bore you with the details, just say that if you want to discuss it we can. Why? Because you are probably smarter than me, and you will probably just use a ZX6R front wheel and axle and rotors and the stock brake calipers and everything will just fit. Swap in the rear wheel from the ZX6R as well, mount that wider rubber, and have yourself a little track day fun or something.
TL;DR
Just some info, man.


