
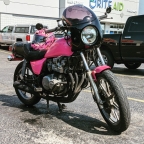
KZ305 Rebuild...attempt
- 82KZ305Belt
-
 Topic Author
- Offline
- User
-

Registered
- Posts: 639
- Thanks: 94
KZ305 Rebuild...attempt
22 Apr 2021 20:37
I'm gonna go ahead and give this a whirl, despite being unqualified for the job I'm also unable to pay someone so...I'm it! I know my head gasket is shot and who knows what else I'll find. My goal is to keep the cost under $305 for this 305 and keep a sharp eye out for a cheap 440 in case things go astray. I've already spent $65 on the gasket set so the magic number is now 240.
Assume I don't know what I'm doing, because for the most part I don't. I'll be violating a rule that has kept me out of serious trouble for decades of driving/riding...."never go past the valve covers". Well, I'm going in. If nothing else I'll learn how to take one apart.
So, tell me up front what stupid mistakes I could make that I should avoid. And is there anything I should do before I start, like compression tests? I don't have a functional battery at the moment but I have a car and a jump starter.
81 KZ650 CSR
77 KZ650B (not in my paws yet)
82 KZ305 CSR
77 KZ650B (not in my paws yet)
82 KZ305 CSR
Please Log in or Create an account to join the conversation.
- hardrockminer
-

- Offline
- Sustaining Member
-

Registered
- Posts: 3131
- Thanks: 1235
Re: KZ305 Rebuild...attempt
23 Apr 2021 04:56
That's the spirit!
Here are some essentials you will need to do things correctly. A large plastic tub, a manual, a box of baggies, a jiffy marker and a camera.
Take many photos as you dismantle things so that when you start reassembly you will have something to refer to. Clean the parts as you proceed. Put parts in the bags and mark them. (ie: head nuts, etc) Put the sealed bags in the plastic tub so that you will not lose anything.
The manual should have a section on engine disassembly. Be sure to follow it while removing stuff. There is a sequence that needs to be followed. Don't start on the head until the other components are removed, like carbs, etc.
I have several restored bikes along with a 2006 Goldwing with a sidecar.
The following user(s) said Thank You: 82KZ305Belt
Please Log in or Create an account to join the conversation.
- ghostdive
-
- Offline
- User
-
Registered
- Posts: 391
- Thanks: 120
Re: KZ305 Rebuild...attempt
23 Apr 2021 05:24
If you don't have two torque wrenches (one in in/lbs, one in ft/lbs) I'd pick those up, they're important for reassembly. I've had good luck with Tekton.
Lots of fresh razor blades for scraping the gasket surface - some also like to use red Scotch-Brite, which works well after scraping, just make sure any holes in the engine are well-plugged first to prevent any abrasives falling in.
There's debate over whether copper head gasket spray (Permatex #80697) is needed, but I feel it's worth the added security.
Take a picture with every step, and if something you remove has multiple bolts of different lengths, draw a diagram marking which goes where.
Good luck
1982 KZ750 Spectre - 6 speed swap, BS34s, 18" rear wheel
2001 ZX-6R
2001 ZX-6R
The following user(s) said Thank You: 82KZ305Belt
Please Log in or Create an account to join the conversation.
- 82KZ305Belt
-
Topic Author
- Offline
- User
-
Registered
- Posts: 639
- Thanks: 94
Re: KZ305 Rebuild...attempt
23 Apr 2021 05:25 - 23 Apr 2021 05:36
yep I discovered that I had the instructions all along in my service manual. Hadn't looked in there for a couple years because the bike hasn't run in a couple years.
Thanks for the tips. I will certainly try to be more careful, clean and organized than I am generally known to be.

I pulled the plugs and did a cold compression test with the throttle wide open. 70 psi on the right, 62 on the left. Yea, we got some problems. I guess I should try it with a little oil in the cylinder too, to cover the bases and because I've never done such a test. I hope a leakdown isn't necessary since I'm tearing it down anyway, and that would eat a big hole in my $240
I do have a couple torque wrenches but I'm gonna have to test the small one that helped me shear off one or two of my rocker arm cover bolts.
Thanks for the tips. I will certainly try to be more careful, clean and organized than I am generally known to be.
I pulled the plugs and did a cold compression test with the throttle wide open. 70 psi on the right, 62 on the left. Yea, we got some problems. I guess I should try it with a little oil in the cylinder too, to cover the bases and because I've never done such a test. I hope a leakdown isn't necessary since I'm tearing it down anyway, and that would eat a big hole in my $240
I do have a couple torque wrenches but I'm gonna have to test the small one that helped me shear off one or two of my rocker arm cover bolts.
81 KZ650 CSR
77 KZ650B (not in my paws yet)
82 KZ305 CSR
77 KZ650B (not in my paws yet)
82 KZ305 CSR
Last edit: 23 Apr 2021 05:36 by 82KZ305Belt.
Please Log in or Create an account to join the conversation.
- TexasKZ
-

- Offline
- Platinum Member
-
Registered
- Posts: 8215
- Thanks: 2689
Re: KZ305 Rebuild...attempt
23 Apr 2021 05:40 - 23 Apr 2021 05:41
Also, you will need the proper screwdrivers. All those cross-head screws you see are NOT Phillips head screws, they are JIS. The main difference is that a JIS screwdriver does not come to a sharp point. That point prevents a Phillips driver from fully seating in JIS screws, resulting in a lot of really buggered up screw heads. If you would rather not buy the correct ones, you can grind down the points on a couple of Phillips drivers until they fit the screws snugly.
A hand impact driver will save much frustration if used cautiously.
You will also need a great deal of patience. When you encounter a stuck fastener, step back and take a deep breath or three, then douse the fastener in some Kroil or Liquid Wrench, repeating the application every few hours for a day or more. Allow the penetrant to do its job before wailing away on some fragile bolt with a sledge hammer. Broken fasteners and broken cases add greatly to the frustration and cost of such a project.
Ask many questions. As a group, the members here have made every imaginable mistake. We can help you avoid them and can help you recover when you make one anyway. We all have that t-shirt.
1982 KZ1000 LTD parts donor
1981 KZ1000 LTD awaiting resurrection
2000 ZRX1100 not ridden enough
www.kzrider.com/11-projects/620336-anoth...uild-thread?start=24
1981 KZ1000 LTD awaiting resurrection
2000 ZRX1100 not ridden enough
www.kzrider.com/11-projects/620336-anoth...uild-thread?start=24
Last edit: 23 Apr 2021 05:41 by TexasKZ.
The following user(s) said Thank You: 82KZ305Belt
Please Log in or Create an account to join the conversation.
- martin_csr
-

- Offline
- User
-
Registered
- Posts: 7994
- Thanks: 1646
Re: KZ305 Rebuild...attempt
23 Apr 2021 06:48 - 23 Apr 2021 06:57
In case you don't have it. There's a 79-82 Z250/KZ305 FSM pdf floating around the internet
that covers your motorcycle. Green Cover w 305-CSR Belt on the front.
Don't throw away anything as the old parts can be handy for future reference. for various reasons.
Kawasaki.com & Partzilla (et al) have diagrams. Partzilla is the easiest to use. EB photos can be handy, especially NOS parts.
that covers your motorcycle. Green Cover w 305-CSR Belt on the front.
Don't throw away anything as the old parts can be handy for future reference. for various reasons.
Kawasaki.com & Partzilla (et al) have diagrams. Partzilla is the easiest to use. EB photos can be handy, especially NOS parts.
Last edit: 23 Apr 2021 06:57 by martin_csr.
The following user(s) said Thank You: 82KZ305Belt
Please Log in or Create an account to join the conversation.
- 82KZ305Belt
-
Topic Author
- Offline
- User
-
Registered
- Posts: 639
- Thanks: 94
Re: KZ305 Rebuild...attempt
23 Apr 2021 07:48
Yea former Kztwins forum mod and dormant member here @Biquetoast reminded me the procedure is in the manual, which is what made me decide to attempt this folly. I won't lie, I'm hoping that a cheap 440 comes along before I get too far into this but until then, onward and downward toward the base gasket we go!
I have one bit, (I think a Master Tool IIRC, don't quote me)) that works on some JIS heads but I will poke around for other sizes. I think I have the original kit that came with the bike and that should have another JIS, methinks.
I spooned a little oil into each cylinder and compression jumped about 10-12 pounds each side. Does that indicate bad rings, or could that indicate more than one possibility?
81 KZ650 CSR
77 KZ650B (not in my paws yet)
82 KZ305 CSR
77 KZ650B (not in my paws yet)
82 KZ305 CSR
Please Log in or Create an account to join the conversation.
- TexasKZ
-
- Offline
- Platinum Member
-
Registered
- Posts: 8215
- Thanks: 2689
Re: KZ305 Rebuild...attempt
23 Apr 2021 08:11Or it could be telling you that a spoonful of oil takes up enough space in the combustion chamber to raise the reading a few pounds. A leak down test is far more reliable, or when you get it apart, you can have a machinist measure the bores and pistons and know for sure if they are ok.
I spooned a little oil into each cylinder and compression jumped about 10-12 pounds each side. Does that indicate bad rings, or could that indicate more than one possibility?
1982 KZ1000 LTD parts donor
1981 KZ1000 LTD awaiting resurrection
2000 ZRX1100 not ridden enough
www.kzrider.com/11-projects/620336-anoth...uild-thread?start=24
1981 KZ1000 LTD awaiting resurrection
2000 ZRX1100 not ridden enough
www.kzrider.com/11-projects/620336-anoth...uild-thread?start=24
Please Log in or Create an account to join the conversation.
- 82KZ305Belt
-
Topic Author
- Offline
- User
-
Registered
- Posts: 639
- Thanks: 94
Re: KZ305 Rebuild...attempt
23 Apr 2021 20:05
got the head cover bolts and the camshaft end bolt soaking overnight. The latter looks like its itching to be stripped, and judging from the number of threads here on that topic it must be. Well its not going to sucker me into that trap. I hope.
81 KZ650 CSR
77 KZ650B (not in my paws yet)
82 KZ305 CSR
77 KZ650B (not in my paws yet)
82 KZ305 CSR
Please Log in or Create an account to join the conversation.
- 82KZ305Belt
-
Topic Author
- Offline
- User
-
Registered
- Posts: 639
- Thanks: 94
Re: KZ305 Rebuild...attempt
24 Apr 2021 13:14 - 24 Apr 2021 14:02
Got the head cover off and didn't even break anything, although I was not without worry on the last 2. Entering uncharted waters (deeeeep breath).
Manual says I need special tools for removing the camshaft oil seal, block, pistons and rings, and valves and guides. Do I?
Edit: hahaha. special tools required to remove oil seal = 2 fingers. You could probably do it with 1 if that's all you have.
Manual says I need special tools for removing the camshaft oil seal, block, pistons and rings, and valves and guides. Do I?
Edit: hahaha. special tools required to remove oil seal = 2 fingers. You could probably do it with 1 if that's all you have.
81 KZ650 CSR
77 KZ650B (not in my paws yet)
82 KZ305 CSR
77 KZ650B (not in my paws yet)
82 KZ305 CSR
Last edit: 24 Apr 2021 14:02 by 82KZ305Belt.
Please Log in or Create an account to join the conversation.
- ghostdive
-
- Offline
- User
-
Registered
- Posts: 391
- Thanks: 120
Re: KZ305 Rebuild...attempt
24 Apr 2021 15:55
Block and pistons should come off with some tugging - there may be a spot to pry it up, there is on 4cyls. Valves and springs can be removed/installed with a socket but it's much easier with an actual compressor. Guides are above my pay grade, someone else may have some advice.
As for reassembly, I'd suggest getting a piston ring compressor to help get the cylinders back on.
As for reassembly, I'd suggest getting a piston ring compressor to help get the cylinders back on.
1982 KZ750 Spectre - 6 speed swap, BS34s, 18" rear wheel
2001 ZX-6R
2001 ZX-6R
The following user(s) said Thank You: 82KZ305Belt
Please Log in or Create an account to join the conversation.
- hardrockminer
-
- Offline
- Sustaining Member
-
Registered
- Posts: 3131
- Thanks: 1235
Re: KZ305 Rebuild...attempt
24 Apr 2021 16:31
When you get the cylinders off you will need a bore gauge to measure the inside diameter to ensure they are still in spec. I suggest you look for a good machinist who can also remove your valves and clean up the head and cylinders. If you have an airport nearby there may be a mechanic who does work on the side.
I have several restored bikes along with a 2006 Goldwing with a sidecar.
The following user(s) said Thank You: 82KZ305Belt
Please Log in or Create an account to join the conversation.
Moderators: Street Fighter LTD