
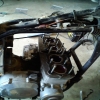
PO is a jerk...camshaft bolt holes stripped...
- larrycavan
-

- User
-

Public
- Thanks: 0
Re: PO is a jerk...camshaft bolt holes stripped...
03 Sep 2010 06:05 - 03 Sep 2010 07:12
Were the 2 stripped holes on #3 cam cap?
The OEM manual lays out a procedure for cam cap installation that pretty much assures you'll over stress the bolt holes on #3 cap. Theres a much better way to install the caps.
The two caps on the left side of the motor have the thrust control faces. Those must locate the cam laterally.
*** use a short 1/4" in drive ratchet and 10mm short socket.
*** Spin a bolt down in every hole first to see if it's gritty. If it is, use brake cleaner with the nozzle on the can to spray out the holes, then blow them out with air. Hold a rag over the hole when you do because it will be messy.
*** when you can, use just the socket to spin the bolts down with your fingers [no ratchet until it's needed]
***ALL the bolts and dowels need to be lubed.
***The tapered end of dowel should point up toward the cap.
***The dowels should be in the head, not the cap.
***If a bolt doesn't fell right, go back and forth with it .
Get #1 cap on first and evenly tighten the bolts to where the cap is over the top of the dowels.
A soon as you can get #2 cap bolts to start down, start them. Keep the cap as even as possible as you tighten the bolts down.
Working the exhaust cam left to right and doing the exhaust cam first buys you 2 things.
a] it keeps the chain taught on the front side of the motor.
b] your pulling the cam down in way that doesn't over tax any bolts.
INTAKE CAM
Put #3 cap on and start two bolts just enough so you know the cam thrust flange is aligned with the cap. That locates the cam where it belongs.
Then simply reverse the procedure for the exhaust cam. Work the intake caps down right to left. Again, that draws the cam down without over stressing any bolts")
Lightly snug all the bolts without a torque wrench. Then it's ok to use an accurate inch pounds wrench and pull them to 7 or 8 ft.lbs.
It's your responsibility to have an accurate torque wrench.
On high lift cams, I'll often push on the end of the cam that's opening a valve with my palm to take the stress off the bolts until the cap down to where the bolts are at least 1/3 of the way home.
Larry C
The OEM manual lays out a procedure for cam cap installation that pretty much assures you'll over stress the bolt holes on #3 cap. Theres a much better way to install the caps.
The two caps on the left side of the motor have the thrust control faces. Those must locate the cam laterally.
*** use a short 1/4" in drive ratchet and 10mm short socket.
*** Spin a bolt down in every hole first to see if it's gritty. If it is, use brake cleaner with the nozzle on the can to spray out the holes, then blow them out with air. Hold a rag over the hole when you do because it will be messy.
*** when you can, use just the socket to spin the bolts down with your fingers [no ratchet until it's needed]
***ALL the bolts and dowels need to be lubed.
***The tapered end of dowel should point up toward the cap.
***The dowels should be in the head, not the cap.
***If a bolt doesn't fell right, go back and forth with it .
Get #1 cap on first and evenly tighten the bolts to where the cap is over the top of the dowels.
A soon as you can get #2 cap bolts to start down, start them. Keep the cap as even as possible as you tighten the bolts down.
Working the exhaust cam left to right and doing the exhaust cam first buys you 2 things.
a] it keeps the chain taught on the front side of the motor.
b] your pulling the cam down in way that doesn't over tax any bolts.
INTAKE CAM
Put #3 cap on and start two bolts just enough so you know the cam thrust flange is aligned with the cap. That locates the cam where it belongs.
Then simply reverse the procedure for the exhaust cam. Work the intake caps down right to left. Again, that draws the cam down without over stressing any bolts
Lightly snug all the bolts without a torque wrench. Then it's ok to use an accurate inch pounds wrench and pull them to 7 or 8 ft.lbs.
It's your responsibility to have an accurate torque wrench.
On high lift cams, I'll often push on the end of the cam that's opening a valve with my palm to take the stress off the bolts until the cap down to where the bolts are at least 1/3 of the way home.
Larry C
Last edit: 03 Sep 2010 07:12 by larrycavan.
Please Log in or Create an account to join the conversation.
- RsvBruno
-
 Topic Author
- Offline
- User
-
Registered
- Posts: 20
- Thanks: 0
Re: PO is a jerk...camshaft bolt holes stripped...
03 Sep 2010 07:11
Hey guys, thanks for all of your input. I talked to a few guys around here as well. I decided to re-tap the threads to see what would happen. I went a little further down and bought some screws that were a little longer. Their heads are a tad thinner in size and they fit perfectly in there with the correct amount of torque on them! I still bought a helicoil because this crap is bound to happen on more than one of my machines throughout life. Especially those 6's...thats gotta be the most common bolt on old Japanese bikes! Anyways, after all the fun that came with getting a stuck motor and this and a myriad of other things: SHE RUNS AWESOMELY!!!!!! :woohoo: :silly: :lol: 
 :laugh:
 ")
")
:laugh:
1981 KZ1000K
1977 KZ650C1
1976 KZ750B
1980 KZ440LTD
1977 KZ650C1
1976 KZ750B
1980 KZ440LTD
Please Log in or Create an account to join the conversation.
- Rickman
-

- Offline
- User
-
Registered
- Posts: 180
- Thanks: 1
Re: PO is a jerk...camshaft bolt holes stripped...
03 Sep 2010 08:24
Here is the best new thing I've learned all day. I too can feel better about stripping cam cap bolt holes. I'd marked it up to unclean holes (don't worry, it's not contagious) but I never suspected my trusty FSM! KZRider needs a wiki to save important things, like FSM errata and most of what Larry says! :laugh: Larry you are a KZgod genius, thank you!
Bruno, glad to hear SHE RUNS, thanks for posting!
Bruno, glad to hear SHE RUNS, thanks for posting!
1983 KZ1100-L1 "LTD Shaft"
Wiseco 10.5:1 1171 piston kit, bored by APE
Dyna 2000, Dyna S, Dyna grey coils, WG coil power mod, CB900 starter
Wiseco 10.5:1 1171 piston kit, bored by APE
Dyna 2000, Dyna S, Dyna grey coils, WG coil power mod, CB900 starter
Please Log in or Create an account to join the conversation.
- DFIGPZ
-
- Offline
- User
-
Registered
- Posts: 618
- Thanks: 121
Re: PO is a jerk...camshaft bolt holes stripped...
03 Sep 2010 09:32
larrycavan wrote:
Larry i do the exact way you described i have done hundreds W/O issue i T/Q my cam caps to 90in lbs and never had a problem ,but i have sure fixed plenty that my customers have stripped. I always use a helicoil to repair and have not had a problem.Were the 2 stripped holes on #3 cam cap?
The OEM manual lays out a procedure for cam cap installation that pretty much assures you'll over stress the bolt holes on #3 cap. Theres a much better way to install the caps.
The two caps on the left side of the motor have the thrust control faces. Those must locate the cam laterally.
*** use a short 1/4" in drive ratchet and 10mm short socket.
*** Spin a bolt down in every hole first to see if it's gritty. If it is, use brake cleaner with the nozzle on the can to spray out the holes, then blow them out with air. Hold a rag over the hole when you do because it will be messy.
*** when you can, use just the socket to spin the bolts down with your fingers [no ratchet until it's needed]
***ALL the bolts and dowels need to be lubed.
***The tapered end of dowel should point up toward the cap.
***The dowels should be in the head, not the cap.
***If a bolt doesn't fell right, go back and forth with it .
Get #1 cap on first and evenly tighten the bolts to where the cap is over the top of the dowels.
A soon as you can get #2 cap bolts to start down, start them. Keep the cap as even as possible as you tighten the bolts down.
Working the exhaust cam left to right and doing the exhaust cam first buys you 2 things.
a] it keeps the chain taught on the front side of the motor.
b] your pulling the cam down in way that doesn't over tax any bolts.
INTAKE CAM
Put #3 cap on and start two bolts just enough so you know the cam thrust flange is aligned with the cap. That locates the cam where it belongs.
Then simply reverse the procedure for the exhaust cam. Work the intake caps down right to left. Again, that draws the cam down without over stressing any bolts
Lightly snug all the bolts without a torque wrench. Then it's ok to use an accurate inch pounds wrench and pull them to 7 or 8 ft.lbs.
It's your responsibility to have an accurate torque wrench.
On high lift cams, I'll often push on the end of the cam that's opening a valve with my palm to take the stress off the bolts until the cap down to where the bolts are at least 1/3 of the way home.
Larry C
1984 750 Turbo
Please Log in or Create an account to join the conversation.
- bountyhunter
-

- Offline
- User
-
Registered
- Posts: 7245
- Thanks: 338
Re: PO is a jerk...camshaft bolt holes stripped...
03 Sep 2010 11:44
sparkn wrote:
Actually, spec on mine is about 110 inch-pounds which is ballpark of 9 ft-lbs. Never saw an inch-ounce spec before. Problem is you don't want to use a 100 ft-lb (full scale ) wrench to do a 9 ft-lb torque as it won't be accurate. I have a 200 I-P full scale wrench which is perfect for cam cap bolts.1 ounce in = 0.00520833333 pounds foot, so:
Yes, you are correct. But, a lb. ft torque wrench would not be accurate enough to use. This also means that 12 ft lbs. is almost 24 times as much torque as is necessary.
1979 KZ-750 Twin
Please Log in or Create an account to join the conversation.
- otakar
-

- Offline
- User
-
Registered
- Posts: 5073
- Thanks: 29
Re: PO is a jerk...camshaft bolt holes stripped...
03 Sep 2010 16:29
That is my mistake. I did mean to write lb/in and NOT oz/in. The older KZ900 and KZ1000 were at 104 Lb/in. That would make it 8.7 Lb/ft and not 12 Lb/ft
74 Z1-A stock
76 KZ-900 Totaly stock vice MAC pipe
77 KZ-1000A stock
78 Z1-R 100%MINT 500 original Mi.
78 Z1-R Yoshi 1103 kit stage 1 cams Yoshi pipe. Etc
79 KZ-1300 (1400)
80 KZ-1300
81 Scratch built GPz1150R
82 KZ1000
76 KZ-900 Totaly stock vice MAC pipe
77 KZ-1000A stock
78 Z1-R 100%MINT 500 original Mi.
78 Z1-R Yoshi 1103 kit stage 1 cams Yoshi pipe. Etc
79 KZ-1300 (1400)
80 KZ-1300
81 Scratch built GPz1150R
82 KZ1000
Please Log in or Create an account to join the conversation.
- sparkn
-
- Offline
- User
-
Registered
- Posts: 93
- Thanks: 0
Re: PO is a jerk...camshaft bolt holes stripped...
04 Sep 2010 06:09 - 04 Sep 2010 06:10
bountyhunter wrote:
Click
I actually have oz/in specs for some of the work I do, but rarely ever resort to a torque wrench for it. Terms like "snug" and "not too tight" easily replace engineering data.
But since Otakar made an Oopsie (I swear a guy at work used "Oospie" when he blew a circuit powering up a server in our data center), the point is moot.
Good point on the range. That's the point I was trying to make.
Never saw an inch-ounce spec before.
Click
I actually have oz/in specs for some of the work I do, but rarely ever resort to a torque wrench for it. Terms like "snug" and "not too tight" easily replace engineering data.
But since Otakar made an Oopsie (I swear a guy at work used "Oospie" when he blew a circuit powering up a server in our data center), the point is moot.
Good point on the range. That's the point I was trying to make.
1979 KZ650 SR
Last edit: 04 Sep 2010 06:10 by sparkn.
Please Log in or Create an account to join the conversation.
- Polar_Bus
-
- Offline
- User
-
Registered
- Posts: 256
- Thanks: 7
Re: PO is a jerk...camshaft bolt holes stripped...
05 Sep 2010 07:29
I'm guilty as well. stripped out 2 cap bolts just trying to establish valve clearences. You gotta' R&R the cams like 10 times to get the lash correct. I do machining by trade, so ALL my M6 holes are now helicoiled !
Bikes:
'84 GPz1100
'06 HD Fatboy
'84 GPz1100
'06 HD Fatboy
Please Log in or Create an account to join the conversation.
Moderators: Street Fighter LTD