
Need help with KZ1000 police special clutch issue.
- Patton
-

- Offline
- KZr Legend
-

Registered
- Posts: 18568
- Thanks: 2104
Re: Need help with KZ1000 police special clutch iss
15 Dec 2008 06:04
PLUMMEN wrote:
There will be no such Clymering around here!

... i have a stack of them i use to boost myself when i need to Clymer to the top shelve to find a shop manual....
There will be no such Clymering around here!
1973 Z1
KZ900 LTD
KZ900 LTD
Attachments:
Please Log in or Create an account to join the conversation.
- wiredgeorge
-

- Offline
- User
-

Registered
- Posts: 5309
- Thanks: 45
Re: Need help with KZ1000 police special clutch iss
15 Dec 2008 06:30
First, start with about 1/8" gap between the clutch perch and the round adjuster up at the top. Make sure the clutch cable is seated proper in the cover with the spring in place. Then take out the slack in the cable by using the two mid-cable lock nut adjusters. Last, loosen the M12 locknut and turn the screw that adjusts the clutch that is on the left cover. The directions in the Clymer almost never provide an adjusted clutch. Get the bike rolling and take a flat bladed screwdriver and go for a short ride and adjust the screw till the clutch is tensioned properly then tighten the M12 locknut.
wiredgeorge Motorcycle Carburetors
Mico TX
www.wgcarbs.com
Too many bikes to list!
Mico TX
www.wgcarbs.com
Too many bikes to list!
Please Log in or Create an account to join the conversation.
- fweep
-

- Offline
- User
-
Registered
- 2001 ZRX1200R, 1991 KZ1000P, 1984 V45 Honda magna
- Posts: 17
- Thanks: 0
Re: Need help with KZ1000 police special clutch iss
15 Dec 2008 14:01 - 15 Dec 2008 14:01
This was discussed on the KZ1000p Yahoo group.
The Kaw manual is wrong......
Clymer is correct: Counter Clock Wise is correct.
From: kz1000p@yahoogroups.com [mailto:kz1000p@yahoogroups.com] On Behalf Of Earl
Sent: Tuesday, July 15, 2008 7:09 PM
To: kz1000p@yahoogroups.com
Subject: [kz1000p] HELP! - clutch adjustment
Importance: High
My clutch started to slip a little tonight so I thought I would adjust it. The Kawaskai manual and the Clymer disagree on which way to turn the adjustment screw—Kawasaki says to turn it clockwise until it becomes hard to turn and then back off ¼ turn…..
Clymer says to turn it counterclockwise until it becomes hard to turn and then back off ¼ turn – which is correct?
Both say to turn the adjustment in at the clutch release lever and in the center of the cable – afterwards they do not say what to do????
.................................................
RE: [kz1000p] HELP! - clutch adjustment
Counter Clock Wise is correct.
Robert (Rob) Ricker
Current Favorite Quote:
"A verbal agreement is as good as the paper it's written on."
Check out:
autos.groups.yahoo.com/group/kz1000p/
It's a good group. I have a 92 KZP.
They have some docs on clutch replacement/adjustment there too.
Bill
Last edit: 15 Dec 2008 14:01 by fweep.
Please Log in or Create an account to join the conversation.
- hodjoel
-
- Offline
- User
-
Registered
- Posts: 2
- Thanks: 0
Re: Need help with KZ1000 police special clutch iss
23 Apr 2012 23:37
I'm having the same issue my clutch cable broke and I'm trying to install a new one, I have followed the manual and read several forums for help but can't figure out what I'm doing wrong. When pulling the clutch there is no tension.
Thanks in advance for any help.
Thanks in advance for any help.
2000 KZ1000p
Please Log in or Create an account to join the conversation.
- MFolks
-

- Offline
- User
-
Registered
- Posts: 6650
- Thanks: 541
Re: Need help with KZ1000 police special clutch issue.
24 Apr 2012 00:17
Clutch Cable Replacement On Some Kawasaki Motorcycles
With Proper Mechanism Adjustments
1.About mid way down the clutch cable is an adjuster; shorten the cable as much as possible.
2.Remove the small cover on the left side of the sprocket cover and loosen up the lock nut on the clutch throw out mechanism.
3.Remove the shifter lever; the sprocket cover, and lay the cover on some rags or news papers.
4.Have on hand a small cotter pin that will be needed to prevent the new clutch cable from coming out of the throw out mechanism.
5.At the left handlebar turn in the slack adjusters for the clutch cable and then take out the pivot bolt.
6.New clutch cables may or may not have lubrication; now's the time to either hang the new cable up overnight so heavy oil can flow through it or buy a cable luber kit with the special clamp and can of spray lube.
7.Attach the cable to the cover's throw out mechanism and secure it with a new cotter pin.
8. While you're in there, check the wiring from the alternator(YELLOW WIRES, or any wires from the alternator), remove the excess chain lube from the clutch push rod and check the wire routing that goes above the engine sprocket.
9. Check the lock washer for cracks on the engine sprocket and any "Hooking" of the sprocket teeth.
10 Route the clutch cable the same way the old one was and connect the cable to the clutch lever; and the pivot bolt gets re-installed.
11.Carefully install the sprocket cover, making sure the push rod is engaged (in the adjustment mechanism)and then tighten up the cover.
12.Adjusting the clutch play and cable tension is real easy; using a flat bladed screwdriver, turn the slotted screw clockwise(to the right) until it becomes hard to turn; then turn it counterclockwise(to the left) 1/4 turn and tighten the lock nut. On some Kawasaki’s, the adjustment will turn the opposite way, so keep this in mind.
13.The mid way cable adjuster and lever slack adjuster may need to be adjusted for correct cable slack.
14.My factory shop manual lists 2-3mm as the correct play in the lever after the cable has been properly tensioned.
15.Re-install the covers, and shifter lever, start the engine to check the shifting action.
16.These engines have a shifting lock out to prevent moving in any gear higher than second unless the engine is running and proper shifting is done.
1982 GPZ1100 B2
General Dynamics/Convair 1983-1993
GLCM BGM-109 Tomahawk, AGM-129A Advanced Cruise Missile (ACM)
General Dynamics/Convair 1983-1993
GLCM BGM-109 Tomahawk, AGM-129A Advanced Cruise Missile (ACM)
Please Log in or Create an account to join the conversation.
- Patton
-
- Offline
- KZr Legend
-
Registered
- Posts: 18568
- Thanks: 2104
Re: Need help with KZ1000 police special clutch iss
24 Apr 2012 00:25
Routine clutch push rod adjustment.
Assure having some "slop" in the clutch cable, using adjustments at the handlebar lever perch and at mid-cable along left frame down tube near the exhaust header.
Removing the access plate should reveal the adjustment screw and locknut.
First, slightly loosen the locknut.
The hidden end of the screw interfaces with the pushrod.
The basic idea is to lightly seat the screw against the pushrod, then back the screw 1/4 turn away from the pushrod, to thereby provide a small gap between end of screw and pushrod.
Here's a possible snag ---
The screw is part of an actuator assembly.
On some designs (screw-type), the screw turns clockwise to seat before turning counter-clockwise to provide the gap.
On other designs (ball and ramp), the screw turns counter-clockwise to seat before turning clockwise to provide the gap.
Will now speculate that the bike at hand has the ball and ramp style, whereby the screw turns counter-clockwise to seat before turning clockwise to provide the gap. But I might be wrong. So if it doesn't work that way, adjust it the other way.
Remember to snug the locknut before finishing. Just snug is plenty tight enough.
Lastly, reduce "slop" in the cable to produce desired amount of free play in the lever at the perch.
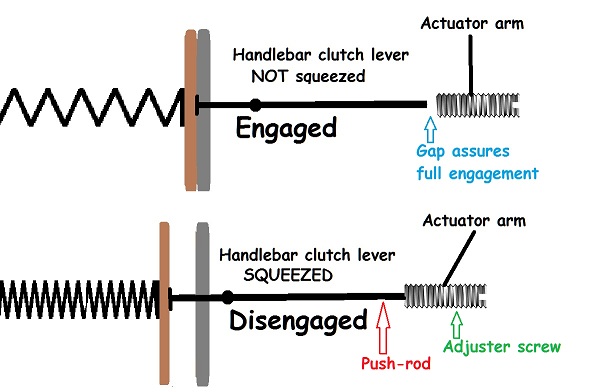
With the clutch lever released (not being squeezed), the clutch is supposed to be fully engaged (plates pressed tightly together).
If the gap isn't there, the plates can't fully press together, which causes the clutch to "slip."
With the clutch lever squeezed, the clutch plates are supposed to be separated. When squeezed, the gap disappears and the push-rod is pressed inward to press the plates apart, overcoming the spring pressure, and thereby disengaging the clutch.
Too much gap wastes clutch lever movement as too much lever travel is expended to simply close the gap before starting pressure against the push-rod. Whereby the clutch may only partly disengage when the lever is fully squeezed, and produce the sensation of a "sticky" or "grabby" clutch.
Way too much gap may waste all the clutch lever movement, as all the lever travel is expended to simply close the gap, with no movement left to exert pressure against the push-rod.
No gap or too little gap may over-stress the actuator assembly when the clutch lever is squeezed and cause the actuator assembly to pop apart.
It's important to know exactly how to set the required gap.
The general rule is to lightly close the gap, then back off ¼~½ turn.
On some models the gap is closed by turning the adjustment screw clockwise. But on other models the gap is closed by turning the adjustment screw counter-clockwise.
Mistaking which direction to turn the adjustment screw could for example start with the gap wide open instead of lightly seated.
Here's a simplified illustration to help visualize what is supposed to happen as the mechanisms engage and disengage the clutch.
Good Fortune!")
Assure having some "slop" in the clutch cable, using adjustments at the handlebar lever perch and at mid-cable along left frame down tube near the exhaust header.
Removing the access plate should reveal the adjustment screw and locknut.
First, slightly loosen the locknut.
The hidden end of the screw interfaces with the pushrod.
The basic idea is to lightly seat the screw against the pushrod, then back the screw 1/4 turn away from the pushrod, to thereby provide a small gap between end of screw and pushrod.
Here's a possible snag ---
The screw is part of an actuator assembly.
On some designs (screw-type), the screw turns clockwise to seat before turning counter-clockwise to provide the gap.
On other designs (ball and ramp), the screw turns counter-clockwise to seat before turning clockwise to provide the gap.
Will now speculate that the bike at hand has the ball and ramp style, whereby the screw turns counter-clockwise to seat before turning clockwise to provide the gap. But I might be wrong. So if it doesn't work that way, adjust it the other way.
Remember to snug the locknut before finishing. Just snug is plenty tight enough.
Lastly, reduce "slop" in the cable to produce desired amount of free play in the lever at the perch.
With the clutch lever released (not being squeezed), the clutch is supposed to be fully engaged (plates pressed tightly together).
If the gap isn't there, the plates can't fully press together, which causes the clutch to "slip."
With the clutch lever squeezed, the clutch plates are supposed to be separated. When squeezed, the gap disappears and the push-rod is pressed inward to press the plates apart, overcoming the spring pressure, and thereby disengaging the clutch.
Too much gap wastes clutch lever movement as too much lever travel is expended to simply close the gap before starting pressure against the push-rod. Whereby the clutch may only partly disengage when the lever is fully squeezed, and produce the sensation of a "sticky" or "grabby" clutch.
Way too much gap may waste all the clutch lever movement, as all the lever travel is expended to simply close the gap, with no movement left to exert pressure against the push-rod.
No gap or too little gap may over-stress the actuator assembly when the clutch lever is squeezed and cause the actuator assembly to pop apart.
It's important to know exactly how to set the required gap.
The general rule is to lightly close the gap, then back off ¼~½ turn.
On some models the gap is closed by turning the adjustment screw clockwise. But on other models the gap is closed by turning the adjustment screw counter-clockwise.
Mistaking which direction to turn the adjustment screw could for example start with the gap wide open instead of lightly seated.
Here's a simplified illustration to help visualize what is supposed to happen as the mechanisms engage and disengage the clutch.
Good Fortune!
1973 Z1
KZ900 LTD
KZ900 LTD
Attachments:
Please Log in or Create an account to join the conversation.
- hodjoel
-
- Offline
- User
-
Registered
- Posts: 2
- Thanks: 0
Re: Need help with KZ1000 police special clutch issue.
26 Apr 2012 00:15
Thanks again for the directions.
I will not have a chances to work on the bike till Saturday, will post how it goes.
I will not have a chances to work on the bike till Saturday, will post how it goes.
2000 KZ1000p
Please Log in or Create an account to join the conversation.
- jdbusch
-
- Offline
- User
-
Registered
- Posts: 80
- Thanks: 3
Re: Need help with KZ1000 police special clutch issue.
26 Apr 2012 00:48 - 26 Apr 2012 00:48
i just got done with rebuilding the whole clutch assembly starting with the cable then the Release arm ( what the cable hooks to) which was broken and i didnt see it right off ( same problem your having with clutch slack ) and then the push rods were fused to the set screw and broken in 3 places yadda yadda yadda........
check that the release arm is twisting the clutch release correctly and that the set screw is done right i had to twist mine to the right till it stopped then backed it out a 1/2 turn
check that the release arm is twisting the clutch release correctly and that the set screw is done right i had to twist mine to the right till it stopped then backed it out a 1/2 turn
Current:
1983 KZ1100-A3 Shafty
Gone:
1979 KZ1000-E Shafty
Email:
jdbusch1978@hotmail.com
1983 KZ1100-A3 Shafty
Gone:
1979 KZ1000-E Shafty
Email:
jdbusch1978@hotmail.com
Last edit: 26 Apr 2012 00:48 by jdbusch.
Please Log in or Create an account to join the conversation.
- Patton
-
- Offline
- KZr Legend
-
Registered
- Posts: 18568
- Thanks: 2104
Re: Need help with KZ1000 police special clutch issue.
26 Apr 2012 00:55 - 26 Apr 2012 00:58Good informationjdbusch wrote: i just got done with rebuilding the whole clutch assembly starting with the cable then the Release arm ( what the cable hooks to) which was broken and i didnt see it right off ( same problem your having with clutch slack ) and then the push rods were fused to the set screw and broken in 3 places yadda yadda yadda........
check that the release arm is twisting the clutch release correctly and that the set screw is done right i had to twist mine to the right till it stopped then backed it out a 1/2 turn
 . . . But, what make and model is "mine?"
Including information about bike year and model is helpful to viewers and usually elicits better responses.
It's easy to put the information in your signature where it shows in all posted messages, past and future.
And may be changed whenever and as often as desired.
If wanting a signature showing information about the bike in posted messages, it's easy to do. Here's how:
Attachment addsig.jpg not found
Good Fortune!
1973 Z1
KZ900 LTD
KZ900 LTD
Attachments:
Last edit: 26 Apr 2012 00:58 by Patton.
The following user(s) said Thank You: jdbusch
Please Log in or Create an account to join the conversation.
- jdbusch
-
- Offline
- User
-
Registered
- Posts: 80
- Thanks: 3
Re: Need help with KZ1000 police special clutch issue.
26 Apr 2012 01:00
oh yeah "mine" is a 1983 KZ1100-A3 shaft
Lol sorry bout that
Lol sorry bout that
Current:
1983 KZ1100-A3 Shafty
Gone:
1979 KZ1000-E Shafty
Email:
jdbusch1978@hotmail.com
1983 KZ1100-A3 Shafty
Gone:
1979 KZ1000-E Shafty
Email:
jdbusch1978@hotmail.com
Please Log in or Create an account to join the conversation.
- spark23ca
-
- Offline
- User
-
Registered
- Posts: 58
- Thanks: 2
Re: Need help with KZ1000 police special clutch issue.
12 Jun 2012 23:08
thanks for the help..i was stumped yet again...its better to come on here ask questions then just go stupid with a set of wrenches and lose peices and never get a ride...thanks again...good fortune guy
1982 kz 1000 ltd ..someone started to make a bobber out of it and realized it didnt' run and they didn't know how to run their wrenches
Please Log in or Create an account to join the conversation.
- spark23ca
-
- Offline
- User
-
Registered
- Posts: 58
- Thanks: 2
Re: Need help with KZ1000 police special clutch iss
12 Jun 2012 23:10
i've had clymer books ..the direction of the firing on the distubuter was backwards in the book..almost tore then engine down b4 i got someone to bump the key for me
1982 kz 1000 ltd ..someone started to make a bobber out of it and realized it didnt' run and they didn't know how to run their wrenches
Please Log in or Create an account to join the conversation.
Moderators: Street Fighter LTD