
1981 GPz1100 B1 Rstomod / ELR "Tribute"
- howardhb
-
 Topic Author
- Offline
- Sustaining Member
-

Registered
- God, I trust
- Posts: 473
- Thanks: 510
Re: 1981 GPz1100 B1 Rstomod / ELR "Tribute"
31 Jan 2023 01:13 - 31 Jan 2023 22:11
EXPOSED!
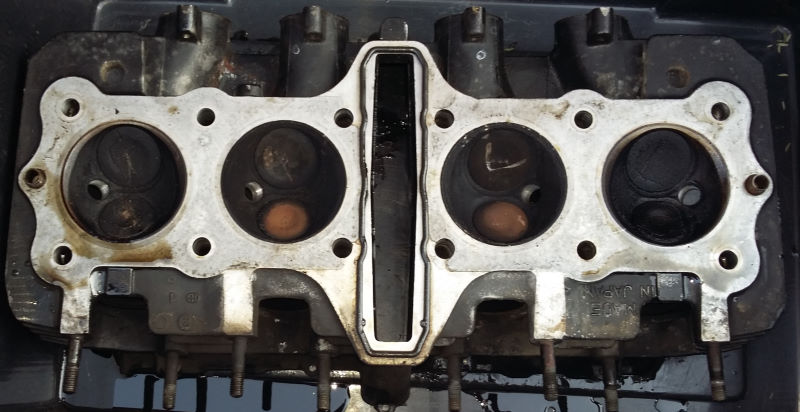
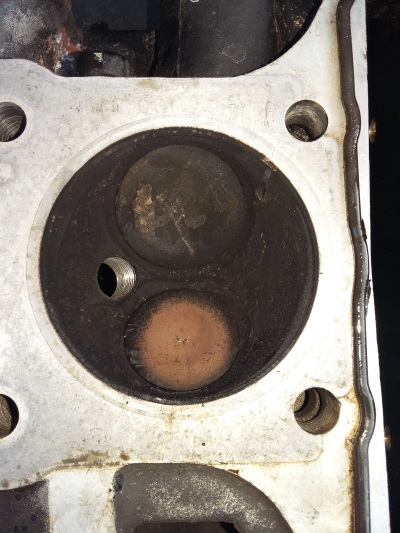
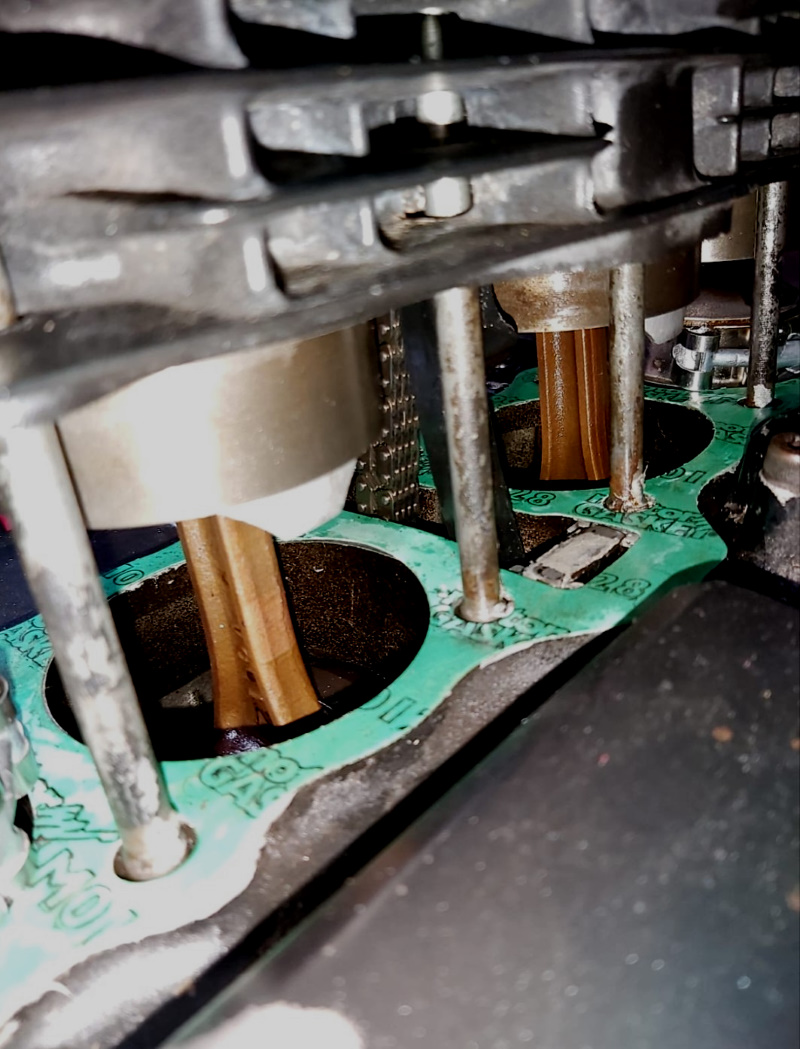
Cylinders 1 and 4 combustion chambers exhibited the same oily appearance, definately something amiss...
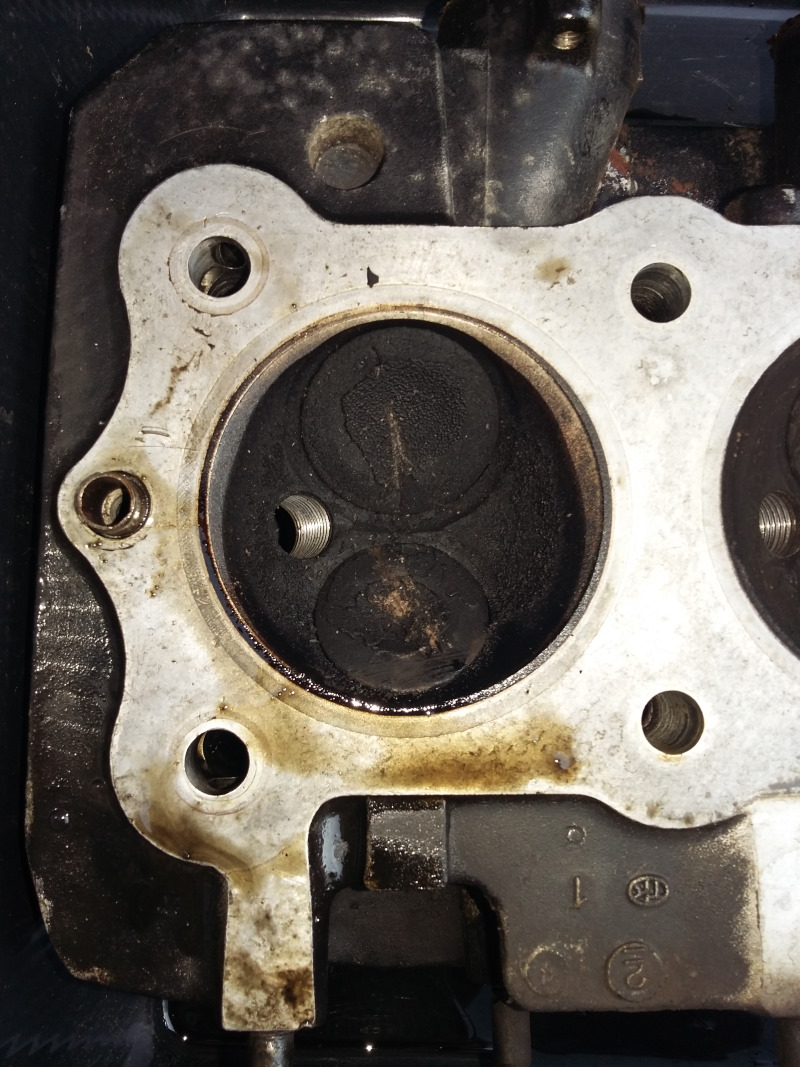
Cylinders 2 and 3 were somewhat less "oily" but still showed a lot of carbon build-up.
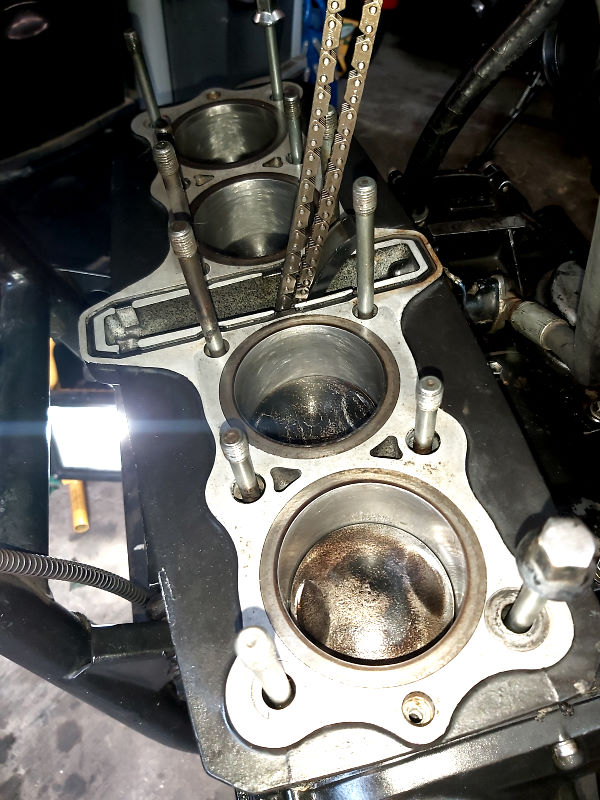
So, jugs off...Yesssss! I see pistons, in pretty good condition, skirts in fine shape...
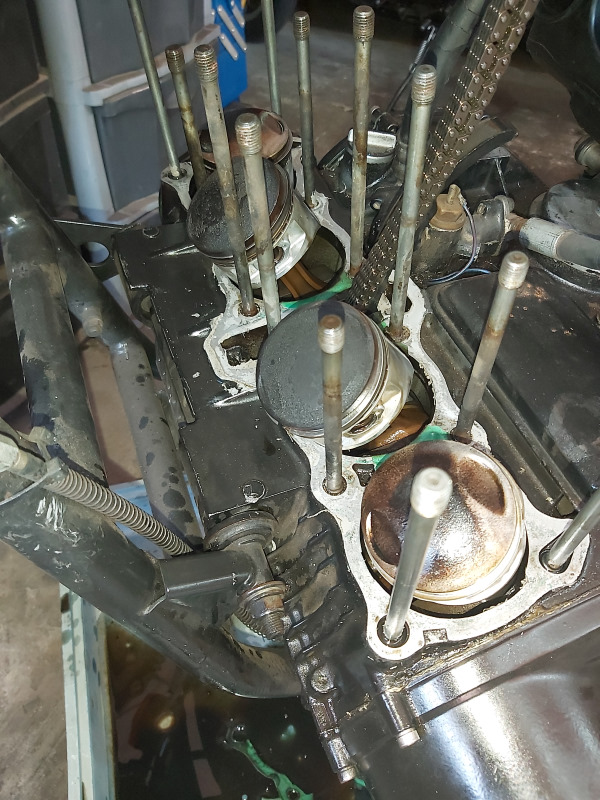
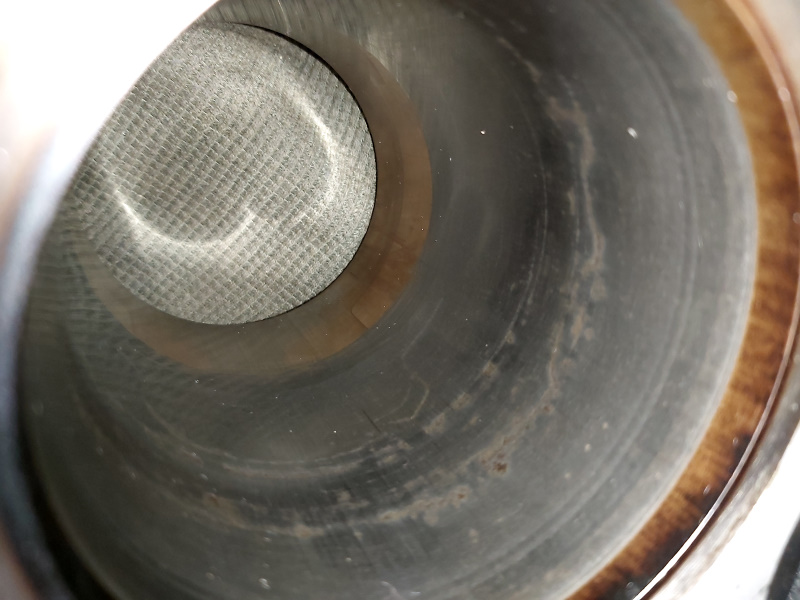
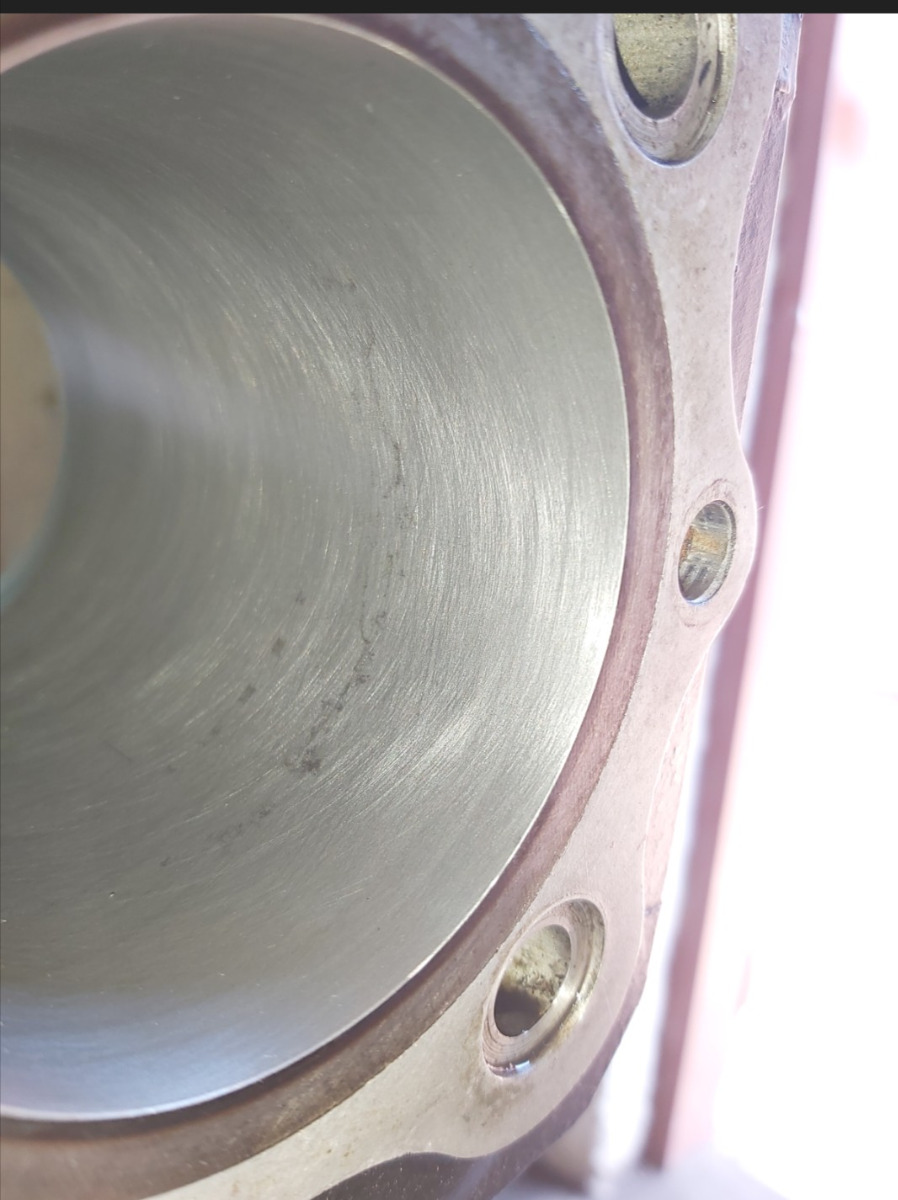
Cylinder 1 bore showed definate signs of moisture / condensation having been in there, maybe not for long, but marks left by the oil rings were clearly evident.
I have seen this before, specifically on the left hand side, as a result of the side-stand "lean angle" and the machine having been left un-attended for extended periods.
The marks were quite superficial: I could hardly feel them with my finger-nail so I was fairly confident that they would "hone out".
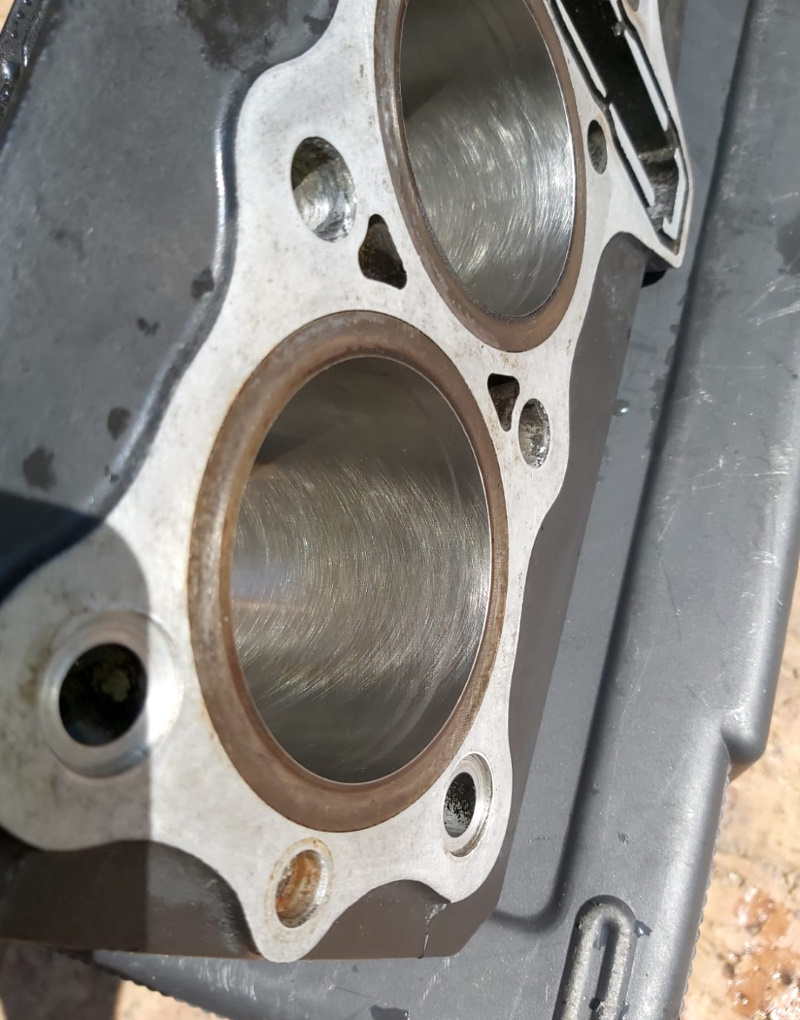
Cylinders 2, 3 and 4 looked ok, some "previous" honing marks still visible, leaving me to wonder what the previous owner had done....

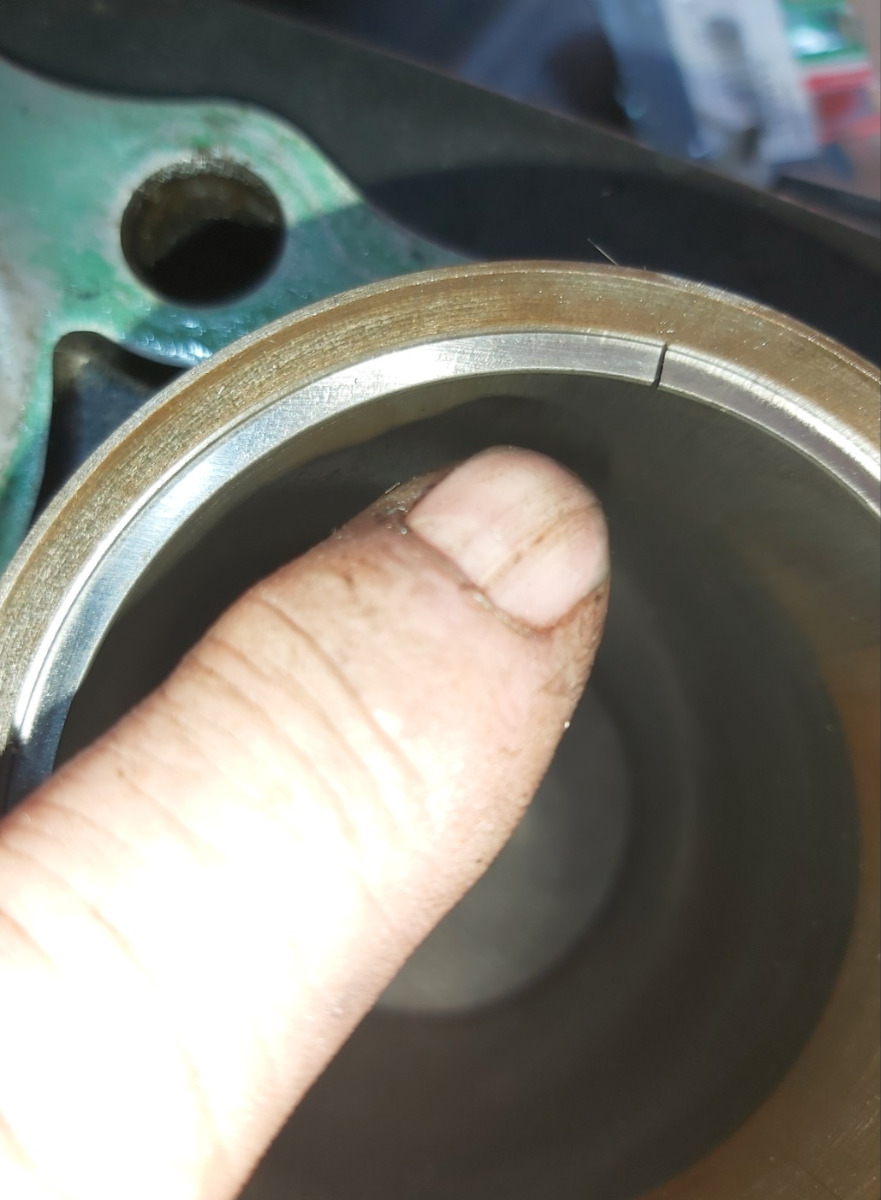
I removed the top compression ring from each piston and inserted them into the bottom of their correcponding bores...
Here is No. 1, looking from the top...
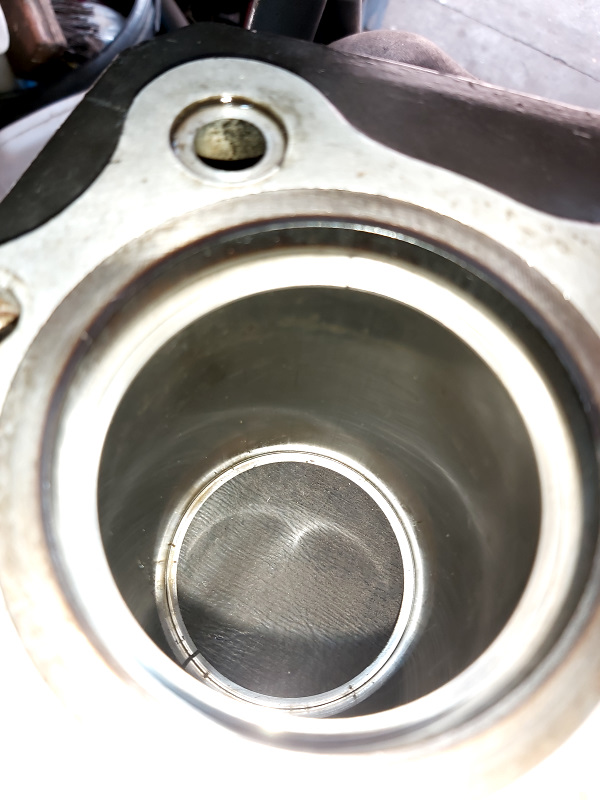
That ring gap is HUGE...
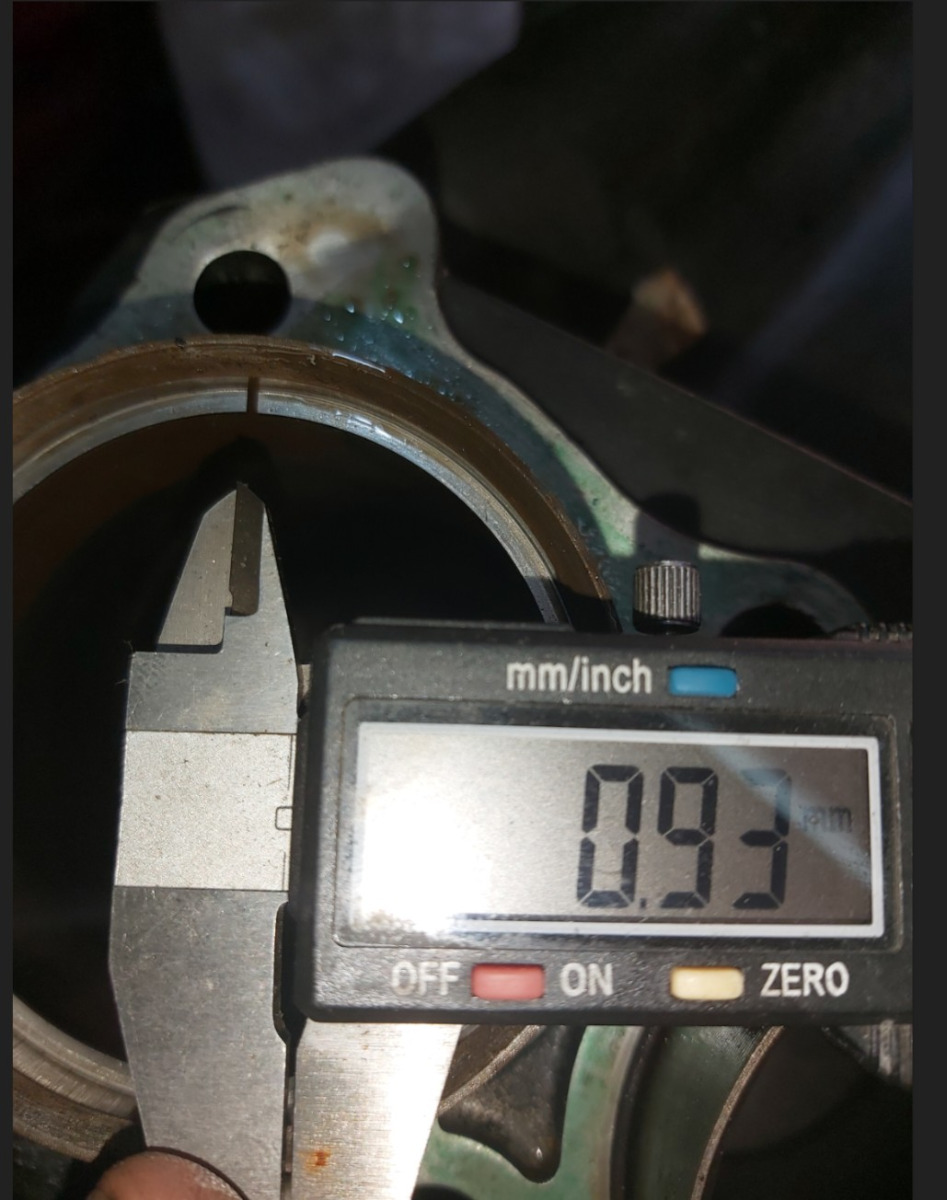
Now lets measure the ring gap at the top: 0.93mm

No wonder compression was way down. The service limit is 0.7mm !
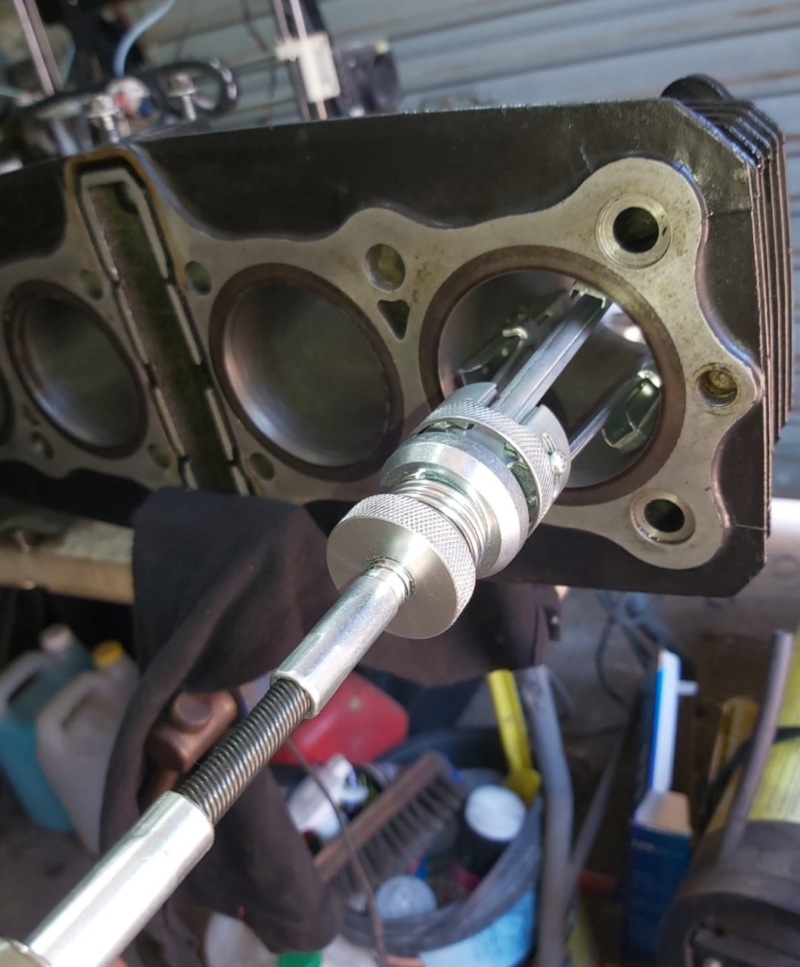
Bore guage measurements proved no appreciable ovality, and arround 0.02mm difference in bore diameter top to bottom, so that's good right?
Right, honing up next...
Cylinders 1 and 4 combustion chambers exhibited the same oily appearance, definately something amiss...
Cylinders 2 and 3 were somewhat less "oily" but still showed a lot of carbon build-up.
So, jugs off...Yesssss! I see pistons, in pretty good condition, skirts in fine shape...
Cylinder 1 bore showed definate signs of moisture / condensation having been in there, maybe not for long, but marks left by the oil rings were clearly evident.
I have seen this before, specifically on the left hand side, as a result of the side-stand "lean angle" and the machine having been left un-attended for extended periods.
The marks were quite superficial: I could hardly feel them with my finger-nail so I was fairly confident that they would "hone out".
Cylinders 2, 3 and 4 looked ok, some "previous" honing marks still visible, leaving me to wonder what the previous owner had done....
I removed the top compression ring from each piston and inserted them into the bottom of their correcponding bores...
Here is No. 1, looking from the top...
That ring gap is HUGE...
Now lets measure the ring gap at the top: 0.93mm
No wonder compression was way down. The service limit is 0.7mm !
Bore guage measurements proved no appreciable ovality, and arround 0.02mm difference in bore diameter top to bottom, so that's good right?
Right, honing up next...
'81 GPz 550 D1
'81 GPz 1100 B1 ELR "Tribute" www.kzrider.com/forum/11-projects/617040...-elr-tribute?start=0
'82 Yamaha YB100 Fizzie
'79 Suzuki GT200 X5 TWO STROKE TWIN - SMOKER!
'81 GPz 1100 B1 ELR "Tribute" www.kzrider.com/forum/11-projects/617040...-elr-tribute?start=0
'82 Yamaha YB100 Fizzie
'79 Suzuki GT200 X5 TWO STROKE TWIN - SMOKER!
Last edit: 31 Jan 2023 22:11 by howardhb.
Please Log in or Create an account to join the conversation.
- Wookie58
-

- Away
- Moderator
-

Registered
- Posts: 6449
- Thanks: 4078
Re: 1981 GPz1100 B1 Rstomod / ELR "Tribute"
31 Jan 2023 01:41 - 31 Jan 2023 01:48
It is indeed fair to say "the newness has worn off" those rings, on the upside it looks like a set of rings and a hone are all that 's required so happy days (could have been much worse) are you going to do the stem seals while it's off ?

PS: I'm sure you already know this but breaking one of the old rings and using the "factory" end makes a great tool for cleaning carbon deposits from the piston ring grooves
PS: I'm sure you already know this but breaking one of the old rings and using the "factory" end makes a great tool for cleaning carbon deposits from the piston ring grooves
1982 KZ1000 Ltd
www.kzrider.com/forum/11-projects/617631...-82-begins?start=192
kzrider.com/filebase-alias?view=download...d-fault-diagnosis&ca
www.kzrider.com/forum/11-projects/617631...-82-begins?start=192
kzrider.com/filebase-alias?view=download...d-fault-diagnosis&ca
Last edit: 31 Jan 2023 01:48 by Wookie58.
The following user(s) said Thank You: howardhb
Please Log in or Create an account to join the conversation.
- howardhb
-
Topic Author
- Offline
- Sustaining Member
-
Registered
- God, I trust
- Posts: 473
- Thanks: 510
Re: 1981 GPz1100 B1 Rstomod / ELR "Tribute"
31 Jan 2023 03:32 - 31 Jan 2023 06:42
So, armed with my cordless drill and a "tri-pod" type honing tool (220 grit stone) I set about "de-glasing" the bores, ready to accept new standard rings.
My dad (having re-built many engines in his time as a gas station owner) instructed that the ideal "cross-hatch" hone pattern should have about a 25 degree included angle, for a ballance of sufficient oil retention and surface "texture" in order to properly "seat" the new rings.
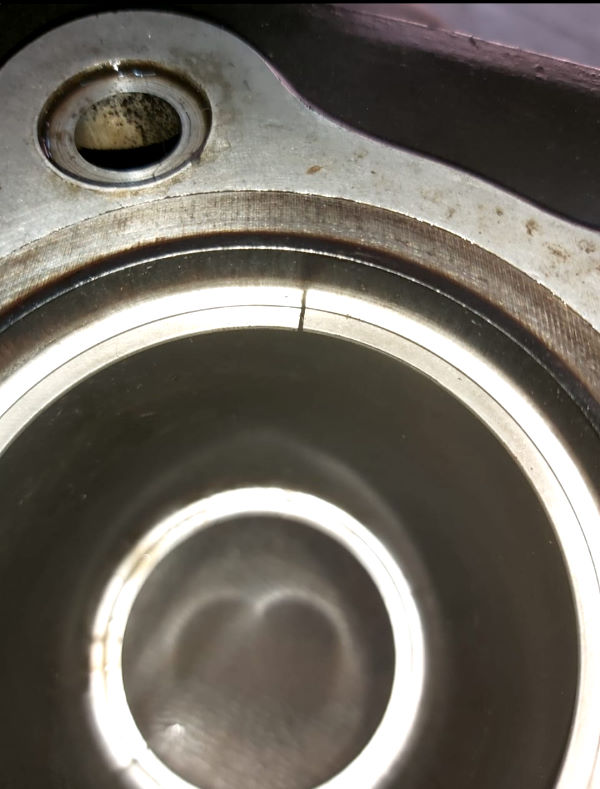
Here is the honing result for cyl. 1... The "marks" that I described earlier have dissapeared almost completely...
I was well pleased!
Once honing was complete, and after PROPERLY washing the cylinders, I inserted the new compression rings into the bottom of each bore and checked the new ring gaps.
I was quite pleased that they were all spot on 0.2mm, perfectly "in spec."
Moving the rings to the top of each bore showed ring gaps increase to 0.22mm. Fine!
I was keen to get the open heart surgery closed up as soon as possible, so decided to re-fit the barrel before attending to the cylinder-head.
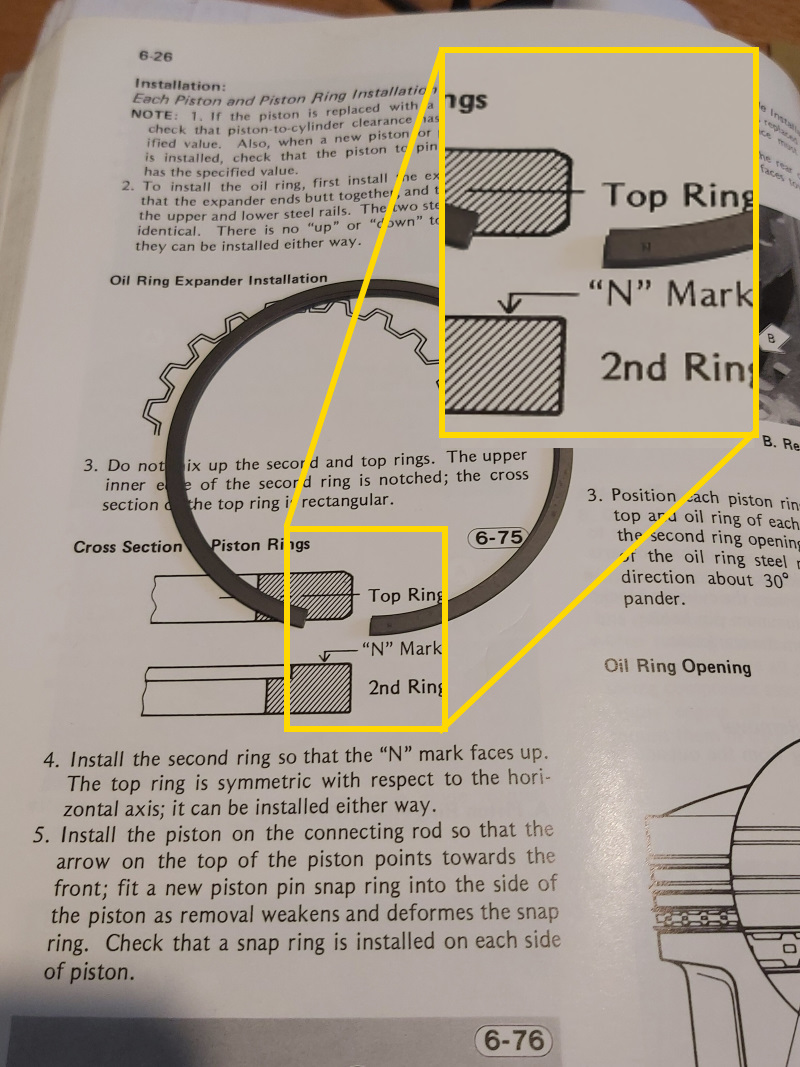
I have the Kawasaki "bible" for the KZ1100, in paper form, which is always nice to "thumb" through!
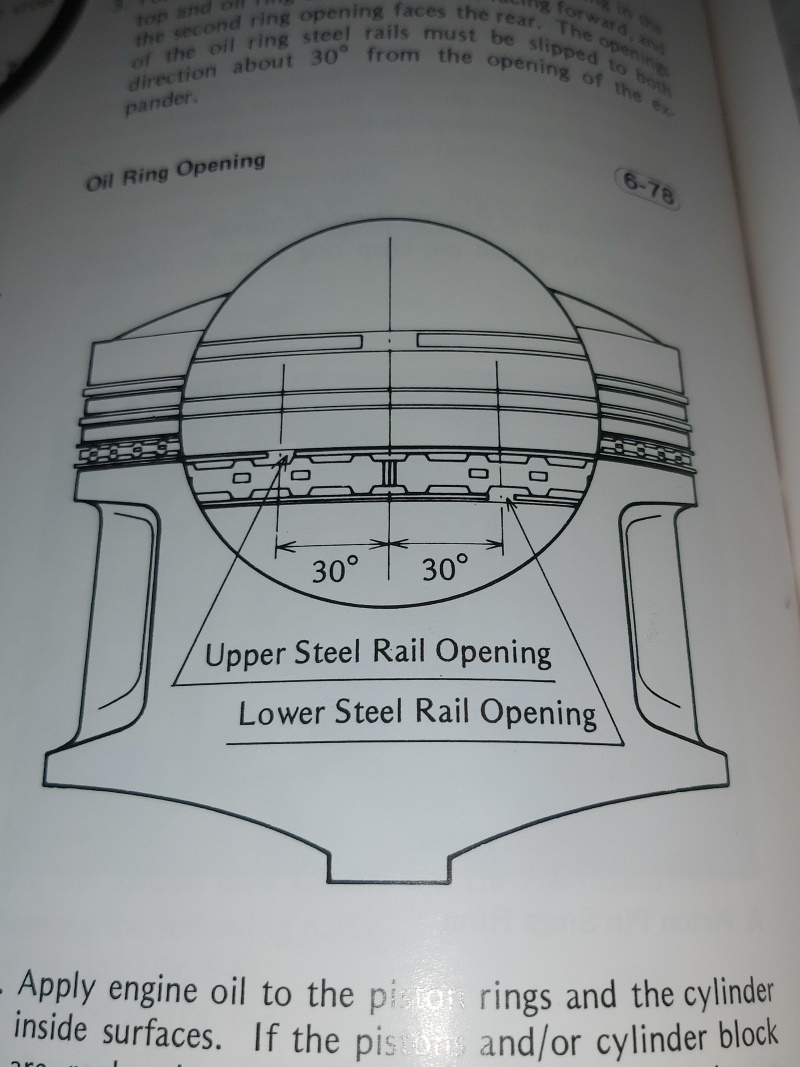
It shows some pretty specific instructions on how to place the ring gaps...
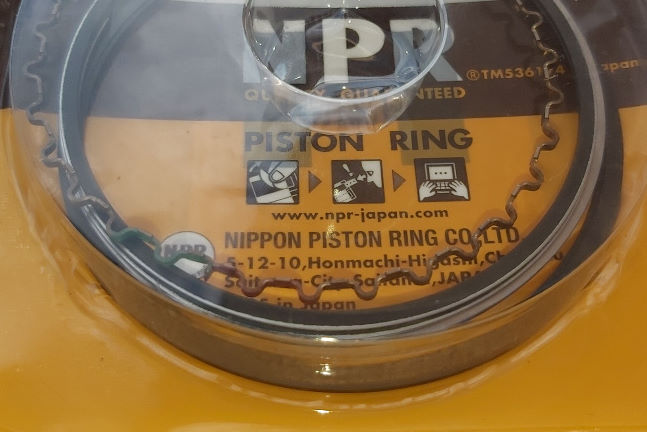
The rings that I ordered (Ebay seller GeorgeFix) are from the Nippon Ring Company in Japan, and are the exact items required.
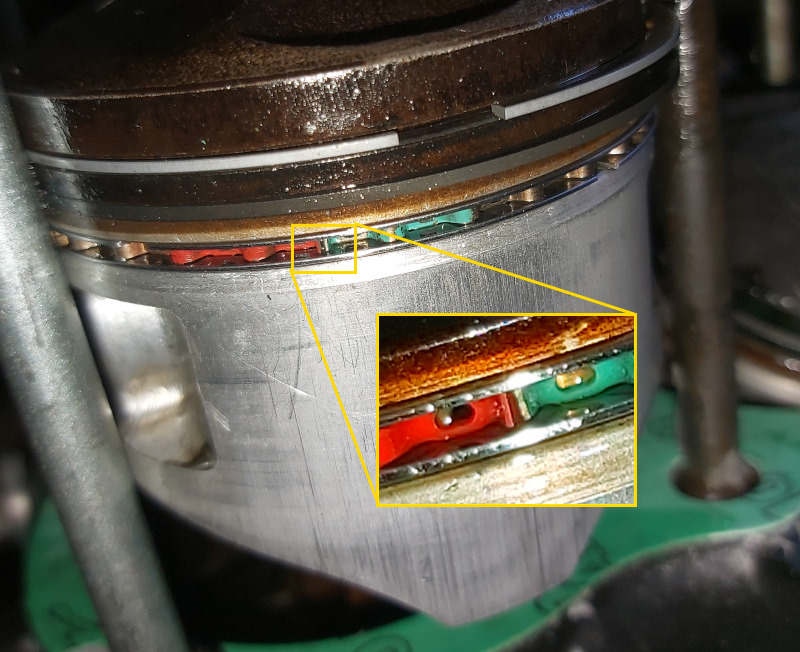
A very handy feature these rings have is the oil expander ring ends are clearly marked in red and green paint, so that you can be absolutely sure that the "ends" propperly "butt" together and do not "over-lapp", as can easilly happen if not paying specific attention to this during installation.
I fit the rings to each piston, paying very carefull attention to their orientation and position, and slowly "squeezed them into their grooves.
I don't own ring-squeezers, and being a bit of an "improvisor", I fashioned some, from suitable hose clamps, used on automotive turbo pipes...
These are typically much wider (20mm) than standard hose-clamps, and can be completely "opend" in order to remove them, once the rings are in...
Also, I found that the "rounded" lip needed to be removed, which caused the clamp to "tilt" prematurely...
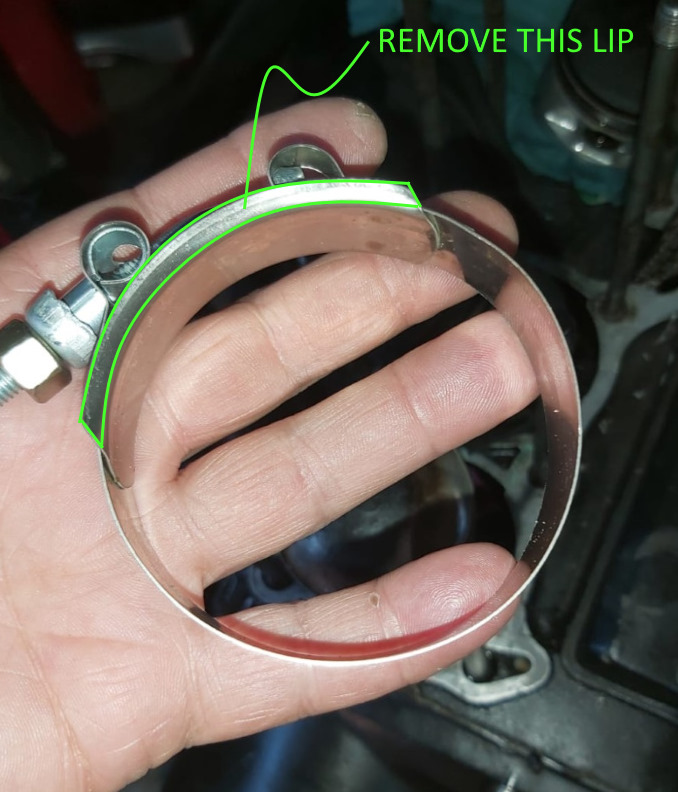
After generously oiling the rings and grooves, I fit my "make-shift" squeezers onto all 4 pistons, gently easing the rings into their grooves, (just tight enough to allow it to "slide down the piston as the barrel slides on...)
Pictures were taken BEFORE I realised that the "rounded lip" needed to be removed.
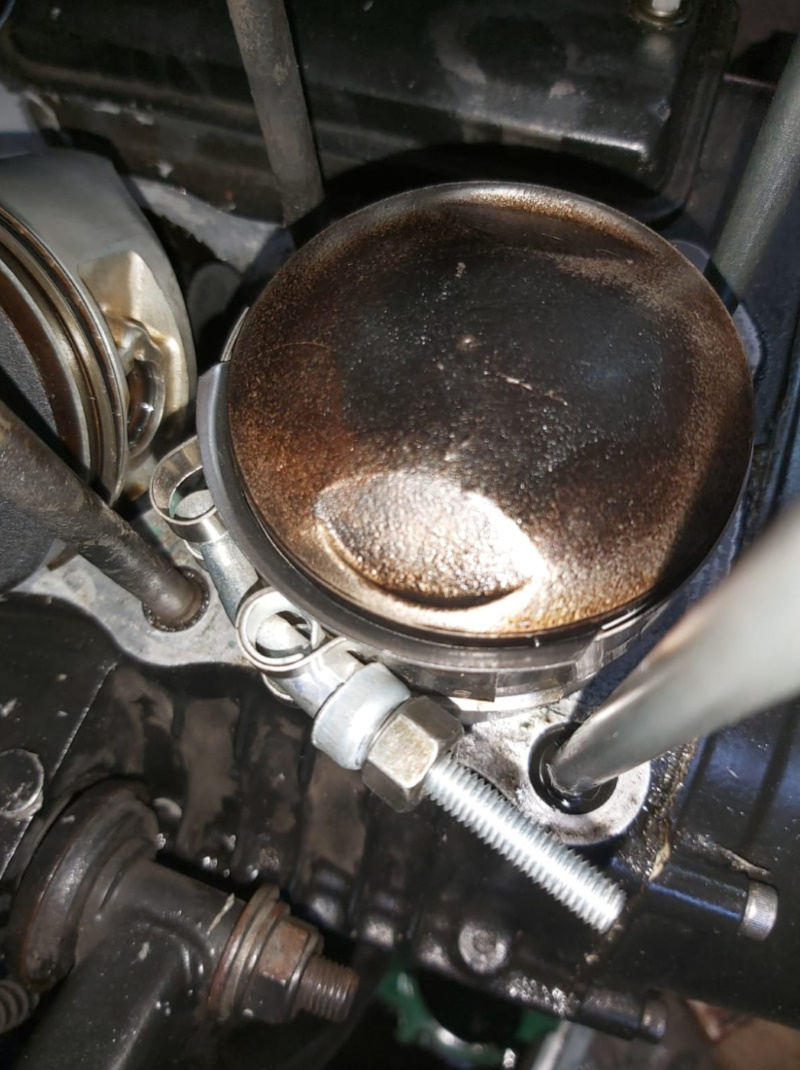
I slowly rotated the crank so that cyl. 2 and 3 were at T.D.C. , ready for the barrel.
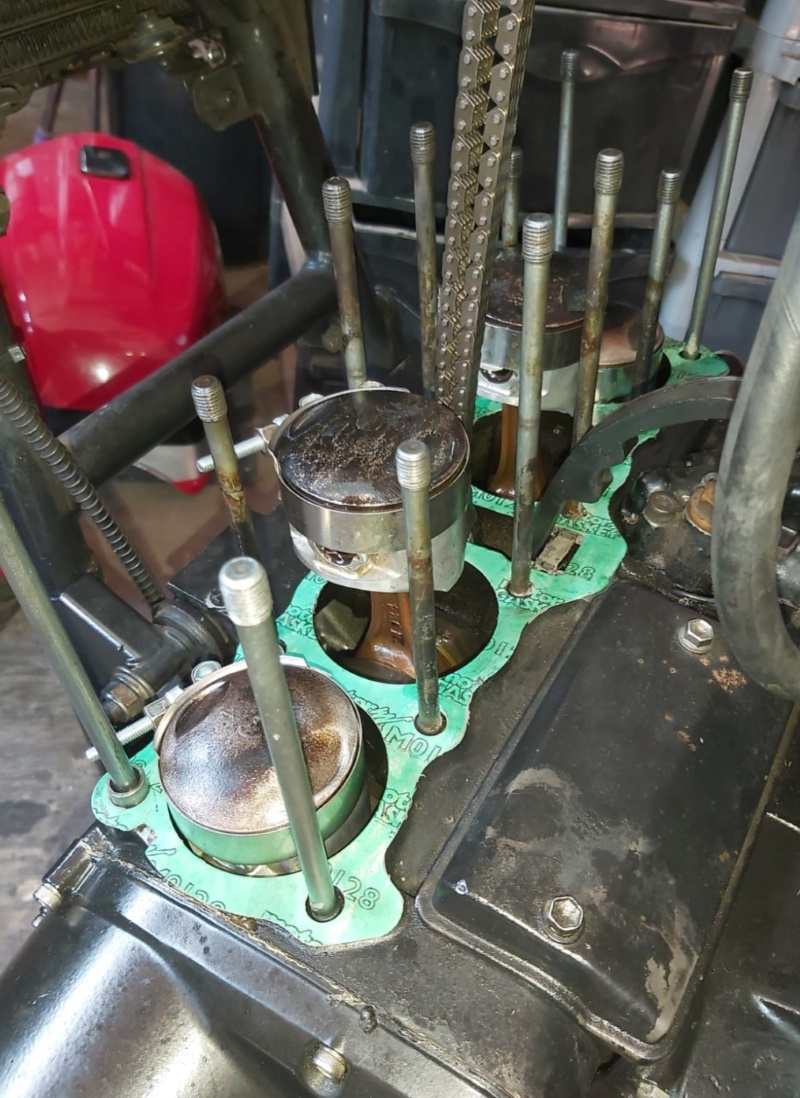
I lubed the bores with fresh engine oil, then fed the cam-chain up through the centre and tied it up to the frame with some wire...
Slowly, very slowly, I lowered the barrel onto the two pistons...
Looking good so far...
Pre-entry...
(see, the top "rounded lip" of the hose clamp has been removed)
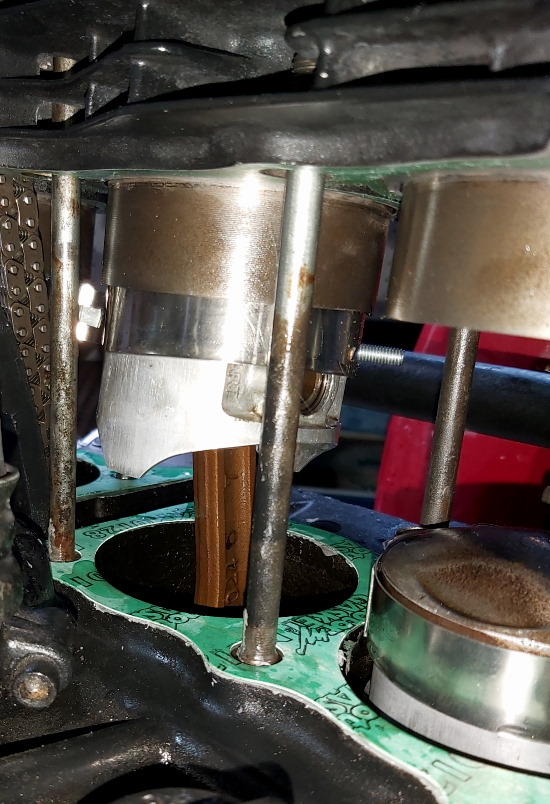
With the slightest of tapping, with my hand on the barrel, pistons 2 and 3 slid in perfectly, with ring squeezers sliding down each piston skirt.
I then removed the two squeezers....
Now, the tricky part... slowly rotate the crank while assisting the barrel, and pre-entering pistons 1 and 4 until all four pistons lined up horizontally, mid-stroke.
Note to self: DON'T FORGET THE REAR CAM CHAIN GUIDE ... which has to be inserted up the centre of the barrel BEFORE rotating the crank.
AND, don't forget the NEW BASE GASKET!
(I missed this step initially and had to start over, once that was sorted
)
I was very pleased that pistons 1 and 4 slid in just as easilly, with light tapping on the barrel.
I removed the last two squeezers and slid the barrel all the way down onto the base gasket.
While supporting the cam-chain, I slowly rotated the crank (forward!) a few times...
There is a very, very unique and satisfying sound, that new rings make when sliding in freshly honed bores.
Quite un-mistakable.

Well that went, uhm, well !
My dad (having re-built many engines in his time as a gas station owner) instructed that the ideal "cross-hatch" hone pattern should have about a 25 degree included angle, for a ballance of sufficient oil retention and surface "texture" in order to properly "seat" the new rings.
Here is the honing result for cyl. 1... The "marks" that I described earlier have dissapeared almost completely...
I was well pleased!
Once honing was complete, and after PROPERLY washing the cylinders, I inserted the new compression rings into the bottom of each bore and checked the new ring gaps.
I was quite pleased that they were all spot on 0.2mm, perfectly "in spec."
Moving the rings to the top of each bore showed ring gaps increase to 0.22mm. Fine!
I was keen to get the open heart surgery closed up as soon as possible, so decided to re-fit the barrel before attending to the cylinder-head.
I have the Kawasaki "bible" for the KZ1100, in paper form, which is always nice to "thumb" through!
It shows some pretty specific instructions on how to place the ring gaps...
The rings that I ordered (Ebay seller GeorgeFix) are from the Nippon Ring Company in Japan, and are the exact items required.
A very handy feature these rings have is the oil expander ring ends are clearly marked in red and green paint, so that you can be absolutely sure that the "ends" propperly "butt" together and do not "over-lapp", as can easilly happen if not paying specific attention to this during installation.
I fit the rings to each piston, paying very carefull attention to their orientation and position, and slowly "squeezed them into their grooves.
I don't own ring-squeezers, and being a bit of an "improvisor", I fashioned some, from suitable hose clamps, used on automotive turbo pipes...
These are typically much wider (20mm) than standard hose-clamps, and can be completely "opend" in order to remove them, once the rings are in...
Also, I found that the "rounded" lip needed to be removed, which caused the clamp to "tilt" prematurely...
After generously oiling the rings and grooves, I fit my "make-shift" squeezers onto all 4 pistons, gently easing the rings into their grooves, (just tight enough to allow it to "slide down the piston as the barrel slides on...)
Pictures were taken BEFORE I realised that the "rounded lip" needed to be removed.
I slowly rotated the crank so that cyl. 2 and 3 were at T.D.C. , ready for the barrel.
I lubed the bores with fresh engine oil, then fed the cam-chain up through the centre and tied it up to the frame with some wire...
Slowly, very slowly, I lowered the barrel onto the two pistons...
Looking good so far...
Pre-entry...
(see, the top "rounded lip" of the hose clamp has been removed)
With the slightest of tapping, with my hand on the barrel, pistons 2 and 3 slid in perfectly, with ring squeezers sliding down each piston skirt.
I then removed the two squeezers....
Now, the tricky part... slowly rotate the crank while assisting the barrel, and pre-entering pistons 1 and 4 until all four pistons lined up horizontally, mid-stroke.
Note to self: DON'T FORGET THE REAR CAM CHAIN GUIDE ... which has to be inserted up the centre of the barrel BEFORE rotating the crank.
AND, don't forget the NEW BASE GASKET!
(I missed this step initially and had to start over, once that was sorted
I was very pleased that pistons 1 and 4 slid in just as easilly, with light tapping on the barrel.
I removed the last two squeezers and slid the barrel all the way down onto the base gasket.
While supporting the cam-chain, I slowly rotated the crank (forward!) a few times...
There is a very, very unique and satisfying sound, that new rings make when sliding in freshly honed bores.
Quite un-mistakable.
Well that went, uhm, well !
'81 GPz 550 D1
'81 GPz 1100 B1 ELR "Tribute" www.kzrider.com/forum/11-projects/617040...-elr-tribute?start=0
'82 Yamaha YB100 Fizzie
'79 Suzuki GT200 X5 TWO STROKE TWIN - SMOKER!
'81 GPz 1100 B1 ELR "Tribute" www.kzrider.com/forum/11-projects/617040...-elr-tribute?start=0
'82 Yamaha YB100 Fizzie
'79 Suzuki GT200 X5 TWO STROKE TWIN - SMOKER!
Last edit: 31 Jan 2023 06:42 by howardhb.
The following user(s) said Thank You: willemZ900, Street Fighter LTD, slayer61, Scirocco, Wookie58
Please Log in or Create an account to join the conversation.
- slayer61
-
- Offline
- User
-

Registered
- KZR FLAG RELAY CARRIER #62
- Posts: 908
- Thanks: 276
Re: 1981 GPz1100 B1 Rstomod / ELR "Tribute"
31 Jan 2023 10:46
Outstanding Sir. Perseverance indeed!
Don't be ridiculous! It's only a flesh wound!
[strike]Wife's little bike... 1984 GPZ 550 Kerker and DynaJet stage I kit[/strike]
Wife's BIG bike......[strike] 1981 GPZ 1100 Kerker and [strike]factory FI[/strike] Mikuni RS34s W/ K&N pods[/strike] SOLD
[strike]Wife's little bike... 1984 GPZ 550 Kerker and DynaJet stage I kit[/strike]
Wife's BIG bike......[strike] 1981 GPZ 1100 Kerker and [strike]factory FI[/strike] Mikuni RS34s W/ K&N pods[/strike] SOLD
The following user(s) said Thank You: howardhb
Please Log in or Create an account to join the conversation.
- howardhb
-
Topic Author
- Offline
- Sustaining Member
-
Registered
- God, I trust
- Posts: 473
- Thanks: 510
Re: 1981 GPz1100 B1 Rstomod / ELR "Tribute"
01 Feb 2023 05:31 - 01 Feb 2023 13:28
So, that being done, I set about re-freshing the cylinder-head.
A while back, when I discovered that the cam timing was one tooth off, I had measured and tabulated the valve clearances.
All were in spec, and mostly to the "upper" end of the tollereance.
After clearly marking each valve, I disassembled them, keeping all the components for each cylider in it's own container.
Valve spring comresser in action....
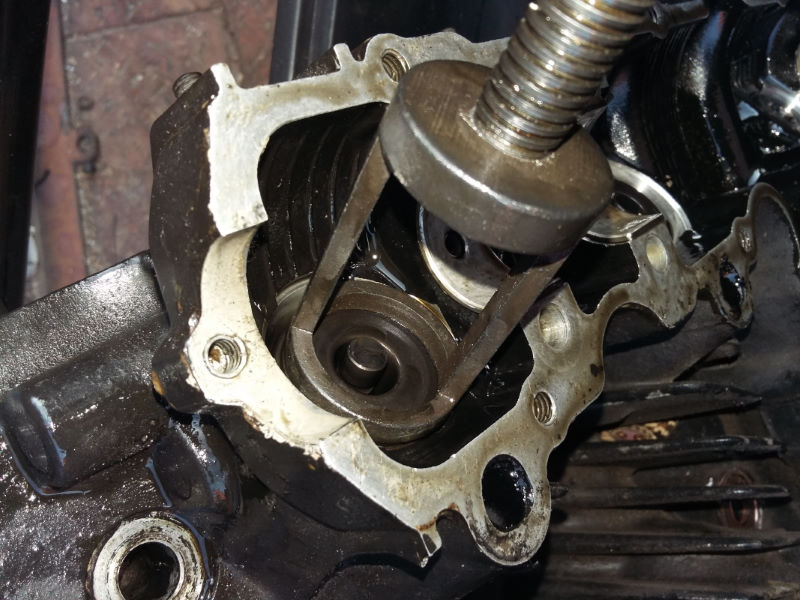
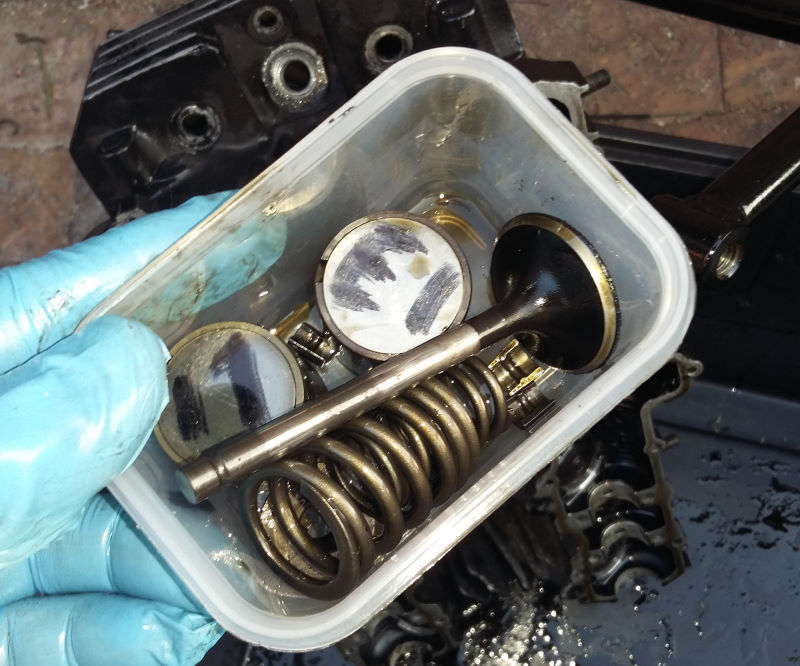
I removed all the old valve-stem seals, which were pretty hard and brittle.
I wish I had a proper tool to do this job... I ended up using an old wire-stripper, which kinda worked ok.
I inspected each valve in its valve guide, checking for side to side play... all good.
The valve seats were all in very good shape, giving credence to the statement by the shop owner (whom worked on the engine just before I bought the bike) that clearances were set and the seats were lapped but, stem seals were not replaced... Who does that ???
I then fit the new stem seals that came in the gasket kit that I bought from WeBike Japan.
Ok, so I reassembled the valves and springs, eager to get this baby together!!!
I bolted the head on- being sure to use the correct torque and tightening pattern, as indicated in the manual.
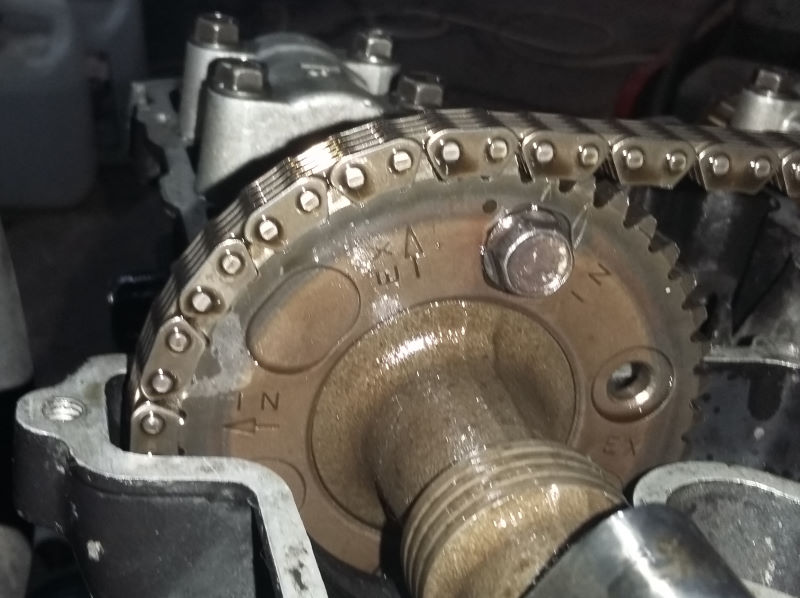
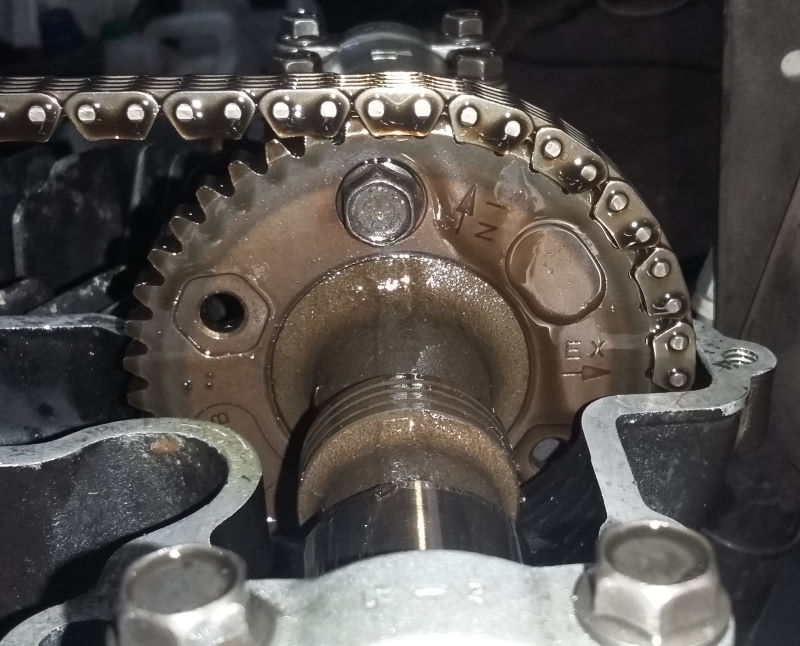
I was very careful to correctly time the cams...don't want egg on my face...

I rechecked valve clearances, and all were in spec. as before.
After closing the cam cover, I fit the ignition coils and connected them up...
I had given the carbs a proper clean, new (home made) gaskets, new fuel needles and seats, and set the float levels...
(this is no trivial task, taking 7 or 8 attempts to get the levels set acceptably)
Also, I sand blasted and spray painted the diaphragm covers and float bowls with 2K satin black.
I had ordered new carb boots, and some pattern carb clamps from WeBike, so those went on too.

Once the carbs were mounted, I fit the exhaust and tank and plumbed in a new inline fuel filter.
Time to test my work...
Choke on, Ignition on, I held my breath and hit the starter button.
To my absolute surprise, after 2 seconds of cranking, she fired right up.
I let her warm up, blipping the throttle occasionally... no smoke, no strange noises.
We're good!
H.
A while back, when I discovered that the cam timing was one tooth off, I had measured and tabulated the valve clearances.
All were in spec, and mostly to the "upper" end of the tollereance.
After clearly marking each valve, I disassembled them, keeping all the components for each cylider in it's own container.
Valve spring comresser in action....
I removed all the old valve-stem seals, which were pretty hard and brittle.
I wish I had a proper tool to do this job... I ended up using an old wire-stripper, which kinda worked ok.
I inspected each valve in its valve guide, checking for side to side play... all good.
The valve seats were all in very good shape, giving credence to the statement by the shop owner (whom worked on the engine just before I bought the bike) that clearances were set and the seats were lapped but, stem seals were not replaced... Who does that ???
I then fit the new stem seals that came in the gasket kit that I bought from WeBike Japan.
Ok, so I reassembled the valves and springs, eager to get this baby together!!!
I bolted the head on- being sure to use the correct torque and tightening pattern, as indicated in the manual.
I was very careful to correctly time the cams...don't want egg on my face...
I rechecked valve clearances, and all were in spec. as before.
After closing the cam cover, I fit the ignition coils and connected them up...
I had given the carbs a proper clean, new (home made) gaskets, new fuel needles and seats, and set the float levels...
(this is no trivial task, taking 7 or 8 attempts to get the levels set acceptably)
Also, I sand blasted and spray painted the diaphragm covers and float bowls with 2K satin black.
I had ordered new carb boots, and some pattern carb clamps from WeBike, so those went on too.
Once the carbs were mounted, I fit the exhaust and tank and plumbed in a new inline fuel filter.
Time to test my work...
Choke on, Ignition on, I held my breath and hit the starter button.
To my absolute surprise, after 2 seconds of cranking, she fired right up.
I let her warm up, blipping the throttle occasionally... no smoke, no strange noises.
We're good!
H.
'81 GPz 550 D1
'81 GPz 1100 B1 ELR "Tribute" www.kzrider.com/forum/11-projects/617040...-elr-tribute?start=0
'82 Yamaha YB100 Fizzie
'79 Suzuki GT200 X5 TWO STROKE TWIN - SMOKER!
'81 GPz 1100 B1 ELR "Tribute" www.kzrider.com/forum/11-projects/617040...-elr-tribute?start=0
'82 Yamaha YB100 Fizzie
'79 Suzuki GT200 X5 TWO STROKE TWIN - SMOKER!
Last edit: 01 Feb 2023 13:28 by howardhb.
The following user(s) said Thank You: Street Fighter LTD, BCScott, Wookie58
Please Log in or Create an account to join the conversation.
- howardhb
-
Topic Author
- Offline
- Sustaining Member
-
Registered
- God, I trust
- Posts: 473
- Thanks: 510
Re: 1981 GPz1100 B1 Rstomod / ELR "Tribute"
01 Feb 2023 06:02 - 01 Feb 2023 23:50
So, I have subsequently ridden about 250Km, and I can report that the performance seems to be improving every time I ride.
I am aware, that while the rings are bedding in, riding at a constant speed is not desireable.
Loading the engine in top gear, but low revs (below 5000) is what is needed...
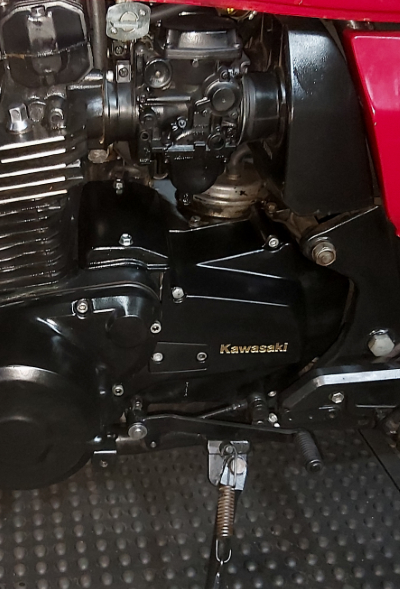
On my to-do list was to paint the engine covers satin black, and repair some cracks and "rash"...I have access to a sand-blast cabinet at work, so that made light work of removing the old paint.
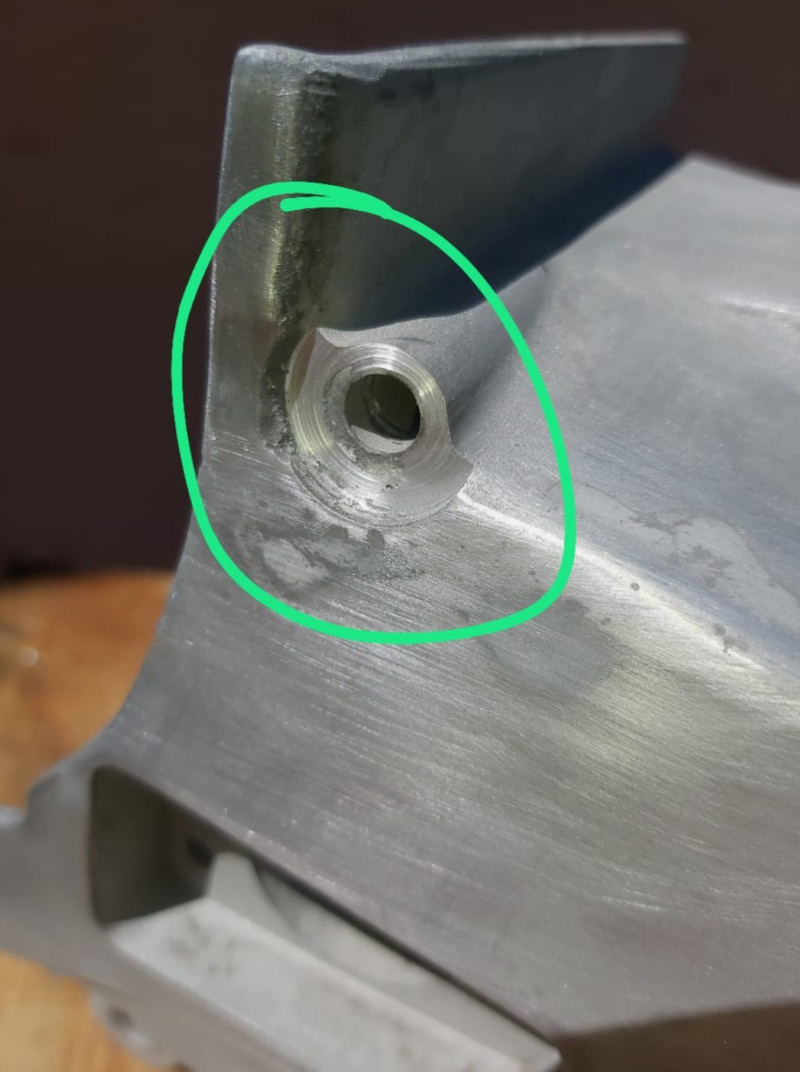
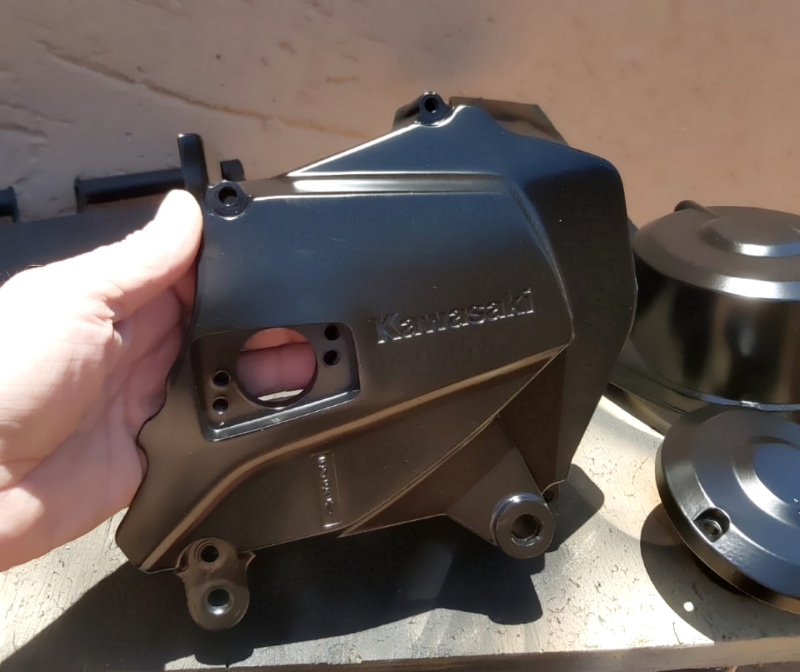
The sprocket cover had a bad crack (probably from a chain break) so that was tig welded.

The crack extended into one of the bolt holes, and it was impossible to weld the crack without slightly closing the bolt hole.
I fabricated a "spot facing tool" to kind of ream out the hole and clean up the face.
I was pleased with the result.
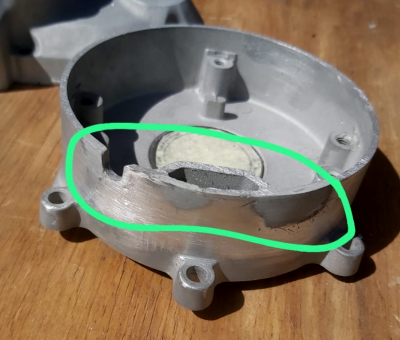
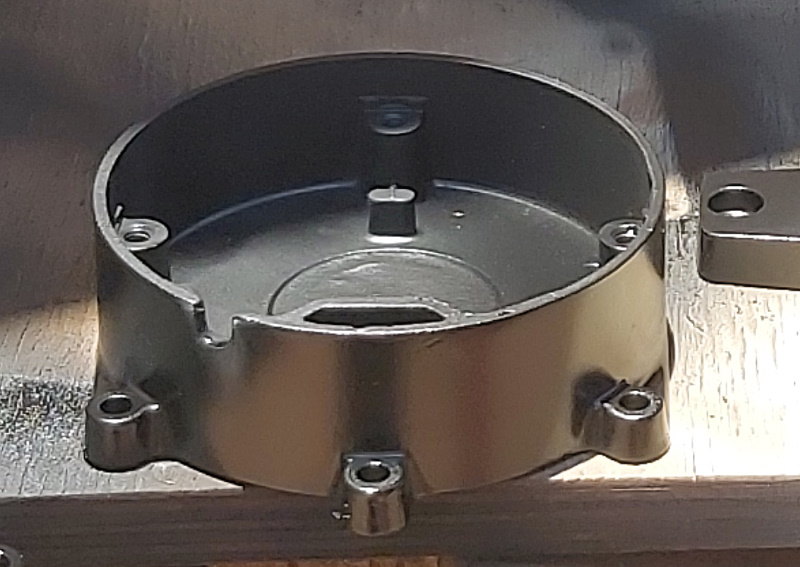
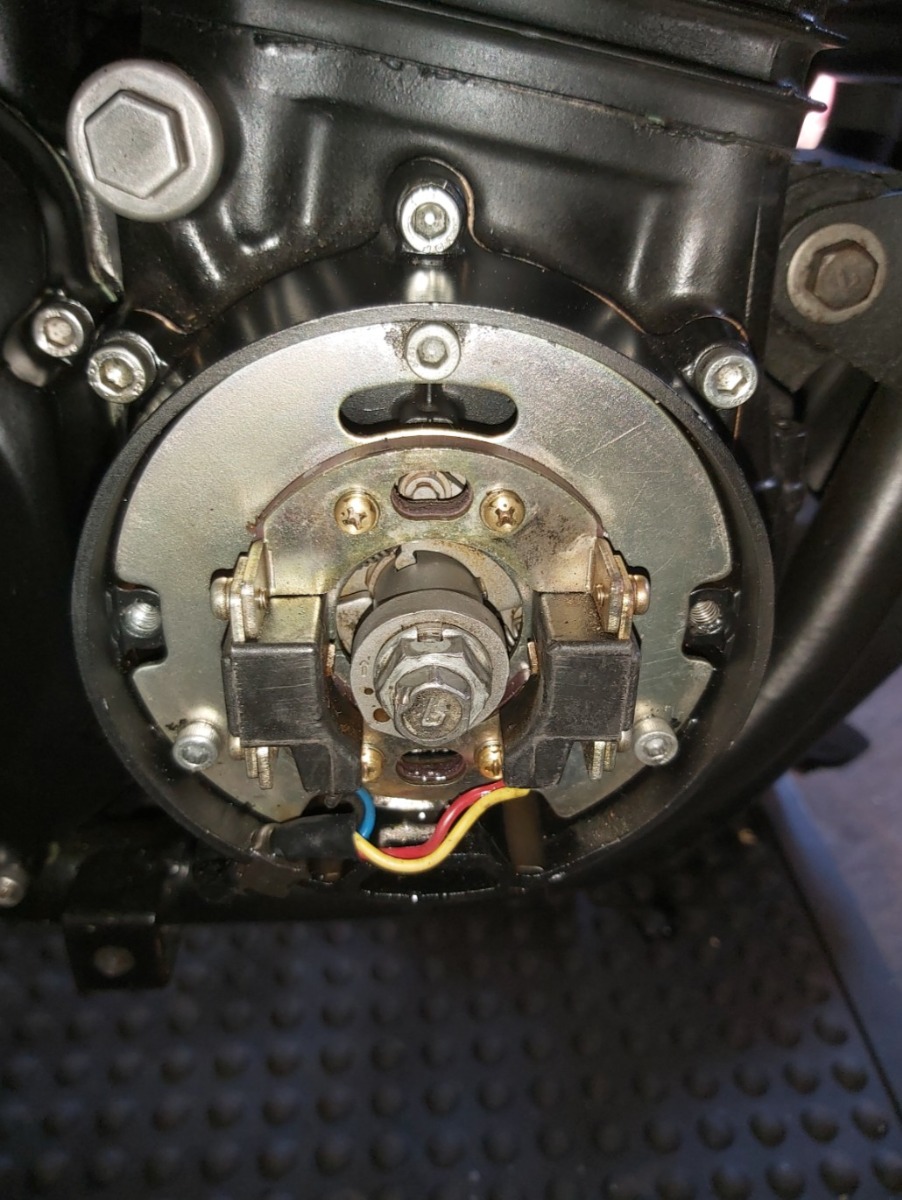
Also, the timing advancer housing had two big "chunks" out of it, so that needed to be repaired.
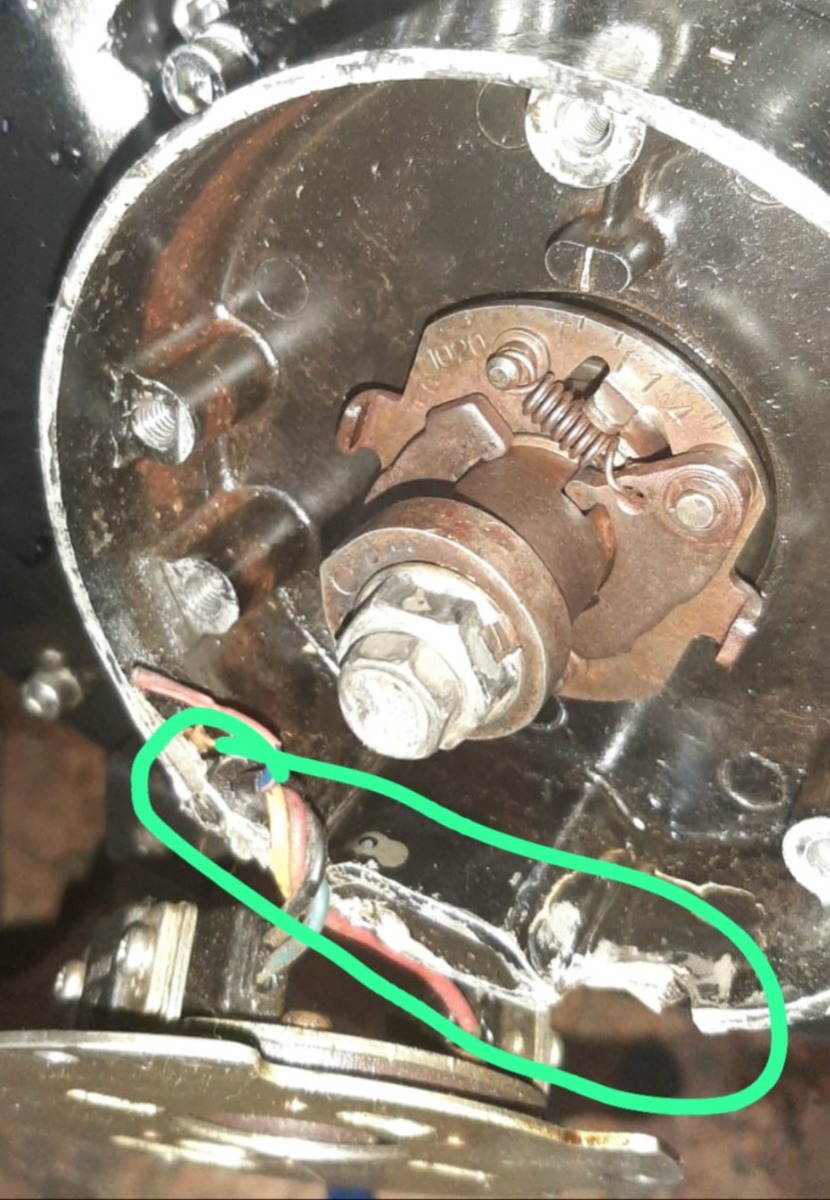
I repaired it with "Pratley Putty"
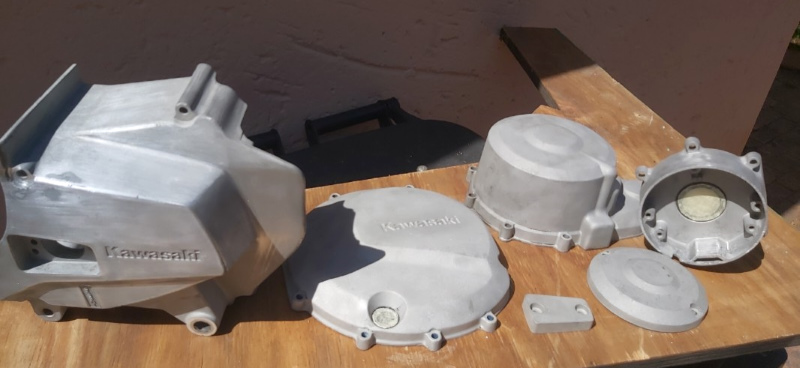
All the bits, prepped and ready for a light dusting of 2K primer...
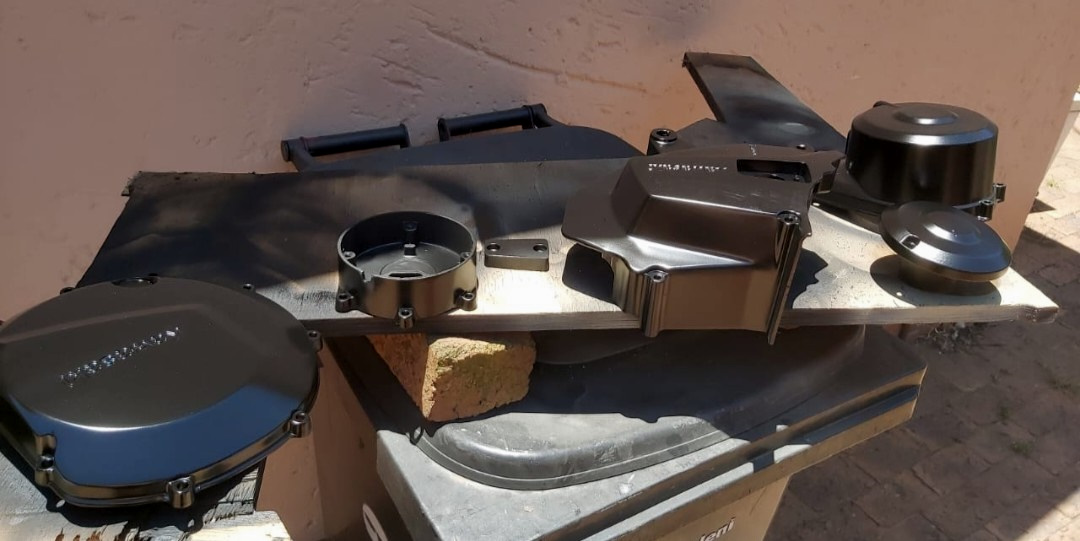
Time to "get my black on" ....
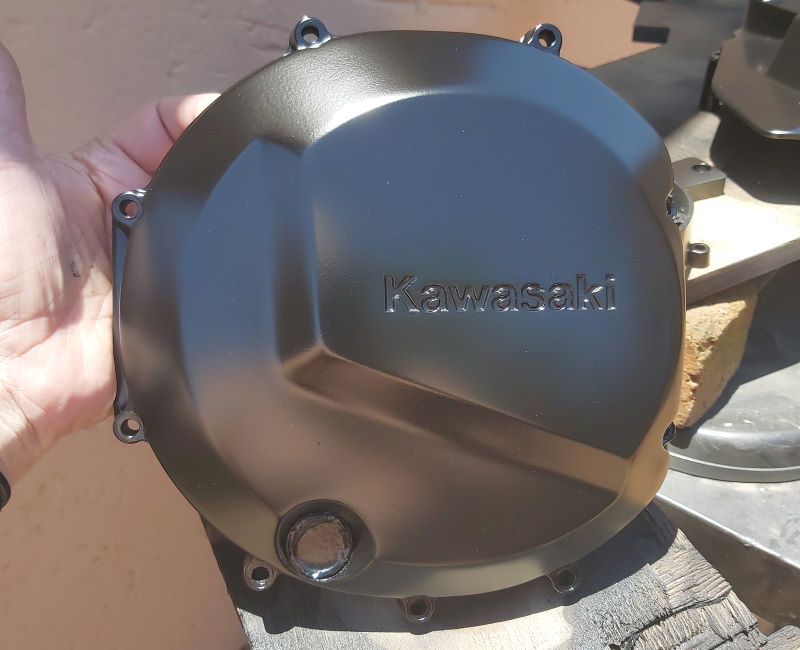
Here follows the sequence to get the gold into the sunken "KAWASAKI" lettering...
Mask off the area and spray gold, liberally.
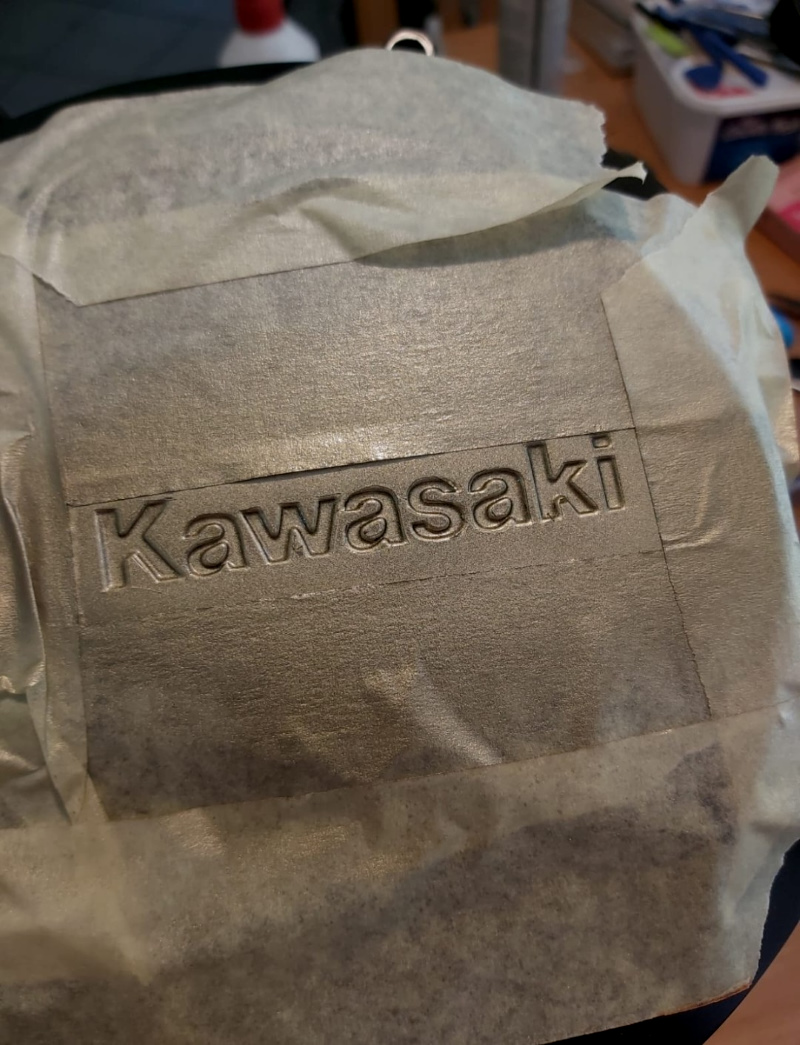
Remove the mask... while holding your breath!
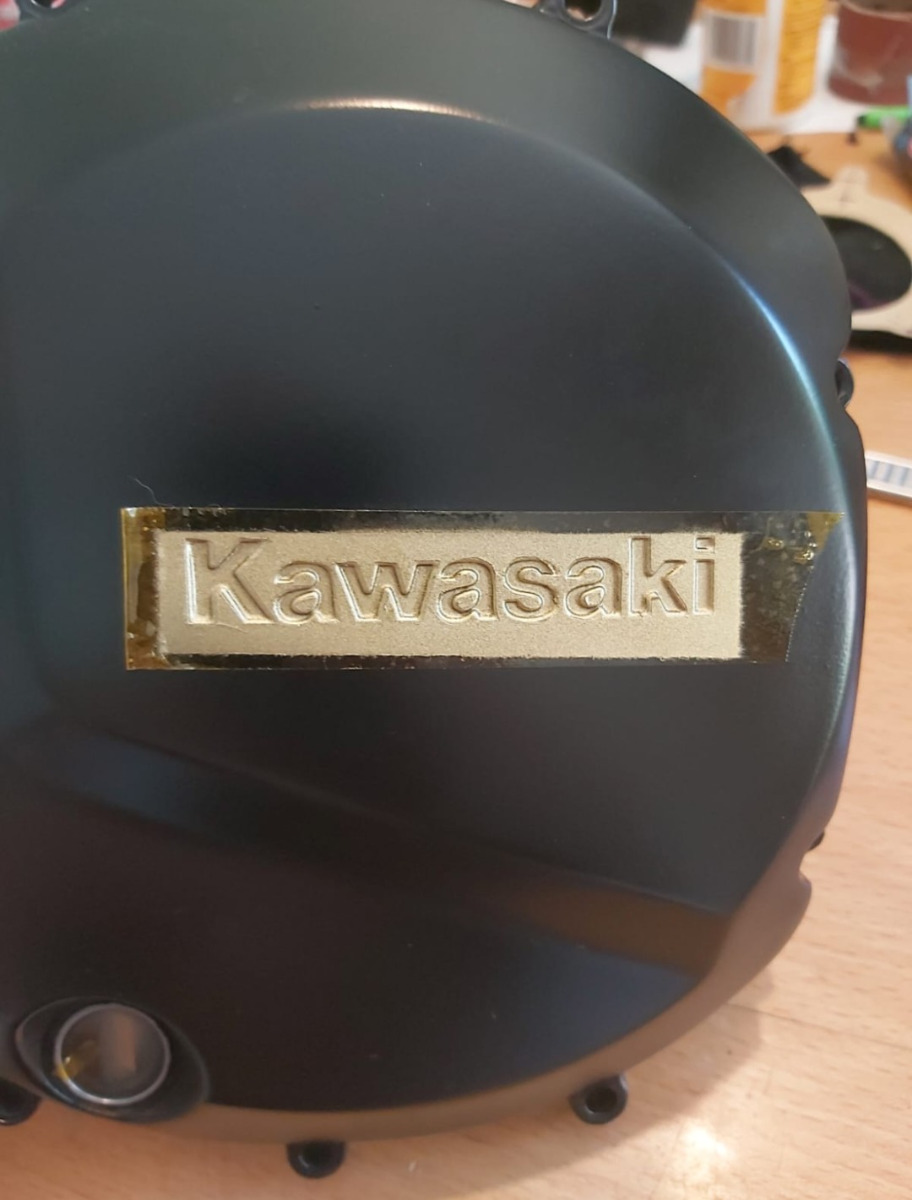
Then, with a clean paper towel, lightly soaked with thinners, quickly remove the excess gold...(This takes a bit of patience and a finger tip in the paper towel...)
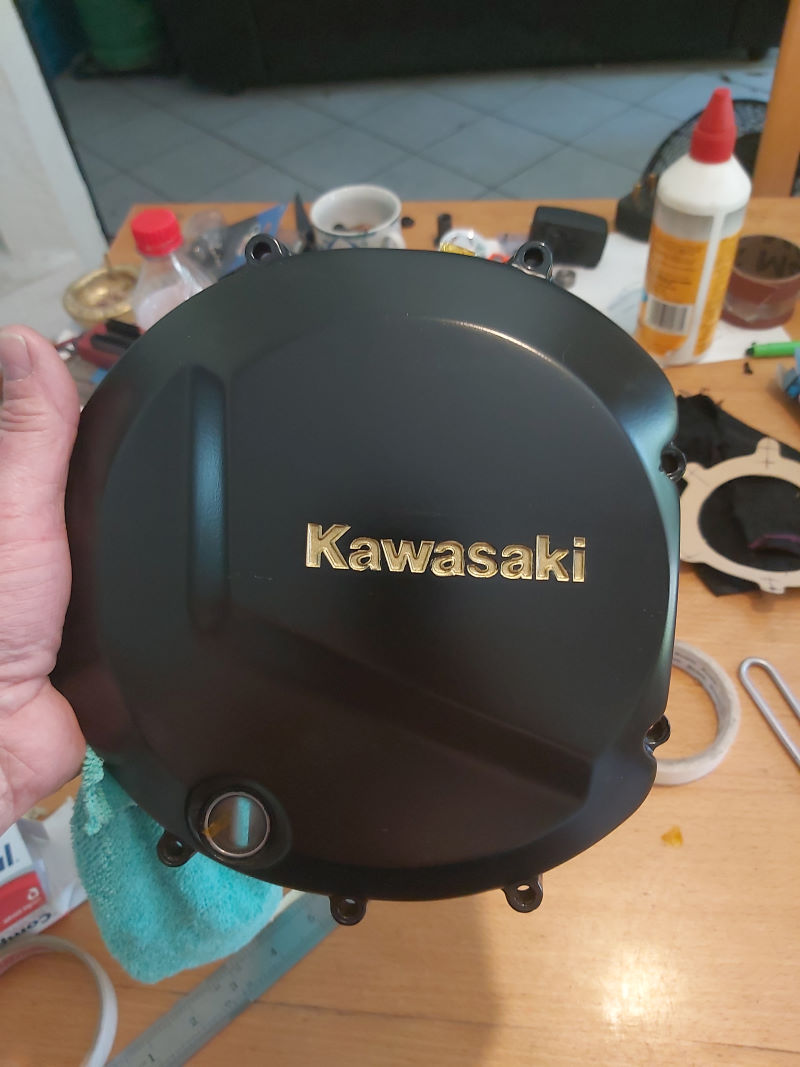
The sprocket cover received the same treatment...
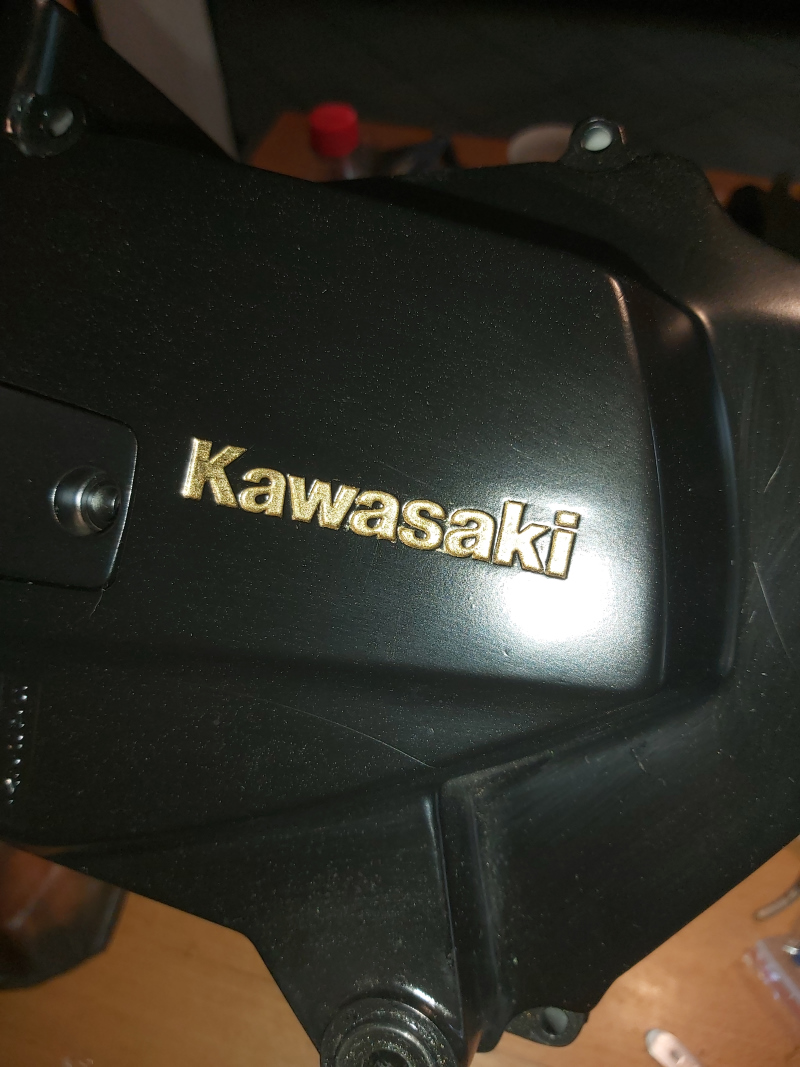
Here are the before / after pics...
Before:
AFTER:
Before:
AFTER:
I also cleaned up the advancer, lubed it lightly.
It's looking good in there now.
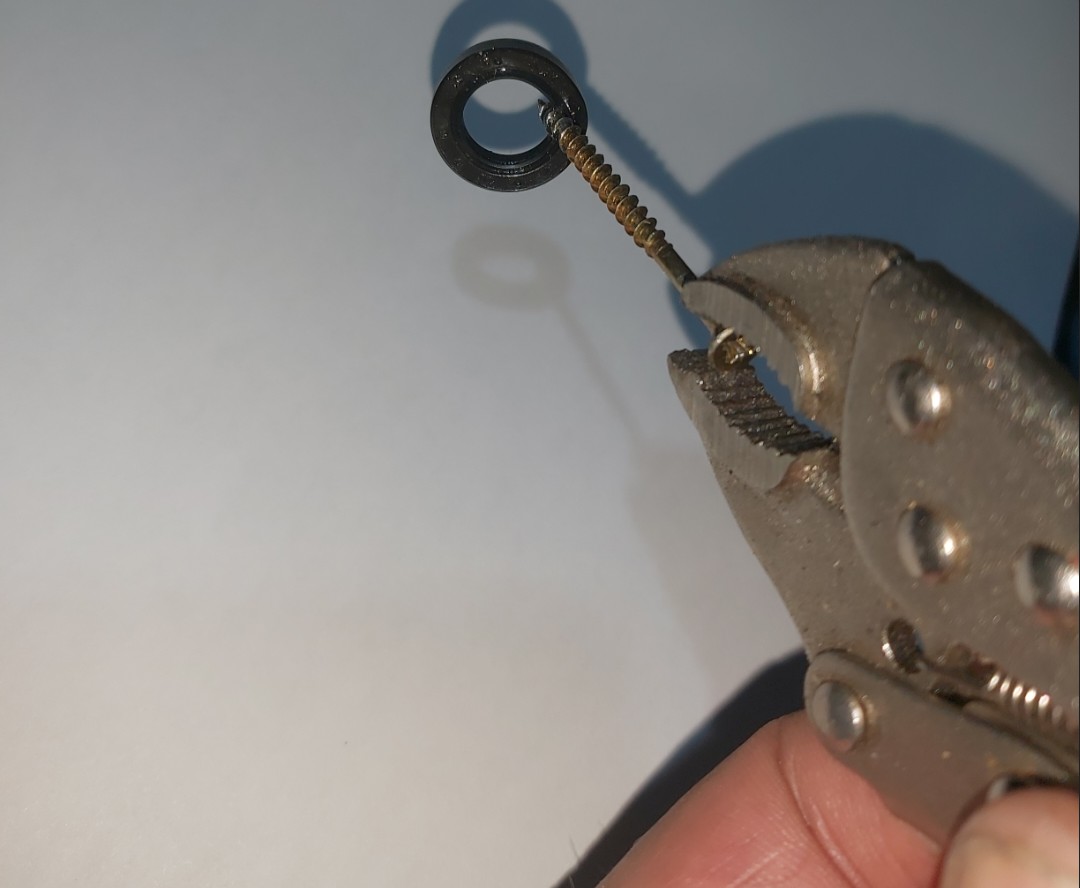
While the clutch cover was off, I replaced the leaky shift lever shaft seal, using a large wood screw.
Simply screw it in about 6mm, then gently tug the seal out.
Slip the new one on and tap it lightly home with a tube socket over the shaft.
It was a 2 minute job!
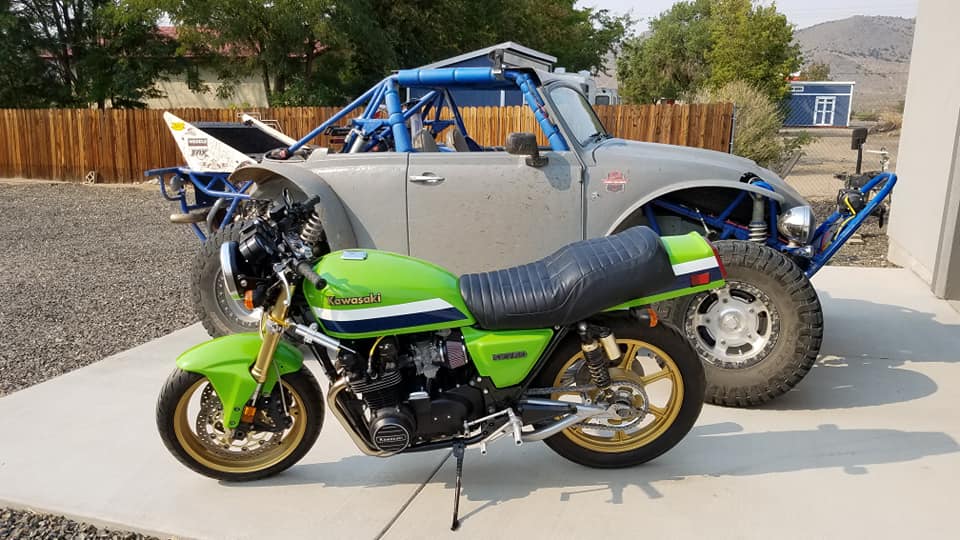
I am running out if excuses not to dive into painting her green...but watching the recent Mecum auction has pushed me over the edge, methinks!
Time to get my green on...
H.
I am aware, that while the rings are bedding in, riding at a constant speed is not desireable.
Loading the engine in top gear, but low revs (below 5000) is what is needed...
On my to-do list was to paint the engine covers satin black, and repair some cracks and "rash"...I have access to a sand-blast cabinet at work, so that made light work of removing the old paint.
The sprocket cover had a bad crack (probably from a chain break) so that was tig welded.
The crack extended into one of the bolt holes, and it was impossible to weld the crack without slightly closing the bolt hole.
I fabricated a "spot facing tool" to kind of ream out the hole and clean up the face.
I was pleased with the result.
Also, the timing advancer housing had two big "chunks" out of it, so that needed to be repaired.
I repaired it with "Pratley Putty"
All the bits, prepped and ready for a light dusting of 2K primer...
Time to "get my black on" ....
Here follows the sequence to get the gold into the sunken "KAWASAKI" lettering...
Mask off the area and spray gold, liberally.
Remove the mask... while holding your breath!
Then, with a clean paper towel, lightly soaked with thinners, quickly remove the excess gold...(This takes a bit of patience and a finger tip in the paper towel...)
The sprocket cover received the same treatment...
Here are the before / after pics...
Before:
AFTER:
Before:
AFTER:
I also cleaned up the advancer, lubed it lightly.
It's looking good in there now.
While the clutch cover was off, I replaced the leaky shift lever shaft seal, using a large wood screw.
Simply screw it in about 6mm, then gently tug the seal out.
Slip the new one on and tap it lightly home with a tube socket over the shaft.
It was a 2 minute job!
I am running out if excuses not to dive into painting her green...but watching the recent Mecum auction has pushed me over the edge, methinks!
Time to get my green on...
H.
'81 GPz 550 D1
'81 GPz 1100 B1 ELR "Tribute" www.kzrider.com/forum/11-projects/617040...-elr-tribute?start=0
'82 Yamaha YB100 Fizzie
'79 Suzuki GT200 X5 TWO STROKE TWIN - SMOKER!
'81 GPz 1100 B1 ELR "Tribute" www.kzrider.com/forum/11-projects/617040...-elr-tribute?start=0
'82 Yamaha YB100 Fizzie
'79 Suzuki GT200 X5 TWO STROKE TWIN - SMOKER!
Last edit: 01 Feb 2023 23:50 by howardhb.
The following user(s) said Thank You: rstnick, Scirocco
Please Log in or Create an account to join the conversation.
- Street Fighter LTD
-
- Offline
- Moderator
-
Registered
- TURBO, Its Better to be Blown than Injected
- Posts: 5110
- Thanks: 2305
Re: 1981 GPz1100 B1 Rstomod / ELR "Tribute"
01 Feb 2023 06:51
Awesome effort !!!!!!!!!!!!!
Original owner 78 1000 LTD
Mr Turbo Race Kit, MTC 1075 Turbo pistons by PitStop Performance , Falicon Ultra Lite Super Crank, APE everything. Les Holt @ PDM's Billet Goodies . Frame by Chuck Kurzawa @ Logghe Chassis . Deep sump 5qt oil pan. RIP Bill Hahn
The following user(s) said Thank You: howardhb
Please Log in or Create an account to join the conversation.
- Wookie58
-
- Away
- Moderator
-
Registered
- Posts: 6449
- Thanks: 4078
Re: 1981 GPz1100 B1 Rstomod / ELR "Tribute"
01 Feb 2023 07:22
Great work Howard, you will be ready to send me some pictures soon

1982 KZ1000 Ltd
www.kzrider.com/forum/11-projects/617631...-82-begins?start=192
kzrider.com/filebase-alias?view=download...d-fault-diagnosis&ca
www.kzrider.com/forum/11-projects/617631...-82-begins?start=192
kzrider.com/filebase-alias?view=download...d-fault-diagnosis&ca
The following user(s) said Thank You: howardhb
Please Log in or Create an account to join the conversation.
- howardhb
-
Topic Author
- Offline
- Sustaining Member
-
Registered
- God, I trust
- Posts: 473
- Thanks: 510
Re: 1981 GPz1100 B1 Rstomod / ELR "Tribute"
01 Feb 2023 07:29
Thanks Wookie!
Yeah, no more excuses.
I have everything I need: very green paint, high quality (read EXPENSIVE) decal set, new tank, side-cover and tail-piece badges... time....
Yeah, no more excuses.
I have everything I need: very green paint, high quality (read EXPENSIVE) decal set, new tank, side-cover and tail-piece badges... time....
'81 GPz 550 D1
'81 GPz 1100 B1 ELR "Tribute" www.kzrider.com/forum/11-projects/617040...-elr-tribute?start=0
'82 Yamaha YB100 Fizzie
'79 Suzuki GT200 X5 TWO STROKE TWIN - SMOKER!
'81 GPz 1100 B1 ELR "Tribute" www.kzrider.com/forum/11-projects/617040...-elr-tribute?start=0
'82 Yamaha YB100 Fizzie
'79 Suzuki GT200 X5 TWO STROKE TWIN - SMOKER!
The following user(s) said Thank You: Wookie58
Please Log in or Create an account to join the conversation.
- Skidmark
-
- Offline
- User
-
Registered
- Posts: 1087
- Thanks: 312
Re: 1981 GPz1100 B1 Rstomod / ELR "Tribute"
01 Feb 2023 09:03
No decals, all paint!
Retired gearhead
'81 KZ-750 E2
'87 Suzuki Savage 650 Street Tracker (lost in the shop fire)
'81 KZ-750 E2
'87 Suzuki Savage 650 Street Tracker (lost in the shop fire)
The following user(s) said Thank You: slayer61, howardhb
Please Log in or Create an account to join the conversation.
- howardhb
-
Topic Author
- Offline
- Sustaining Member
-
Registered
- God, I trust
- Posts: 473
- Thanks: 510
Re: 1981 GPz1100 B1 Rstomod / ELR "Tribute"
01 Feb 2023 13:24No decals, all paint!
... And patience. Nice work!
'81 GPz 550 D1
'81 GPz 1100 B1 ELR "Tribute" www.kzrider.com/forum/11-projects/617040...-elr-tribute?start=0
'82 Yamaha YB100 Fizzie
'79 Suzuki GT200 X5 TWO STROKE TWIN - SMOKER!
'81 GPz 1100 B1 ELR "Tribute" www.kzrider.com/forum/11-projects/617040...-elr-tribute?start=0
'82 Yamaha YB100 Fizzie
'79 Suzuki GT200 X5 TWO STROKE TWIN - SMOKER!
The following user(s) said Thank You: Skidmark
Please Log in or Create an account to join the conversation.
- Scirocco
-

- Offline
- Premium Member
-

Registered
- Never change a running system
- Posts: 4397
- Thanks: 2260
Re: 1981 GPz1100 B1 Rstomod / ELR "Tribute"
01 Feb 2023 21:08 - 01 Feb 2023 21:12
Yes, go green

My 1975 Z 1 B 900 Project
www.kzrider.com/forum/11-projects/605133...ears-deep-sleep-mode
www.kzrider.com/forum/11-projects/605133...ears-deep-sleep-mode
Last edit: 01 Feb 2023 21:12 by Scirocco.
The following user(s) said Thank You: howardhb
Please Log in or Create an account to join the conversation.
Moderators: Street Fighter LTD