
KZ750H Restoration
- calum
-
 Topic Author
- Offline
- User
-

Registered
- Posts: 1144
- Thanks: 415
Re: KZ750H Restoration
06 Feb 2020 09:06
Bore scope ordered. Will be here on Saturday so I can check before I try to start the engine for the first time. I hand cranked it a couple of times doing the valve clearances but should hopefully still be OK. Quite interested to see how the bore scope goes, could be a handy tool to have lying around.
KZ1000 Restomod (
www.kzrider.com/forum/11-projects/614517-1977-kz1000-restomod
)
1977 KZ1000A1 ( www.kzrider.com/forum/11-projects/616901...-spare-parts-project )
1980 KZ750H ( kzrider.com/forum/11-projects/612054-kz750h-restoration )
2000 BMW F650GS
1977 KZ1000A1 ( www.kzrider.com/forum/11-projects/616901...-spare-parts-project )
1980 KZ750H ( kzrider.com/forum/11-projects/612054-kz750h-restoration )
2000 BMW F650GS
Please Log in or Create an account to join the conversation.
- M_a_t_t
-
- Offline
- Sustaining Member
-

Registered
- Posts: 254
- Thanks: 41
Re: KZ750H Restoration
06 Feb 2020 09:46
Are those factory handlebars for the H model? I've got an e2 that looks likes its been swapped with stuff from the H model and those handlebars look very similar.
83 KZ1100A (shaft)
17 Versys X 300 abs
81 kz650h1
81 kz750e2
90 Honda CBR600F (brother's)
17 Versys X 300 abs
81 kz650h1
81 kz750e2
90 Honda CBR600F (brother's)
Please Log in or Create an account to join the conversation.
- calum
-
Topic Author
- Offline
- User
-
Registered
- Posts: 1144
- Thanks: 415
Re: KZ750H Restoration
06 Feb 2020 09:51
Yeah, they're the stock handlebars. Looks like you have a 750H seat as well.
KZ1000 Restomod (
www.kzrider.com/forum/11-projects/614517-1977-kz1000-restomod
)
1977 KZ1000A1 ( www.kzrider.com/forum/11-projects/616901...-spare-parts-project )
1980 KZ750H ( kzrider.com/forum/11-projects/612054-kz750h-restoration )
2000 BMW F650GS
1977 KZ1000A1 ( www.kzrider.com/forum/11-projects/616901...-spare-parts-project )
1980 KZ750H ( kzrider.com/forum/11-projects/612054-kz750h-restoration )
2000 BMW F650GS
Please Log in or Create an account to join the conversation.
- calum
-
Topic Author
- Offline
- User
-
Registered
- Posts: 1144
- Thanks: 415
Re: KZ750H Restoration
09 Feb 2020 13:36 - 09 Feb 2020 13:37
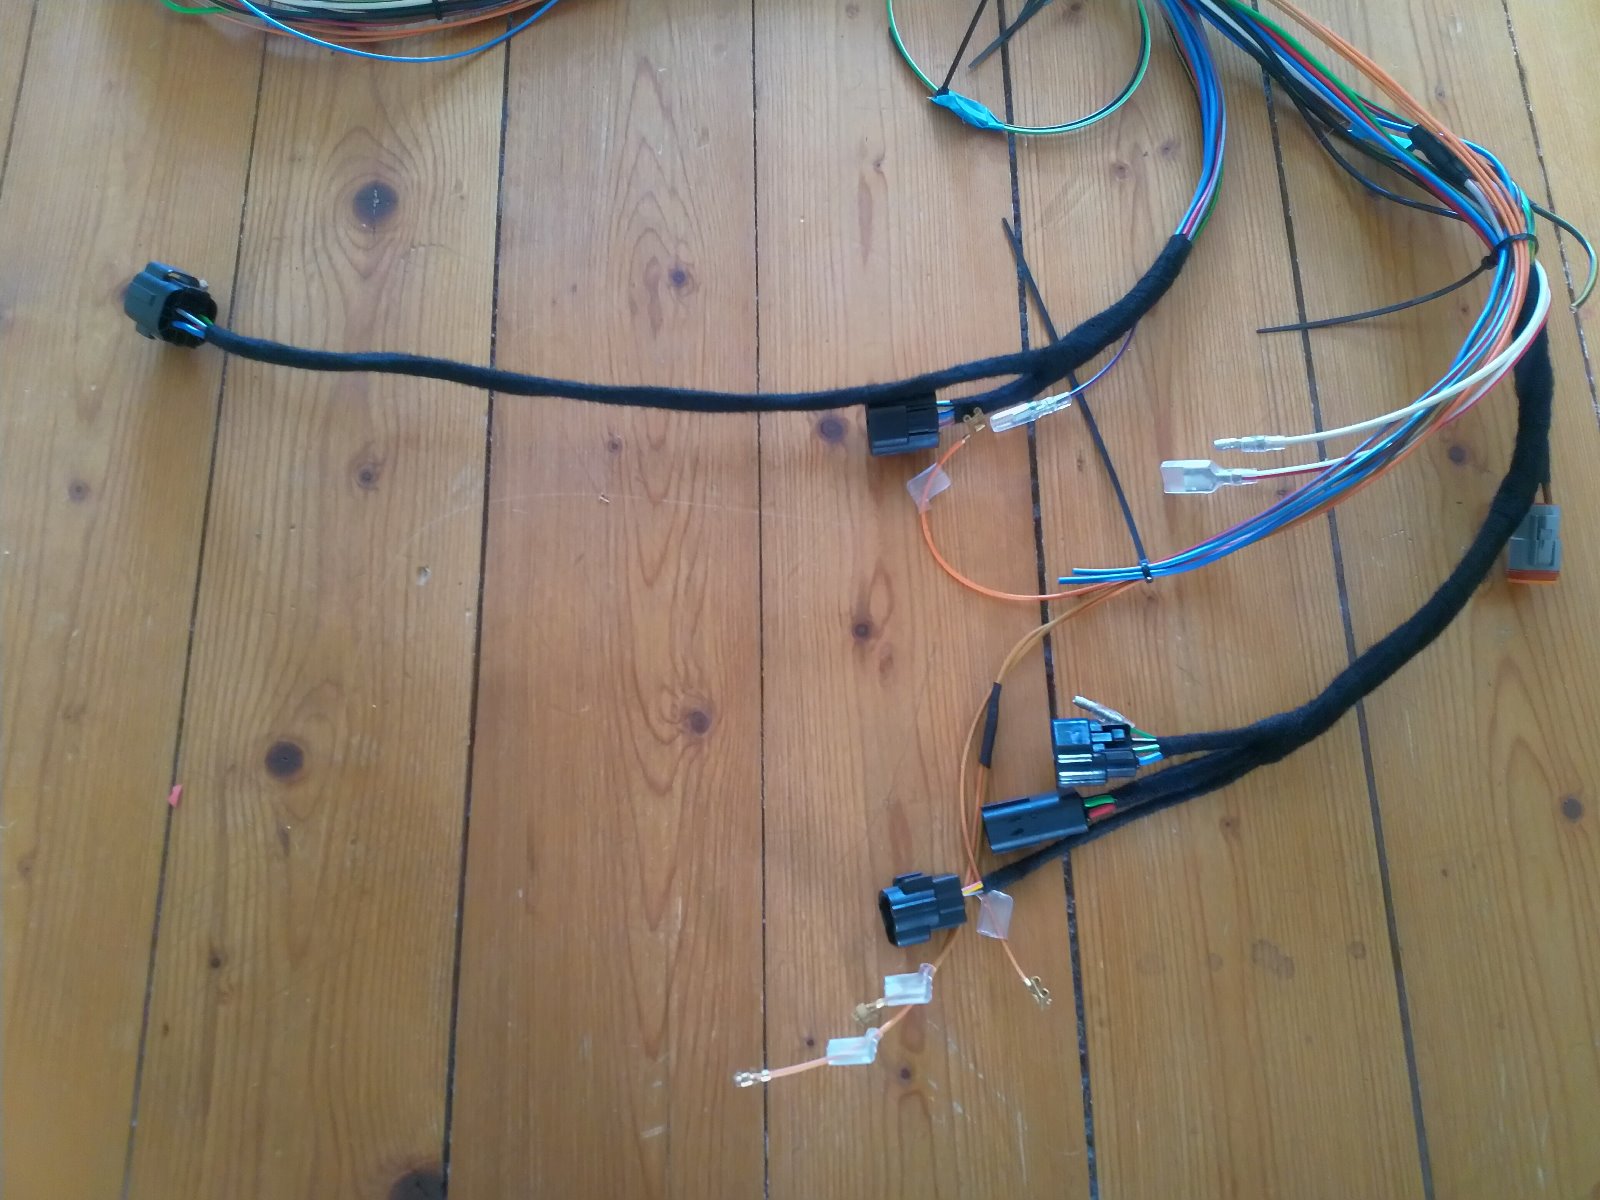
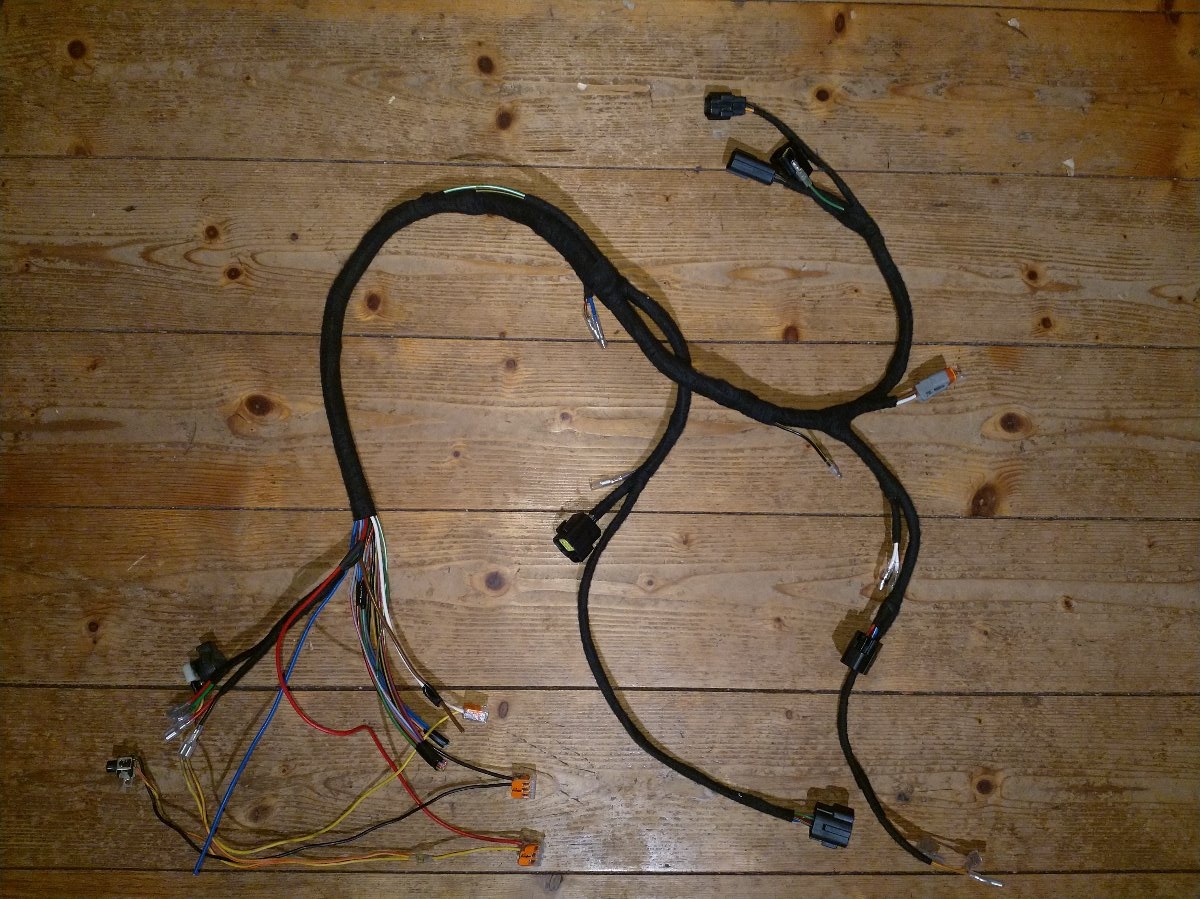
Got a little bit further with the wire harness today. Had to call it quits though as I was missing a single colour for the wiring!! Ordered the missing colour and will keep working on it on Wednesday.
Was thinking about separating the main harness from the wiring going into the headlight with a 12-pin econoseal connector. This would just be a bit of a separation of concerns, making it easier to fix any future problems. The connector would end up being right under the frame but above the valve cover (so I can still have the coil and handlebar control connectors on the main harness). There'd be a bit of space between the connector and the engine and they're rated to 105°C. Should I expect any melting?
Todays half finished work:
KZ1000 Restomod (
www.kzrider.com/forum/11-projects/614517-1977-kz1000-restomod
)
1977 KZ1000A1 ( www.kzrider.com/forum/11-projects/616901...-spare-parts-project )
1980 KZ750H ( kzrider.com/forum/11-projects/612054-kz750h-restoration )
2000 BMW F650GS
1977 KZ1000A1 ( www.kzrider.com/forum/11-projects/616901...-spare-parts-project )
1980 KZ750H ( kzrider.com/forum/11-projects/612054-kz750h-restoration )
2000 BMW F650GS
Last edit: 09 Feb 2020 13:37 by calum.
The following user(s) said Thank You: Nessism
Please Log in or Create an account to join the conversation.
- calum
-
Topic Author
- Offline
- User
-
Registered
- Posts: 1144
- Thanks: 415
Re: KZ750H Restoration
12 Feb 2020 07:51
Had a look in the cylinders today - no debris so all good to start.

Finished up the wiring for all the main components. Need to wire up the coils and then I can just short the ignition to start her up. Have used a cloth wrap on all the parts of the wire harness that are covered. This will be a fair weather bike so no I'm not really worried about rot. Also kind of an experiment to see how it holds up to moisture and vibrations/rubbing. Will put a 15 point connector up towards the front under the tank. This will go to the cockpit and I'll use a waterproof wrap from there (ditto for the tail).
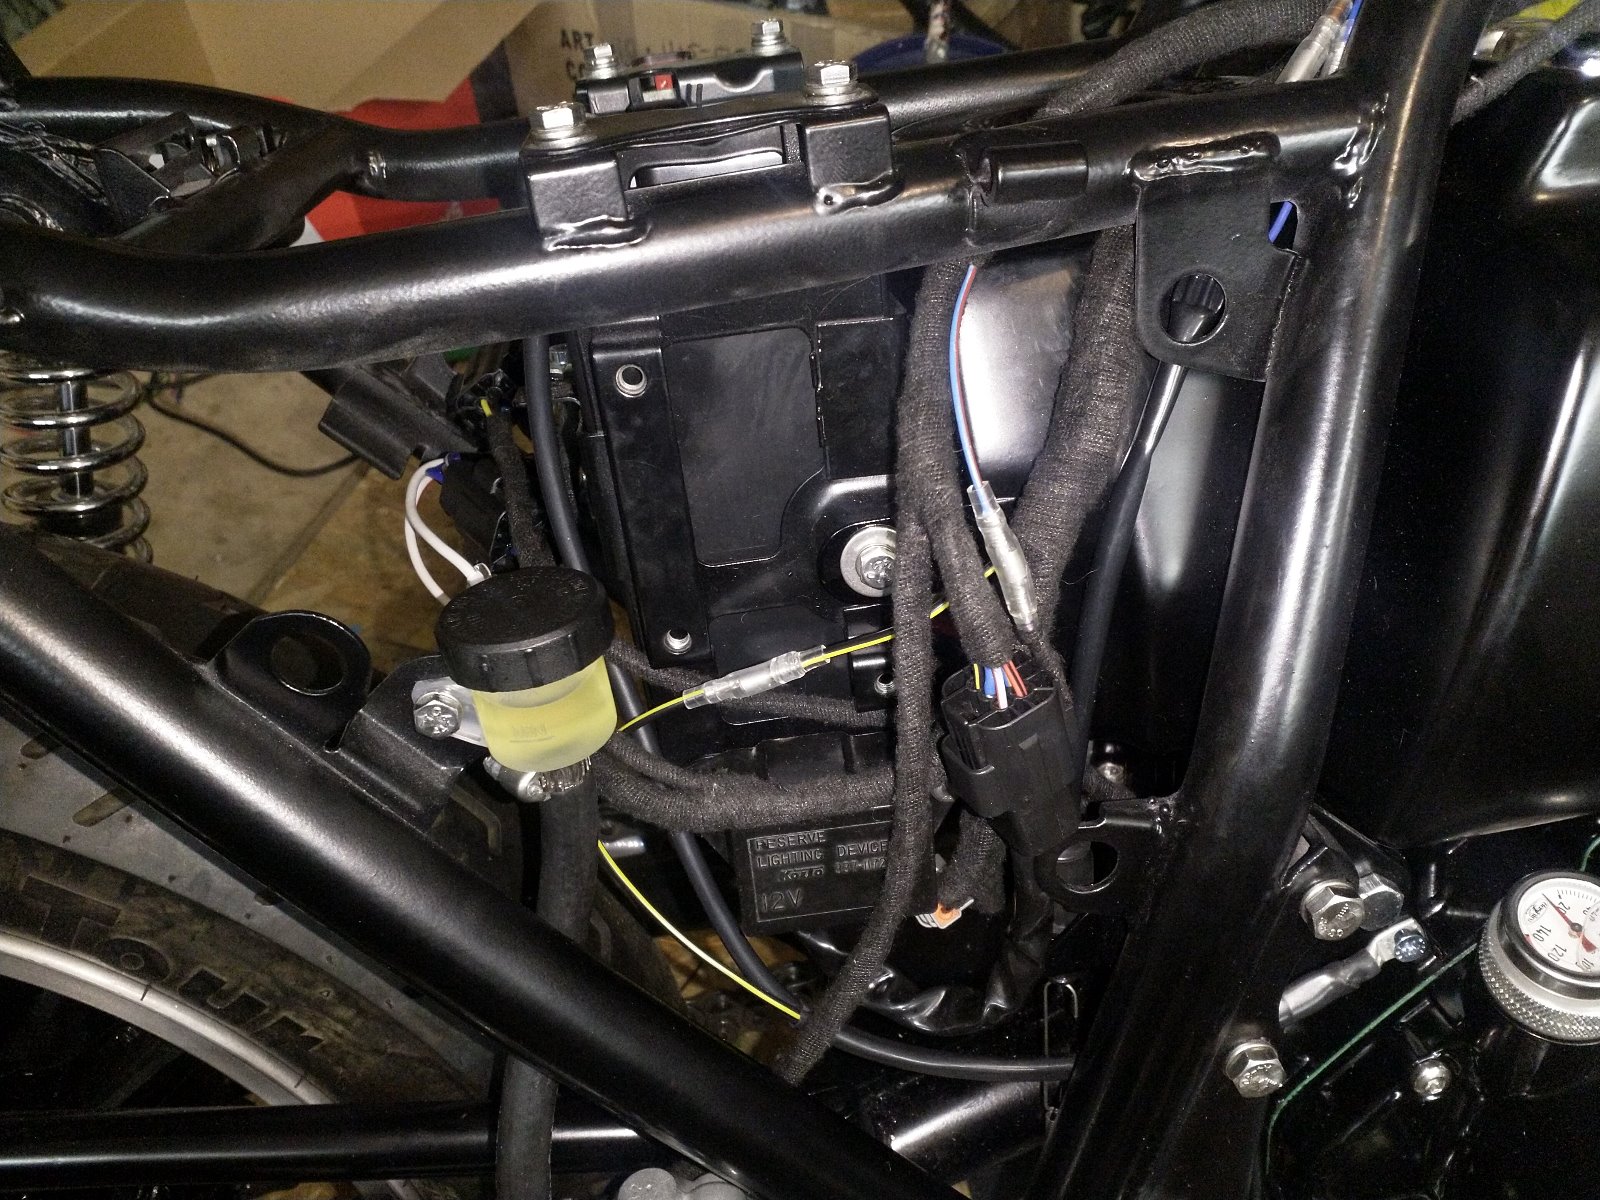
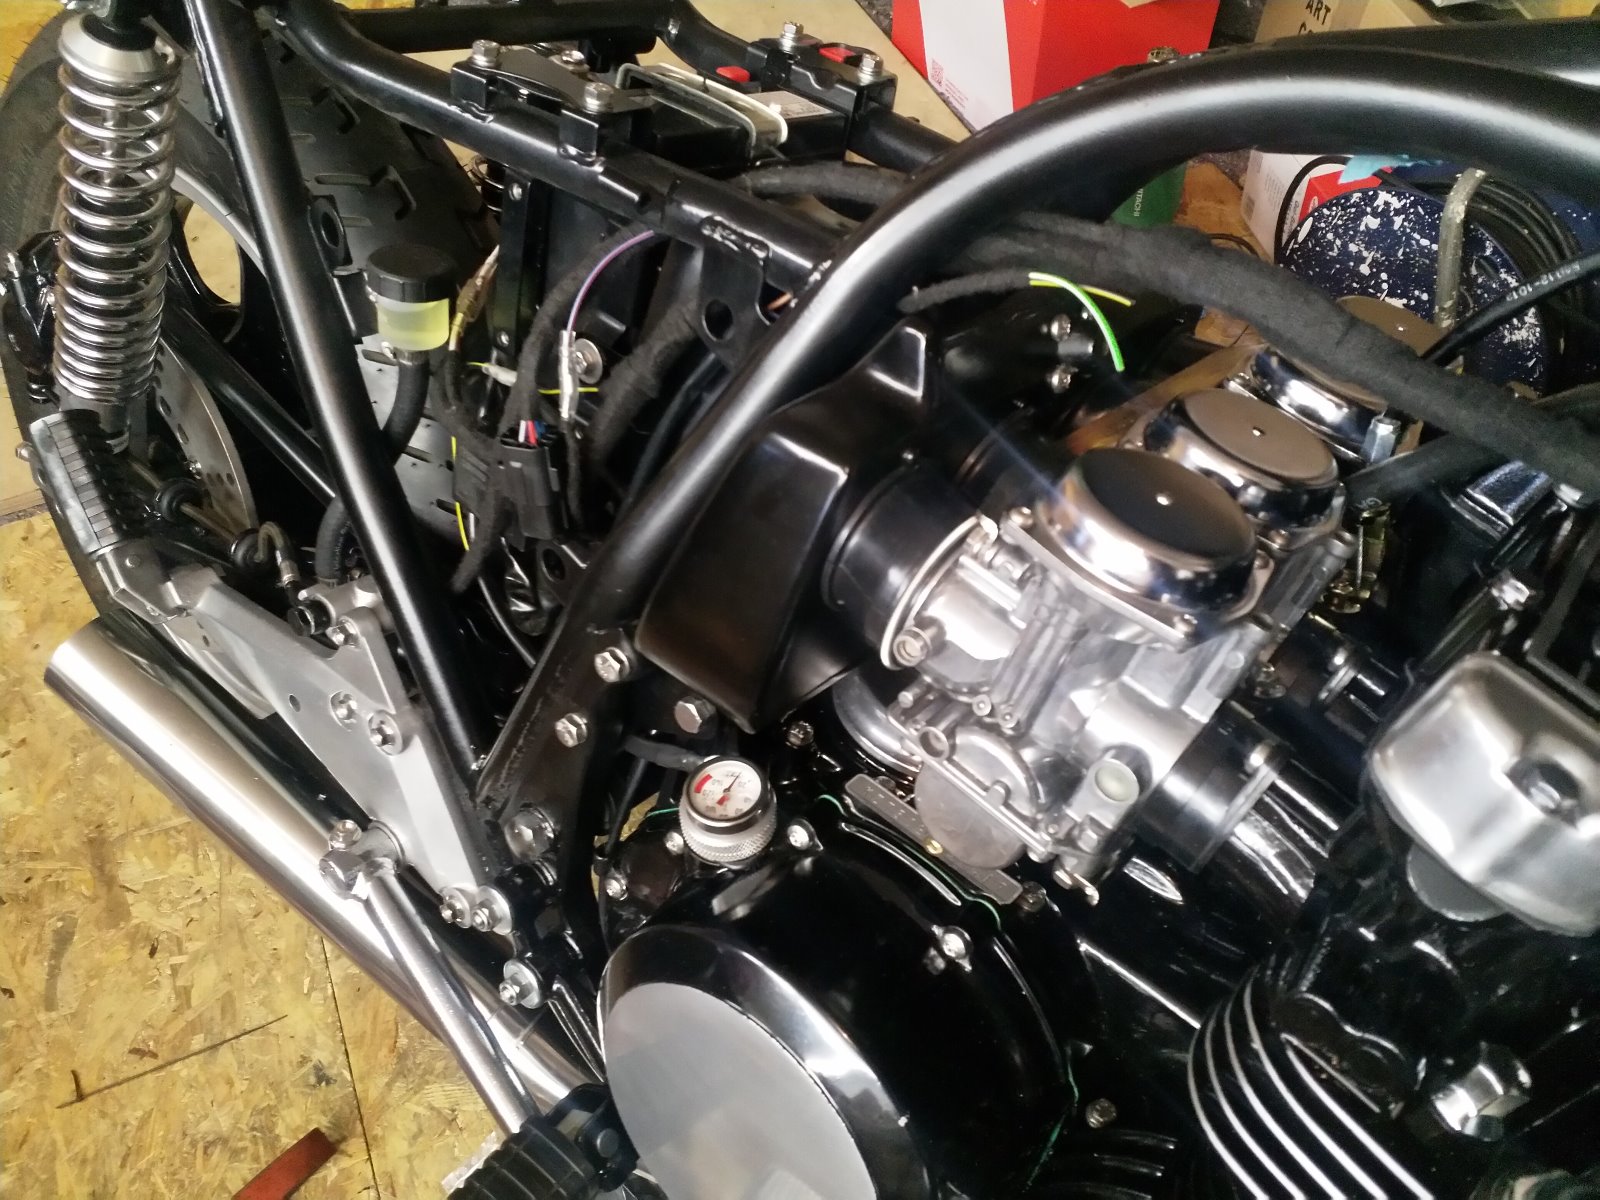
Finished up the wiring for all the main components. Need to wire up the coils and then I can just short the ignition to start her up. Have used a cloth wrap on all the parts of the wire harness that are covered. This will be a fair weather bike so no I'm not really worried about rot. Also kind of an experiment to see how it holds up to moisture and vibrations/rubbing. Will put a 15 point connector up towards the front under the tank. This will go to the cockpit and I'll use a waterproof wrap from there (ditto for the tail).
KZ1000 Restomod (
www.kzrider.com/forum/11-projects/614517-1977-kz1000-restomod
)
1977 KZ1000A1 ( www.kzrider.com/forum/11-projects/616901...-spare-parts-project )
1980 KZ750H ( kzrider.com/forum/11-projects/612054-kz750h-restoration )
2000 BMW F650GS
1977 KZ1000A1 ( www.kzrider.com/forum/11-projects/616901...-spare-parts-project )
1980 KZ750H ( kzrider.com/forum/11-projects/612054-kz750h-restoration )
2000 BMW F650GS
Please Log in or Create an account to join the conversation.
- calum
-
Topic Author
- Offline
- User
-
Registered
- Posts: 1144
- Thanks: 415
Re: KZ750H Restoration
12 Feb 2020 13:05
Was getting too cold to crimp wires in the garage, so I pulled the harness and did a bit more work at the kitchen table. Put the spade terminals on for the coils and used some clips to connect up the kill and starter switches. The front will get connected up when I get the 12-way connector (it's in the post) and the headlight housing. I'll use a 12-way, a 2-way and a bullet connector (for the main power line) to connect the front to the main harness. Couldn't get hold of a decent 15-way connector.
Anyway, I've got everything on the main harness done except the fuel sensor, so I can put some fuel in the carbs on Saturday and see what happens.
Anyway, I've got everything on the main harness done except the fuel sensor, so I can put some fuel in the carbs on Saturday and see what happens.
KZ1000 Restomod (
www.kzrider.com/forum/11-projects/614517-1977-kz1000-restomod
)
1977 KZ1000A1 ( www.kzrider.com/forum/11-projects/616901...-spare-parts-project )
1980 KZ750H ( kzrider.com/forum/11-projects/612054-kz750h-restoration )
2000 BMW F650GS
1977 KZ1000A1 ( www.kzrider.com/forum/11-projects/616901...-spare-parts-project )
1980 KZ750H ( kzrider.com/forum/11-projects/612054-kz750h-restoration )
2000 BMW F650GS
Please Log in or Create an account to join the conversation.
- calum
-
Topic Author
- Offline
- User
-
Registered
- Posts: 1144
- Thanks: 415
Re: KZ750H Restoration
15 Feb 2020 11:44 - 15 Feb 2020 11:52
So, finally got everything sorted for the first run after 10 months of work. Was a bit ginger on the gas first up.
Here's a short video after the engine was warmed up. Idle is still a bit high, but considering I completely forgot to plug up the vacuum pipe on the second carb (usually goes to the petcock) it ran reasonably well. I have since balanced the carbs (am still trying to figure out how to tighten the locknuts on the adjusters - no room to work at all). If anyone out there with a good ear (something I don't have) can give me some feedback it would be greatly appreciated.
Here's a short video after the engine was warmed up. Idle is still a bit high, but considering I completely forgot to plug up the vacuum pipe on the second carb (usually goes to the petcock) it ran reasonably well. I have since balanced the carbs (am still trying to figure out how to tighten the locknuts on the adjusters - no room to work at all). If anyone out there with a good ear (something I don't have) can give me some feedback it would be greatly appreciated.
KZ1000 Restomod (
www.kzrider.com/forum/11-projects/614517-1977-kz1000-restomod
)
1977 KZ1000A1 ( www.kzrider.com/forum/11-projects/616901...-spare-parts-project )
1980 KZ750H ( kzrider.com/forum/11-projects/612054-kz750h-restoration )
2000 BMW F650GS
1977 KZ1000A1 ( www.kzrider.com/forum/11-projects/616901...-spare-parts-project )
1980 KZ750H ( kzrider.com/forum/11-projects/612054-kz750h-restoration )
2000 BMW F650GS
Last edit: 15 Feb 2020 11:52 by calum.
Please Log in or Create an account to join the conversation.
- calum
-
Topic Author
- Offline
- User
-
Registered
- Posts: 1144
- Thanks: 415
Re: KZ750H Restoration
15 Feb 2020 11:51 - 15 Feb 2020 12:04
Here's a pic of the nice gold headers after getting it running. At least I know it's not running too lean.
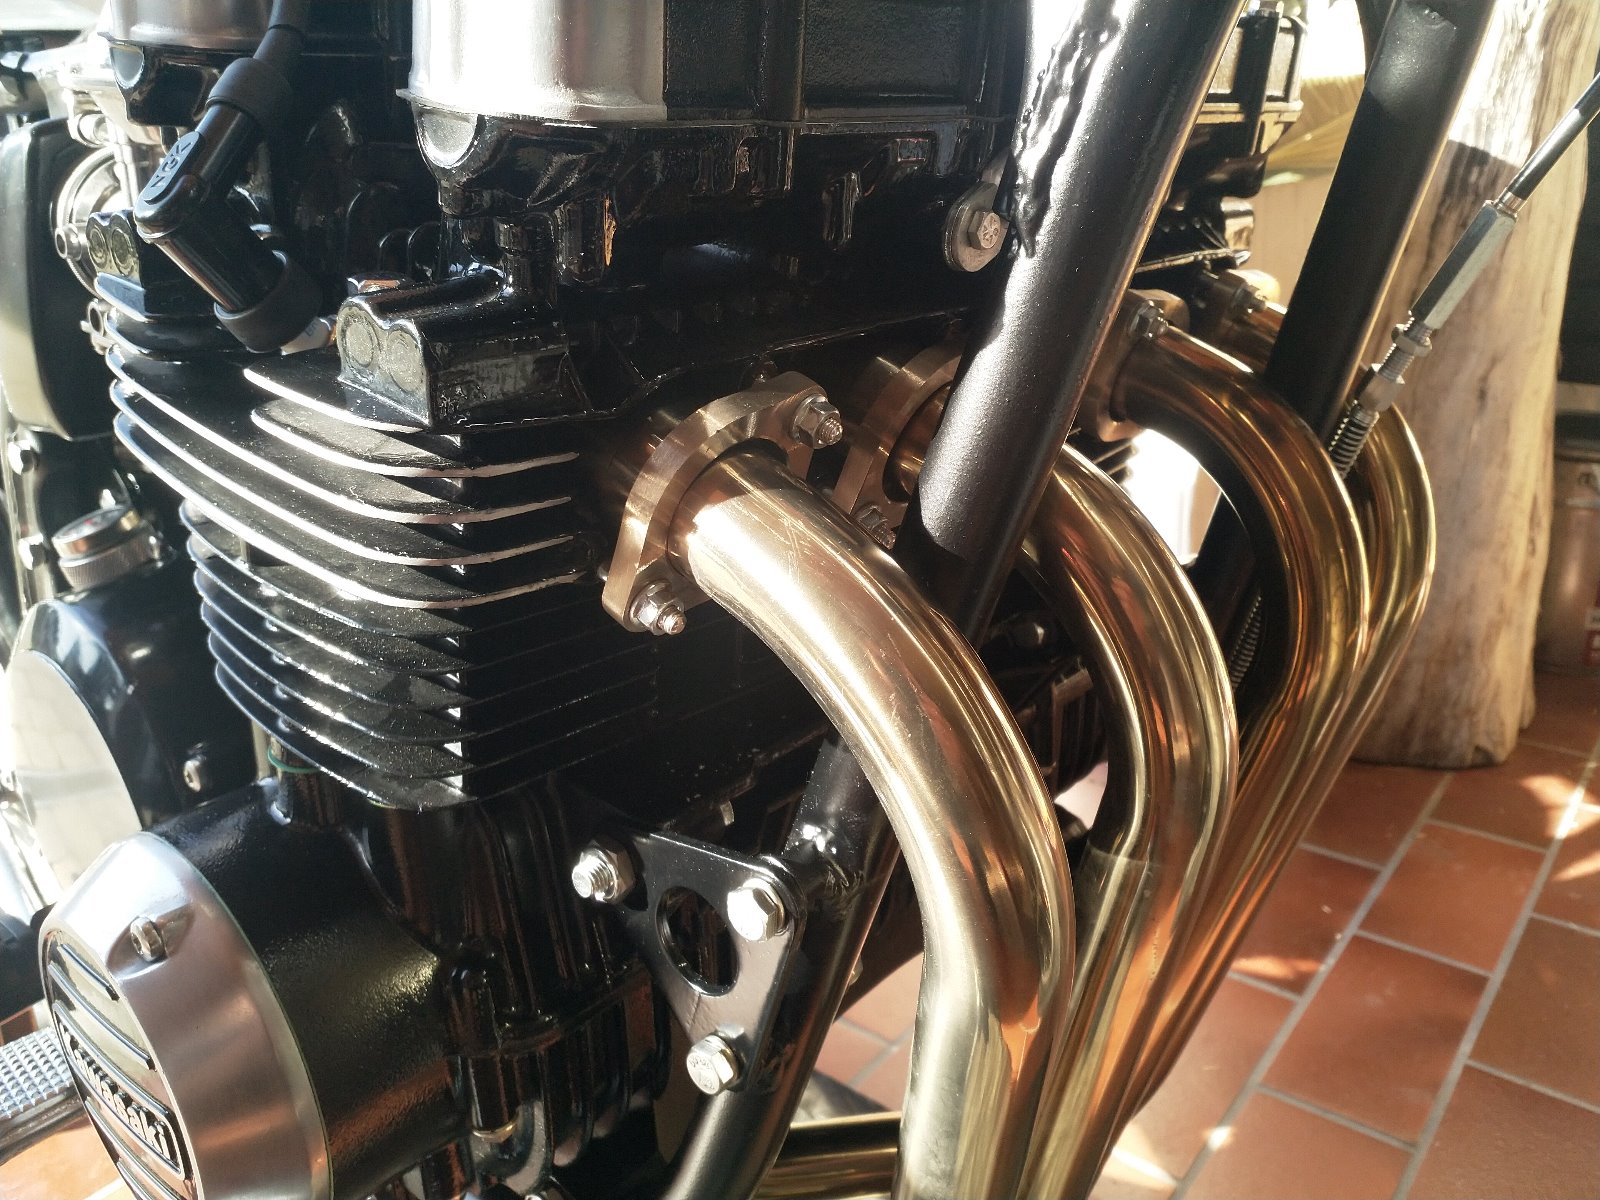
I replaced all the jets with new stock ones, but I realised today that the previous owner may have adjusted the needle height. Pulled out one of the sliders but had no idea what to look for and the screw inside the slider wouldn't budge (I wasn't going to force the issue). Any tips?
I replaced all the jets with new stock ones, but I realised today that the previous owner may have adjusted the needle height. Pulled out one of the sliders but had no idea what to look for and the screw inside the slider wouldn't budge (I wasn't going to force the issue). Any tips?
KZ1000 Restomod (
www.kzrider.com/forum/11-projects/614517-1977-kz1000-restomod
)
1977 KZ1000A1 ( www.kzrider.com/forum/11-projects/616901...-spare-parts-project )
1980 KZ750H ( kzrider.com/forum/11-projects/612054-kz750h-restoration )
2000 BMW F650GS
1977 KZ1000A1 ( www.kzrider.com/forum/11-projects/616901...-spare-parts-project )
1980 KZ750H ( kzrider.com/forum/11-projects/612054-kz750h-restoration )
2000 BMW F650GS
Last edit: 15 Feb 2020 12:04 by calum.
Please Log in or Create an account to join the conversation.
- Skidmark
-
- Offline
- User
-
Registered
- Posts: 1087
- Thanks: 312
Re: KZ750H Restoration
15 Feb 2020 12:03
Make sure you are using a screwdriver with a snug fit in the slot, and reaches to the bottom of the slot. Put some tape around the slider, and put it gently in a vise. Mine were tight to, but they popped loose this way.
Retired gearhead
'81 KZ-750 E2
'87 Suzuki Savage 650 Street Tracker (lost in the shop fire)
'81 KZ-750 E2
'87 Suzuki Savage 650 Street Tracker (lost in the shop fire)
The following user(s) said Thank You: calum
Please Log in or Create an account to join the conversation.
- calum
-
Topic Author
- Offline
- User
-
Registered
- Posts: 1144
- Thanks: 415
Re: KZ750H Restoration
15 Feb 2020 12:08
Sweet, thanks. I might try it on the spare set first ")
Will it be obvious how they are set? It's hard to tell looking at the parts diagram. I do know that they are stock needles, as I could read the N01A on the collar just below the slider.
Will it be obvious how they are set? It's hard to tell looking at the parts diagram. I do know that they are stock needles, as I could read the N01A on the collar just below the slider.
KZ1000 Restomod (
www.kzrider.com/forum/11-projects/614517-1977-kz1000-restomod
)
1977 KZ1000A1 ( www.kzrider.com/forum/11-projects/616901...-spare-parts-project )
1980 KZ750H ( kzrider.com/forum/11-projects/612054-kz750h-restoration )
2000 BMW F650GS
1977 KZ1000A1 ( www.kzrider.com/forum/11-projects/616901...-spare-parts-project )
1980 KZ750H ( kzrider.com/forum/11-projects/612054-kz750h-restoration )
2000 BMW F650GS
Please Log in or Create an account to join the conversation.
- Skidmark
-
- Offline
- User
-
Registered
- Posts: 1087
- Thanks: 312
Re: KZ750H Restoration
15 Feb 2020 15:07
I don't recall what groove the clips are on in the stock configuration. I just put the Dynojet stage 3 kit in mine, and you change needles and the clip position.
Retired gearhead
'81 KZ-750 E2
'87 Suzuki Savage 650 Street Tracker (lost in the shop fire)
'81 KZ-750 E2
'87 Suzuki Savage 650 Street Tracker (lost in the shop fire)
Please Log in or Create an account to join the conversation.
- Kidkawie
-

- Offline
- User
-
Registered
- I bleed premix
- Posts: 1911
- Thanks: 243
Re: KZ750H Restoration
16 Feb 2020 02:50
The owners manual might have stock settings.
1975 Z1 900
1994 KX250 Supermoto
2004 KX125
1994 KX250 Supermoto
2004 KX125
Please Log in or Create an account to join the conversation.
Moderators: Street Fighter LTD