
The Wounded Z
- Mikaw
-
- Offline
- Sustaining Member
-

Registered
- Posts: 4825
- Thanks: 1851
Re: The Wounded Z
21 May 2020 07:56 - 21 May 2020 08:04TexasKZ wrote: It also occurs to me to wonder how much the fuel level varies while the engine is running.
Dare we even consider the effects of vibration, bumps, or omg, fierce cornering?k
AAAAAARRRRRRGGGGGGHHHHHH!!!!
I have silently been kicking around these similar situations. Biggest for me was hard accelerating. We all know what happens to the oil in the crankcase and some have even added mechanical gates to control it. Just my $.02
1976 KZ 900 A4
kzrider.com/forum/11-projects/613548-1976-kz-900-a4
1976 KZ 900 B1 LTD
1978 KZ 1000 B2 LTD
1980 KZ 750 E1
Kowledge Speaks, But Wisdom Listens.
Jimi Hendrix.
1976 KZ 900 B1 LTD
1978 KZ 1000 B2 LTD
1980 KZ 750 E1
Kowledge Speaks, But Wisdom Listens.
Jimi Hendrix.
Last edit: 21 May 2020 08:04 by Mikaw.
Please Log in or Create an account to join the conversation.
- TexasKZ
-

- Offline
- Platinum Member
-
Registered
- Posts: 8139
- Thanks: 2646
Re: The Wounded Z
21 May 2020 08:03Mikaw wrote:TexasKZ wrote: It also occurs to me to wonder how much the fuel level varies while the engine is running.
Dare we even consider the effects of vibration, bumps, or omg, fierce cornering?
AAAAAARRRRRRGGGGGGHHHHHH!!!!
I have silently been kicking around these similar situations. Biggest for me was had accelerating. We all know what happens to the oil in the crankcase and some have even added mechanical gates to control it. Just my $.02
Wheelies and stoppies?
1982 KZ1000 LTD parts donor
1981 KZ1000 LTD awaiting resurrection
2000 ZRX1100 not ridden enough
www.kzrider.com/11-projects/620336-anoth...uild-thread?start=24
1981 KZ1000 LTD awaiting resurrection
2000 ZRX1100 not ridden enough
www.kzrider.com/11-projects/620336-anoth...uild-thread?start=24
The following user(s) said Thank You: Mikaw
Please Log in or Create an account to join the conversation.
- Nerdy
-
- Offline
- Sustaining Member
-
Registered
- Posts: 1125
- Thanks: 463
Re: The Wounded Z
21 May 2020 09:10
By now slmjim & Z1BEBE might be sorry for bringing it up. :laugh:
I'm picturing a calibrated cup that has lines for specific fluids. Distilled water? Use line A. Ethanol? Line B. Pure gasoline? Line C, etc.
The cup could have three sets of lines 120 degrees apart: one for 3mm, one for 4mm, and one for 5mm. Turn the cup so you see the setting you want to use.
That should work for most folks. If you want 3.7183mm you're on your own.")
This all assumes that the differences in SG per liquid would be large enough to allow separation of the levels into visually-distinct lines. If not, might need to use only two lines [per set] for common liquids that we know would behave differently.
I'm picturing a calibrated cup that has lines for specific fluids. Distilled water? Use line A. Ethanol? Line B. Pure gasoline? Line C, etc.
The cup could have three sets of lines 120 degrees apart: one for 3mm, one for 4mm, and one for 5mm. Turn the cup so you see the setting you want to use.
That should work for most folks. If you want 3.7183mm you're on your own.
This all assumes that the differences in SG per liquid would be large enough to allow separation of the levels into visually-distinct lines. If not, might need to use only two lines [per set] for common liquids that we know would behave differently.
1967 Yamaha YCS1 Bonanza
1980 KZ440B
1981 Yamaha XT250H
1981 KZ440 LTD project bike
1981 GPz550
2013 Yamaha FZ6R
Please Log in or Create an account to join the conversation.
- hardrockminer
-

- Offline
- Sustaining Member
-
Registered
- Posts: 3112
- Thanks: 1229
Re: The Wounded Z
21 May 2020 09:20 - 21 May 2020 09:22
I think at least part of the answer is in Jim's last reply. The higher the float level the richer the mixture.
I found several interesting observations coming out of trying this float setting method. First one was how easy it was compared to the traditional method. Since the float setting spec is +- 0.5 mm a change of 10% in SG probably won't result in poor performance, as one would still be inside the spec. But if your measurement was at the top or bottom of the spec you might encounter very rich or very lean running conditions. I guess these could be compensated for by adjusting other parts of the carbs...the fuel/air screws or the needles. I remember reading somewhere in the manual (I think in the section on performance improvements) that the Z1 runs rich under normal conditions. Not sure what that means for float setting but I take it to mean that one is better off being a bit low on the spec rather than a bit high.
Second was (and this is just my opinion) this test method is a far more accurate method than using the tube. This is because the meniscus on the edge of the glass is quite easy to see, and the bottom of the meniscus is where the float needs to be set, as this is the actual level in the bowl, or the glass during a test. With the tube method the meniscus is much higher and the bottom of the meniscus is much harder (for me anyway) to read.
I understand Jim's issue with fumes. He needs to find a liquid that doesn't create strong odour. In my case I have a shop that's separate from my house so I can do my testing indoors with gas. In my area I have a fair number of gas stations offering non-ethanol fuel (premium) so I try to use it whenever I can get it, which is almost always. I usually have a can of non-ethanol fuel in my shop so that's what I use for float setting.
I have several restored bikes along with a 2006 Goldwing with a sidecar.
Last edit: 21 May 2020 09:22 by hardrockminer.
Please Log in or Create an account to join the conversation.
- slmjim+Z1BEBE
-
 Topic Author
- Offline
- User
-

Registered
- Enjoy Life! IT HAS AN EXPIRATION DATE!
- Posts: 1410
- Thanks: 900
Re: The Wounded Z
22 May 2020 07:30 - 22 May 2020 07:36
Seems we've opened the proverbial Can O' Worms here, and in doing so we have an example of
Zymurgy's First Law of Evolving System Dynamics:
If you open a can of worms, the only way to re-can them is to use a larger can.
Perhaps it's time to continue this line of discussion by opening a thread in the Carbs sub-forum. Something titled "Alternate Float Setting Methods" or some such. Won't be today, as it'll take more time than we have at the moment to do some copy/paste/re-post in order for all the pertinent pics & discussion to be transferred. Bear with us.
Anyway... for simplicity, our responses in blue.
To answer your specific question, our pic in this thread, post #825825 shows float level ~ 1mm low. (~ is a way to cheat by not saying 'about' ) Also, see the video from KZJOE900, post 826078 in this thread.
Like the way you think. We'll see if different lines are practical. Last time we tested different liquids was with a tube, using a carb that had been set correctly using E10.
We really appreciate the tech talk everyone! slmjim does anyway. The Lovely Z1BEBE's eyes start to glaze over eventually & she gets restless, looking for something to torque to spec, organize, or clean & polish, her claws ..., er, nails included.
Good Ridin'
slmjim &Z1BEBE
Zymurgy's First Law of Evolving System Dynamics:
If you open a can of worms, the only way to re-can them is to use a larger can.
Perhaps it's time to continue this line of discussion by opening a thread in the Carbs sub-forum. Something titled "Alternate Float Setting Methods" or some such. Won't be today, as it'll take more time than we have at the moment to do some copy/paste/re-post in order for all the pertinent pics & discussion to be transferred. Bear with us.
Anyway... for simplicity, our responses in blue.
Speculation on our part but, it's doubtful there would be a measurable difference using what is, at the end of the day, a fairly crude method of measurement. We use E10 only because that's what is by far most common around here & practical to run in all of our bikes. Next time we have the float bench set up outside we'll test the difference between E10 and pure gasoline.TexasKZ wrote: Does this mean that if I set my fuel levels using E10, and later decide to run a few tanks of E0, that I should reset the fuel levels?
Put another way, how big a change in SG will there need to be to make a measurable difference in fuel level?
Warning for Slimjim and Z1Bebe, there will be many assumptions in the following question----
Assuming that I set the levels using a liquid with a 10% lower SG than the fuel I normally use. Will the levels be 10% lower when I reintroduce the .72 fuel? If so, then we are talking about the fuel level dropping from 3mm below the body to 3.3 mm below? Do any of us measure that accurately, and would that make any difference in how the engine runs?
Cracks in VM28 overflow tubes are not uncommon. A crack can be difficult to see unless under brilliant lighting & magnification. If a crack only extends down from the top of the overflow tube only a few mm, that might be where fuel is coming from. Cracks can be mended with solder.Rick H. wrote: This is really getting "technical" now. I can't possibly envision resetting float levels based on what type of gasoline I am running. Is there really that big a difference in them? Slimjim and Z1 Bebe: Is it possible for you to post a picture of where you would normally set the fuel level? If I set mine near the top edge of the float bowl I immediately have issues with one or two carbs pushing fuel out of the overflow tubes. So for right now I have the float levels on carbs 3 and 4 set a bit lower then the FSM recommends to avoid this. Nothing scientific here or recommended, just a SWAG as to where I should set the level to avoid fuel dump. Thanks...
Rick H.
To answer your specific question, our pic in this thread, post #825825 shows float level ~ 1mm low. (~ is a way to cheat by not saying 'about'
) Also, see the video from KZJOE900, post 826078 in this thread.Absolutely no regrets on broaching this subject! Love the tech discourse.Nerdy wrote: By now slmjim & Z1BEBE might be sorry for bringing it up. :laugh:
I'm picturing a calibrated cup that has lines for specific fluids. Distilled water? Use line A. Ethanol? Line B. Pure gasoline? Line C, etc.
The cup could have three sets of lines 120 degrees apart: one for 3mm, one for 4mm, and one for 5mm. Turn the cup so you see the setting you want to use.
That should work for most folks. If you want 3.7183mm you're on your own.
This all assumes that the differences in SG per liquid would be large enough to allow separation of the levels into visually-distinct lines. If not, might need to use only two lines [per set] for common liquids that we know would behave differently.
Like the way you think. We'll see if different lines are practical. Last time we tested different liquids was with a tube, using a carb that had been set correctly using E10.
hardrockminer wrote: I think at least part of the answer is in Jim's last reply. The higher the float level the richer the mixture.
I found several interesting observations coming out of trying this float setting method. First one was how easy it was compared to the traditional method. Since the float setting spec is +- 0.5 mm a change of 10% in SG probably won't result in poor performance, as one would still be inside the spec.
Don't you mean +/- 1mm? White Manual, Table 3 Pg. 72. Also, text on Pg. 75 under "Fuel level measurement and adjustment
But if your measurement was at the top or bottom of the spec you might encounter very rich or very lean running conditions. I guess these could be compensated for by adjusting other parts of the carbs...the fuel/air screws or the needles.
At the lower end of the spec is where we encounter lean running on the late '74 and all '75 carbs. The early VM28's (17mm drain plug, 2.5 cutaway, etc.) don't seem to be as sensitive, but they're set up to be richer overall to begin with.
I remember reading somewhere in the manual (I think in the section on performance improvements) that the Z1 runs rich under normal conditions. Not sure what that means for float setting but I take it to mean that one is better off being a bit low on the spec rather than a bit high.
Seems we read on the other forum where Z1Achim indicated he runs B7ES plugs because VM 28's tend to the rich side. We've also read incidental comments claiming same.
Second was (and this is just my opinion) this test method is a far more accurate method than using the tube. This is because the meniscus on the edge of the glass is quite easy to see, and the bottom of the meniscus is where the float needs to be set, as this is the actual level in the bowl, or the glass during a test. With the tube method the meniscus is much higher and the bottom of the meniscus is much harder (for me anyway) to read.
Reading past the meniscus can be confounding. Concur with the ease of the cup method.
I understand Jim's issue with fumes. He needs to find a liquid that doesn't create strong odour. In my case I have a shop that's separate from my house so I can do my testing indoors with gas. In my area I have a fair number of gas stations offering non-ethanol fuel (premium) so I try to use it whenever I can get it, which is almost always. I usually have a can of non-ethanol fuel in my shop so that's what I use for float setting.
Odors are really secondary. Our critical safety concern is a standing pilot light 4" above floor level in the water heater, less than 10 ' from the service bay. Since gasoline & most volatile liquid vapors are heavier than air, well... 'nuff said.
We really appreciate the tech talk everyone! slmjim does anyway. The Lovely Z1BEBE's eyes start to glaze over eventually & she gets restless, looking for something to torque to spec, organize, or clean & polish, her claws ..., er, nails included.
Good Ridin'
slmjim &Z1BEBE
A biker looks at your engine and chrome.
A Rider looks at your odometer and tags.
1973 ('72 builds) Z1 x2
1974 Z1-A x2
1975 Z1-B x2
1993 CB 750 Nighthawk x2
2009 ST1300A
www.kawasaki-z-classik.com
A Forum tightly focused on all things Z1 and Z2.
A Rider looks at your odometer and tags.
1973 ('72 builds) Z1 x2
1974 Z1-A x2
1975 Z1-B x2
1993 CB 750 Nighthawk x2
2009 ST1300A
www.kawasaki-z-classik.com
A Forum tightly focused on all things Z1 and Z2.
Last edit: 22 May 2020 07:36 by slmjim+Z1BEBE. Reason: Typos & clarity
The following user(s) said Thank You: Rick H.
Please Log in or Create an account to join the conversation.
- hardrockminer
-
- Offline
- Sustaining Member
-
Registered
- Posts: 3112
- Thanks: 1229
Re: The Wounded Z
22 May 2020 09:54
Apologies, yes, +- 1.0 mm. I don't know why I have 3.5 to 4.5 in my head.
The lower flammable level (LFL) for gasoline is 1.4%. I've never tested that limit but I suspect you would be seeing visions if the vapour in your basement reached that level.
The lower flammable level (LFL) for gasoline is 1.4%. I've never tested that limit but I suspect you would be seeing visions if the vapour in your basement reached that level.
I have several restored bikes along with a 2006 Goldwing with a sidecar.
Please Log in or Create an account to join the conversation.
- slmjim+Z1BEBE
-
Topic Author
- Offline
- User
-
Registered
- Enjoy Life! IT HAS AN EXPIRATION DATE!
- Posts: 1410
- Thanks: 900
Re: The Wounded Z
09 Jun 2020 08:36
Top end is together now, carbs installed, points gapped & static-timed. OK, so lets do a simple crank test. Turn the ignition switch on and... nothing. Whole bike dead. Inert. Still in a 35+ year sleep even after being thoroughly jostled, shaken & de-/ re-constructed.
Long story short, the rotary contacts inside the OEM ignition switch were electrically open, even though to the naked eye they looked clean & good. An invisible film of oxidation. Not long after disassemble/clean/reassemble of the ignition switch, we discovered the same problem with the dimmer switch contacts that was preventing the headlight from energizing; looked good but, just would not pass current. In all cases, a gentle application of a miniature Dremel wire wheel polished the flat contacts to a fine bright brass sheen, and a few swipes of 2,000 grit wet-dry abrasive paper on the rotary contact points resolved the issues. In both cases, lesson learned; test before install :blush: . We'd completely disassembled the handlebar switchgear months ago to replace the sleeves, and simple cleaning at that time of what looked like clean contacts would have saved us a day of re-tracing our steps & circuit troubleshooting. A thin wipe of conductive grease on the now-cleaned contacts will maintain good conductivity likely long after we've left this world for those great twisty roads in the sky.
So now we have a sound electrical system, everything works, and a simple test crank moved the crank, pistons & tranny under power of the starter motor for the first time in 35+ years. Nothing smoked, melted or blew up .
Moving right along, the petcock handle was, shall we say, reluctant to move when we got the bike.
Penetrating potions, heat & gentle persuasion had done nothing to change that for the last 18 months or so. One more trip to the wash tank, dig more crud out of the screen area, and into the ultrasonic tank filled with the Yamaha Carb Dip solution for a total run time of about six hours. Heated the solution to ~70 deg. C (~160 deg F.) for the duration. Voilà! The handle finally freed enough to be removed.
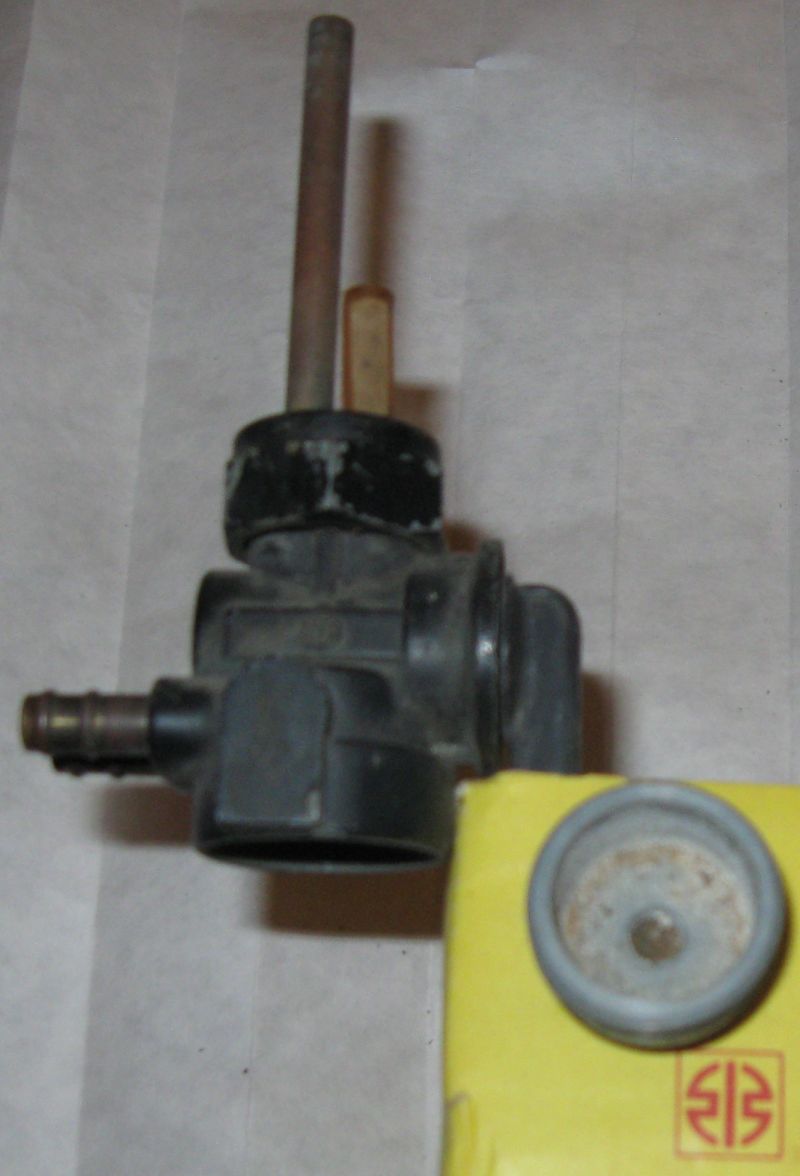
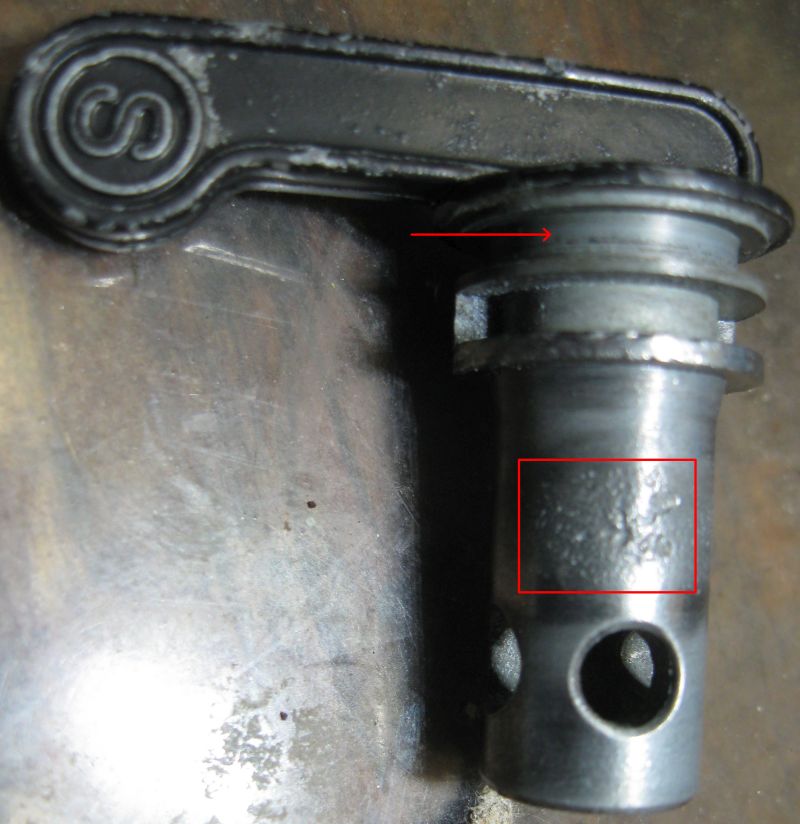
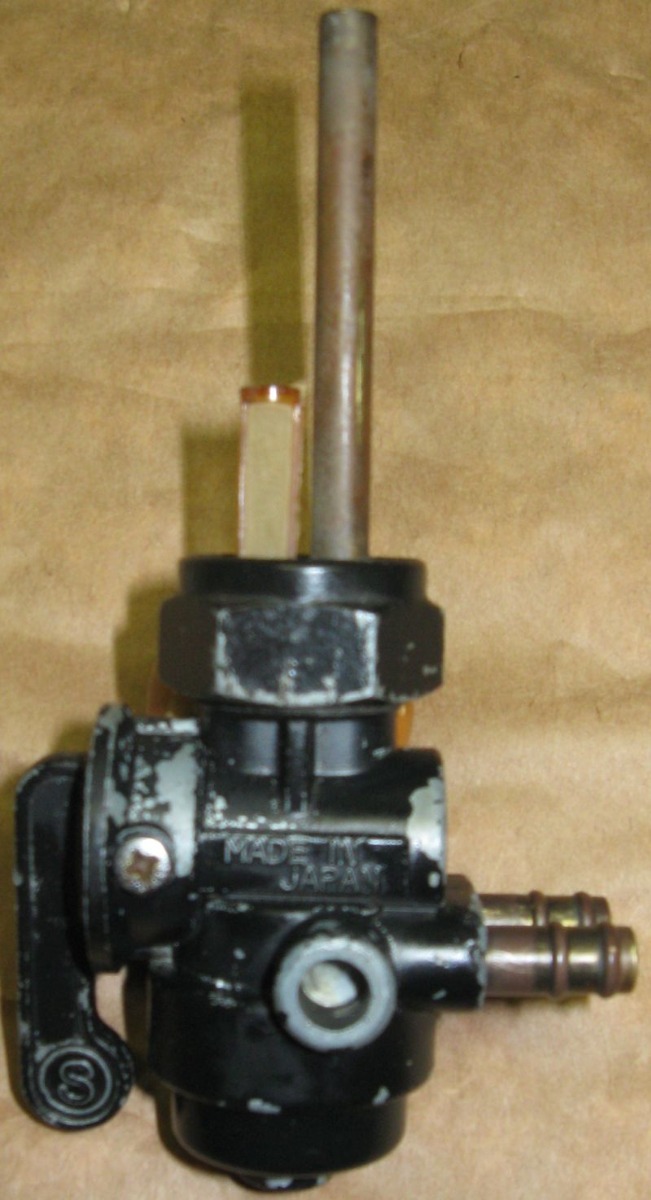
The petcock is the later version of the 'early' black petcock that has an O-ring on the handle. The earliest petcock handles sans O-ring had an unfortunate habit of leaking the contents of the tank into whatever environment it was located at the time. The original handle O-ring came off in brittle pieces upon removal. The rubber sleeve seems undamaged and is surprisingly pliable. The valve portion of the handle exhibits the same pitting from corrosion that is present on any bare aluminum that was exposed to atmosphere during it's long barn sleep. We had a NOS K&L petcock rebuild kit on the shelf for decades, as we only run later petcocks that have a tapered nylon cone valve & never needed it, so it was consumed in the rebuilding of this petcock.
Red arrow shows groove for the O-ring introduced not long after production commenced. The red square shows the pitting.
A trip into the blast cabinet for some cleaning, and it's ready to reassemble. The bottom brass filter screen is present & undamaged - we just forgot to include it in the pic.
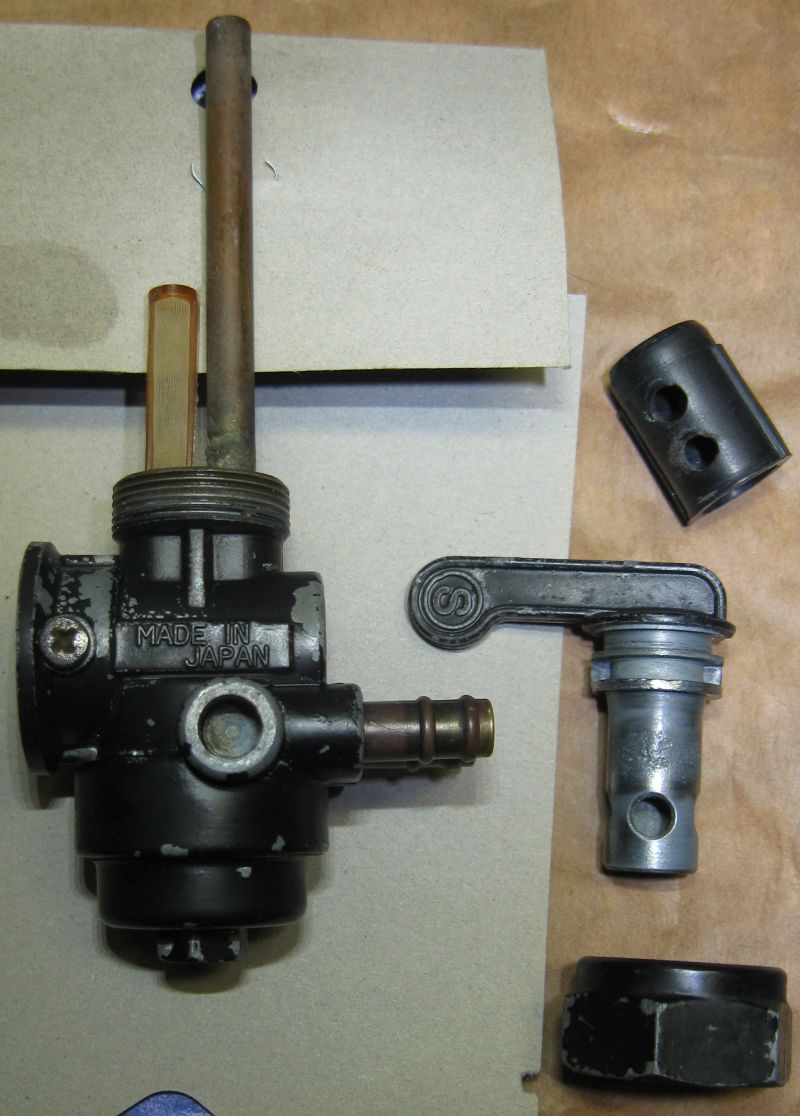
After fresh O-rings, a dab of silicone grease on the handle valve and inside of the rubber valve sleeve, and it moves smoothly with normal resistance. Bench test shows it's liquid tight. Ready to install.
We've had a mismatched set (mix of Z1 and '76 KZ900) of OEM 4-4 pipes with baffles hanging in the shop for a year or so that were always planned for this bike. They show a few small dings, some tiny rust/pitting spots here & there & a little discoloration at the bend of the head pipes. No road rash. Considering that we paid well under half the cost of a repop set for them, they're fitting for this bike. They maintain the concept perfectly that was our intent from the beginning; that of a refurbished-original 'suvivor' that's correct at a glance from ten feet. We installed the pipes yesterday. The Lovely Z1BEBE was again instrumental in assisting with this bike, as she spent most of the morning cleaning & polishing the pipes. She then helped corral the pipes during installation, keeping them together at the rear, inserting the mounting bolt and generally maintaining things under control while slmjim got the headers into the exhaust ports with the split keepers taped in place and the exhaust collars attached. A 4-4 install is a challenge for one person 'cause there's so many moving parts spaced far apart. Besides, she makes the shop prettier .
In three days when the weather is expected to cool:
Hook up the timing light & dwell meter, DMM to monitor charging system, mercury sticks on the carbs, hang the aux fuel tank, place a fire extinguisher on each side of the service bay, stretch socks over the ends of the pipes to keep the inevitable carbon bits from blowing out & trashing the shop floor for ten feet, place a box fan in front of the motor for cooling and, set up the big 1/2 horse exhaust fan at the basement door with the upstairs windows open so we don't gas the entire house, ourselves and the dogs, and do the first test start & fine tuning.
Anticipation...!
Until then, we work on cleaning the bottom inch or so of the tank. Looks like light rust with maybe some varnish. Not sure about the varnish - it's only on the left rear side that was the down side while the bike was on the sidestand for years & is very difficult to see clearly. First up on that; a half gallon of kerosene along with half pound of nuts. Shaken, not stirred (Bond... James bond") ) & see what happens.
) & see what happens.
Good Ridin'
slmjim & Z1BEBE
Long story short, the rotary contacts inside the OEM ignition switch were electrically open, even though to the naked eye they looked clean & good. An invisible film of oxidation. Not long after disassemble/clean/reassemble of the ignition switch, we discovered the same problem with the dimmer switch contacts that was preventing the headlight from energizing; looked good but, just would not pass current. In all cases, a gentle application of a miniature Dremel wire wheel polished the flat contacts to a fine bright brass sheen, and a few swipes of 2,000 grit wet-dry abrasive paper on the rotary contact points resolved the issues. In both cases, lesson learned; test before install :blush: . We'd completely disassembled the handlebar switchgear months ago to replace the sleeves, and simple cleaning at that time of what looked like clean contacts would have saved us a day of re-tracing our steps & circuit troubleshooting. A thin wipe of conductive grease on the now-cleaned contacts will maintain good conductivity likely long after we've left this world for those great twisty roads in the sky.
So now we have a sound electrical system, everything works, and a simple test crank moved the crank, pistons & tranny under power of the starter motor for the first time in 35+ years. Nothing smoked, melted or blew up
.Moving right along, the petcock handle was, shall we say, reluctant to move when we got the bike.
Penetrating potions, heat & gentle persuasion had done nothing to change that for the last 18 months or so. One more trip to the wash tank, dig more crud out of the screen area, and into the ultrasonic tank filled with the Yamaha Carb Dip solution for a total run time of about six hours. Heated the solution to ~70 deg. C (~160 deg F.) for the duration. Voilà! The handle finally freed enough to be removed.
The petcock is the later version of the 'early' black petcock that has an O-ring on the handle. The earliest petcock handles sans O-ring had an unfortunate habit of leaking the contents of the tank into whatever environment it was located at the time. The original handle O-ring came off in brittle pieces upon removal. The rubber sleeve seems undamaged and is surprisingly pliable. The valve portion of the handle exhibits the same pitting from corrosion that is present on any bare aluminum that was exposed to atmosphere during it's long barn sleep. We had a NOS K&L petcock rebuild kit on the shelf for decades, as we only run later petcocks that have a tapered nylon cone valve & never needed it, so it was consumed in the rebuilding of this petcock.
Red arrow shows groove for the O-ring introduced not long after production commenced. The red square shows the pitting.
A trip into the blast cabinet for some cleaning, and it's ready to reassemble. The bottom brass filter screen is present & undamaged - we just forgot to include it in the pic.
After fresh O-rings, a dab of silicone grease on the handle valve and inside of the rubber valve sleeve, and it moves smoothly with normal resistance. Bench test shows it's liquid tight. Ready to install.
We've had a mismatched set (mix of Z1 and '76 KZ900) of OEM 4-4 pipes with baffles hanging in the shop for a year or so that were always planned for this bike. They show a few small dings, some tiny rust/pitting spots here & there & a little discoloration at the bend of the head pipes. No road rash. Considering that we paid well under half the cost of a repop set for them, they're fitting for this bike. They maintain the concept perfectly that was our intent from the beginning; that of a refurbished-original 'suvivor' that's correct at a glance from ten feet. We installed the pipes yesterday. The Lovely Z1BEBE was again instrumental in assisting with this bike, as she spent most of the morning cleaning & polishing the pipes. She then helped corral the pipes during installation, keeping them together at the rear, inserting the mounting bolt and generally maintaining things under control while slmjim got the headers into the exhaust ports with the split keepers taped in place and the exhaust collars attached. A 4-4 install is a challenge for one person 'cause there's so many moving parts spaced far apart. Besides, she makes the shop prettier
.In three days when the weather is expected to cool:
Hook up the timing light & dwell meter, DMM to monitor charging system, mercury sticks on the carbs, hang the aux fuel tank, place a fire extinguisher on each side of the service bay, stretch socks over the ends of the pipes to keep the inevitable carbon bits from blowing out & trashing the shop floor for ten feet, place a box fan in front of the motor for cooling and, set up the big 1/2 horse exhaust fan at the basement door with the upstairs windows open so we don't gas the entire house, ourselves and the dogs, and do the first test start & fine tuning.
Anticipation...!
Until then, we work on cleaning the bottom inch or so of the tank. Looks like light rust with maybe some varnish. Not sure about the varnish - it's only on the left rear side that was the down side while the bike was on the sidestand for years & is very difficult to see clearly. First up on that; a half gallon of kerosene along with half pound of nuts. Shaken, not stirred (Bond... James bond
) & see what happens.Good Ridin'
slmjim & Z1BEBE
A biker looks at your engine and chrome.
A Rider looks at your odometer and tags.
1973 ('72 builds) Z1 x2
1974 Z1-A x2
1975 Z1-B x2
1993 CB 750 Nighthawk x2
2009 ST1300A
www.kawasaki-z-classik.com
A Forum tightly focused on all things Z1 and Z2.
A Rider looks at your odometer and tags.
1973 ('72 builds) Z1 x2
1974 Z1-A x2
1975 Z1-B x2
1993 CB 750 Nighthawk x2
2009 ST1300A
www.kawasaki-z-classik.com
A Forum tightly focused on all things Z1 and Z2.
Please Log in or Create an account to join the conversation.
- slmjim+Z1BEBE
-
Topic Author
- Offline
- User
-
Registered
- Enjoy Life! IT HAS AN EXPIRATION DATE!
- Posts: 1410
- Thanks: 900
Re: The Wounded Z
05 Jul 2020 05:39 - 05 Jul 2020 06:43
The OEM black petcock leaks, needing a new inner rubber sleeve; otherwise it's in good working condition. The tank now has an OEM dual-outlet KZ900 petcock on it that we had laying around the shop.
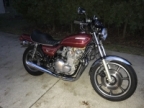
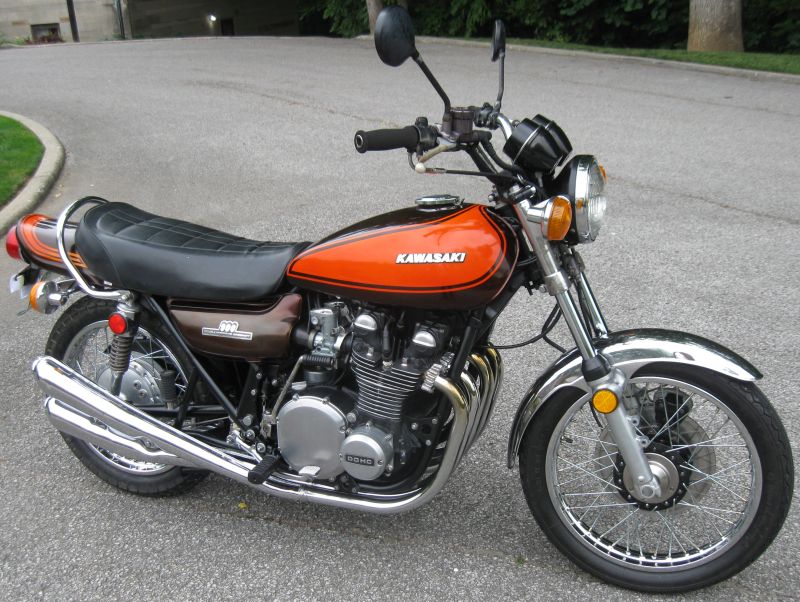
Guess it's mostly done now. Right or wrong, we think it meets our intent of a correct-at-a-glance-from-ten-feet daily rider/survivor. It can either be a rider needing minimal work or, a fine starting place for a proper resto.
Apologies for the poor lighting of the left side; there was a tall tree canopy behind it & we shoulda' used fill flash.
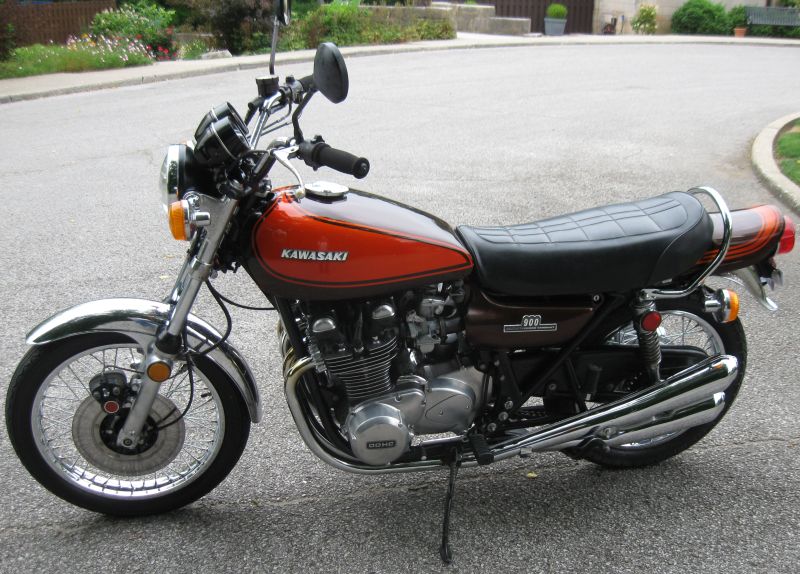
Since we had no intention of keeping this bike from the beginning, we did the project on a shoestring. Reassembled with 98% + of all the original fasteners, and all the original OEM parts & components. In that respect it could be considered a rough-ish reference bike. We both spent hours at the wire wheel knocking rust off of various steel fasteners & other ferrous parts. The process of getting the cosmetics prepared for viewing is well documented earlier in the thread. What few items are not correct (headlight bulb, petcock, air filter) are easily dealt with. Wish we had a video of the OEM air filter crumbling to bits when it was removed 18 months ago...
Factory original rims were re-chromed & new plated spokes with yellow nipples installed. Original torque link and early (short) top hat head nuts also re-chromed. That's pretty much it for re-chroming. Look closely (~3 ft.), and the pitting & flaking in the OEM chrome is visible. Look even closer (18 in.) in good light and the pitting in the polished aluminum is visible. The pitting in the aluminum is so deep & widespread in some places they can't be removed without removing enough material to create obvious depressions.
Still needs brake work. We have ATF in the front brake plumbing in case of any weeping brake fluid. The bore of the original MC was pitted too badly to hone out, but ATF swells seals pretty effectively. So far no leaks or weeps. Front brake worked fine for road testing. New shoes on the rear.
Tires aren't correct, nor are they suitable for much road mileage as they're too old. We didn't spring for new tires that were likely to be replaced by a new owner with what they might want anyway. Since we carefully cleaned & reinstalled every component, all date codes and other identifiers are correct for the build date. Didn't install the rimlocks. Fork lock peg was missing when we got the bike, but the cylinder works. Wrong handgrips. The handlebar clamp bolts aren't correct; the bike had handlebar rearsets on it with allen bolts holding everything together, and we don't have a correct set of those bolts. Partial tool kit. Correct '73 OEM owners manual in fair condition. Gauges refreshed by ZRESTO (Thanks Bob!) keeping the original miles showing. Inside of the tank was in unbelievably good condition considering, so it was gently cleaned using kerosene and a pound or so of sheet metal screws shaken, not stirred (Bond...James bond). Tapered steering bearings installed 'cause of rust on the OEM balls & races. New sprockets & DID non O-ring chain. OEM chain oiler, tank & all is present. Kept the original under seat stickers. Black foam in the seat.
Still not perfectly happy with the carbs. We think the floats are still 1mm or so too low. It starts on choke with just a touch of the button, then seems excessively cold-blooded until it's completely warmed up, when it runs fine. This time we're gonna take the time to compare float level using the clear drinking glass setup with the OEM clear tube tool method. We're still learning how to read the meniscus of the fuel in the glass container as compared to the meniscus of the fuel in a clear tube.
Pipes are a mismatched set of Z1 and KZ900 pipes in fair to good condition we found locally, maintaining the correct-at-a-glance theme.
The pics were taken at the VJMC North American National Rally at Spring Mill State Park in Indiana on June 27. The bike is registered but not currently licensed, so all we could do is ride the loop around the park. The first miles it's run since 1986 . Felt good! The signature 'clunk' of the early forks is still there.
Looks like Mid-Ohio is cancelled this year, so our intended selling opportunity won't happen until next year. We'll likely take the bike to Barber in October & hang a For Sale sign on it & see what happens.
The Lovely Z1BEBE is concerned now that we (read 'slmjim' :dry: ) won't have a project for next winter. She sez we (slmjim) need to find another Z1 project . Gotta love :kiss: those chicks who are so afflicted with The Dreaded Z-Bug that she sez, "We need another Z1 now, don't we?"
Stay safe everyone
&
Good Ridin'
slmjim & Z1BEBE
Guess it's mostly done now. Right or wrong, we think it meets our intent of a correct-at-a-glance-from-ten-feet daily rider/survivor. It can either be a rider needing minimal work or, a fine starting place for a proper resto.
Apologies for the poor lighting of the left side; there was a tall tree canopy behind it & we shoulda' used fill flash.
Since we had no intention of keeping this bike from the beginning, we did the project on a shoestring. Reassembled with 98% + of all the original fasteners, and all the original OEM parts & components. In that respect it could be considered a rough-ish reference bike. We both spent hours at the wire wheel knocking rust off of various steel fasteners & other ferrous parts. The process of getting the cosmetics prepared for viewing is well documented earlier in the thread. What few items are not correct (headlight bulb, petcock, air filter) are easily dealt with. Wish we had a video of the OEM air filter crumbling to bits when it was removed 18 months ago...
Factory original rims were re-chromed & new plated spokes with yellow nipples installed. Original torque link and early (short) top hat head nuts also re-chromed. That's pretty much it for re-chroming. Look closely (~3 ft.), and the pitting & flaking in the OEM chrome is visible. Look even closer (18 in.) in good light and the pitting in the polished aluminum is visible. The pitting in the aluminum is so deep & widespread in some places they can't be removed without removing enough material to create obvious depressions.
Still needs brake work. We have ATF in the front brake plumbing in case of any weeping brake fluid. The bore of the original MC was pitted too badly to hone out, but ATF swells seals pretty effectively. So far no leaks or weeps. Front brake worked fine for road testing. New shoes on the rear.
Tires aren't correct, nor are they suitable for much road mileage as they're too old. We didn't spring for new tires that were likely to be replaced by a new owner with what they might want anyway. Since we carefully cleaned & reinstalled every component, all date codes and other identifiers are correct for the build date. Didn't install the rimlocks. Fork lock peg was missing when we got the bike, but the cylinder works. Wrong handgrips. The handlebar clamp bolts aren't correct; the bike had handlebar rearsets on it with allen bolts holding everything together, and we don't have a correct set of those bolts. Partial tool kit. Correct '73 OEM owners manual in fair condition. Gauges refreshed by ZRESTO (Thanks Bob!) keeping the original miles showing. Inside of the tank was in unbelievably good condition considering, so it was gently cleaned using kerosene and a pound or so of sheet metal screws shaken, not stirred (Bond...James bond). Tapered steering bearings installed 'cause of rust on the OEM balls & races. New sprockets & DID non O-ring chain. OEM chain oiler, tank & all is present. Kept the original under seat stickers. Black foam in the seat.
Still not perfectly happy with the carbs. We think the floats are still 1mm or so too low. It starts on choke with just a touch of the button, then seems excessively cold-blooded until it's completely warmed up, when it runs fine. This time we're gonna take the time to compare float level using the clear drinking glass setup with the OEM clear tube tool method. We're still learning how to read the meniscus of the fuel in the glass container as compared to the meniscus of the fuel in a clear tube.
Pipes are a mismatched set of Z1 and KZ900 pipes in fair to good condition we found locally, maintaining the correct-at-a-glance theme.
The pics were taken at the VJMC North American National Rally at Spring Mill State Park in Indiana on June 27. The bike is registered but not currently licensed, so all we could do is ride the loop around the park. The first miles it's run since 1986
. Felt good! The signature 'clunk' of the early forks is still there.Looks like Mid-Ohio is cancelled this year, so our intended selling opportunity won't happen until next year. We'll likely take the bike to Barber in October & hang a For Sale sign on it & see what happens.
The Lovely Z1BEBE is concerned now that we (read 'slmjim' :dry: ) won't have a project for next winter. She sez we (slmjim) need to find another Z1 project
. Gotta love :kiss: those chicks who are so afflicted with The Dreaded Z-Bug that she sez, "We need another Z1 now, don't we?"Stay safe everyone
&
Good Ridin'
slmjim & Z1BEBE
A biker looks at your engine and chrome.
A Rider looks at your odometer and tags.
1973 ('72 builds) Z1 x2
1974 Z1-A x2
1975 Z1-B x2
1993 CB 750 Nighthawk x2
2009 ST1300A
www.kawasaki-z-classik.com
A Forum tightly focused on all things Z1 and Z2.
A Rider looks at your odometer and tags.
1973 ('72 builds) Z1 x2
1974 Z1-A x2
1975 Z1-B x2
1993 CB 750 Nighthawk x2
2009 ST1300A
www.kawasaki-z-classik.com
A Forum tightly focused on all things Z1 and Z2.
Last edit: 05 Jul 2020 06:43 by slmjim+Z1BEBE. Reason: Thought of more stuff
The following user(s) said Thank You: TexasKZ, Nerdy, Dragbike_Mike
Please Log in or Create an account to join the conversation.
- TexasKZ
-
- Offline
- Platinum Member
-
Registered
- Posts: 8139
- Thanks: 2646
Re: The Wounded Z
05 Jul 2020 06:24
Very nicely done. Thank you both for taking us on this journey and for carefully documenting it for others.
1982 KZ1000 LTD parts donor
1981 KZ1000 LTD awaiting resurrection
2000 ZRX1100 not ridden enough
www.kzrider.com/11-projects/620336-anoth...uild-thread?start=24
1981 KZ1000 LTD awaiting resurrection
2000 ZRX1100 not ridden enough
www.kzrider.com/11-projects/620336-anoth...uild-thread?start=24
The following user(s) said Thank You: slmjim+Z1BEBE
Please Log in or Create an account to join the conversation.
- z1kzonly
-

- Offline
- User
-
Registered
- Sustaining Member
- Posts: 2818
- Thanks: 526
Re: The Wounded Z
10 Jul 2020 08:50
Hello Jim. Very Nice Build! Great work! I wish I had 25% of your grit and determination to get a project done!
Marty in Buffalo
Marty in Buffalo
Livin in "CheektaVegas, NY
Went thru 25 of these in 40 yrs.
I SOLD OUT! THE KAW BARN IS EMPTY.
More room for The Old Girl, Harley 75 FLH Electra Glide,
Old faithful! Points ign. Bendix Orig. carb.
Starts everytime!
Went thru 25 of these in 40 yrs.
I SOLD OUT! THE KAW BARN IS EMPTY.
More room for The Old Girl, Harley 75 FLH Electra Glide,
Old faithful! Points ign. Bendix Orig. carb.
Starts everytime!
The following user(s) said Thank You: slmjim+Z1BEBE
Please Log in or Create an account to join the conversation.
- krazee1
-
- Offline
- User
-
Registered
- Posts: 364
- Thanks: 212
Re: The Wounded Z
10 Jul 2020 17:55
Very cool thread, thank you for taking the time, and sharing your knowledge!
Mike
Mike
Former M.E. at Kawasaki Motors Manufacturing, Lincoln, NE
1966 W1 (the Z1 of 1966-50H.P. and 100mph!)
1974 Z1
1978 KZ1000 LTD
1976 KZ900B pile O parts
1980 KZ750E
1980 Honda XL250S (I know, wrong flavor!)
1966 W1 (the Z1 of 1966-50H.P. and 100mph!)
1974 Z1
1978 KZ1000 LTD
1976 KZ900B pile O parts
1980 KZ750E
1980 Honda XL250S (I know, wrong flavor!)
The following user(s) said Thank You: slmjim+Z1BEBE
Please Log in or Create an account to join the conversation.
Moderators: Street Fighter LTD