
The Wounded Z
- old_kaw
-
- Offline
- User
-

Registered
- Posts: 929
- Thanks: 270
Re: The Wounded Z
27 Apr 2019 14:38 - 27 Apr 2019 14:38
The plier type squeeze connectors you found behind the headlight are referred to as "scotchlock" connectors (for the 3M scotch trade mark) . They are junk, and are a bad connection when new. A lot of U-Haul type hacks like to use them to install trailer lighting / plug connections. My truck has a trailer lighting pigtail installed from the OEM that just needs a plug added. I cringe at the idea of finding those on a bike. :S
1981 Kawasaki Kz1000K1
Located in the Saint Louis, Missouri Area.
Located in the Saint Louis, Missouri Area.
Last edit: 27 Apr 2019 14:38 by old_kaw.
Please Log in or Create an account to join the conversation.
- slmjim+Z1BEBE
-
 Topic Author
- Offline
- User
-
Registered
- Enjoy Life! IT HAS AN EXPIRATION DATE!
- Posts: 1410
- Thanks: 900
Re: The Wounded Z
28 Apr 2019 13:25 - 28 Apr 2019 19:37
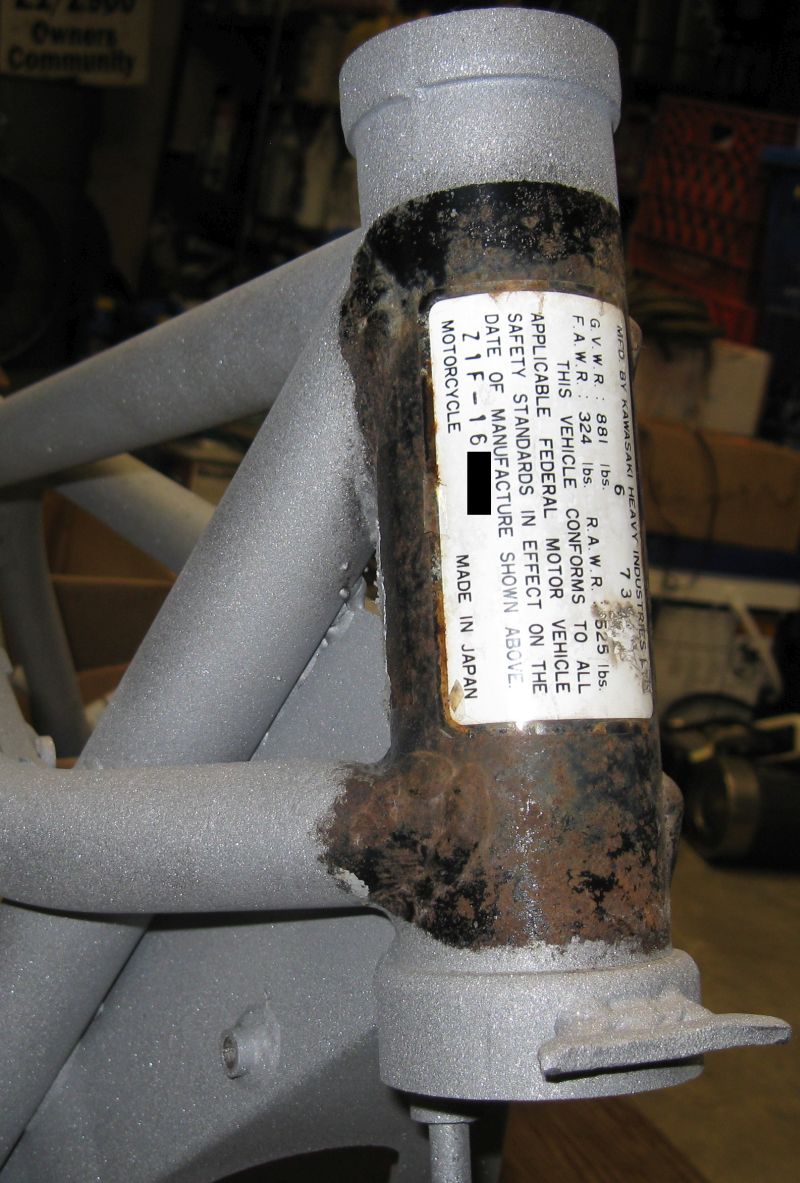
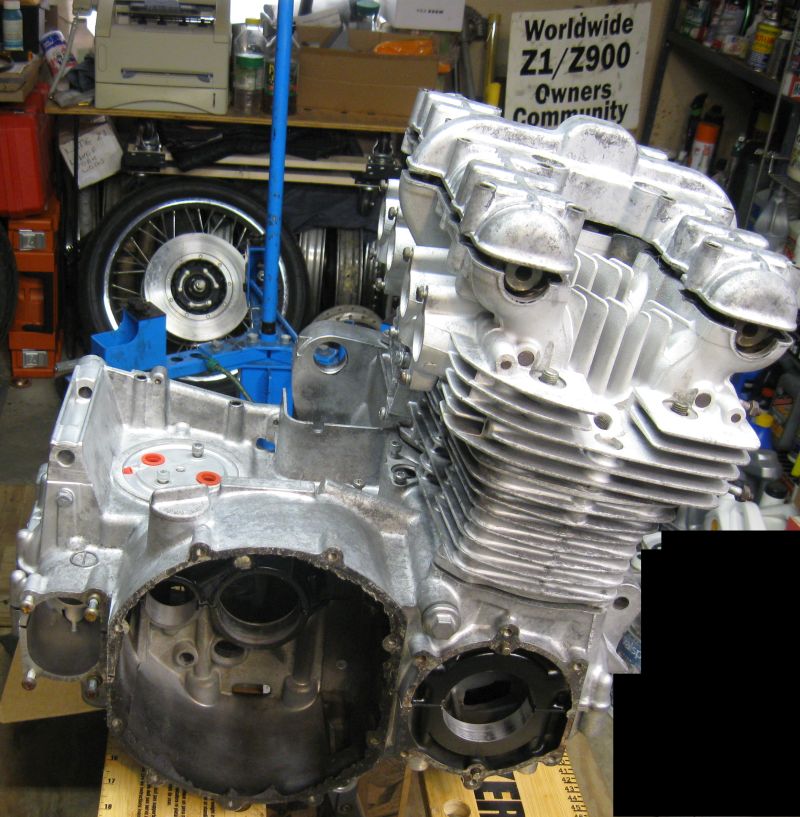
The frame, heavy frame parts and motor are back from being blasted. Soda on the motor, crushed glass on the frame & heavy frame parts. The sheet metal parts (tool tray, battery box, motor mounts etc.) are at the blasters now.
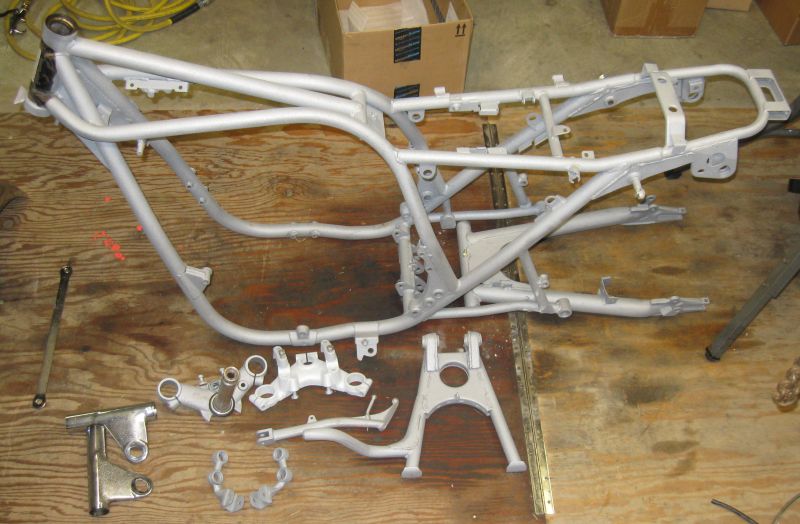
We made it crystal clear to the blast guys that the VIN tag absolutely, positively could not be damaged. They did great! The Lovely Z1BEBE will be running a tiny dremel wire wheel to get the neck cleaned up close to the VIN tag. Think we'll leave the OEM paint as is on the stamped VIN#.
Head is done. Local (retired) guy & motorhead extraordinaire Steve Miles (M&M Racing back in the day) got the remains of the broken plug out, inserted the hole, checked the valve guides (OK), lapped & set the initial valve lash in the 270 ~ 290 range. He's got a nice home/hobbyist shop! Jugs are done, bores & pistons miked, waiting for reassembly. Crank is straight, tranny is sound, with no chipped gear teeth. Shift forks straight, shift dogs look pristine.
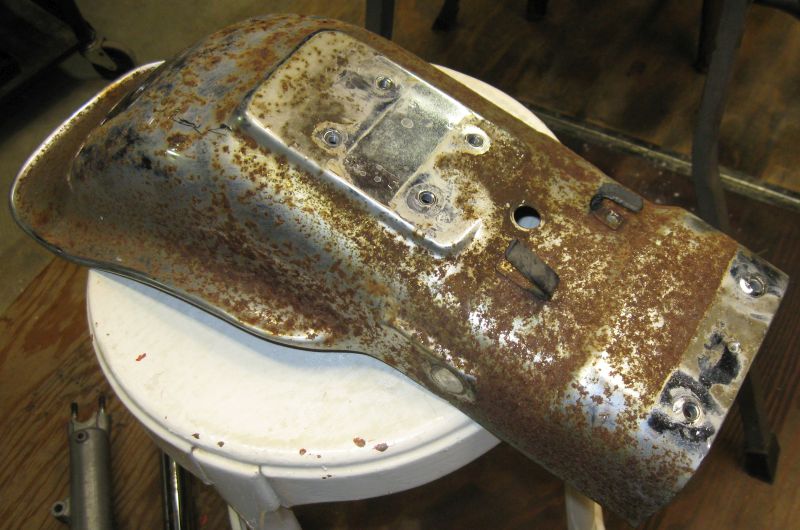
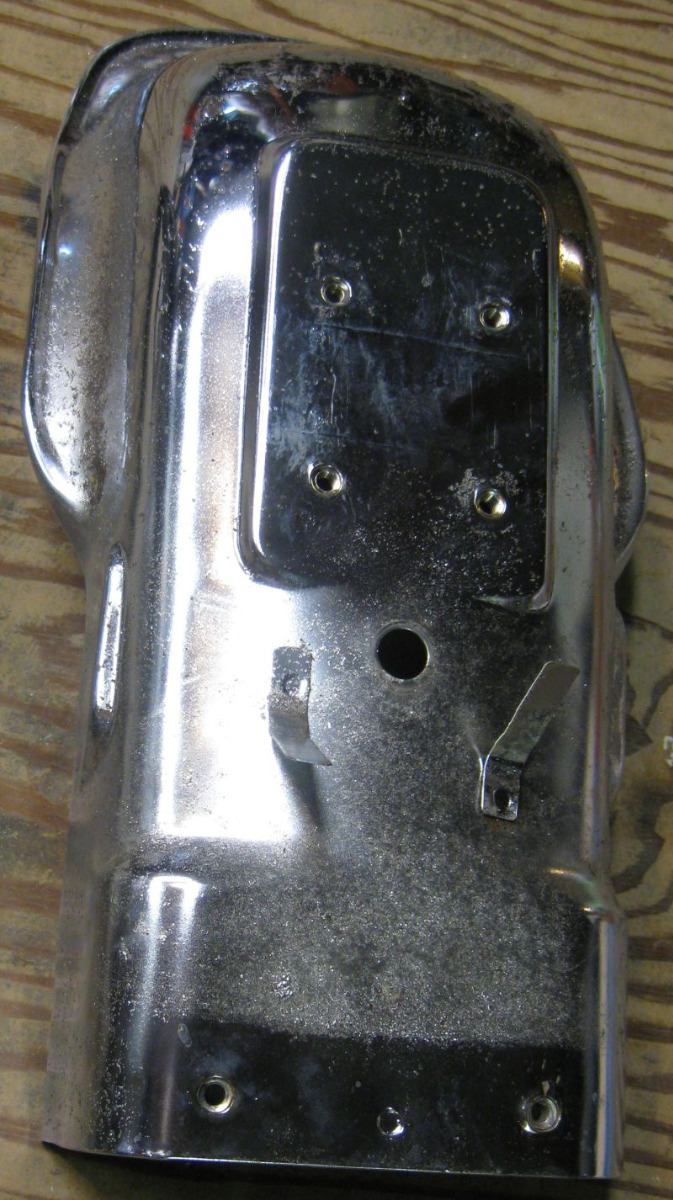
We needed to change the water in the vapor blaster anyway so, just out of curiosity, we decided to blast the very rusty chrome pieces to see how they'd clean up. We're going to have Space Coast Plating give an estimate on re-chroming, then weigh the cost of good used/new OEM and/or new repop parts.
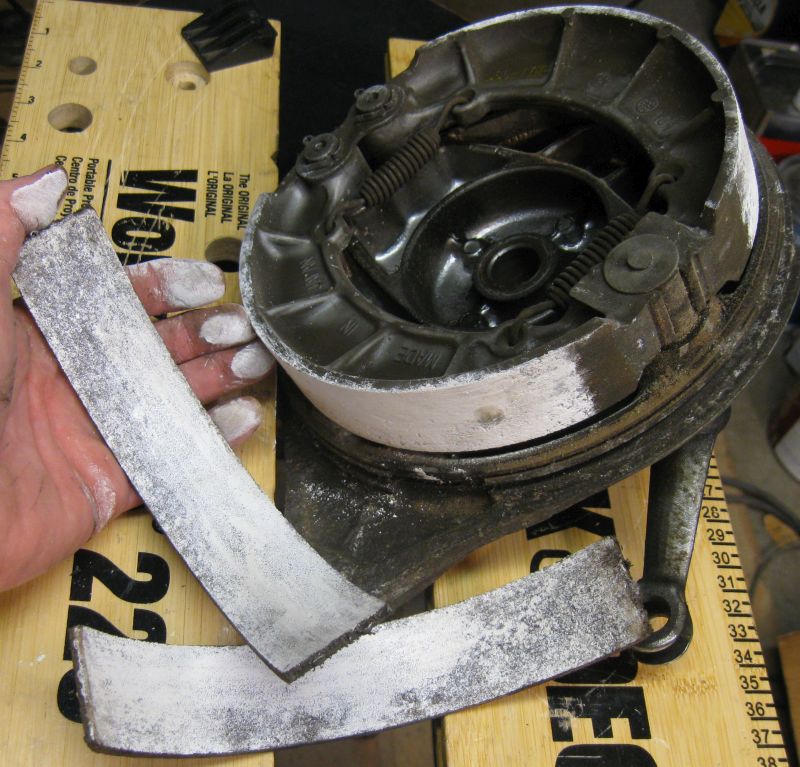
The linings on the brake shoes just fell off when the drum was removed. 30+ yrs. of moldering in a damp PNW environment allowed corrosion to grow under the adhesive & separate the linings from the backing.
There's a thought tugging at us to simply reassemble The Wounded Z with as many of the original parts as possible after getting them as presentable as possible. The motor had to be done; it'll be repainted as new. The frame had to be done just 'cause. It'll be repainted original 80% gloss, and the black bits will be repainted as new. That'll get the hard stuff done. The Lovely Z1BEBE wants to ride it for a season. It'll be fun to take it and The Seven Year _itch to shows & bike nights just for the contrast of clean survivor vs full frame-up resto.
EDIT: Just like to add, that after 30+ yrs., tires get stiff!. Took over two hrs. to get them off the rims.
The Seven Year _itch.
Good Ridin'
slmjim & Z1BEBE
We made it crystal clear to the blast guys that the VIN tag absolutely, positively could not be damaged. They did great! The Lovely Z1BEBE will be running a tiny dremel wire wheel to get the neck cleaned up close to the VIN tag. Think we'll leave the OEM paint as is on the stamped VIN#.
Head is done. Local (retired) guy & motorhead extraordinaire Steve Miles (M&M Racing back in the day) got the remains of the broken plug out, inserted the hole, checked the valve guides (OK), lapped & set the initial valve lash in the 270 ~ 290 range. He's got a nice home/hobbyist shop! Jugs are done, bores & pistons miked, waiting for reassembly. Crank is straight, tranny is sound, with no chipped gear teeth. Shift forks straight, shift dogs look pristine.
We needed to change the water in the vapor blaster anyway so, just out of curiosity, we decided to blast the very rusty chrome pieces to see how they'd clean up. We're going to have Space Coast Plating give an estimate on re-chroming, then weigh the cost of good used/new OEM and/or new repop parts.
The linings on the brake shoes just fell off when the drum was removed. 30+ yrs. of moldering in a damp PNW environment allowed corrosion to grow under the adhesive & separate the linings from the backing.
There's a thought tugging at us to simply reassemble The Wounded Z with as many of the original parts as possible after getting them as presentable as possible. The motor had to be done; it'll be repainted as new. The frame had to be done just 'cause. It'll be repainted original 80% gloss, and the black bits will be repainted as new. That'll get the hard stuff done. The Lovely Z1BEBE wants to ride it for a season. It'll be fun to take it and The Seven Year _itch to shows & bike nights just for the contrast of clean survivor vs full frame-up resto.
EDIT: Just like to add, that after 30+ yrs., tires get stiff!. Took over two hrs. to get them off the rims.
The Seven Year _itch.
Good Ridin'
slmjim & Z1BEBE
A biker looks at your engine and chrome.
A Rider looks at your odometer and tags.
1973 ('72 builds) Z1 x2
1974 Z1-A x2
1975 Z1-B x2
1993 CB 750 Nighthawk x2
2009 ST1300A
www.kawasaki-z-classik.com
A Forum tightly focused on all things Z1 and Z2.
A Rider looks at your odometer and tags.
1973 ('72 builds) Z1 x2
1974 Z1-A x2
1975 Z1-B x2
1993 CB 750 Nighthawk x2
2009 ST1300A
www.kawasaki-z-classik.com
A Forum tightly focused on all things Z1 and Z2.
Last edit: 28 Apr 2019 19:37 by slmjim+Z1BEBE.
Please Log in or Create an account to join the conversation.
- z1kzonly
-

- Offline
- User
-
Registered
- Sustaining Member
- Posts: 2818
- Thanks: 526
Re: The Wounded Z
28 Apr 2019 19:34
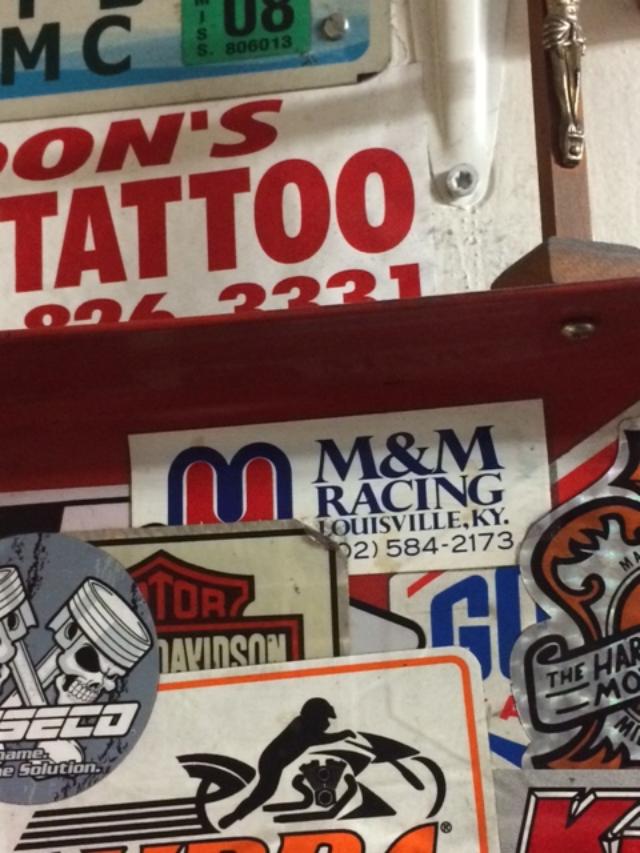
M&M racing!! 1980 Louisville, KY!
The plug hole with the broken spark plug had to have an insert, 'cause whoever broke it off had started it in crooked in the first place, egging the plug hole such that even after the remnants of the plug had been removed, the remaining threaded hole was no longer round. *** My local guy Steve Miles (one of the "M" 's from M&M Racing back in the day) *** accomplished the plug hole repair nicely in his shop, as well as cleaning up the chambers & being able to recover the #3 & #4 valve seats after exposure to water for however many years sat there. Only one valve had to be tipped a few thou, to arrive at all eight shims being in the 270 ~ 290 range.
Hi Jim, I seen your post here, and it triggered a memory! **M&M ** they were one of the few originals back in the early days! I can't remember what I bought?
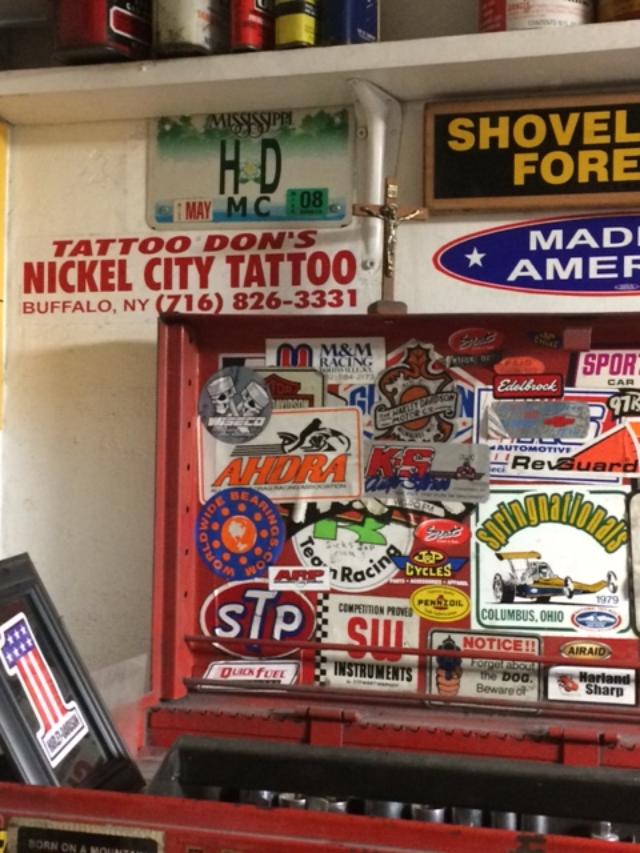
But , I did buy something? I started my Craftsman tool box decal collection after High School in 1976. A present from my Mom, for graduating high school. Then I started adding decals. I sill use the tool box today! Mostly from memories and respect for the past! How many of these decals are left??? Cool! Thanks for the trigger for the memory!
Marty in Buffalo
The plug hole with the broken spark plug had to have an insert, 'cause whoever broke it off had started it in crooked in the first place, egging the plug hole such that even after the remnants of the plug had been removed, the remaining threaded hole was no longer round. *** My local guy Steve Miles (one of the "M" 's from M&M Racing back in the day) *** accomplished the plug hole repair nicely in his shop, as well as cleaning up the chambers & being able to recover the #3 & #4 valve seats after exposure to water for however many years sat there. Only one valve had to be tipped a few thou, to arrive at all eight shims being in the 270 ~ 290 range.
Hi Jim, I seen your post here, and it triggered a memory! **M&M ** they were one of the few originals back in the early days! I can't remember what I bought?
But , I did buy something? I started my Craftsman tool box decal collection after High School in 1976. A present from my Mom, for graduating high school. Then I started adding decals. I sill use the tool box today! Mostly from memories and respect for the past! How many of these decals are left??? Cool! Thanks for the trigger for the memory!
Marty in Buffalo
Livin in "CheektaVegas, NY
Went thru 25 of these in 40 yrs.
I SOLD OUT! THE KAW BARN IS EMPTY.
More room for The Old Girl, Harley 75 FLH Electra Glide,
Old faithful! Points ign. Bendix Orig. carb.
Starts everytime!
Went thru 25 of these in 40 yrs.
I SOLD OUT! THE KAW BARN IS EMPTY.
More room for The Old Girl, Harley 75 FLH Electra Glide,
Old faithful! Points ign. Bendix Orig. carb.
Starts everytime!
Please Log in or Create an account to join the conversation.
- slmjim+Z1BEBE
-
Topic Author
- Offline
- User
-
Registered
- Enjoy Life! IT HAS AN EXPIRATION DATE!
- Posts: 1410
- Thanks: 900
Re: The Wounded Z
28 Apr 2019 19:53
Thanks for sharing that Marty! Been a long time since I've seen one of those in the wild. I guess The Lovely Z1BEBE has never seen one at all!
I'll show that to Steve, he'll get a kick out of it.
Good Ridin'
slmjim
I'll show that to Steve, he'll get a kick out of it.
Good Ridin'
slmjim
A biker looks at your engine and chrome.
A Rider looks at your odometer and tags.
1973 ('72 builds) Z1 x2
1974 Z1-A x2
1975 Z1-B x2
1993 CB 750 Nighthawk x2
2009 ST1300A
www.kawasaki-z-classik.com
A Forum tightly focused on all things Z1 and Z2.
A Rider looks at your odometer and tags.
1973 ('72 builds) Z1 x2
1974 Z1-A x2
1975 Z1-B x2
1993 CB 750 Nighthawk x2
2009 ST1300A
www.kawasaki-z-classik.com
A Forum tightly focused on all things Z1 and Z2.
Please Log in or Create an account to join the conversation.
- slmjim+Z1BEBE
-
Topic Author
- Offline
- User
-
Registered
- Enjoy Life! IT HAS AN EXPIRATION DATE!
- Posts: 1410
- Thanks: 900
Re: The Wounded Z
04 Jun 2019 06:55
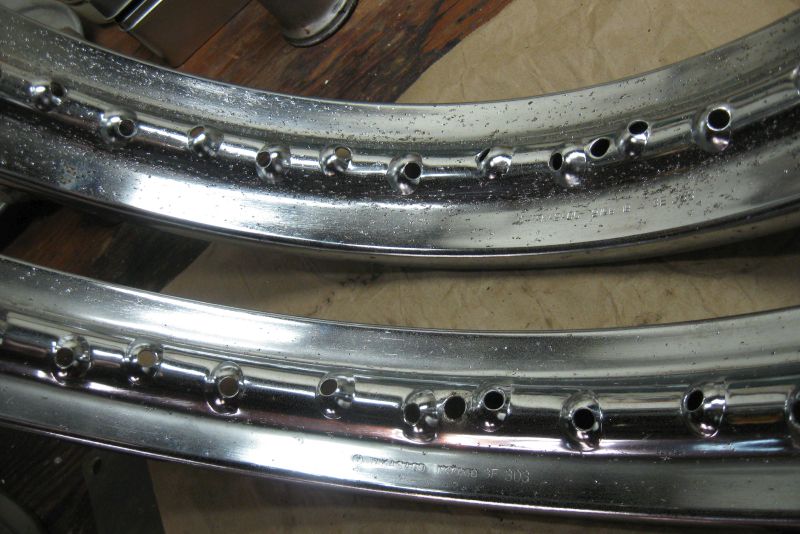
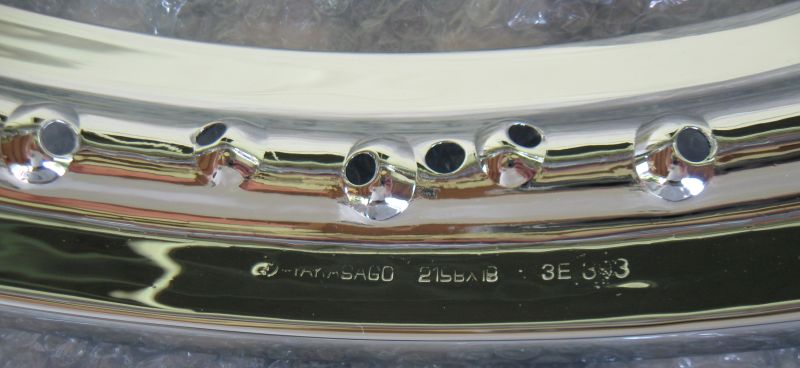
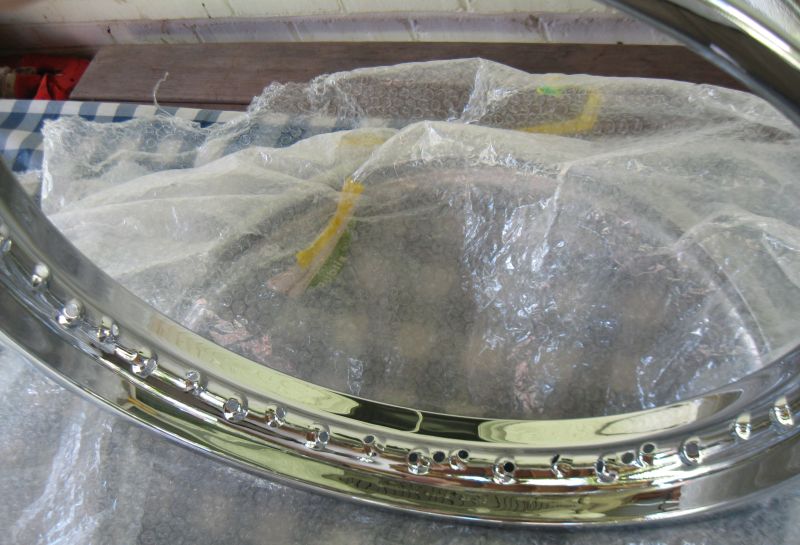
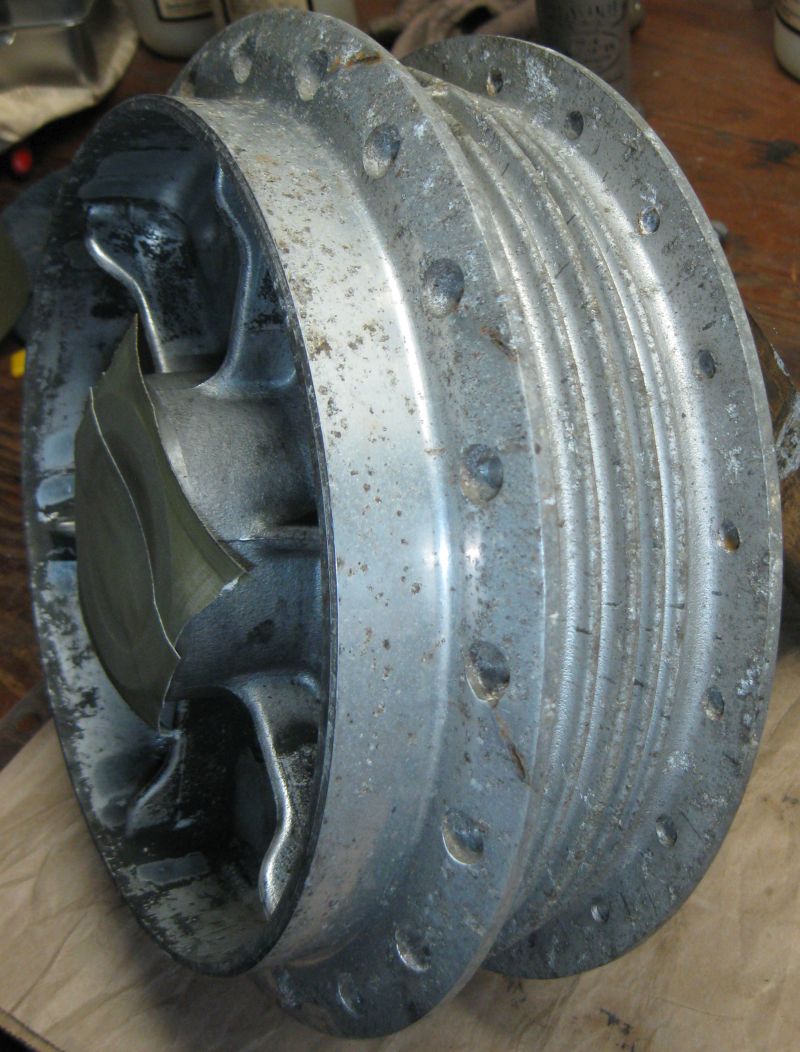
We visited friends in Lakeland, FL in early May. There's a chrome shop named Space Coast Plating (SCP) located 90 minutes away in Melbourne, FL that advertises in the VJMC magazine. We carried many of the candidates for re-chroming (or replacement) with us on this trip, with the intent of saving on shipping and, having estimates done on the spot. While there, the staff was able to show us some Z1 parts that were there from another client. Only the copper plating had been done on the wheels, but the stamped date codes & such were still crisp & clearly visible, but the linishing marks had necessarily been polished out due to pitting. Apparently it's often the copper plate step wherein stamped characters lose crispness or are lost entirely. We left the rims, head nuts, rear brake pedal and torque link there to be re-chromed, with the clear, written understanding that the date codes must be preserved.
We considered & made notes of pricing for all of the chrome items; buying used from fleaBay and/or new aftermarket vs having items re-chromed. It was convenient to be able to get pricing on the spot while at SCP, and being able to decide based on projected costs. They also have a database of past Z1 parts they had done in the past with which to estimate cost. What we found was that it was more economical to re-chrome some items (below) vs buying used, or new repops. Other items will be replaced with fleaBay items or repops. Or, some easily-accessed parts just reinstalled as is & the buyer can decide what to do.
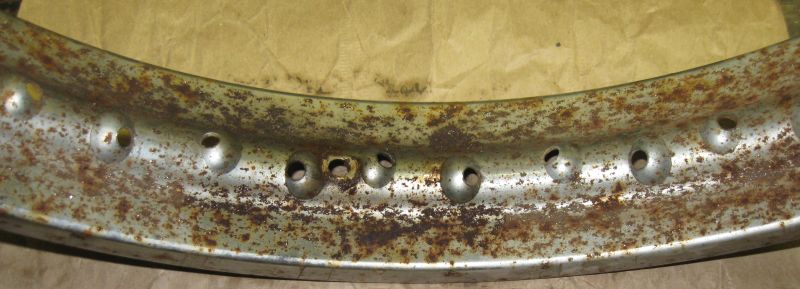
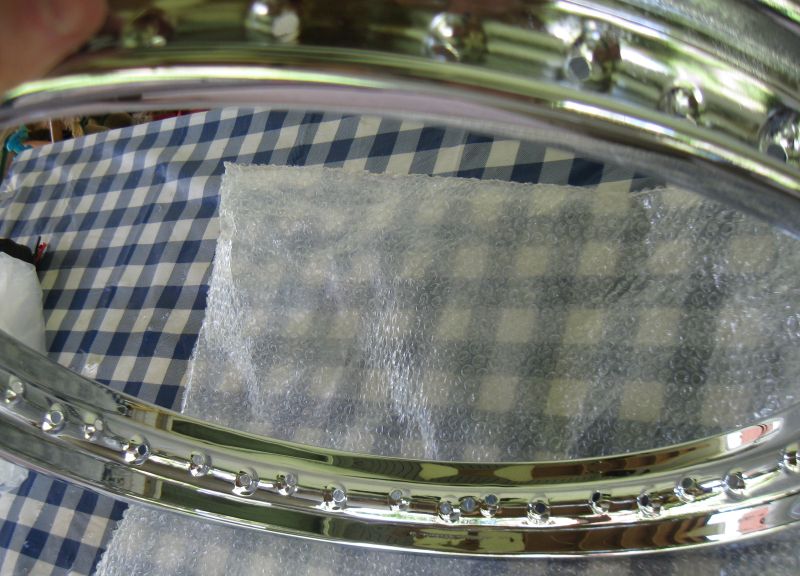
The rims were so badly pitted that there was no chance of retaining the linishing marks. We knew that going in. The stampings were retained as best they could, considering the depth of the pitting. Slightly less crisp, but still clearly visible. The depth of the stampings were uneven to begin with. Overall, the rims came out "better" than new.

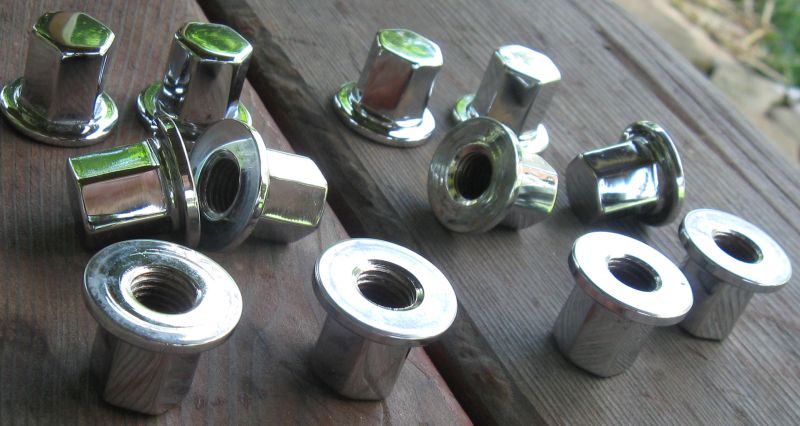
Head nuts. The early, "short" top hats, correct for this ser.#. If not for that, we would have used a set of later, "tall" top hat nuts we have on the shelf.
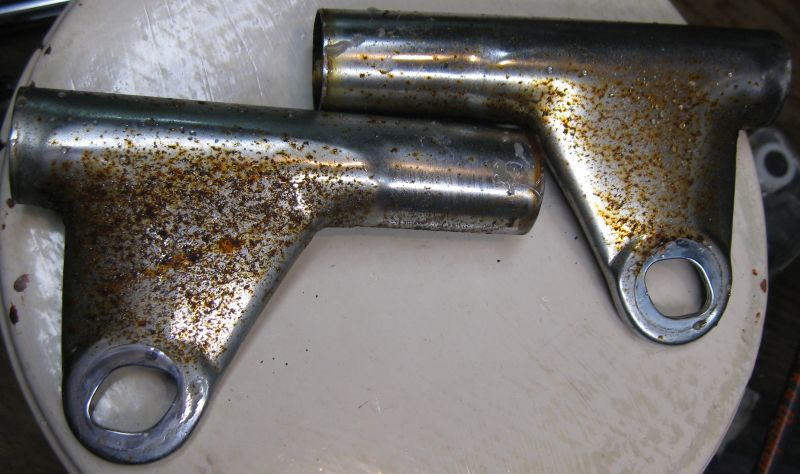
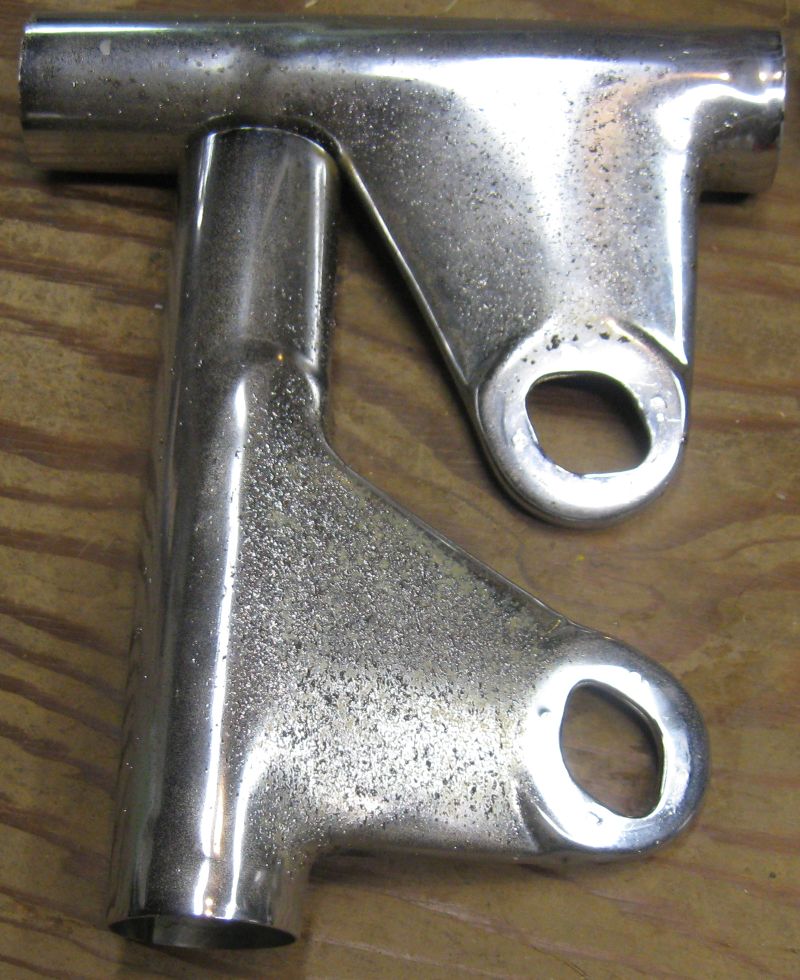
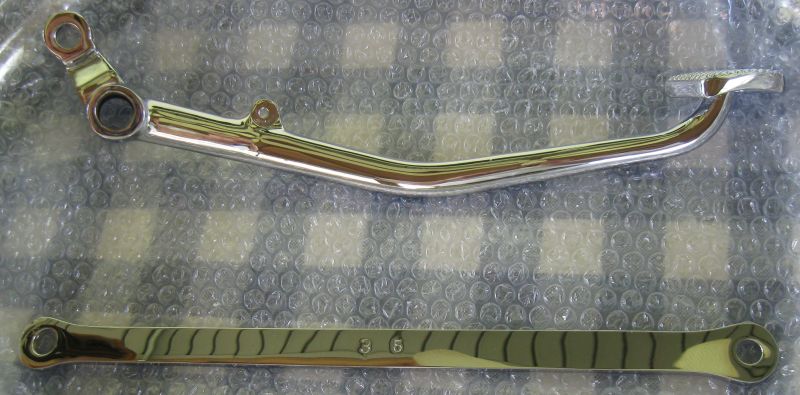
Good used rear brake pedals are surprisingly expensive, so we had it done too, as well as the torque link. The date code on the rear of the link is clearly visible in this pic. The front looks just as good. It started with deep rust pitting and acid damage.
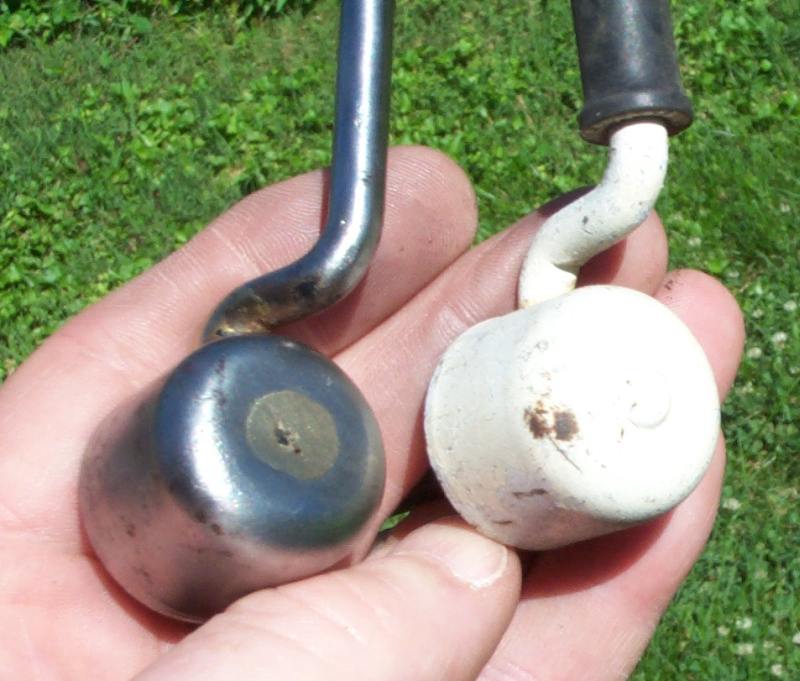
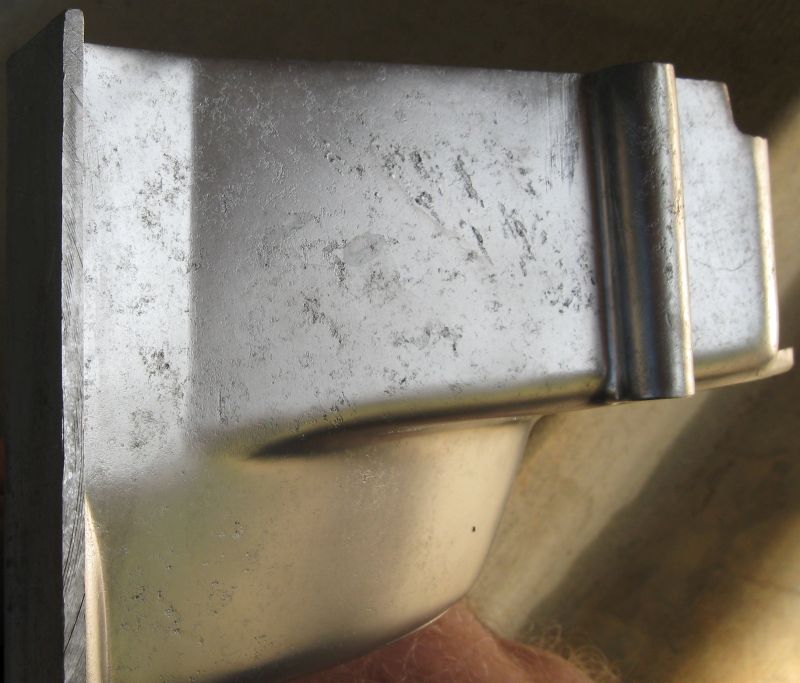
We're beginning to prep for paint on the frame & frame parts. Just priming so far. We had everything blasted with crushed glass to get as much rust & pitting removed as possible. The seat latch lever shows the internal yellow brazing used for assembly of the lever to the latch shaft & "cup".
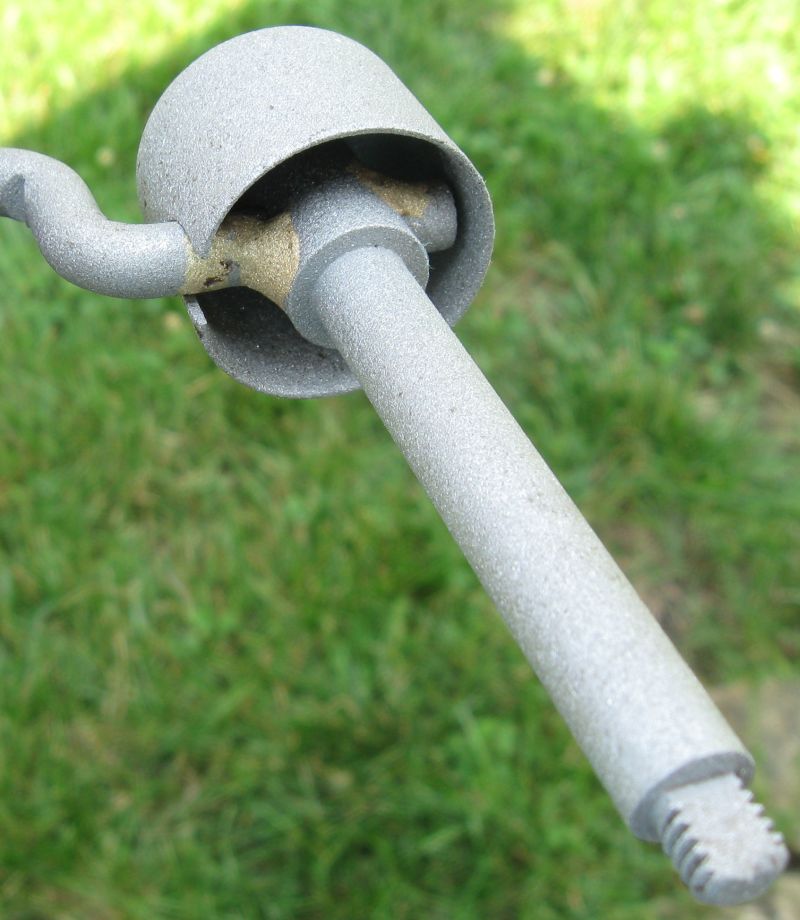
Note that the above is the the later, riveted construction wherein the shaft end is riveted to the cup. The earlier latch shaft ends were brazed to the cup as well as the levers, as seen in the pic below. Brazed one sans rivet on the left, circa. ser# low 2300's (late '72 mfgr. date), from "the Seven Year _itch", a basket case we completed a couple years ago. One on he right is an example of another riveted assembly. Don't know when the change was made, date or ser.#, from braze to rivet.
Next steps of motor paint & assembly, frame & frame parts paint and wheel assembly with new spokes will be forthcoming as progress allows.
Good Ridin'
slmjim & Z1BEBE
We considered & made notes of pricing for all of the chrome items; buying used from fleaBay and/or new aftermarket vs having items re-chromed. It was convenient to be able to get pricing on the spot while at SCP, and being able to decide based on projected costs. They also have a database of past Z1 parts they had done in the past with which to estimate cost. What we found was that it was more economical to re-chrome some items (below) vs buying used, or new repops. Other items will be replaced with fleaBay items or repops. Or, some easily-accessed parts just reinstalled as is & the buyer can decide what to do.
The rims were so badly pitted that there was no chance of retaining the linishing marks. We knew that going in. The stampings were retained as best they could, considering the depth of the pitting. Slightly less crisp, but still clearly visible. The depth of the stampings were uneven to begin with. Overall, the rims came out "better" than new.
Head nuts. The early, "short" top hats, correct for this ser.#. If not for that, we would have used a set of later, "tall" top hat nuts we have on the shelf.
Good used rear brake pedals are surprisingly expensive, so we had it done too, as well as the torque link. The date code on the rear of the link is clearly visible in this pic. The front looks just as good. It started with deep rust pitting and acid damage.
We're beginning to prep for paint on the frame & frame parts. Just priming so far. We had everything blasted with crushed glass to get as much rust & pitting removed as possible. The seat latch lever shows the internal yellow brazing used for assembly of the lever to the latch shaft & "cup".
Note that the above is the the later, riveted construction wherein the shaft end is riveted to the cup. The earlier latch shaft ends were brazed to the cup as well as the levers, as seen in the pic below. Brazed one sans rivet on the left, circa. ser# low 2300's (late '72 mfgr. date), from "the Seven Year _itch", a basket case we completed a couple years ago. One on he right is an example of another riveted assembly. Don't know when the change was made, date or ser.#, from braze to rivet.
Next steps of motor paint & assembly, frame & frame parts paint and wheel assembly with new spokes will be forthcoming as progress allows.
Good Ridin'
slmjim & Z1BEBE
A biker looks at your engine and chrome.
A Rider looks at your odometer and tags.
1973 ('72 builds) Z1 x2
1974 Z1-A x2
1975 Z1-B x2
1993 CB 750 Nighthawk x2
2009 ST1300A
www.kawasaki-z-classik.com
A Forum tightly focused on all things Z1 and Z2.
A Rider looks at your odometer and tags.
1973 ('72 builds) Z1 x2
1974 Z1-A x2
1975 Z1-B x2
1993 CB 750 Nighthawk x2
2009 ST1300A
www.kawasaki-z-classik.com
A Forum tightly focused on all things Z1 and Z2.
The following user(s) said Thank You: hardrockminer
Please Log in or Create an account to join the conversation.
- slmjim+Z1BEBE
-
Topic Author
- Offline
- User
-
Registered
- Enjoy Life! IT HAS AN EXPIRATION DATE!
- Posts: 1410
- Thanks: 900
Re: The Wounded Z
26 Jun 2019 08:30 - 26 Jun 2019 14:53
Update.
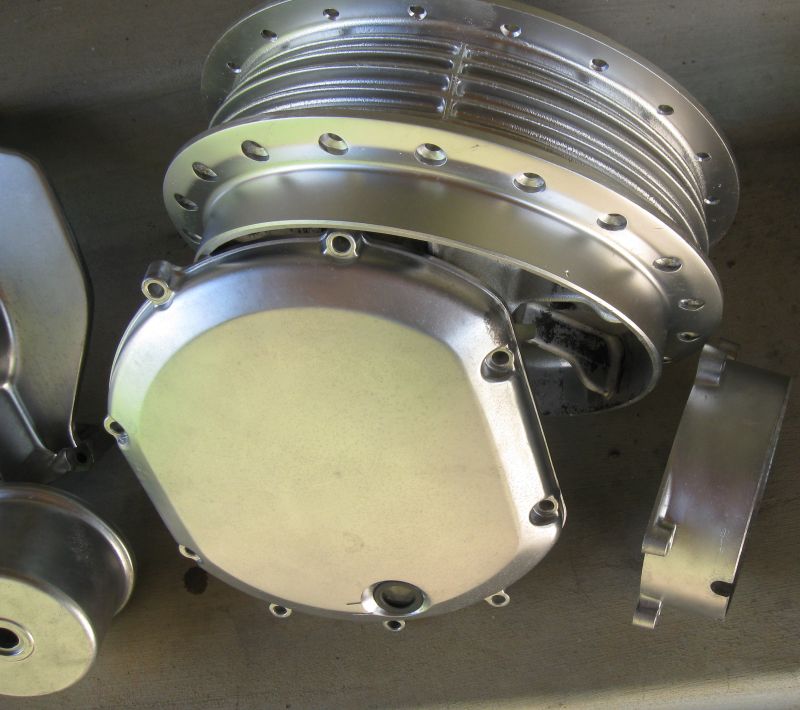
We've already established that over three decades of inactivity in a PNW barn was not kind to the finishes of this bike. The before pics at the beginning of this thread are representative of the painted finishes. Below are some before pics of the polished aluminum after bulk chemical degreasing outside with de-greaser and a hose to get them clean enough to go in the parts washer. They're cleaner than they look. What's left is very stubborn creeping-crud corrosion and the resulting pitting. After these pics, final washing in the parts washer, and finish washing with strong detergent & water was done to prep them for vapor blast.
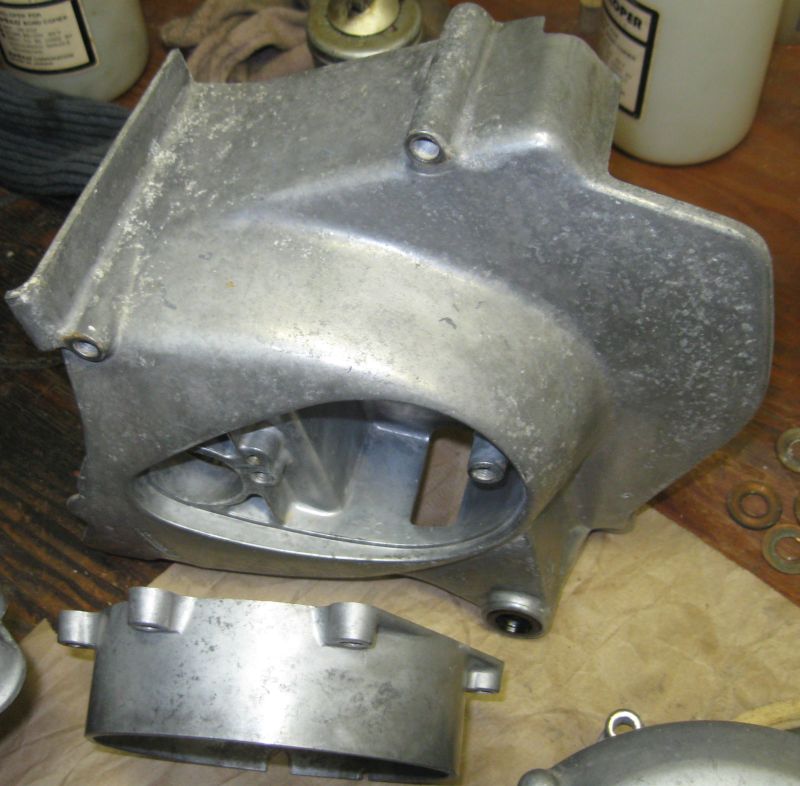
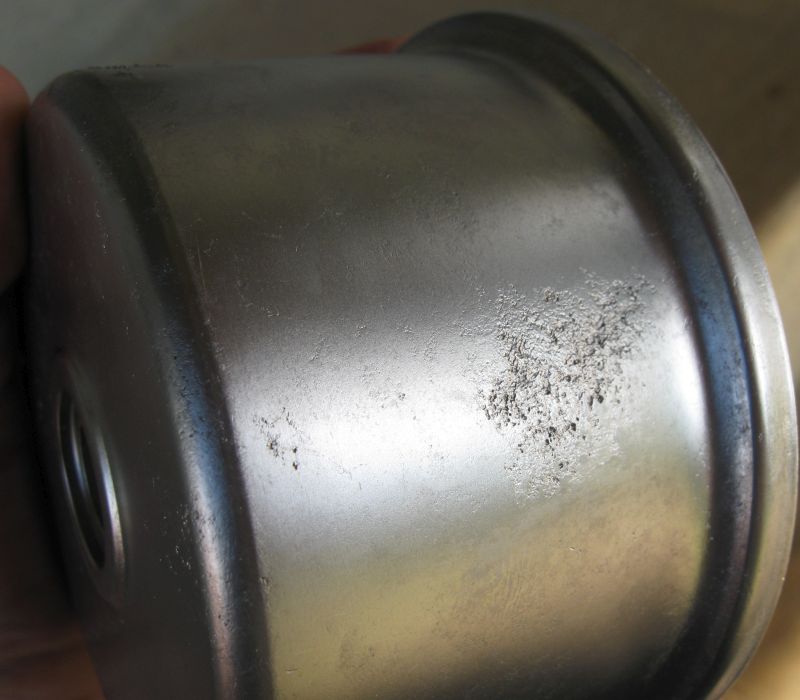
The valve cover was bolted to the head during soda blasting. This is how it appears after soda blasting.
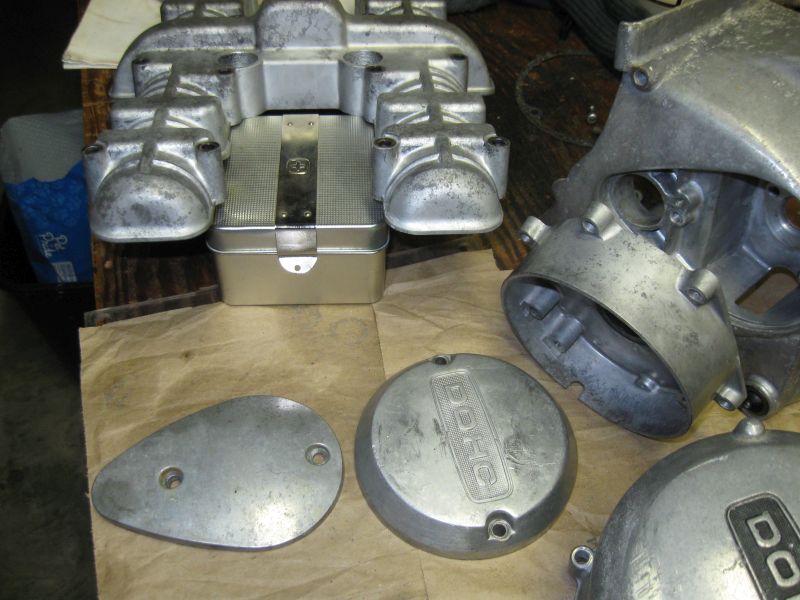
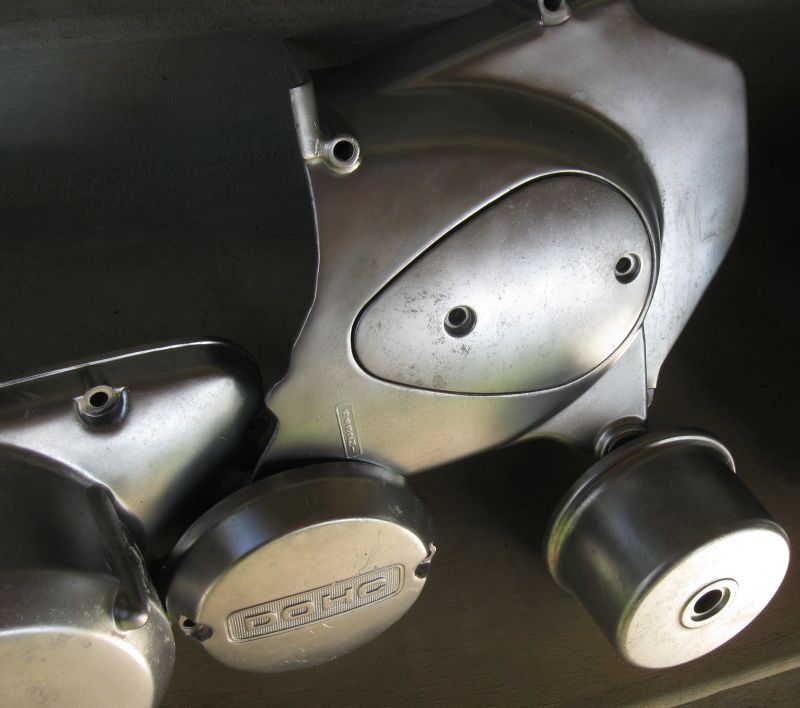
The shiny area at the bottom of the dyno cover is where I dressed down some deep scratches with a carbide stone, then a fine file, to get the them approximately level with the surrounding area.

After vapor blast, but before final hand finishing. That will be done with wet 2,000-grit abrasive paper to achieve something close to the original, slightly-less-than-mirror-gloss. Vapor blasting leaves more of a shiny/satin-ish finish that, while attractive, isn't quite correct, IMO.
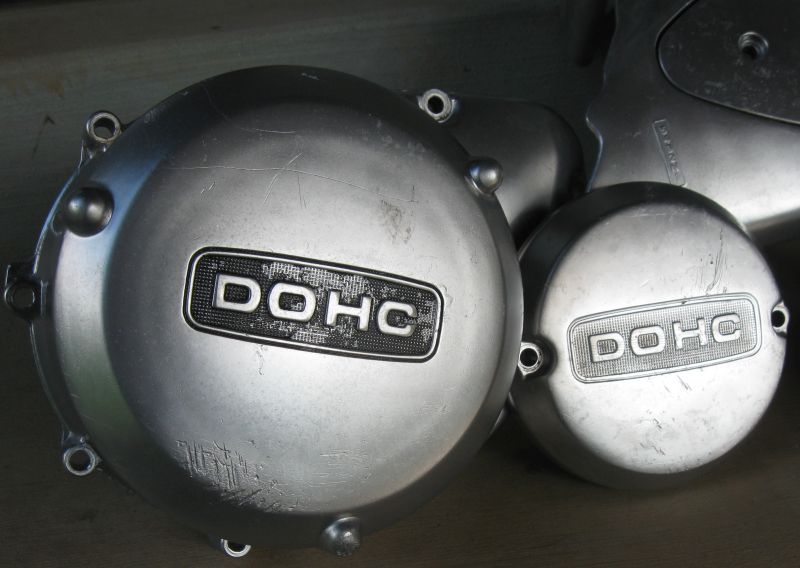
Pitting on the polished aluminum surfaces left behind by corrosion was deep in some places. While it might be possible to polish it all out, doing so would remove so much material that it would create shallow depressions relative to the surrounding areas. If this was in steel, it could be masked with repeated coats of filling primer with hand-sanding between coats. This is as good as it's going to get on these pieces. 2,000-grit wet sanding won't reduce this pitting at all. These are the worst of the bunch, but it's present to a lesser extent on everything.
With the polished aluminum parts in the final stages, we move on to the painted items.
How to deal with painting the frame & frame parts? After some consideration, slmjim had a thought!!! (The Lovely Z1BEBE knows that seems unlikely, but it really happened! She was amused & maybe a little surprised.) It involves gettin' my butt out of the hammock for a change.
This pic is after priming the frame & swingarm with etching primer, detailed, dry hand-sanding with 420-grit, wiping everything with a tack cloth, another coat of primer, hand-sanding & tack cloth wipe, and one color coat, as shown. We'll let this first color coat cure for a few weeks before hand-sanding again, then another careful color coat, and see what it looks like. The frame can easily be rotated sideways & upside-down to get all surfaces exposed for painting. Not shown here, are the small sheet metal & cast frame parts (tool tray, center electrical panel, side & center stands, headlight bucket, etc.) They've been primed with ordinary automotive primer after crushed glass blasting. They'll be suspended from the hammock rack for final black color coats. (Soon as slmjim gets his butt out of the hammock again, that is.) The valve cover is shown with a coat of zinc chromate primer, in prep for a coat of PJ1 Fast Black that leaves a finish that's essentially identical to Mama Kaw's original motor paint. What can't be seen is the polished valve cover ends have been masked, after vapor blasting and final finishing with wet 2,000 grit.
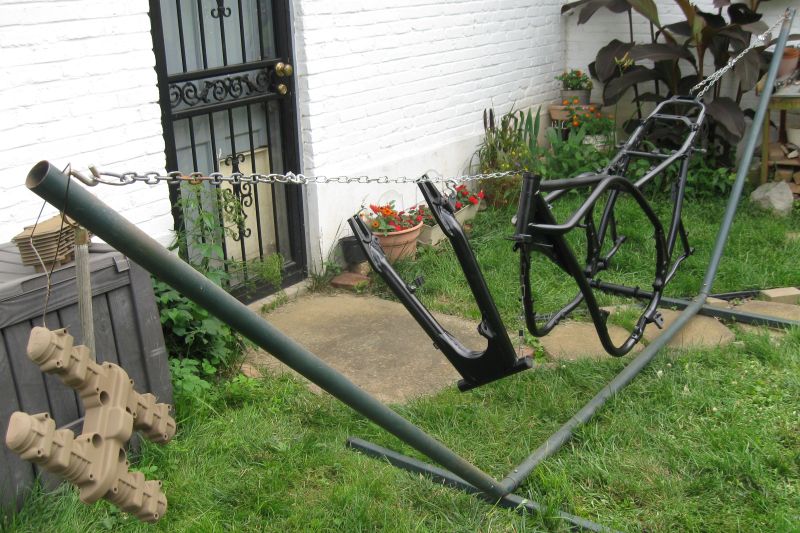
Some of the rust pitting on the frame was deep enough, even after being dry-blasted with crushed glass, that it will end up showing through the final color coats, . A huge amount of time & effort would be needed to mask it all with repeated priming & sanding. If this bike was meant to be a 100-point resto that we intended to keep we'd do it, but we decided early-on that was not our intent; it will be a ten-foot, correct-at-a-glance bike that is for sale. Most of the severe pitting will be hidden by the tank & tailpiece anyway. Those areas seem to be where most of the condensation recurred for decades.
Painting this time of year can be challenging. We have to do it outside, so wind has to be fairly calm, and humidity must be low enough that it doesn't cause milk hazing in the black color coat while it's still wet.
More to come as progress is made.
Good Ridin'
slmjim & Z1BEBE
We've already established that over three decades of inactivity in a PNW barn was not kind to the finishes of this bike. The before pics at the beginning of this thread are representative of the painted finishes. Below are some before pics of the polished aluminum after bulk chemical degreasing outside with de-greaser and a hose to get them clean enough to go in the parts washer. They're cleaner than they look. What's left is very stubborn creeping-crud corrosion and the resulting pitting. After these pics, final washing in the parts washer, and finish washing with strong detergent & water was done to prep them for vapor blast.
The valve cover was bolted to the head during soda blasting. This is how it appears after soda blasting.
The shiny area at the bottom of the dyno cover is where I dressed down some deep scratches with a carbide stone, then a fine file, to get the them approximately level with the surrounding area.
After vapor blast, but before final hand finishing. That will be done with wet 2,000-grit abrasive paper to achieve something close to the original, slightly-less-than-mirror-gloss. Vapor blasting leaves more of a shiny/satin-ish finish that, while attractive, isn't quite correct, IMO.
Pitting on the polished aluminum surfaces left behind by corrosion was deep in some places. While it might be possible to polish it all out, doing so would remove so much material that it would create shallow depressions relative to the surrounding areas. If this was in steel, it could be masked with repeated coats of filling primer with hand-sanding between coats. This is as good as it's going to get on these pieces. 2,000-grit wet sanding won't reduce this pitting at all. These are the worst of the bunch, but it's present to a lesser extent on everything.
With the polished aluminum parts in the final stages, we move on to the painted items.
How to deal with painting the frame & frame parts? After some consideration, slmjim had a thought!!! (The Lovely Z1BEBE knows that seems unlikely, but it really happened! She was amused & maybe a little surprised.) It involves gettin' my butt out of the hammock for a change.
This pic is after priming the frame & swingarm with etching primer, detailed, dry hand-sanding with 420-grit, wiping everything with a tack cloth, another coat of primer, hand-sanding & tack cloth wipe, and one color coat, as shown. We'll let this first color coat cure for a few weeks before hand-sanding again, then another careful color coat, and see what it looks like. The frame can easily be rotated sideways & upside-down to get all surfaces exposed for painting. Not shown here, are the small sheet metal & cast frame parts (tool tray, center electrical panel, side & center stands, headlight bucket, etc.) They've been primed with ordinary automotive primer after crushed glass blasting. They'll be suspended from the hammock rack for final black color coats. (Soon as slmjim gets his butt out of the hammock again, that is.) The valve cover is shown with a coat of zinc chromate primer, in prep for a coat of PJ1 Fast Black that leaves a finish that's essentially identical to Mama Kaw's original motor paint. What can't be seen is the polished valve cover ends have been masked, after vapor blasting and final finishing with wet 2,000 grit.
Some of the rust pitting on the frame was deep enough, even after being dry-blasted with crushed glass, that it will end up showing through the final color coats, . A huge amount of time & effort would be needed to mask it all with repeated priming & sanding. If this bike was meant to be a 100-point resto that we intended to keep we'd do it, but we decided early-on that was not our intent; it will be a ten-foot, correct-at-a-glance bike that is for sale. Most of the severe pitting will be hidden by the tank & tailpiece anyway. Those areas seem to be where most of the condensation recurred for decades.
Painting this time of year can be challenging. We have to do it outside, so wind has to be fairly calm, and humidity must be low enough that it doesn't cause milk hazing in the black color coat while it's still wet.
More to come as progress is made.
Good Ridin'
slmjim & Z1BEBE
A biker looks at your engine and chrome.
A Rider looks at your odometer and tags.
1973 ('72 builds) Z1 x2
1974 Z1-A x2
1975 Z1-B x2
1993 CB 750 Nighthawk x2
2009 ST1300A
www.kawasaki-z-classik.com
A Forum tightly focused on all things Z1 and Z2.
A Rider looks at your odometer and tags.
1973 ('72 builds) Z1 x2
1974 Z1-A x2
1975 Z1-B x2
1993 CB 750 Nighthawk x2
2009 ST1300A
www.kawasaki-z-classik.com
A Forum tightly focused on all things Z1 and Z2.
Last edit: 26 Jun 2019 14:53 by slmjim+Z1BEBE. Reason: Typos
Please Log in or Create an account to join the conversation.
- toolmaker
-
- Offline
- User
-
Registered
- Posts: 217
- Thanks: 19
Re: The Wounded Z
20 Nov 2019 07:20
Have you done much with the bike lately?
I live near Portland, Oregon and my rider is a '76 KZ900 I bought new. I'm also in the process of restoring another one and a '73 Z1.
Please Log in or Create an account to join the conversation.
- slmjim+Z1BEBE
-
Topic Author
- Offline
- User
-
Registered
- Enjoy Life! IT HAS AN EXPIRATION DATE!
- Posts: 1410
- Thanks: 900
Re: The Wounded Z
21 Nov 2019 14:54Hi Gary,toolmaker wrote: Have you done much with the bike lately?
Good to hear from ya'! Hope retirement is treating you well. Seems a cross-country move was in the works too...? Ya' know, you & yours have a standing invite if you pass this way.
Synopsis:
The summer months were spent having all the surfaces needing paint media blasted, then we primed & painted & cleaned , with very limited time spent on the resto otherwise 'cause Ridin' season.
Motor & chassis paint was done outside while it was warm/calm/low humidity enough to do so. We don't have a good indoor space to do spray paint without stinking up the house & having overspray settle on stuff.
The motor cases, jugs & head were soda blasted, then neutralized, before a very light coat of aluminum-specific etching primer, then painted using PJ1 Fast Black, which has proven to be a very close match the the original sheen when doing touch-up on our unrestored (deep cleaned/refurbished) late '72 Jafffa Z1.
All the steel chassis parts parts were blasted with crushed glass; that was the only way to effectively remove the deepest-pitted rust . The pitting on the frame was so deep in some places that it is still visible if light hits it just right even after repeated prime/sand cycles. Hi quality etching primer was applied to everything, then gloss, semi-gloss and matte black paints were sprayed where appropriate.
The original rims were re-chromed, with the date codes being retained nicely. Four days spent ('cause we're not experts at this) at the patio table lacing , truing & torquing new spokes to 26 ~ 30 in. lbs. to refinished hubs resulted in very nice wheels that look OEM.
Some other parts were re-chromed as necessary due to rarity, date codes needing to be retained, and replacement parts being even more expensive than re-chroming. For instance, the rear brake torque link was chromed to retain the date code. The old-style, "short" top hat head nuts are NLA from Mama Kaw, and stupid-expensive if they can be found at all. The slightly-later "tall" top hat nuts can sometimes be found aftermarket or fleaBay but are not correct for the build date, and, the tapered-shoulder nuts beginning with the Z1-B are cheap and ubiquitous but in no way correct for this bike.
We vapor blasted all the polished aluminum items, then followed with wet sanding, ending with 2,000 grit wet. Some pitting in the polished aluminum is far too deep to remove by any practical method.
Cylinder sleeves had to be replaced because the pitting was too deep. We have multiple sets of OEM std. pistons & rings, and didn't want to go the the expense of boring 1st. over, so a damaged jug with good sleeves was cannibalized for it's sleeves.
Local guy Steve Mikes, one of the "M's" from M&M Racing back in the day did the valve job & inserted the spark plug hole where the remains of a cross-threaded plug was broken off decades ago. The major internals, tranny, crank, cams (hollow!) etc. all came out of hibernation in very good shape and will be used as is. The deep layer of coal black gunk in the bottom of the pan required much um... "friendly persuasion" to remove. New case screws & bolts are on the motor bench waiting for motor reassembly to commence.
We horse traded for a tool kit sans feeler gauge, but a guy in Germany made some excellent repro feeler gauges a couple years ago & we bought a few spares, so now the tool kit's complete. We already had a couple of '73 owners manuals on the shelf.
We found an odd 9-pin Molex wiring harness tucked behind the headlight that had been spliced into the headlight & turn signal harness in the headlight bucket, so we suspect the bike had been prepped for a fairing at one time. Even more odd was that the brown connector at the wiring junction on the battery box had been removed & replaced with a white Molex connector, and the brown connector on the main harness had been modified accordingly. Same guy from Germany supplied us with the brown pin corrector & male and female pins needed to return the main harness & junction assy. to stock configuration. A friend from Australia even kicked in a NOS junction assy! Everything mentioned will allow us to return the wiring to OEM condition.
We vapor blasted all the rusty chrome bits not re-plated. They came out reasonably well. We'd been considering how deep down the resto-rabbit hole to go since we got the bike, and have decided to use as many of the cleaned/refurbed/unrestored original parts to make as close to an unrestored original "survivor" as we can. The motor was necessarily repainted, and will be held together with new hardware. The Jaffa paint is in amazingly good condition all things considered, and will just be hand rubbed to restore luster. We found a very-nice-but-mismatched set of 4-4 pipes locally. When all's said and done, it will be terrific "10 foot" bike, correct at a glance and with almost all original & correct parts for those knowledgeable enough to know what they're seeing if they look closely. After all; how many perfectly-restored Z1's does the world really need? In the future, if anyone wants to do a 100 pt. concourse-quality resto of a '73 Z1, it will be an easy & correct platform with which to do so.
Ridin' season is winding down here now. The past two weeks have seen beginning of basic chassis reassembly. We still have lots of cleaning & restoration of minor components to accomplish, such as switchgear, fork lowers, wiring harnesses etc.. This bike will be our winter project, something to keep us occupied in the shop while the cold winds blow. The dogs will continue to supervise & remind us when it's play/breakfast/play/lunch/play/dinner/play time. If things proceed as planned, the bike will be ready next spring to turn a wheel on the road for the first time in more than 30+ yrs. We'll keep this thread updated as things progress.
Good Ridin'
slmjim & Z1BEBE
A biker looks at your engine and chrome.
A Rider looks at your odometer and tags.
1973 ('72 builds) Z1 x2
1974 Z1-A x2
1975 Z1-B x2
1993 CB 750 Nighthawk x2
2009 ST1300A
www.kawasaki-z-classik.com
A Forum tightly focused on all things Z1 and Z2.
A Rider looks at your odometer and tags.
1973 ('72 builds) Z1 x2
1974 Z1-A x2
1975 Z1-B x2
1993 CB 750 Nighthawk x2
2009 ST1300A
www.kawasaki-z-classik.com
A Forum tightly focused on all things Z1 and Z2.
Please Log in or Create an account to join the conversation.
- toolmaker
-
- Offline
- User
-
Registered
- Posts: 217
- Thanks: 19
Re: The Wounded Z
27 Nov 2019 05:08
Sounds great Jim, you 2 have way more energy than I do!
We haven't moved yet - the house isn't selling yet.
I'm about to Craigslist or eBay the rest of the parts (KZ1000) soon.
We haven't moved yet - the house isn't selling yet.
I'm about to Craigslist or eBay the rest of the parts (KZ1000) soon.
I live near Portland, Oregon and my rider is a '76 KZ900 I bought new. I'm also in the process of restoring another one and a '73 Z1.
Please Log in or Create an account to join the conversation.
- slmjim+Z1BEBE
-
Topic Author
- Offline
- User
-
Registered
- Enjoy Life! IT HAS AN EXPIRATION DATE!
- Posts: 1410
- Thanks: 900
Re: The Wounded Z
01 Jan 2020 07:36
Activity has increased with the advent of winter weather. Some chassis reassembly has occurred, along with much cleaning & surface renewal.
The bike was clearly a rust bucket when it got here. Many parts will never return to their original condition.
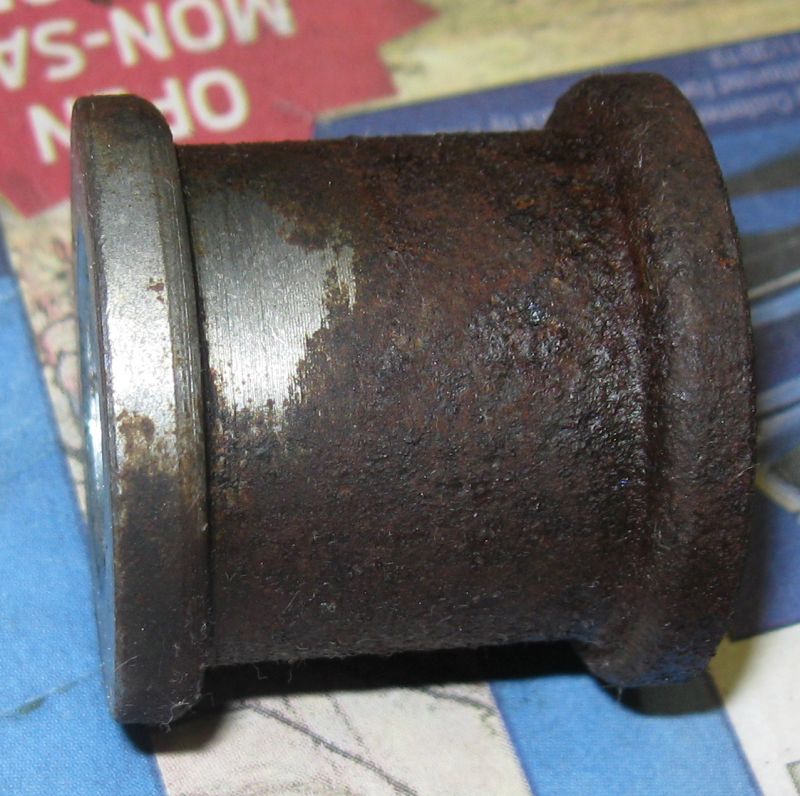
The rear axle spacer as found:
Rear axle spacer after a visit to the blast cabinet. The castle nut & adjuster bolts were in similar condition prior to blasting:
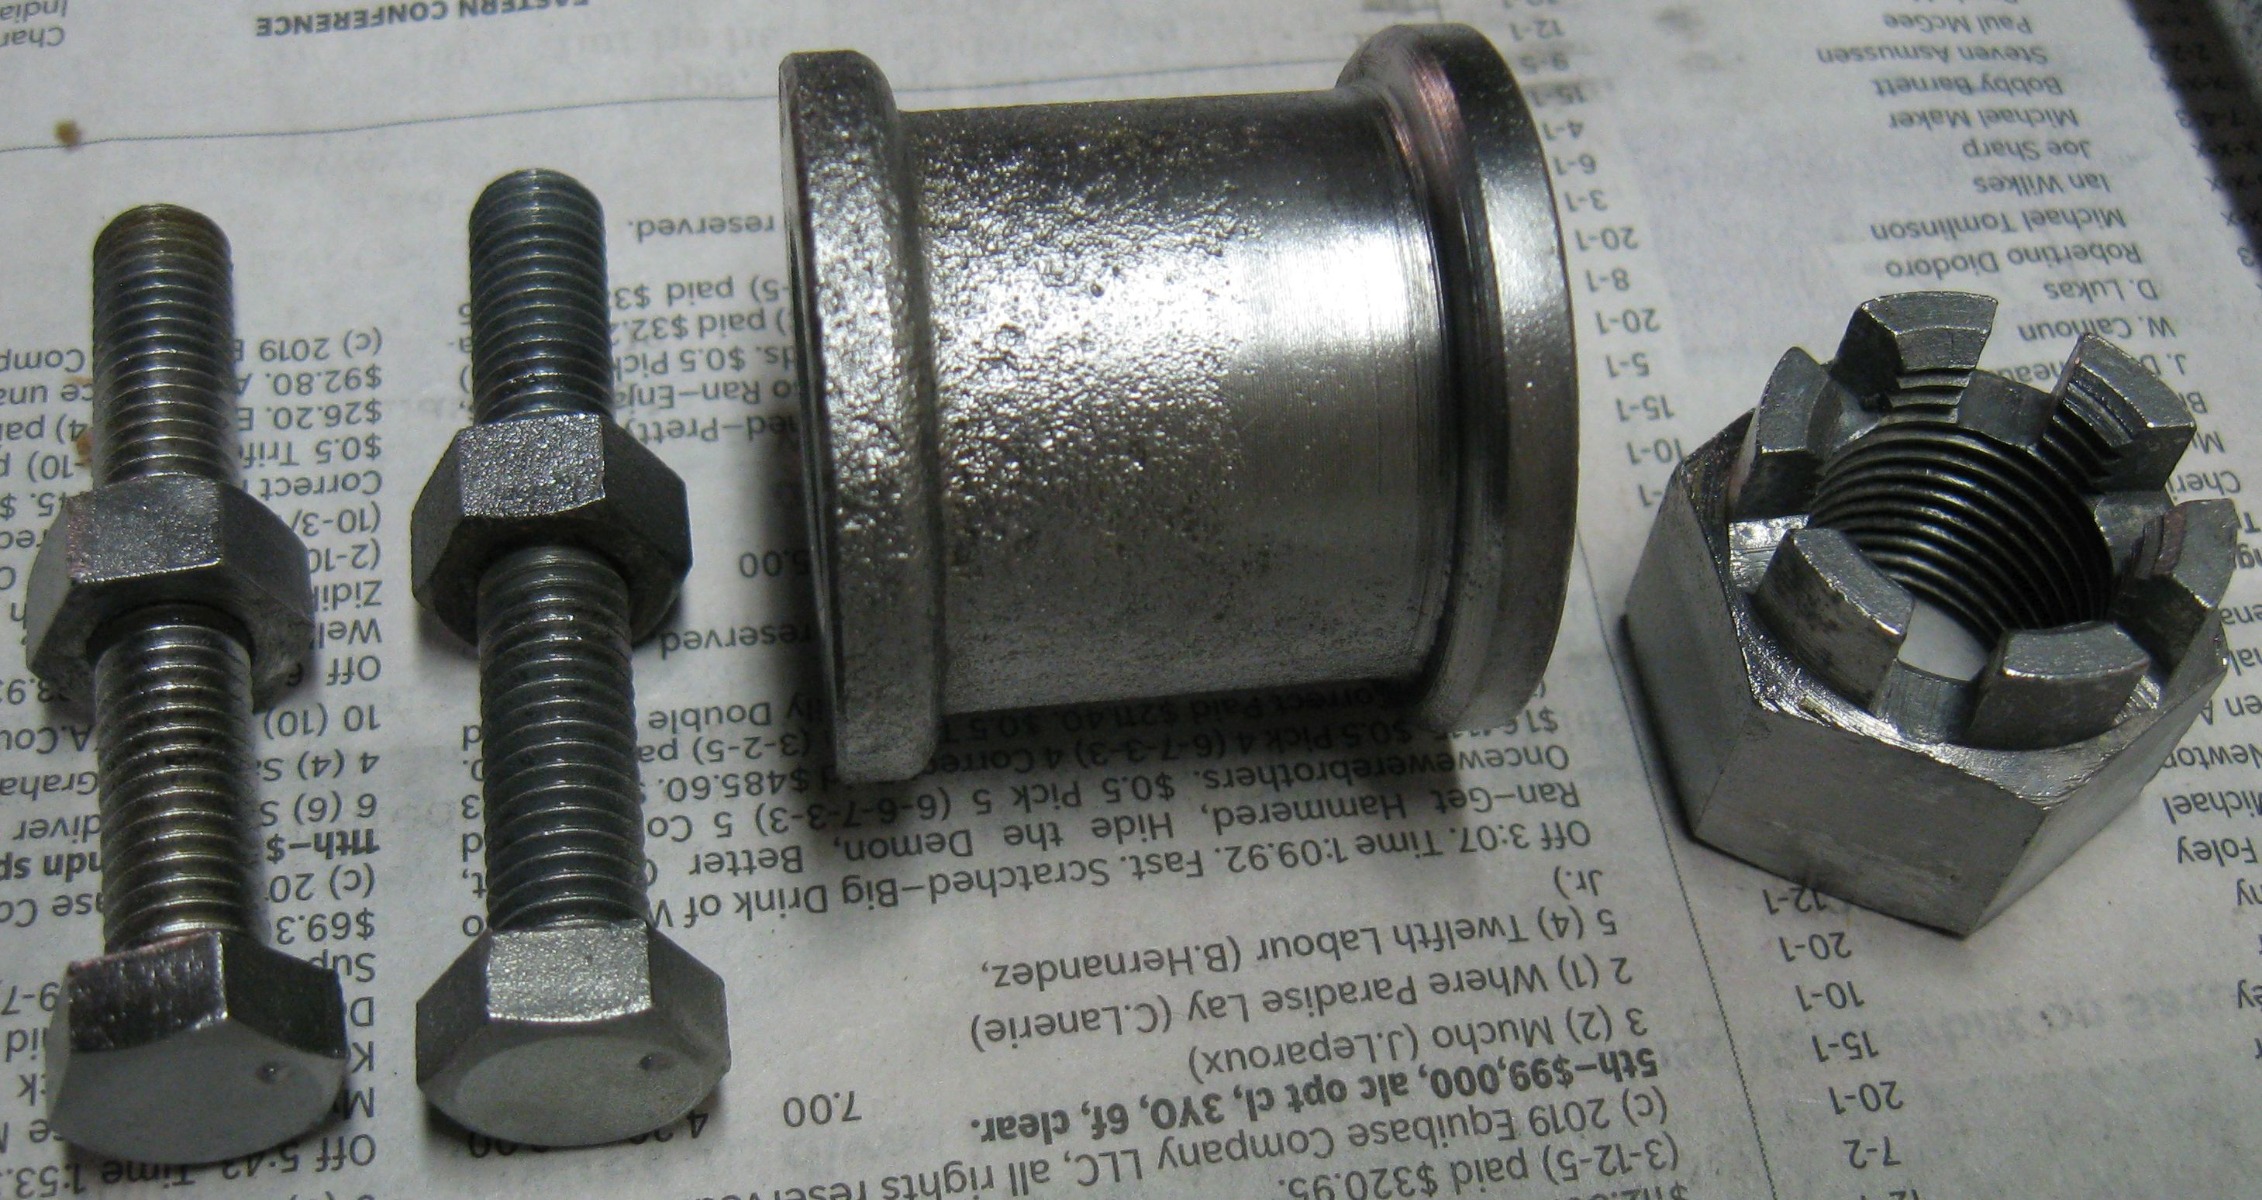
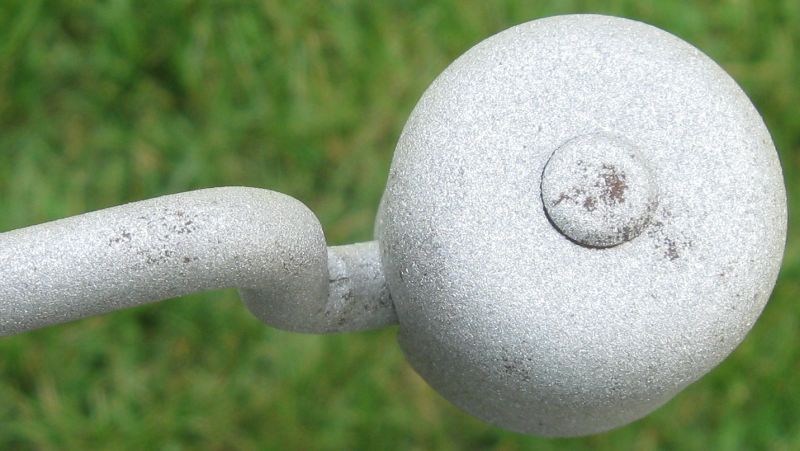
The adjuster bolts are a curiosity. Note the tit on each head. We've never seen those before on adjuster bolts. These appear to be OEM on this bike, and are the earlier 8mm bolts. The tits aren't present on any of our other Z1's, Z1-A's or Z1-B's:

More to come as progress is made.
Good Ridin'
slmjim & Z1BEBE
The bike was clearly a rust bucket when it got here. Many parts will never return to their original condition.
The rear axle spacer as found:
Rear axle spacer after a visit to the blast cabinet. The castle nut & adjuster bolts were in similar condition prior to blasting:
The adjuster bolts are a curiosity. Note the tit on each head. We've never seen those before on adjuster bolts. These appear to be OEM on this bike, and are the earlier 8mm bolts. The tits aren't present on any of our other Z1's, Z1-A's or Z1-B's:
More to come as progress is made.
Good Ridin'
slmjim & Z1BEBE
A biker looks at your engine and chrome.
A Rider looks at your odometer and tags.
1973 ('72 builds) Z1 x2
1974 Z1-A x2
1975 Z1-B x2
1993 CB 750 Nighthawk x2
2009 ST1300A
www.kawasaki-z-classik.com
A Forum tightly focused on all things Z1 and Z2.
A Rider looks at your odometer and tags.
1973 ('72 builds) Z1 x2
1974 Z1-A x2
1975 Z1-B x2
1993 CB 750 Nighthawk x2
2009 ST1300A
www.kawasaki-z-classik.com
A Forum tightly focused on all things Z1 and Z2.
Please Log in or Create an account to join the conversation.
- hardrockminer
-

- Offline
- Sustaining Member
-

Registered
- Posts: 3112
- Thanks: 1229
Re: The Wounded Z
01 Jan 2020 14:21
I like tits!
I have several restored bikes along with a 2006 Goldwing with a sidecar.
Please Log in or Create an account to join the conversation.
- slmjim+Z1BEBE
-
Topic Author
- Offline
- User
-
Registered
- Enjoy Life! IT HAS AN EXPIRATION DATE!
- Posts: 1410
- Thanks: 900
Re: The Wounded Z
04 Jan 2020 07:08 - 04 Jan 2020 07:10:whistle:hardrockminer wrote: I like tits!

Indeed!
Info contained in John Brookes' excellent reference book " Kawasaki Z1 & Z2 Restorer's Parts Book" regarding this question was posted on the other forum. The raised dots (aka tits) indicate Mama Kaw's then new-ish adherence to ISO standards for certain fasteners. Most fasteners already had either tits or dimples, both indicating adherence to JIS standards (JIS = ISO) according John's book.
Good Ridin'
slmjim & Z1BEBE
A biker looks at your engine and chrome.
A Rider looks at your odometer and tags.
1973 ('72 builds) Z1 x2
1974 Z1-A x2
1975 Z1-B x2
1993 CB 750 Nighthawk x2
2009 ST1300A
www.kawasaki-z-classik.com
A Forum tightly focused on all things Z1 and Z2.
A Rider looks at your odometer and tags.
1973 ('72 builds) Z1 x2
1974 Z1-A x2
1975 Z1-B x2
1993 CB 750 Nighthawk x2
2009 ST1300A
www.kawasaki-z-classik.com
A Forum tightly focused on all things Z1 and Z2.
Last edit: 04 Jan 2020 07:10 by slmjim+Z1BEBE.
Please Log in or Create an account to join the conversation.
Moderators: Street Fighter LTD