
750 twin revival
- Hemp
-
 Topic Author
- Offline
- User
-

Registered
- Posts: 15
- Thanks: 0
750 twin revival
13 Sep 2013 16:51 - 13 Sep 2013 16:54
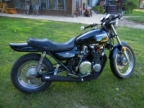
I picked up this crashed 1980-750G-Twin for a couple Benjamins. After lots of electrical trouble shooting finally got spark and got her revving nicely. Turns out the culprit was not filing the points enough! I replaced coils, condenser, re-wired ignition switch and still no spark. Filed the points a second time and she fired right up...WTF?!
Below are a few progress pictures with a log of what's been done. All prices are total after F&H. Hope this helps other newbies.
Note the crashed front forks. Purchased a used pair of Fleabay for $90. After removing the old forks I realized the bottom triple was also bent. So went back to fleabay and ordered a lower tripple from a 1980 750 four and it didn't match!!! $20 wasted. Found a matching triple top & bottom from a '76 twin for $30
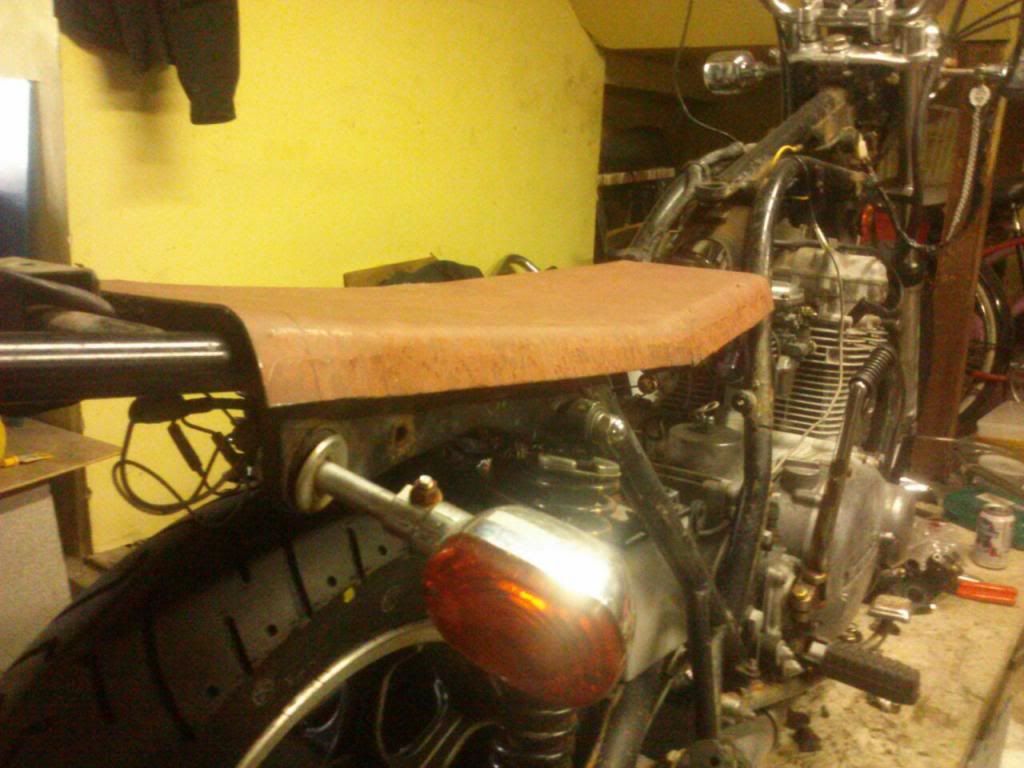
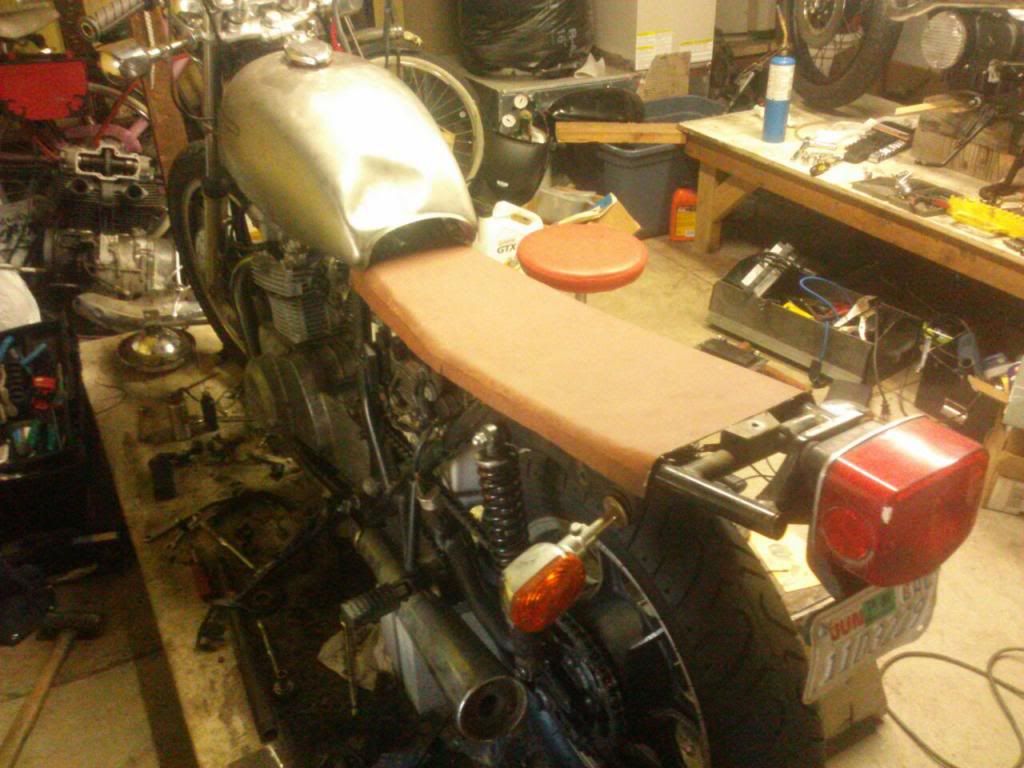
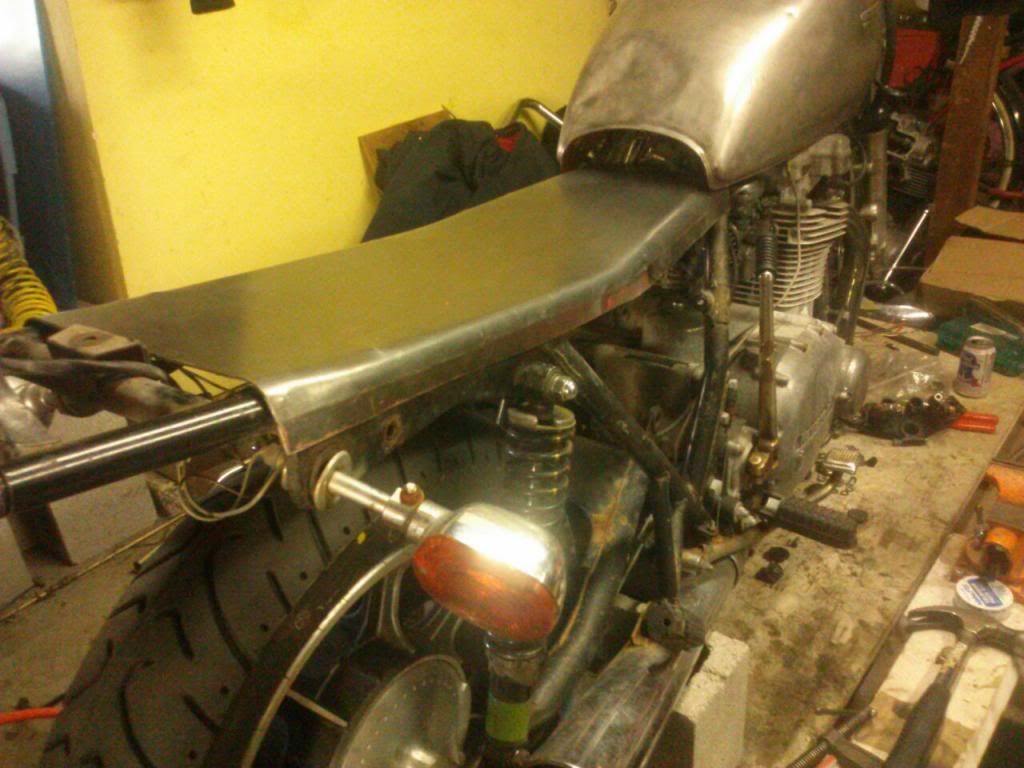
After I got the engine running I felt justified to start chopping her up for a slightly meaner cafe/chopper look. Using an old street sign for my seat pan.
Took off air box and battery tray and installed my own crude battery tray. Also installed Emgo pod filters and 150 main jets $20. Haven't fired up yet.

Since the last photo I've...
Installed short clutch cable from Z1 $17
New front master cylinder, Ebay $40. Sprayed brake cleaner in old unit and melted diaphragm!!!
New tires from Motorcycle Superstore. Some of the best service I've ever had. Fast free freight, easy returns, good tech support etc. $140 total
Rinsed rusty tank with Naval Jelly. Worked great. Poured whole 1-pint bottle in and topped of tank with water. Sat for 30 minutes then dropped in a length of chain and shook tank vigorously for 20 minutes. 90% or rust was gone. Neutralized with baking soda and coated with thin mixture of oil and gas. $8 for the Naval Jelly.
New 530 front 18T & rear 38T sprockets from Z1. Cheapo Chinese #50 industrial roller chain. I clean my chain diligently so I don't mind using non O-ring chain. Total for all three was $65
Modified petcock. Tank-3/8" NPT adaptor from Parts n More. Soldered the small valve directly to the brass reducer because no adaptor for the two was available. Total for all 3 parts was $16
Moose brand fuel line from Motorcycle Superstore $7. Home Cheapot's regular clear PVC was discoloring and becoming brittle very quickly. Hopefully the Moose stuff holds up better.
To Be continued...
Below are a few progress pictures with a log of what's been done. All prices are total after F&H. Hope this helps other newbies.
Note the crashed front forks. Purchased a used pair of Fleabay for $90. After removing the old forks I realized the bottom triple was also bent. So went back to fleabay and ordered a lower tripple from a 1980 750 four and it didn't match!!! $20 wasted. Found a matching triple top & bottom from a '76 twin for $30

After I got the engine running I felt justified to start chopping her up for a slightly meaner cafe/chopper look. Using an old street sign for my seat pan.

Took off air box and battery tray and installed my own crude battery tray. Also installed Emgo pod filters and 150 main jets $20. Haven't fired up yet.

Since the last photo I've...
Installed short clutch cable from Z1 $17
New front master cylinder, Ebay $40. Sprayed brake cleaner in old unit and melted diaphragm!!!
New tires from Motorcycle Superstore. Some of the best service I've ever had. Fast free freight, easy returns, good tech support etc. $140 total
Rinsed rusty tank with Naval Jelly. Worked great. Poured whole 1-pint bottle in and topped of tank with water. Sat for 30 minutes then dropped in a length of chain and shook tank vigorously for 20 minutes. 90% or rust was gone. Neutralized with baking soda and coated with thin mixture of oil and gas. $8 for the Naval Jelly.
New 530 front 18T & rear 38T sprockets from Z1. Cheapo Chinese #50 industrial roller chain. I clean my chain diligently so I don't mind using non O-ring chain. Total for all three was $65
Modified petcock. Tank-3/8" NPT adaptor from Parts n More. Soldered the small valve directly to the brass reducer because no adaptor for the two was available. Total for all 3 parts was $16

Moose brand fuel line from Motorcycle Superstore $7. Home Cheapot's regular clear PVC was discoloring and becoming brittle very quickly. Hopefully the Moose stuff holds up better.
To Be continued...
Last edit: 13 Sep 2013 16:54 by Hemp.
Please Log in or Create an account to join the conversation.
- peavylotus
-
- Offline
- User
-
Registered
- Movin on up
- Posts: 255
- Thanks: 15
Re: 750 twin revival
13 Sep 2013 19:44
Nice man this will be an interesting build. Stoked to see how she turns out.
1980 KZ 1045 LTD Currently Workin' It Out
Please Log in or Create an account to join the conversation.
- AtLarge
-
- Offline
- User
-
Registered
- Posts: 187
- Thanks: 21
Re: 750 twin revival
14 Sep 2013 00:17
Subcribed ")
1973 Honda CL70-K3
1975 Kawasaki 350 F9-C
1983 Kawasaki KZ750-K1
1994 BMW K1100RS
2008 Suzuki GSX1300-BKK8 #1120
1975 Kawasaki 350 F9-C
1983 Kawasaki KZ750-K1
1994 BMW K1100RS
2008 Suzuki GSX1300-BKK8 #1120
Please Log in or Create an account to join the conversation.
- kzz1king
-
- Offline
- User
-
Registered
- Posts: 822
- Thanks: 52
Re: 750 twin revival
14 Sep 2013 22:07
I just noticed, I had a sissy bar just like that!
Wayne
Wayne
74 Z1 1075, 29 smoothbores, owned and ridden since 1976
Home built KZ1000 turbo setup
www.kzrider.com/forum/11-projects/532476...s-budget-turbo-build
www.kzrider.com/forum/11-projects/532489-74-z-makeover
Home built KZ1000 turbo setup
www.kzrider.com/forum/11-projects/532476...s-budget-turbo-build
www.kzrider.com/forum/11-projects/532489-74-z-makeover
Please Log in or Create an account to join the conversation.
- Rainman
-

- Offline
- Sustaining Member
-

Registered
- and a little Kaw shall lead them
- Posts: 597
- Thanks: 76
Re: 750 twin revival
15 Sep 2013 00:31
Welcome Hemp, good looking project.
80 KZ750 H1 - the Kaw calf
79 KZ750 Twin - Miss Nov 2008 KZR calander
79 KZ750 Twin parts bike
78 KZ650 C2 Parts Bike
75 KZ400 Wife's old bike sold
81 KZ440 A2 LTD Wife's new bike
84 Honda 450 Rebel Wife's newest bike
Jim
Quincy,IL
79 KZ750 Twin - Miss Nov 2008 KZR calander
79 KZ750 Twin parts bike
78 KZ650 C2 Parts Bike
75 KZ400 Wife's old bike sold
81 KZ440 A2 LTD Wife's new bike
84 Honda 450 Rebel Wife's newest bike
Jim
Quincy,IL
Please Log in or Create an account to join the conversation.
- boatdrinks
-

- Offline
- User
-
Registered
- Posts: 469
- Thanks: 54
Re: 750 twin revival
15 Sep 2013 10:28
Welcome aboard. Looking forward to your build.
Charles
Madison, AL
1978 KZ650 B2A, Luminous Dark Blue
Madison, AL
1978 KZ650 B2A, Luminous Dark Blue
Please Log in or Create an account to join the conversation.
- fitscott
-

- Offline
- User
-
Registered
- Posts: 79
- Thanks: 9
Re: 750 twin revival
15 Sep 2013 10:34
Does anybody make an 850 or similar Big Bore Kit for these twins?
Please Log in or Create an account to join the conversation.
- Hemp
-
Topic Author
- Offline
- User
-
Registered
- Posts: 15
- Thanks: 0
Re: 750 twin revival
17 Sep 2013 14:10
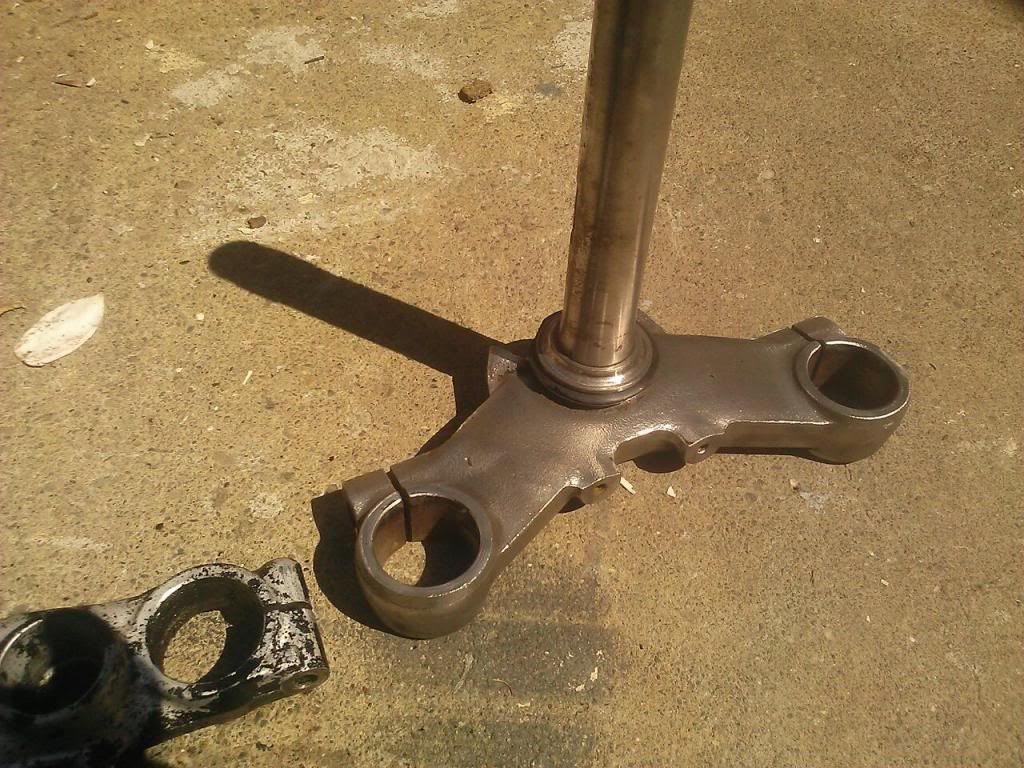
So my cast iron lower triple came in and I decided to strip it down to bare metal with my wire wheel. The result was very silvery so I sprayed it with hydrogen peroxide a half dozen times over 30 minutes and it darkened to a steely grey.
Forks and wheel slipped right in. Feels good to have two wheels back on this bike. She's screaming for drag bars. I'm on a tight budget so might dig around for some scrap 7/8" round.

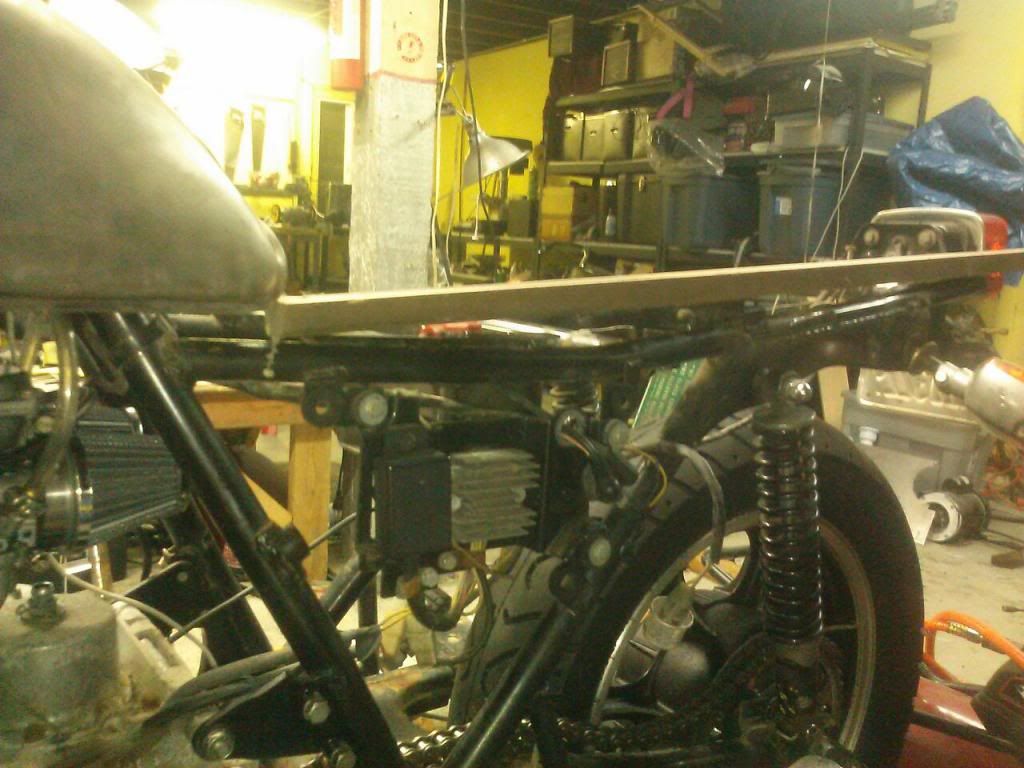
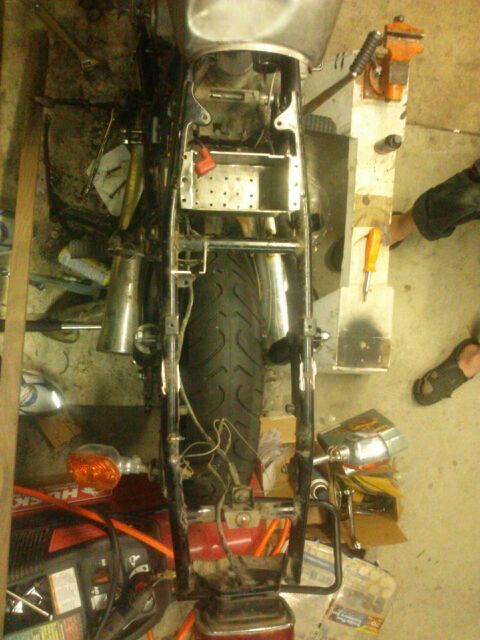
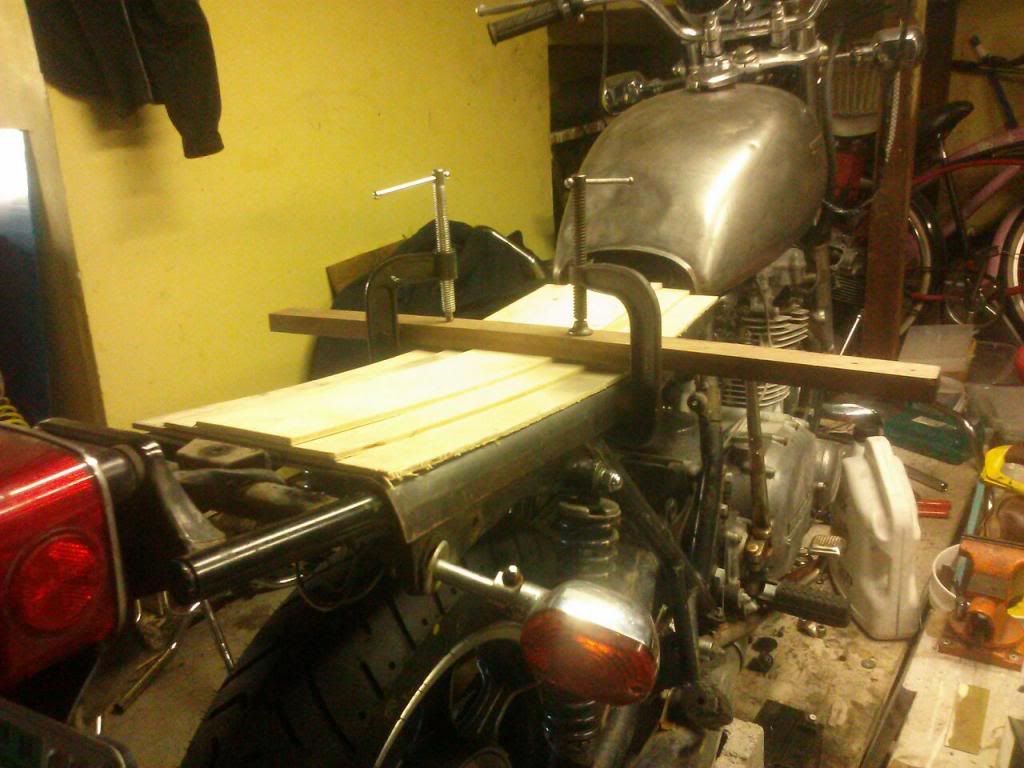
Decided to ditch aluminum seat pan and build a wood one. I've got lots of Walnut scraps and wood will be a much more flexible medium to accommodate my frame's pronounces dip. These '80s frames are not nearly as simple as the straight '70s frames. I installed some old British shocks after dremmeling out the bushings to fit my 14mm studs.
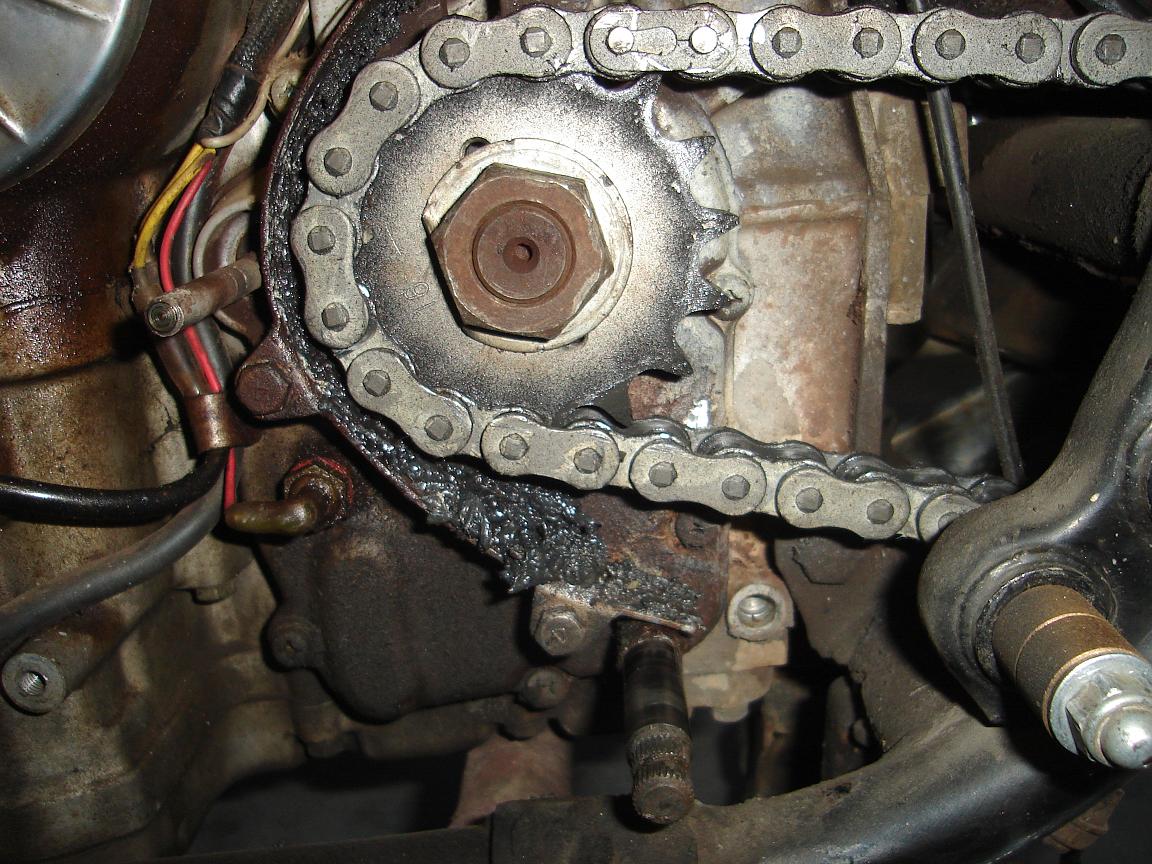
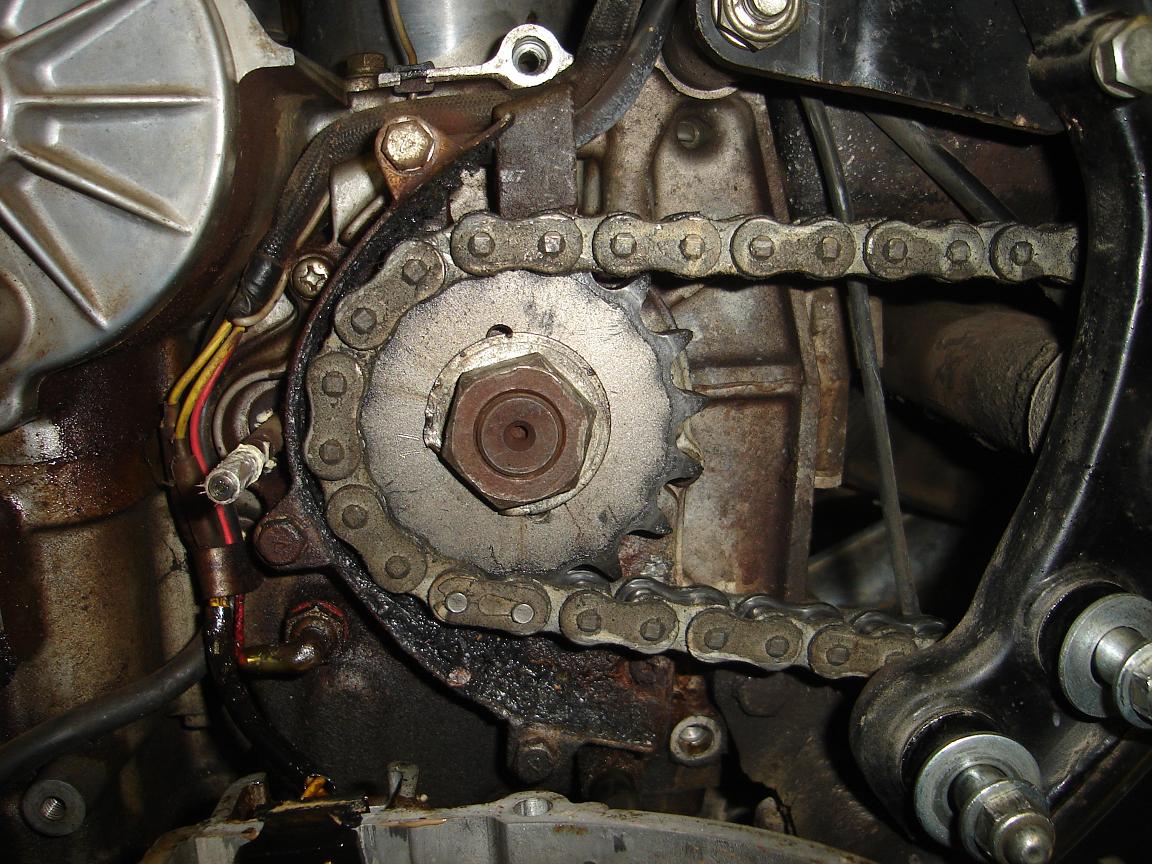
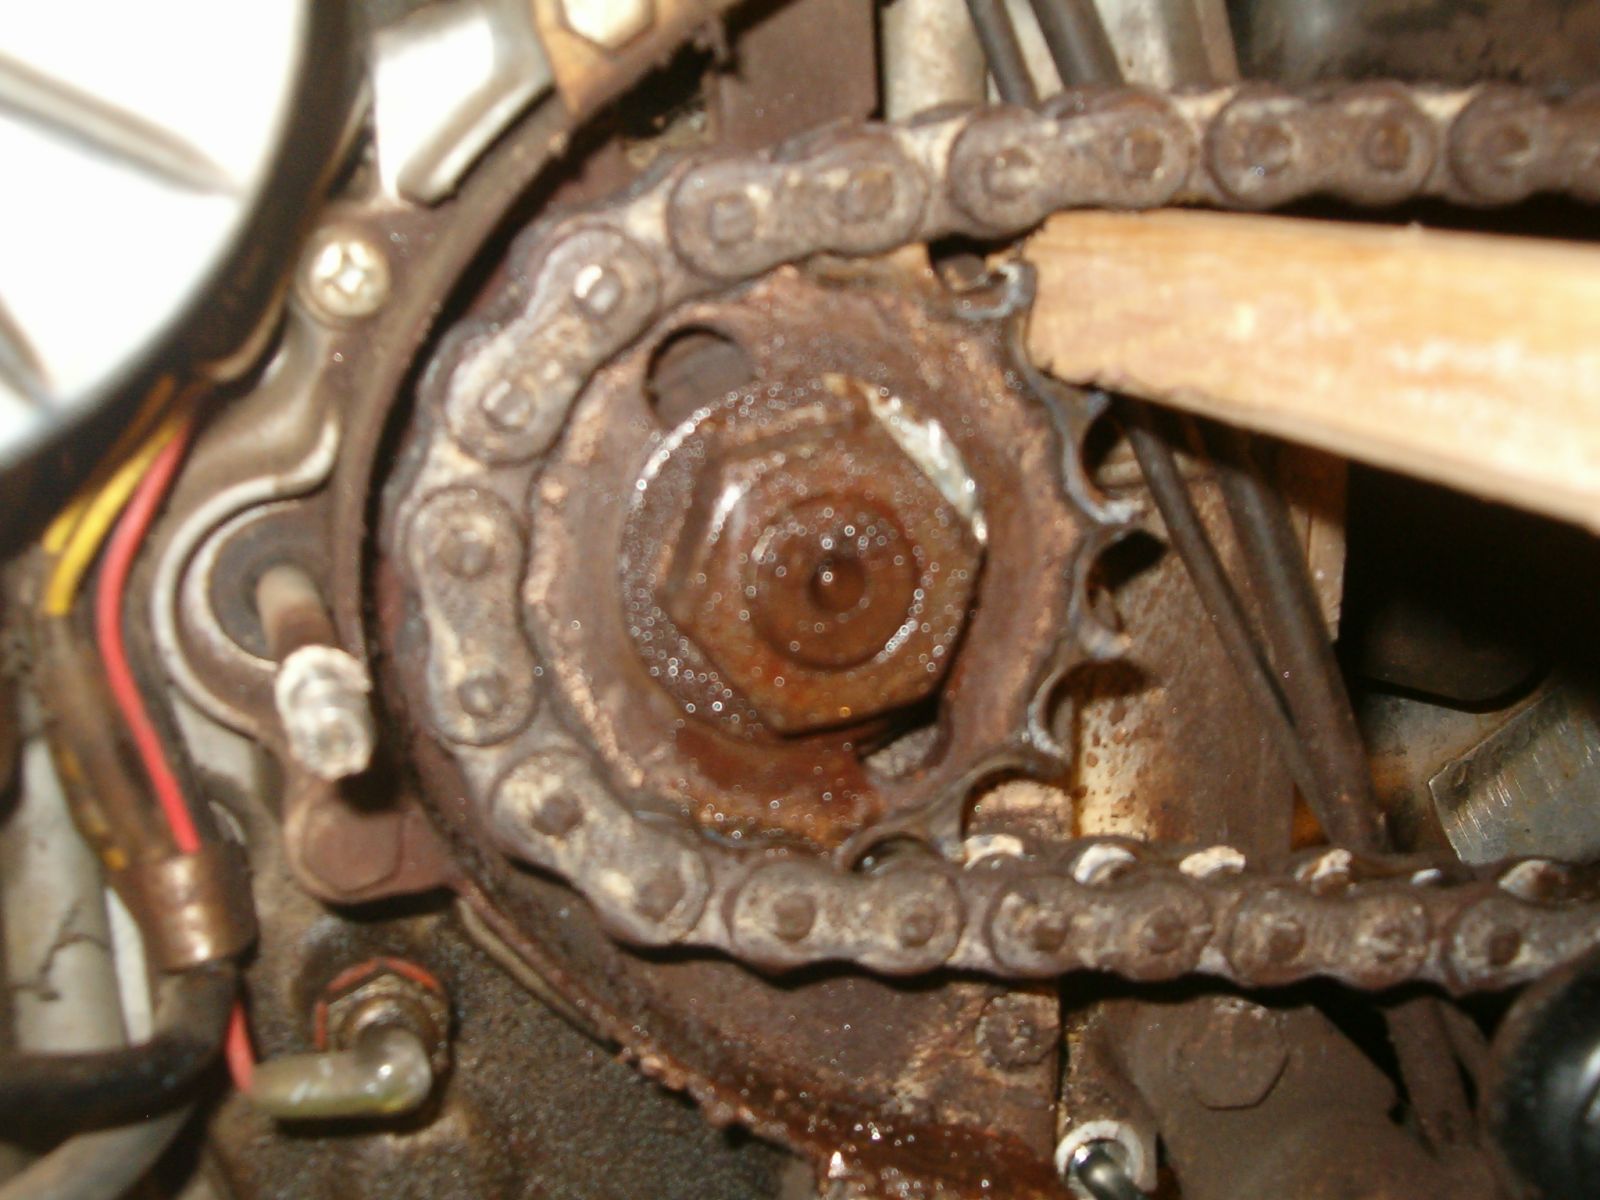
I tried to remove my drive sprocket but failed. Will have to fabricate the chain tool that Patton posted in the tool section. At first glance it appears my 18T sprocket will NOT clear my clutch push-rod. Cross fingers! :pinch:
Top view of seat frame. I hate cutting and welding frames but I'm struggling to design a brat style seat that will cover the whole frame and not look stupid...decisions, decisions.
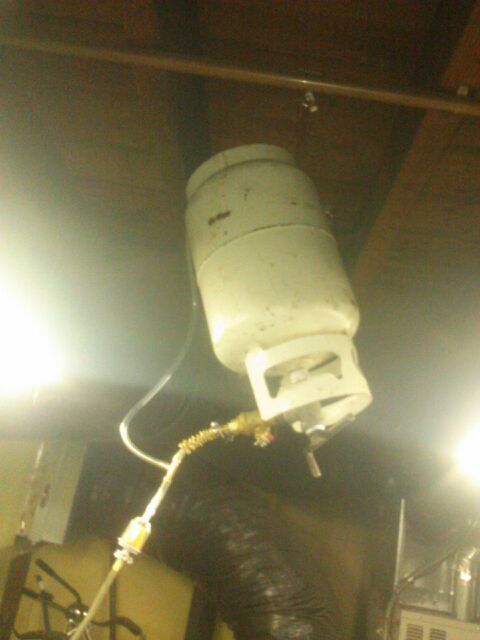
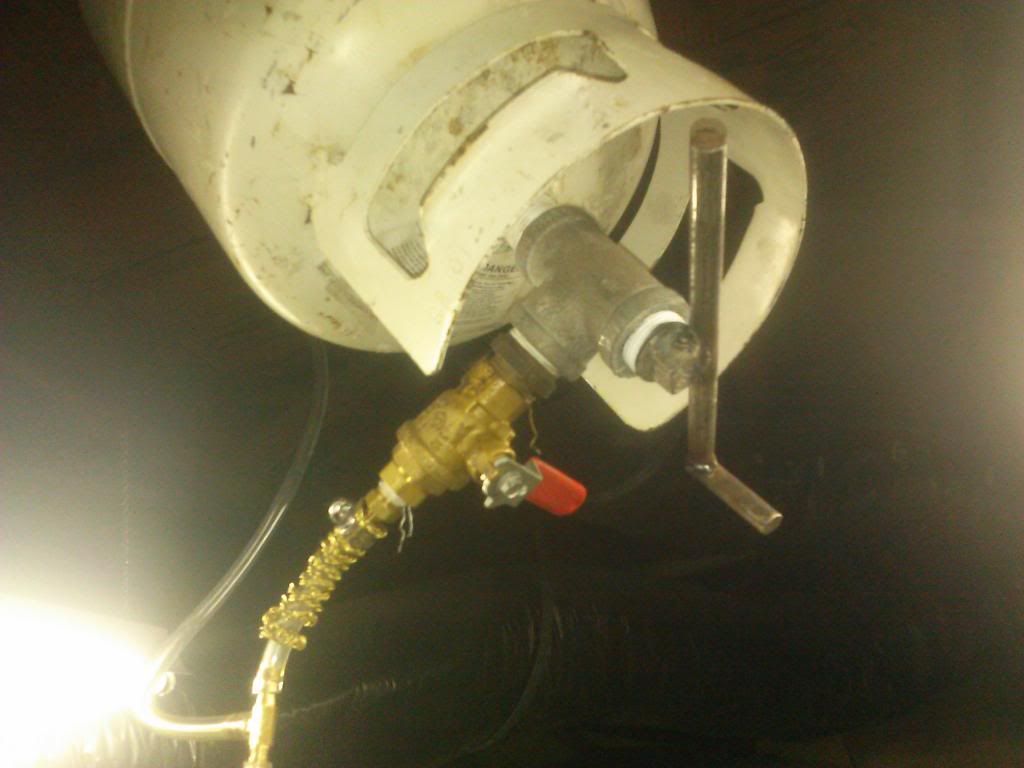
I thought you guys would appreciate my auxiliary fuel supply. It's an old propane tank. All portable propane tanks (minus vehicle/fork lift tanks) have standard 3/4" NPT threads. Be warned removing the valve is a B&^%$. The tanks handle and base make the perfect mounts for hanging and carry around. Note the Vent tube going up. If I was to build this again I would use a larger 1.25' T to give more room for the gas station nozzle. My 1" T is a tad snug. I welded the round cross-bar to the filler plug so I could securely open and close at the station without a wrench.

Forks and wheel slipped right in. Feels good to have two wheels back on this bike. She's screaming for drag bars. I'm on a tight budget so might dig around for some scrap 7/8" round.

Decided to ditch aluminum seat pan and build a wood one. I've got lots of Walnut scraps and wood will be a much more flexible medium to accommodate my frame's pronounces dip. These '80s frames are not nearly as simple as the straight '70s frames. I installed some old British shocks after dremmeling out the bushings to fit my 14mm studs.

I tried to remove my drive sprocket but failed. Will have to fabricate the chain tool that Patton posted in the tool section. At first glance it appears my 18T sprocket will NOT clear my clutch push-rod. Cross fingers! :pinch:
Top view of seat frame. I hate cutting and welding frames but I'm struggling to design a brat style seat that will cover the whole frame and not look stupid...decisions, decisions.

I thought you guys would appreciate my auxiliary fuel supply. It's an old propane tank. All portable propane tanks (minus vehicle/fork lift tanks) have standard 3/4" NPT threads. Be warned removing the valve is a B&^%$. The tanks handle and base make the perfect mounts for hanging and carry around. Note the Vent tube going up. If I was to build this again I would use a larger 1.25' T to give more room for the gas station nozzle. My 1" T is a tad snug. I welded the round cross-bar to the filler plug so I could securely open and close at the station without a wrench.


Please Log in or Create an account to join the conversation.
- Rainman
-
- Offline
- Sustaining Member
-
Registered
- and a little Kaw shall lead them
- Posts: 597
- Thanks: 76
Re: 750 twin revival
17 Sep 2013 14:42
The 18 Tooth front sproket will fit, but the chain guard will have to be removed.
Stock 16 Tooth
1 up 17 tooth
Here is the "tool" I used on the original sprocket (lots of PB Blaster not shown).
Good luck,
Jim
Stock 16 Tooth
1 up 17 tooth
Here is the "tool" I used on the original sprocket (lots of PB Blaster not shown).
Good luck,
Jim
80 KZ750 H1 - the Kaw calf
79 KZ750 Twin - Miss Nov 2008 KZR calander
79 KZ750 Twin parts bike
78 KZ650 C2 Parts Bike
75 KZ400 Wife's old bike sold
81 KZ440 A2 LTD Wife's new bike
84 Honda 450 Rebel Wife's newest bike
Jim
Quincy,IL
79 KZ750 Twin - Miss Nov 2008 KZR calander
79 KZ750 Twin parts bike
78 KZ650 C2 Parts Bike
75 KZ400 Wife's old bike sold
81 KZ440 A2 LTD Wife's new bike
84 Honda 450 Rebel Wife's newest bike
Jim
Quincy,IL
Please Log in or Create an account to join the conversation.
- Hemp
-
Topic Author
- Offline
- User
-
Registered
- Posts: 15
- Thanks: 0
Re: 750 twin revival
17 Sep 2013 16:27
Ha! that tool wins the simplicity award.
Great news about 18T fitting. I removed the chain guard (same as yours) and braced the new sprocket against the drive shaft and old sprocket. while slowly rotated the new sprocket the chain appeared to be gently hitting the clutch rod. I sincerely hope you're right and all is clear after my install.
Thanks for your input.
Please Log in or Create an account to join the conversation.
- Nebr_Rex
-

- Offline
- User
-
Registered
- Posts: 1889
- Thanks: 295
Re: 750 twin revival
17 Sep 2013 18:46
Wait 'til ya get the r.p.m. up.
2002 ZRX1200R
81 GPz1100
79 KZ1000st daily ride
79 KZ1000mk2 prodject
78 KZ650sr
78 KZ650b
81 KZ750e
80 KZ750ltd
77 KZ400/440 cafe project
76 KZ400/440 Fuel Injected
www.dotheton.com/index.php?threads/dr-je...air-of-kz400s.39120/
.
81 GPz1100
79 KZ1000st daily ride
79 KZ1000mk2 prodject
78 KZ650sr
78 KZ650b
81 KZ750e
80 KZ750ltd
77 KZ400/440 cafe project
76 KZ400/440 Fuel Injected
www.dotheton.com/index.php?threads/dr-je...air-of-kz400s.39120/
.
Please Log in or Create an account to join the conversation.
- Hemp
-
Topic Author
- Offline
- User
-
Registered
- Posts: 15
- Thanks: 0
Re: 750 twin revival
29 Sep 2013 18:28 - 29 Sep 2013 19:05
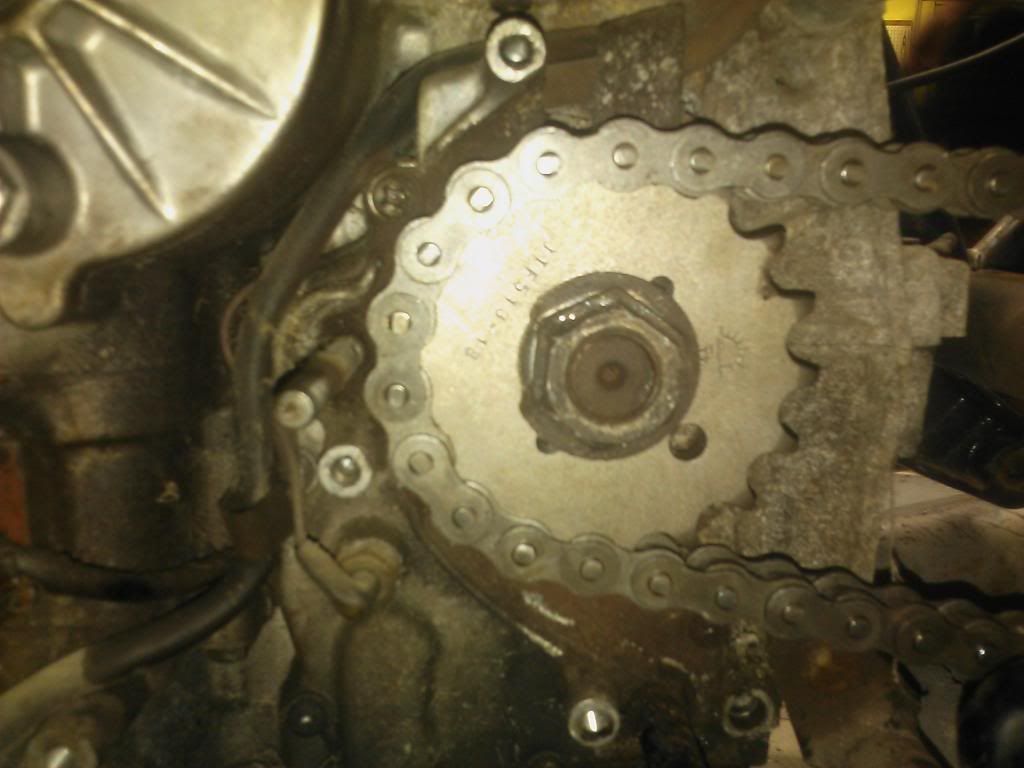
18T sprocket fit like a charm. With the chain guard removed there is nothing to prevent chain lube and other sludge from hitting my clutch rod. I might install a small 8x12mm shaft seal and then slide on a retainer spring for extra protection.
My seat design kept changing. The 80's style frame thwarted any simple AND good looking designs. I bit the bullet and opted to hammer out an all steel pan 29" long made from 1/8" scrap sheet metal that would follow the dip/contour of the frame. The sheet metal came primed with brown paint on one side. My plan was to do 80% of the shaping by hammering the edges round over a form on the ground and then do final forming with the sheet metal on the frame.
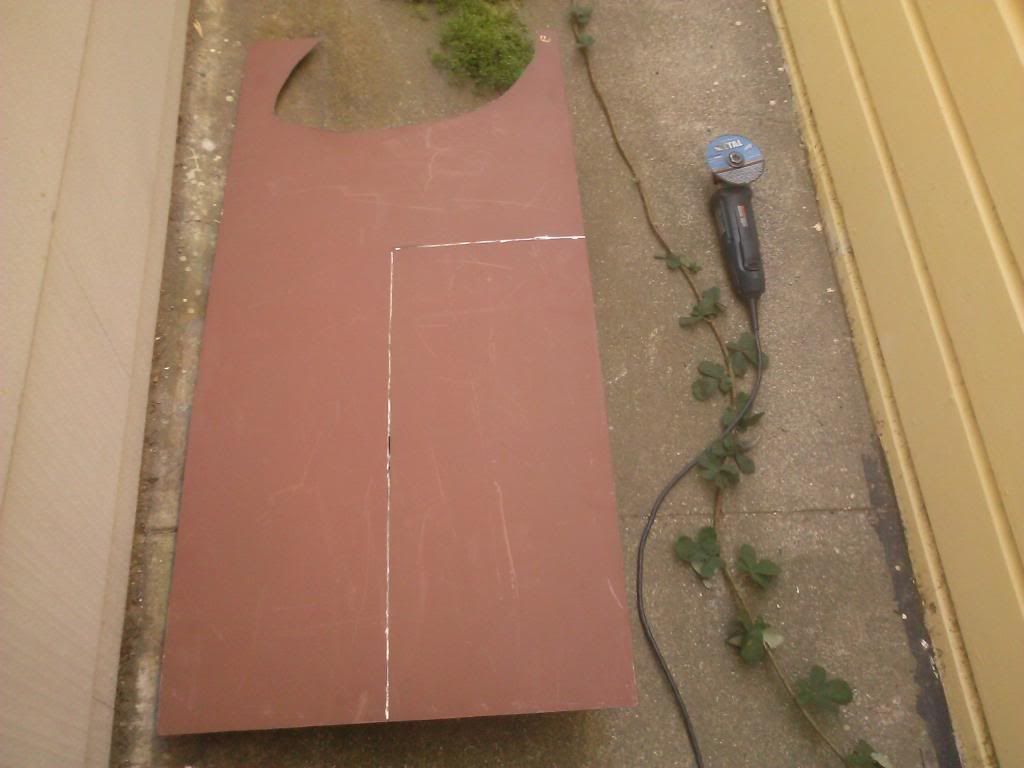
After cutting I traced the frame and then stenciled a second line offset 1". This 1" of material was going to curve down over frame. There was no way I was going to shape 1/8" thick metal with a hammer so I ground a groove half way deep along the frame line with my angle grinder. This groove/cut would ensure a uniform bend that would follow the frame. The resulting bend/edge would likely appear more square than I prefer, but I needed to get this pan done.
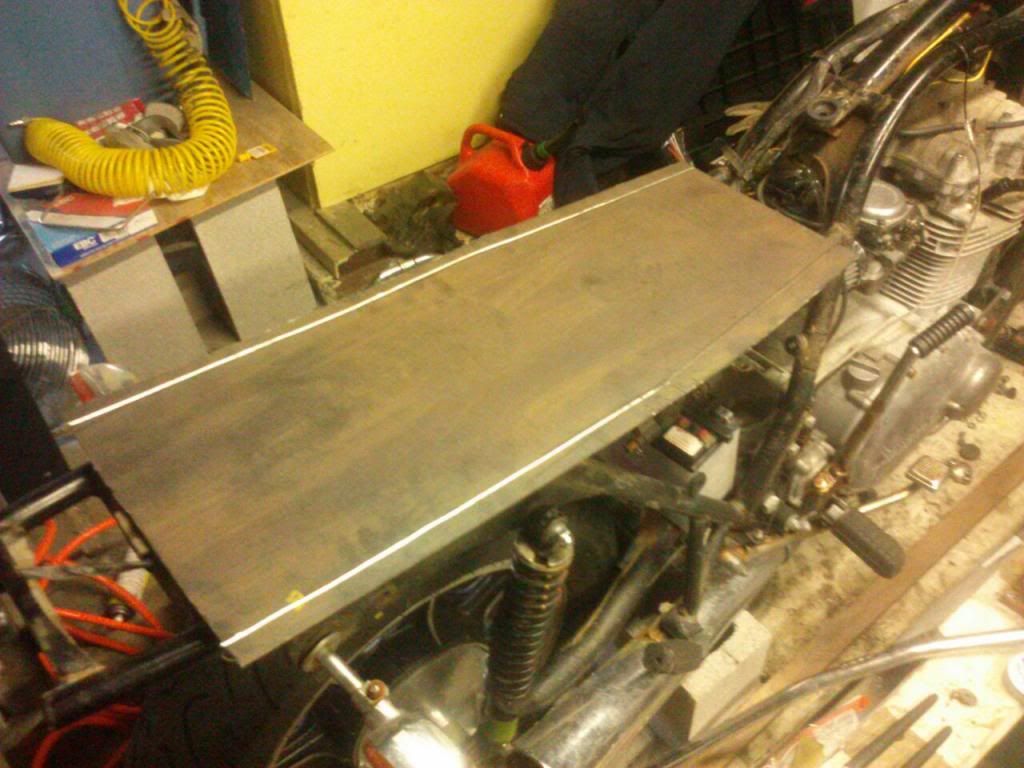
Before I started hammering the sheet-metal edges over the form I laid it on the frame for one last check and discovered I f&%$# up my original stencil. My black sharpy line that I traced along the frame was off and far from uniform. I spent all that time grinding a groove in the wrong place. I should have made a guide or brace for the pen rather than free handing it. I didn't want to spend another hour tracing and cutting another piece of metal so I grabbed a large framing hammer, pressed the sheet hard against the frame and started hitting just above the outer edge of the frame. The hammer bounced off without persuading any metal. I grabbed the 3-lb sledge hammer and tried again. The striking force made it impossible to hold the metal down but the metal did begin to bend! This was only going to work if I could bend the flat metal against the contoured frame and keep it there while hammering. I tried clamping down with C-Clamps but they kept popping off.
I tried other clamps but they all failed or got in the way. I cut slits in the metal at the apex of the bend and this allowed my body weight to lean the metal against the frame and hammer at the same time. 14g would have been sooo much nicer!! After all my planning, measuring, sketching and grinding I found myself simply holding down the metal and hammering away with nothing to guide me. After 30 minutes I was half way done with good results and a sorry right arm.
30 more painful minutes and I'm finished forming around the frame. If you look closely you can see the seam where my groove was cut. The cut groove was a huge help when hammering sideways to "tuck" the metal slightly underneath. The finished pan has no rattle or play and pops on and off with a nice spring.
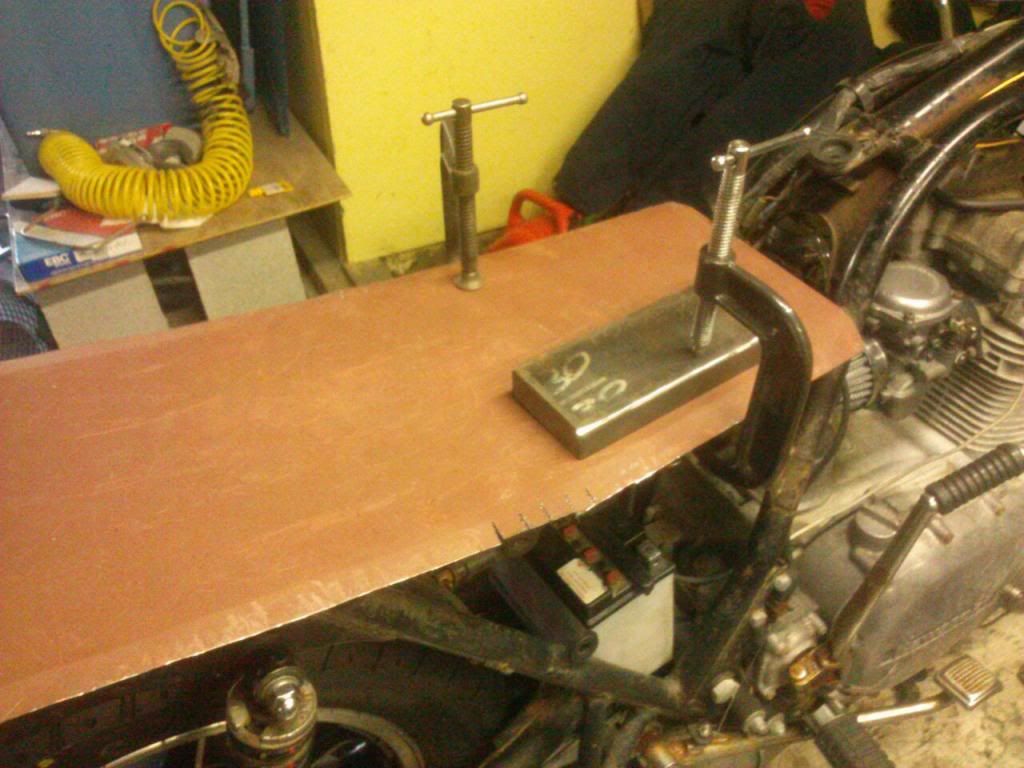
Brown paint stripped. I left the rear corner edges un-tucked because I haven't decided where I'm chopping the frame. I patched the cut slots with the mig welder and ground flush. The nice thing about using such thick metal is there's no such thing as hammer to far or too hard. This stuff doesn't wrinkle or pinch or cave in. Instead it wraps over everything like stiff leather and stays there.
For my seat I stacked 3 pieces of 3/16" thick door skin and glued them together against the pan.
Next step is taking the bike to CHP for inspection before I chop her up. After inspection I’ll chop frame and finish grind the side profile of the pan.
I'm planning on a brat style seat around 28" long stuffed with layers of chip foam.
If I ever hammer a seat pan again I'm definitely holding out for 14g sheet metal and investing in a 2-lb. hammer and rubber mallet. I suggest to anyone considering this to forgo any careful planning and measuring and just go for it. It's a abstract process that can only be achieved with patience and flexibility.
Cheers

My seat design kept changing. The 80's style frame thwarted any simple AND good looking designs. I bit the bullet and opted to hammer out an all steel pan 29" long made from 1/8" scrap sheet metal that would follow the dip/contour of the frame. The sheet metal came primed with brown paint on one side. My plan was to do 80% of the shaping by hammering the edges round over a form on the ground and then do final forming with the sheet metal on the frame.

After cutting I traced the frame and then stenciled a second line offset 1". This 1" of material was going to curve down over frame. There was no way I was going to shape 1/8" thick metal with a hammer so I ground a groove half way deep along the frame line with my angle grinder. This groove/cut would ensure a uniform bend that would follow the frame. The resulting bend/edge would likely appear more square than I prefer, but I needed to get this pan done.

Before I started hammering the sheet-metal edges over the form I laid it on the frame for one last check and discovered I f&%$# up my original stencil. My black sharpy line that I traced along the frame was off and far from uniform. I spent all that time grinding a groove in the wrong place. I should have made a guide or brace for the pen rather than free handing it. I didn't want to spend another hour tracing and cutting another piece of metal so I grabbed a large framing hammer, pressed the sheet hard against the frame and started hitting just above the outer edge of the frame. The hammer bounced off without persuading any metal. I grabbed the 3-lb sledge hammer and tried again. The striking force made it impossible to hold the metal down but the metal did begin to bend! This was only going to work if I could bend the flat metal against the contoured frame and keep it there while hammering. I tried clamping down with C-Clamps but they kept popping off.

I tried other clamps but they all failed or got in the way. I cut slits in the metal at the apex of the bend and this allowed my body weight to lean the metal against the frame and hammer at the same time. 14g would have been sooo much nicer!! After all my planning, measuring, sketching and grinding I found myself simply holding down the metal and hammering away with nothing to guide me. After 30 minutes I was half way done with good results and a sorry right arm.

30 more painful minutes and I'm finished forming around the frame. If you look closely you can see the seam where my groove was cut. The cut groove was a huge help when hammering sideways to "tuck" the metal slightly underneath. The finished pan has no rattle or play and pops on and off with a nice spring.

Brown paint stripped. I left the rear corner edges un-tucked because I haven't decided where I'm chopping the frame. I patched the cut slots with the mig welder and ground flush. The nice thing about using such thick metal is there's no such thing as hammer to far or too hard. This stuff doesn't wrinkle or pinch or cave in. Instead it wraps over everything like stiff leather and stays there.

For my seat I stacked 3 pieces of 3/16" thick door skin and glued them together against the pan.

Next step is taking the bike to CHP for inspection before I chop her up. After inspection I’ll chop frame and finish grind the side profile of the pan.
I'm planning on a brat style seat around 28" long stuffed with layers of chip foam.
If I ever hammer a seat pan again I'm definitely holding out for 14g sheet metal and investing in a 2-lb. hammer and rubber mallet. I suggest to anyone considering this to forgo any careful planning and measuring and just go for it. It's a abstract process that can only be achieved with patience and flexibility.
Cheers
Last edit: 29 Sep 2013 19:05 by Hemp.
Please Log in or Create an account to join the conversation.
Moderators: Street Fighter LTD