
Taking a dive! 82 KZ550 LTD Build
- cte.matt
-
 Topic Author
- Offline
- User
-

Registered
- Posts: 19
- Thanks: 0
Re: Taking a dive! 82 KZ550 LTD Build
08 Aug 2011 04:18loudhvx wrote: On your motor, you should not have turned it over until the tensioner was in place so it could take up the slack before any jumping could happen.
But before you put the cover on, you should rotate the crank at least 3 full rotations (with tensioner full installed and you pressing on the middle section of chain) and verify the timing each time. That makes sure there is no walking.
sorry, left that out. I did put the tensioner on before i turned it over. And I left the cross wedge off, i believe that was the correct thing to do... Maybe i am not verifying the timing right, but i did turn it while adding pressure by hand in between the sprockets and it did remain correct. It went screwy when i installed the valve cover. This seems kind of bizarre to me but i don't really see a point where i am doing something wrong. Somebody please prove me otherwise.
Please Log in or Create an account to join the conversation.
- loudhvx
-

- Offline
- KZr Legend
-

Registered
- Posts: 10864
- Thanks: 1621
Re: Taking a dive! 82 KZ550 LTD Build
08 Aug 2011 13:05
The cross wedge has to be in place for the tensioner to work properly. If you rotate the engine without the cross wedge, the tensioner will give back the slack it takes up, thus allowing the chain to jump.
Before installing the valve cover, the cross wedge must NOT be in place. But after installing the valve cover, the cross wedge must be in place before turning the motor.
Before installing the valve cover, the cross wedge must NOT be in place. But after installing the valve cover, the cross wedge must be in place before turning the motor.
1981 KZ550 D1 gpz.
Kz550 valve train warning.
Other links.
Kz550 valve train warning.
Other links.
Please Log in or Create an account to join the conversation.
- cte.matt
-
Topic Author
- Offline
- User
-
Registered
- Posts: 19
- Thanks: 0
Re: Taking a dive! 82 KZ550 LTD Build
08 Aug 2011 22:38
DUH!:silly:
Alright. got it all setup! Gonna grab some new plugs soon.
Thank you guys for your help! Seriously!
NOW
I took a look at my wiring harness
...looked some more...did a little more looking... then went inside. I am WAY over my head when it comes to electronics. and that's where i was hoping some of you generous fellows could come in. I would like to greatly simplify the wiring but don't really know where to start. I don't know what to keep, what to throw away, or honestly what everything is. Obviously i know a little, but when i look at the wiring diagram and how everything is connected to everything it just seems impossible to figure out! Anyways, looking to keep headlight, & brake light. I bought a marine grade starter with momentary and "push-to-choke" possible horn integration. Thought it would be a cool piece to integrate.
cgi.ebay.com/ebaymotors/Marine-Grade-Ign...ssories#ht_700wt_928
Can anyone explain some of basics to me? I know thats a very, very, vague question. But anywhere is a good place to start for me. Thanks in advance. Oh yeah, i took a few pictures (at random) that i thought might help. I believe the points are transistorized, which i don't hear about often so a little explanation of that would be helpful.
Alright. got it all setup! Gonna grab some new plugs soon.
Attachment IMG_1894.JPG not found
Thank you guys for your help! Seriously!
NOW
I took a look at my wiring harness
Attachment IMG_1897.JPG not found
...looked some more...did a little more looking... then went inside. I am WAY over my head when it comes to electronics. and that's where i was hoping some of you generous fellows could come in. I would like to greatly simplify the wiring but don't really know where to start. I don't know what to keep, what to throw away, or honestly what everything is. Obviously i know a little, but when i look at the wiring diagram and how everything is connected to everything it just seems impossible to figure out! Anyways, looking to keep headlight, & brake light. I bought a marine grade starter with momentary and "push-to-choke" possible horn integration. Thought it would be a cool piece to integrate.
cgi.ebay.com/ebaymotors/Marine-Grade-Ign...ssories#ht_700wt_928
Can anyone explain some of basics to me? I know thats a very, very, vague question. But anywhere is a good place to start for me. Thanks in advance. Oh yeah, i took a few pictures (at random) that i thought might help. I believe the points are transistorized, which i don't hear about often so a little explanation of that would be helpful.
Attachment IMG_1898.jpg not found
Attachment IMG_1900.jpg not found
Attachment IMG_1901.jpg not found
Attachments:
Please Log in or Create an account to join the conversation.
- Tested
-
- Offline
- User
-
Registered
- Posts: 55
- Thanks: 0
Re: Taking a dive! 82 KZ550 LTD Build
09 Aug 2011 02:13
A wiring diagram is the only thing that saved my ass. Seems that they are all pretty similar on the KZ. I used a 650 for my 750.
I love the wrench monkey stuff too. They put out some awesome bikes. I am in the middle of redoing my seat and backend. Going for a similar look.
Keep posting updates man.
I love the wrench monkey stuff too. They put out some awesome bikes. I am in the middle of redoing my seat and backend. Going for a similar look.
Keep posting updates man.
2008 KLR 650
1977 KZ 750
_____ Have had _____
1981 KZ 440
1970's CR 125
1982 KLX 175
1977 KZ 750
_____ Have had _____
1981 KZ 440
1970's CR 125
1982 KLX 175
Please Log in or Create an account to join the conversation.
- Chaotic Reason
-
- Offline
- User
-
Registered
- Posts: 384
- Thanks: 15
Re: Taking a dive! 82 KZ550 LTD Build
09 Aug 2011 03:16 - 09 Aug 2011 03:19
You're doing good work mate, keep it up. The wiring diagram looked like a foreign language to me too. Thank God I have an older brother who can help me out, otherwise I'd be up a creek too. The wiring diagram is paramount. If you don't have one in your manual, look at the signature of loudhvx, he has a diagram for someone else that is bare bones what you need to run the bike. After that, any add on is up to you. (just as a last resort if you don't have one yourself)
Oh, and wrenchmonkeys bikes are pretty cool. Have you checked out Sanctuary's? Their site is in Japanese, but Google does an ok job of translating it. But no translations are needed for the pictures of their bikes. They're awesome!
translate.google.com/translate?hl=en&ie=...p/factory/index.html
Oh, and wrenchmonkeys bikes are pretty cool. Have you checked out Sanctuary's? Their site is in Japanese, but Google does an ok job of translating it. But no translations are needed for the pictures of their bikes. They're awesome!
translate.google.com/translate?hl=en&ie=...p/factory/index.html
Michael
1980 KZ1000 shaft drive
1980 KZ1000 shaft drive
Last edit: 09 Aug 2011 03:19 by Chaotic Reason.
Please Log in or Create an account to join the conversation.
- cte.matt
-
Topic Author
- Offline
- User
-
Registered
- Posts: 19
- Thanks: 0
Re: Taking a dive! 82 KZ550 LTD Build
27 Sep 2011 14:22
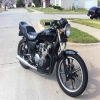
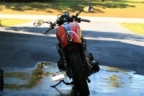
Soo, its been a while since i have posted. here's an update. I haven't done too much, but slow progress is progress nonetheless.
Here's where she sits now
Just put the engine in the frame and "polished" the tank up a bit. Built my first fiberglass seat. It took 3 tries. Apparently i was using too much hardener (even though i followed the instructions). I decided to relocate the ignition to the seat to give the front end a little more space. I bought a marine-grade starter that works like a car ignition with the momentary on the far right. I think after leather, it will look pretty sick.
I started working on a battery box from sheet metal. I am not a welder and have only welded one other thing in my life, so i threw this together and found it not too bad. Unfortunately after grinding the welds down with a flap disc i see a bunch of spots i missed and will need to go back and fill.
I was originally going to mount the entire thing to the seat, but i had some spacing issues so i let the back tab rest over the frame crossbar and mounted the front tab to the seat, like so:
Hopefully it works out well. It seems strong enough to hold the battery and take a beating.
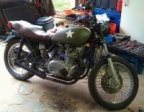
I know a bunch of people are going to give me flak for this, but i painted my wheels with black epoxy last weekend. I think after a little sanding and a second coat, they will look very nice.
I also ground, sanded, and polished the right side cover smooth. I think i eventually will paint some sort of design on it, to give it a more personal touch.
More to come soon.
Here's where she sits now
Attachment IMG_6232.JPG not found
Just put the engine in the frame and "polished" the tank up a bit. Built my first fiberglass seat. It took 3 tries. Apparently i was using too much hardener (even though i followed the instructions). I decided to relocate the ignition to the seat to give the front end a little more space. I bought a marine-grade starter that works like a car ignition with the momentary on the far right. I think after leather, it will look pretty sick.
Attachment IMG_6229.JPG not found
I started working on a battery box from sheet metal. I am not a welder and have only welded one other thing in my life, so i threw this together and found it not too bad. Unfortunately after grinding the welds down with a flap disc i see a bunch of spots i missed and will need to go back and fill.
Attachment IMG_6219.JPG not found
I was originally going to mount the entire thing to the seat, but i had some spacing issues so i let the back tab rest over the frame crossbar and mounted the front tab to the seat, like so:
Attachment IMG_6224.JPG not found
Hopefully it works out well. It seems strong enough to hold the battery and take a beating.
I know a bunch of people are going to give me flak for this, but i painted my wheels with black epoxy last weekend. I think after a little sanding and a second coat, they will look very nice.
Attachment IMG_6233.JPG not found
I also ground, sanded, and polished the right side cover smooth. I think i eventually will paint some sort of design on it, to give it a more personal touch.
Attachment IMG_6239.JPG not found
More to come soon.
Attachment IMG_6243.JPG not found
Attachments:
Please Log in or Create an account to join the conversation.
- cte.matt
-
Topic Author
- Offline
- User
-
Registered
- Posts: 19
- Thanks: 0
Re: Taking a dive! 82 KZ550 LTD Build
08 Oct 2011 17:44
I started tearing up the electronics using a couple diagrams i found from loudvhx.
found a little bit of this
little bit of that. I guess someone put a relay before the coils. From what i've gathered, this is to get a better spark. Is this correct?
I came across this fine piece of japanese technology. Can anyone tell me what this is and if I can scrap it?
I started relocating electrical components to inside the right side cover using a piece of galvanized sheet metal i had laying around. I think it's turning out rather nice.
rectifier
starter solenoid
cover
What do you guys think? Any advice?
Thanks
M
Attachment IMG_1897_2011-10-08.JPG not found
found a little bit of this
Attachment IMG_6265.JPG not found
little bit of that. I guess someone put a relay before the coils. From what i've gathered, this is to get a better spark. Is this correct?
Attachment IMG_6262.JPG not found
I came across this fine piece of japanese technology. Can anyone tell me what this is and if I can scrap it?
Attachment IMG_6267.JPG not found
I started relocating electrical components to inside the right side cover using a piece of galvanized sheet metal i had laying around. I think it's turning out rather nice.
Attachment IMG_6274.jpg not found
rectifier
Attachment IMG_6276.JPG not found
starter solenoid
Attachment IMG_6280.JPG not found
cover
Attachment IMG_6275.JPG not found
What do you guys think? Any advice?
Thanks
M
Attachments:
Please Log in or Create an account to join the conversation.
- loudhvx
-
- Offline
- KZr Legend
-
Registered
- Posts: 10864
- Thanks: 1621
Re: Taking a dive! 82 KZ550 LTD Build
08 Oct 2011 22:17
The project looks like it's coming along good. ")
That relay looks like an add-on to band-aid the voltage at the coils (as you figured). With a rewire, it's not necessary, as long as you are replacing the igntion switch and fuse holders.
That Japanese technology you are referring to is the brake light failure unit. It flashes the brake indicator to let you know the bulb is burned out. If you don't want that feature, or you are getting rid of the gauges, then you can leave it off the bike. I wouldn't trash it, though. Someone may want it and it doesn't take up much space.
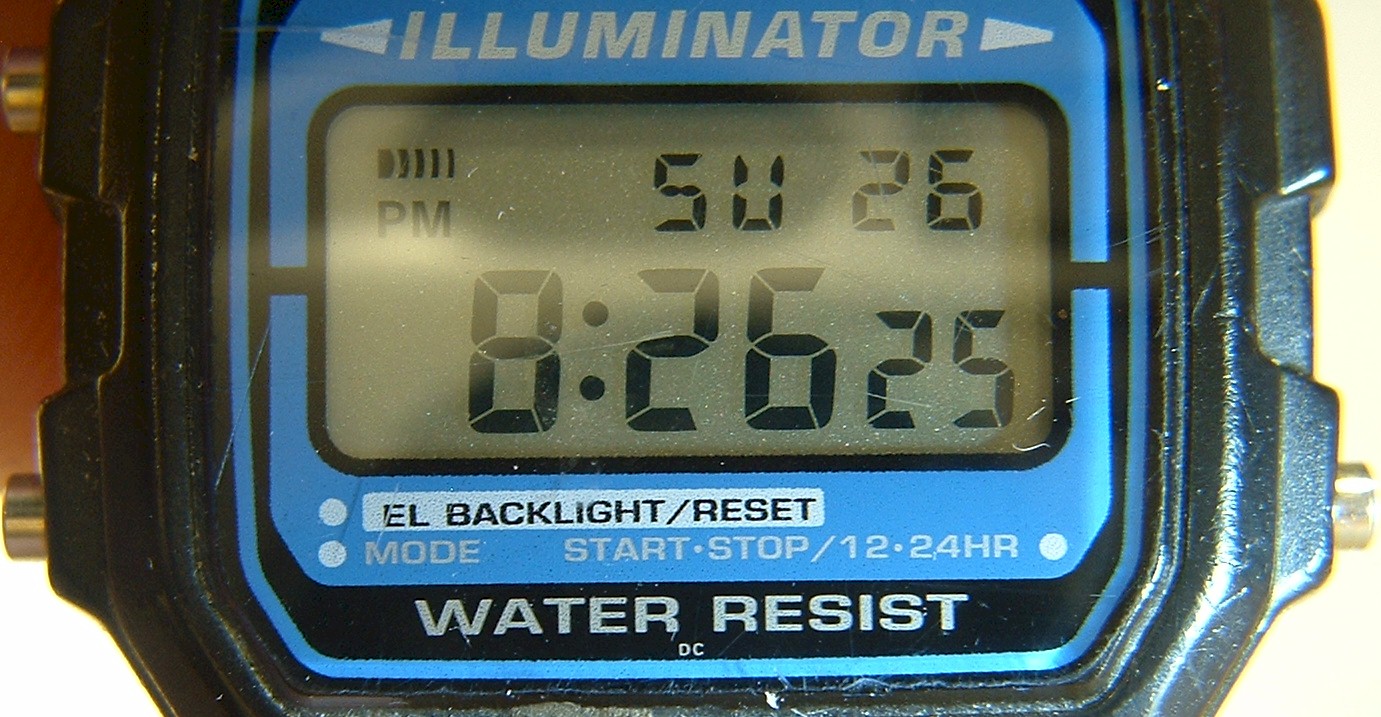
Unless... you are referring to this piece of Japanese technology. Strange, I was testing my home-made macro attachment and shot this photo. I never noiced the "DC" before.
That relay looks like an add-on to band-aid the voltage at the coils (as you figured). With a rewire, it's not necessary, as long as you are replacing the igntion switch and fuse holders.
That Japanese technology you are referring to is the brake light failure unit. It flashes the brake indicator to let you know the bulb is burned out. If you don't want that feature, or you are getting rid of the gauges, then you can leave it off the bike. I wouldn't trash it, though. Someone may want it and it doesn't take up much space.
Unless... you are referring to this piece of Japanese technology. Strange, I was testing my home-made macro attachment and shot this photo. I never noiced the "DC" before.
1981 KZ550 D1 gpz.
Kz550 valve train warning.
Other links.
Kz550 valve train warning.
Other links.
Attachments:
Please Log in or Create an account to join the conversation.
- clutch
-
- Offline
- User
-
Registered
- I wish I had a tad more patience to do it better!
- Posts: 1051
- Thanks: 12
Re: Taking a dive! 82 KZ550 LTD Build
09 Oct 2011 03:44 - 09 Oct 2011 03:45cte.matt wrote: I came across this fine piece of japanese technology. Can anyone tell me what this is and if I can scrap it?
Attachment IMG_6267.JPG not found
That part is called the warning light self checker. From what I have read, it flashes all indicator/warning lights to show that they are functioning when power is initially turned on. It may serve other purposes(heard rumors it may indicate burned out indicator bulbs somehow), but it is scrap-able. (I actually just rewired my 750-4 and scrapped that little bugar myself :woohoo:) Looks like you are getting things under control, keep up the good work.
~Clutch
BTW, I agree that those Enkei's look pretty sweet on your bike as they were in the first pic. Any idea what was used to clean them up that nice?
Southern Maryland, USA
1980 KZ250 LTD (traded, but still missed)
1982 KZ750 E3 (Cafe Project) (Dyna-S, Dyna Coils, V&H 4-1, K&N Pods, 6 Sigma Jet Kit, Acewell Computer, Woodcraft Clip-ons, Custom Rewire)
1966 A1 Samurai (Restoration Project)
Wish List:
KZ1000 P (For a "touring" bike)
Z1 (need I...
1980 KZ250 LTD (traded, but still missed)
1982 KZ750 E3 (Cafe Project) (Dyna-S, Dyna Coils, V&H 4-1, K&N Pods, 6 Sigma Jet Kit, Acewell Computer, Woodcraft Clip-ons, Custom Rewire)
1966 A1 Samurai (Restoration Project)
Wish List:
KZ1000 P (For a "touring" bike)
Z1 (need I...
Last edit: 09 Oct 2011 03:45 by clutch.
Please Log in or Create an account to join the conversation.
- loudhvx
-
- Offline
- KZr Legend
-
Registered
- Posts: 10864
- Thanks: 1621
Re: Taking a dive! 82 KZ550 LTD Build
09 Oct 2011 12:48 - 09 Oct 2011 13:08
Oops. Yeah Clutch is right. On the 82-83 KZ550C it's the self checker (for fuel level sender).
On the earlier models, it's the brake light failure unit. It seems, judging by the diagrams, that they eliminated the brake light failure sender on the bikes that use two tail/brake bulbs. The earlier 550's (A,C,D) used a single tail/brake bulb, and they have the brake failure warning. The later 550's (C), with two bulbs, have a fuel warning, self checker (3-wire). Other models (M, F) got a 5-wire checker, that included oil warning. The H model had the fuel warning device integrated into the gauge cluster.
On the earlier models, it's the brake light failure unit. It seems, judging by the diagrams, that they eliminated the brake light failure sender on the bikes that use two tail/brake bulbs. The earlier 550's (A,C,D) used a single tail/brake bulb, and they have the brake failure warning. The later 550's (C), with two bulbs, have a fuel warning, self checker (3-wire). Other models (M, F) got a 5-wire checker, that included oil warning. The H model had the fuel warning device integrated into the gauge cluster.
1981 KZ550 D1 gpz.
Kz550 valve train warning.
Other links.
Kz550 valve train warning.
Other links.
Last edit: 09 Oct 2011 13:08 by loudhvx.
Please Log in or Create an account to join the conversation.
- clutch
-
- Offline
- User
-
Registered
- I wish I had a tad more patience to do it better!
- Posts: 1051
- Thanks: 12
Re: Taking a dive! 82 KZ550 LTD Build
10 Oct 2011 01:37loudhvx wrote: Oops. Yeah Clutch is right. On the 82-83 KZ550C it's the self checker (for fuel level sender).
On the earlier models, it's the brake light failure unit. It seems, judging by the diagrams, that they eliminated the brake light failure sender on the bikes that use two tail/brake bulbs. The earlier 550's (A,C,D) used a single tail/brake bulb, and they have the brake failure warning. The later 550's (C), with two bulbs, have a fuel warning, self checker (3-wire). Other models (M, F) got a 5-wire checker, that included oil warning. The H model had the fuel warning device integrated into the gauge cluster.
LOL! I was about to post that I stuck my foot in my mouth again, but I got lucky this time. Good thing I saw your edit before I posted that LOL! Thanks for double checking me though...it's good to make sure we're giving out the right info :woohoo:
Southern Maryland, USA
1980 KZ250 LTD (traded, but still missed)
1982 KZ750 E3 (Cafe Project) (Dyna-S, Dyna Coils, V&H 4-1, K&N Pods, 6 Sigma Jet Kit, Acewell Computer, Woodcraft Clip-ons, Custom Rewire)
1966 A1 Samurai (Restoration Project)
Wish List:
KZ1000 P (For a "touring" bike)
Z1 (need I...
1980 KZ250 LTD (traded, but still missed)
1982 KZ750 E3 (Cafe Project) (Dyna-S, Dyna Coils, V&H 4-1, K&N Pods, 6 Sigma Jet Kit, Acewell Computer, Woodcraft Clip-ons, Custom Rewire)
1966 A1 Samurai (Restoration Project)
Wish List:
KZ1000 P (For a "touring" bike)
Z1 (need I...
Please Log in or Create an account to join the conversation.
- cte.matt
-
Topic Author
- Offline
- User
-
Registered
- Posts: 19
- Thanks: 0
Re: Taking a dive! 82 KZ550 LTD Build
11 Oct 2011 00:57 - 11 Oct 2011 00:58
Sweet. Thanks guys. I will more than likely just scrap that piece. Loudhvx, i forgot to ask you a question. I swiped two of your diagrams from a couple posts and tried putting them together. I wanted to get your opinion on whether or not this will work. Thus far, its how i am wiring the bike.
I merged the diagrams from toolboy and chanman. I wanted an automotive style momentary starter switch.
See any problems? Thanks.
Attachment electronics1.jpg not found
I merged the diagrams from toolboy and chanman. I wanted an automotive style momentary starter switch.
See any problems? Thanks.
Attachments:
Last edit: 11 Oct 2011 00:58 by cte.matt. Reason: picture in wrong format
Please Log in or Create an account to join the conversation.
Moderators: Street Fighter LTD