78 Z1R Winter Project
- testarossa
-
- Offline
- User
-

Registered
- Attack life, it's only trying to kill you.
- Posts: 3674
- Thanks: 82
Re: 78 Z1R Winter Project
18 May 2010 04:27
I'm with timebomb. Go ahead and scratch it where the seat rubs or someplace like that, JK. Paint looks real good BTW. All of your prep work just paid off. Welcome back!
1978 KZ1000 A2 Click--->Build Thread
2004 ZX-10R
2007 Harley Sportster 1200
2020 Harley Street Glide Special
Angola, IN
2004 ZX-10R
2007 Harley Sportster 1200
2020 Harley Street Glide Special
Angola, IN
Please Log in or Create an account to join the conversation.
- 531blackbanshee
-
- Offline
- Vendor
-

Vendors
- Posts: 7444
- Thanks: 796
Re: 78 Z1R Winter Project
18 May 2010 05:53
looks good !
i would probably not intentionally scratch the paint.just worry over it until you do then let it ruin a day,thats the natural order :laugh: !
the first one is the worst one.
leon
i would probably not intentionally scratch the paint.just worry over it until you do then let it ruin a day,thats the natural order :laugh: !
the first one is the worst one.
leon
skiatook,oklahoma 1980 z1r,1978 kz 1000 z1r x 3,
1976 kz 900 x 3
i make what i can,and save the rest!
billybiltit.blogspot.com/
www.kzrider.com/forum/5-chassis/325862-triple-tree-custom-work
kzrider.com/forum/5-chassis/294594-frame-bracing?limitstart=0
1976 kz 900 x 3
i make what i can,and save the rest!
billybiltit.blogspot.com/
www.kzrider.com/forum/5-chassis/325862-triple-tree-custom-work
kzrider.com/forum/5-chassis/294594-frame-bracing?limitstart=0
Please Log in or Create an account to join the conversation.
- porchev914
-
- Offline
- User
-

Registered
- Whats that? Half of my swingarm is missing?!?!?
- Posts: 2709
- Thanks: 19
Re: 78 Z1R Winter Project
18 May 2010 10:00
I have known many contractors that would intentionally key their new trucks so they wouldn't worry about that first scratch. I wouldn't recommend that strategy. Protect that Black Beauty with your life!
FRANKEN Z!
1978 KZ1000 A2A with 08'Speed Triple SSSA and '06 GSXR1000 front end
1978 KZ1000 A2A with 08'Speed Triple SSSA and '06 GSXR1000 front end
Please Log in or Create an account to join the conversation.
- JakeB
-
 Topic Author
- Offline
- User
-

Registered
- Posts: 174
- Thanks: 0
Re: 78 Z1R Winter Project
18 May 2010 16:03
Umm, thanks for the scratching idea I guess, :blink:
but I think I will just wait until it finally happens on its own.
I think that this will be a good excuse to buy a cheap 550 or 650, then spray bomb it flat black, then I won't even need to worry about putting it in the front row at walmart! :woohoo:
but I think I will just wait until it finally happens on its own.
I think that this will be a good excuse to buy a cheap 550 or 650, then spray bomb it flat black, then I won't even need to worry about putting it in the front row at walmart! :woohoo:
1978 Z1-R
Please Log in or Create an account to join the conversation.
- JakeB
-
 Topic Author
- Offline
- User
-

Registered
- Posts: 174
- Thanks: 0
Re: 78 Z1R Winter Project
23 May 2010 20:51
I made some good progress this weekend. It took Friday night and Saturday morning to get the cylinder head cleaned up decently. I fashioned myself a little scraper tool from a thin strip of spring steel that was salvaged from a wiper blade. I just cut a 6" or 7" piece off and put a 90° bend about a 1/4" from one end. It worked quite well to break loose the caked on carbon in the exhaust ports, and having the straight end was handy in a few situations as well.
Then I lapped the valves, which took less than I thought. I used the $4 HF lapping tools and Permatex lapping compound which is supposed to go from course to fine as you lap the valve. I used a sharpie on the valve seats to show any areas where the valves and seats weren't mating completely. On most of the valves it only took one application of compound to clean up the mating surfaces. A few of the seats had some dimples left after the first go, but a second pass cleaned them up nicely.
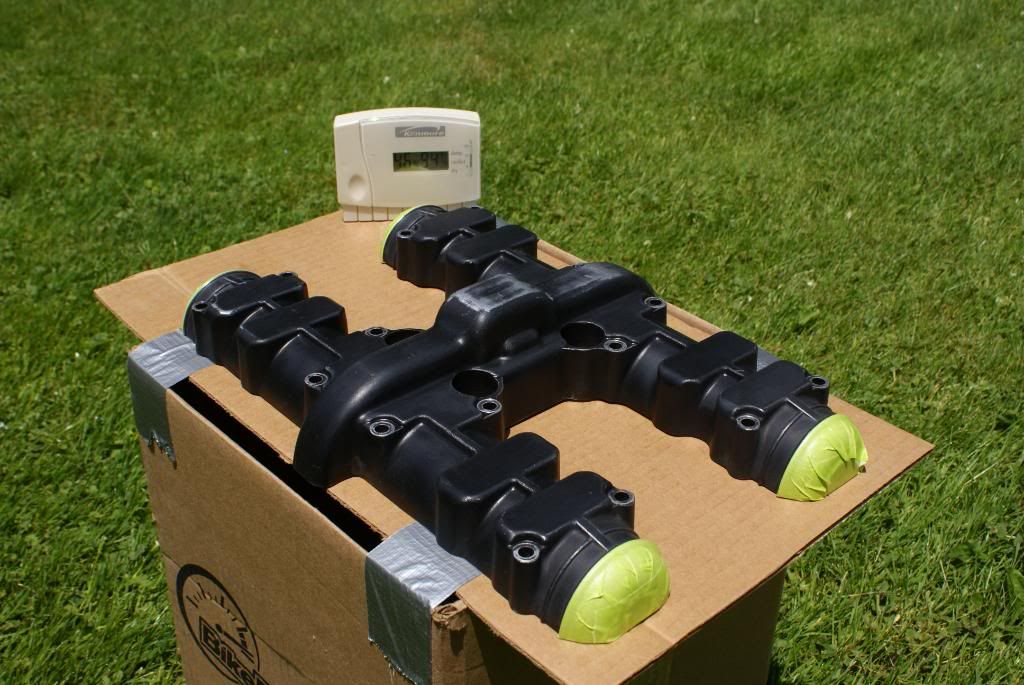
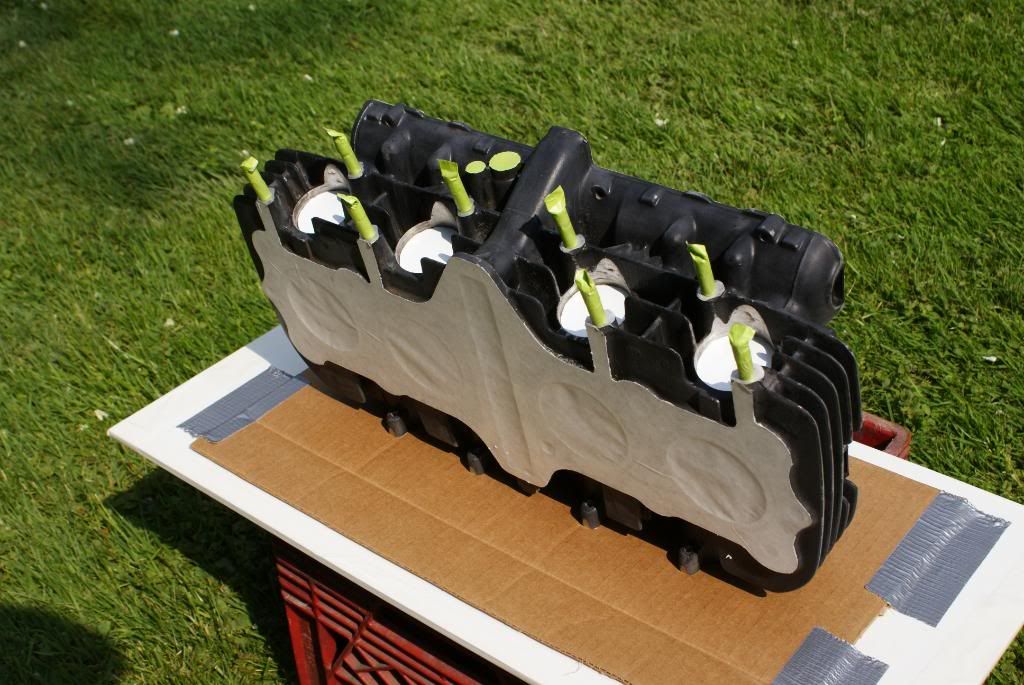
Then I got the head and valve cover prepped to paint. After a thorough cleaning with soap and water, I scuffed with scotch-brite, and sanded down any edges where the paint was chipped. Before I masked them up, I sprayed them down good with brake cleaner to remove most of the dust and any dirt or grease left after the first cleaning. I put a quick polish on the ends of the valve cover so I wouldn't mess up the paint doing it later. I flipped around the old cam end plugs to give me a flat surface to mask to on top of the head. Right before I started painting, I wiped the parts down well with wax and grease remover.
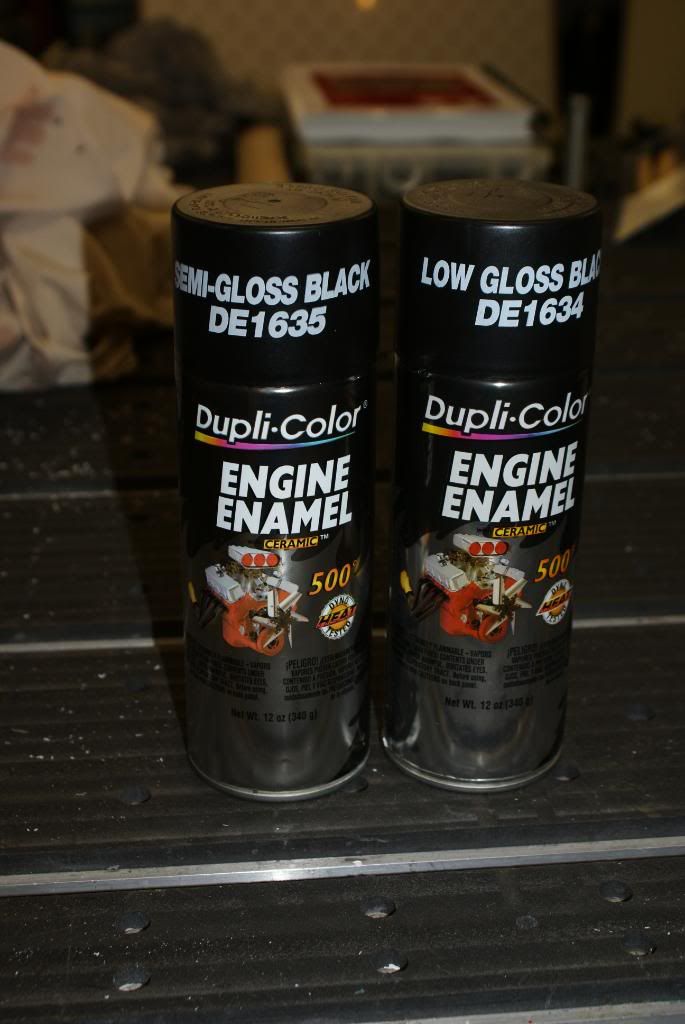
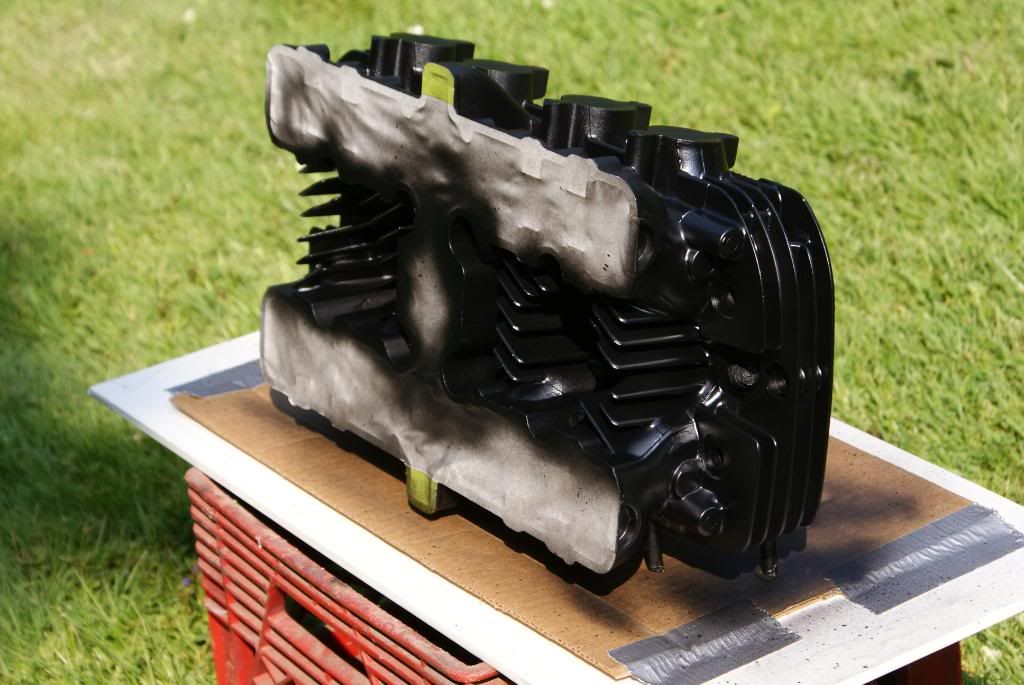
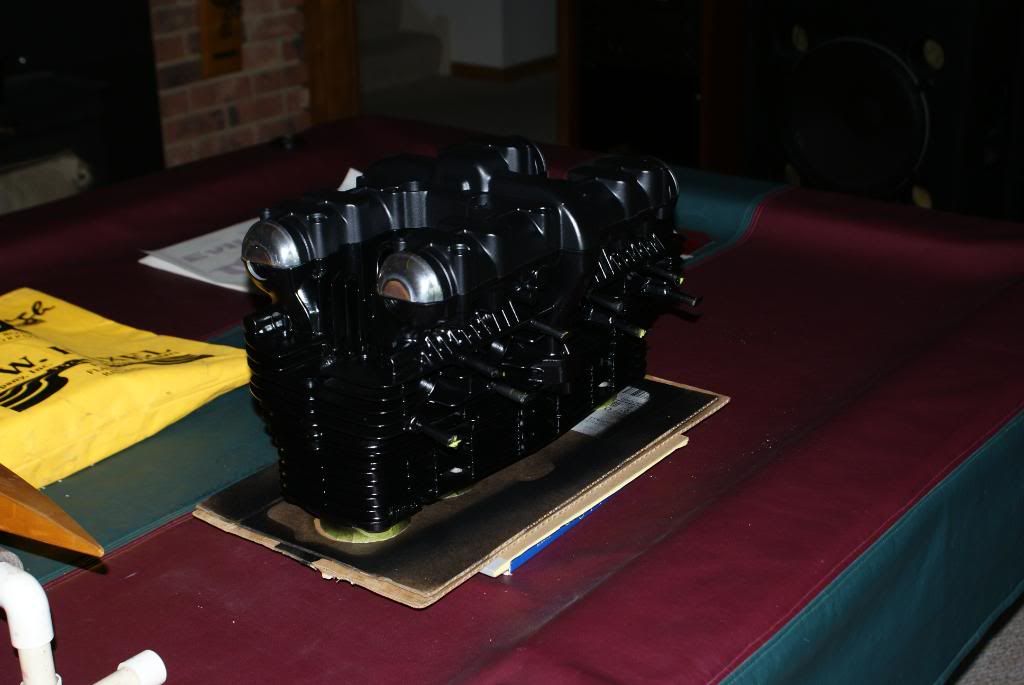
I decided to use Dupli-color engine enamel because past experience has shown it to be fairly durable. I started with "low gloss black" as I already had a partial can (thanks to past experience ) That can lasted through the valve cover and the first two coats on the head. After checking at three stores, the closest thing I could find was the same product but the color was called "semi gloss black" and the part number was off by one digit. So the last coat on the head was with the semi-gloss and the difference in gloss ended up being noticeable. Unfortunately, being enamel I have to wait until it's completely cured before I can repaint the valve cover; I decided to put it together as is and wait until the next time I check valve clearances to respray it to match.
Different gloss aside, I think the paint came out well, here's some pictures.
Here's the paint I used, yay Dupli-color! :lol:
The valve cover scuffed, masked, and ready for paint;
The cylinder head in a similar state;
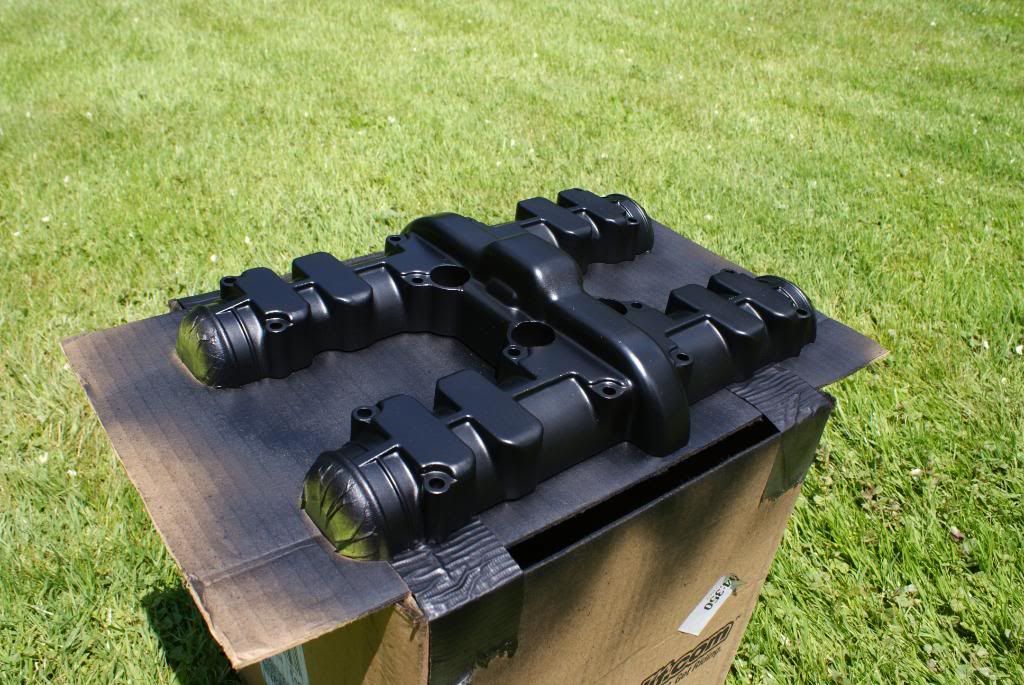
And after a little TV magic...
Valve cover;
Notice the higher gloss on the head;
I plan on getting the rest of the engine painted and ready this week, and hopefully I'll get the rest of my paint back.
It should be just simple cleanup and reassembly from there! :woohoo:
Then I lapped the valves, which took less than I thought. I used the $4 HF lapping tools and Permatex lapping compound which is supposed to go from course to fine as you lap the valve. I used a sharpie on the valve seats to show any areas where the valves and seats weren't mating completely. On most of the valves it only took one application of compound to clean up the mating surfaces. A few of the seats had some dimples left after the first go, but a second pass cleaned them up nicely.
Then I got the head and valve cover prepped to paint. After a thorough cleaning with soap and water, I scuffed with scotch-brite, and sanded down any edges where the paint was chipped. Before I masked them up, I sprayed them down good with brake cleaner to remove most of the dust and any dirt or grease left after the first cleaning. I put a quick polish on the ends of the valve cover so I wouldn't mess up the paint doing it later. I flipped around the old cam end plugs to give me a flat surface to mask to on top of the head. Right before I started painting, I wiped the parts down well with wax and grease remover.
I decided to use Dupli-color engine enamel because past experience has shown it to be fairly durable. I started with "low gloss black" as I already had a partial can (thanks to past experience
Different gloss aside, I think the paint came out well, here's some pictures.
Here's the paint I used, yay Dupli-color! :lol:
The valve cover scuffed, masked, and ready for paint;
The cylinder head in a similar state;
And after a little TV magic...
Valve cover;
Notice the higher gloss on the head;
I plan on getting the rest of the engine painted and ready this week, and hopefully I'll get the rest of my paint back.
It should be just simple cleanup and reassembly from there! :woohoo:
1978 Z1-R
Please Log in or Create an account to join the conversation.
- 531blackbanshee
-

- Offline
- Vendor
-

Vendors
- Posts: 7444
- Thanks: 796
Re: 78 Z1R Winter Project
24 May 2010 07:12
looks good man!
the tank covers so much of that valve cover you may never notice they are diff. once you get it together.
leon
the tank covers so much of that valve cover you may never notice they are diff. once you get it together.
leon
skiatook,oklahoma 1980 z1r,1978 kz 1000 z1r x 3,
1976 kz 900 x 3
i make what i can,and save the rest!
billybiltit.blogspot.com/
www.kzrider.com/forum/5-chassis/325862-triple-tree-custom-work
kzrider.com/forum/5-chassis/294594-frame-bracing?limitstart=0
1976 kz 900 x 3
i make what i can,and save the rest!
billybiltit.blogspot.com/
www.kzrider.com/forum/5-chassis/325862-triple-tree-custom-work
kzrider.com/forum/5-chassis/294594-frame-bracing?limitstart=0
Please Log in or Create an account to join the conversation.
- richard head
-
- Offline
- Banned
-

Registered
- Posts: 30
- Thanks: 0
Re: 78 Z1R Winter Project
24 May 2010 19:36
Nice ! The 78 Z1R was always on of my favorite bikes.
Please Log in or Create an account to join the conversation.
- JakeB
-
 Topic Author
- Offline
- User
-

Registered
- Posts: 174
- Thanks: 0
Re: 78 Z1R Winter Project
24 May 2010 19:46
Thanks Leon, I think you're right about not seeing the difference on the bike, which is why I'm not worried about putting it on there for now. I'm sure I'll have the valve cover off soon enough anyway (I can never seem to just leave things alone :blush:) and I'll just spray it to match then.
I should probably go buy a few more cans while they still have that finish, I don't need a third on there! :laugh: :laugh:
I got the cylinder block painted tonight. Sorry no pics, I'll try to take some tomorrow when it's light out. I have the cylinder, head, and valve cover stacked up and it looks really good. After seeing it together like that I'm glad I ended up with the glossier finish.
I can't wait to see the whole bike together! :woohoo:
I think I may spend a day just staring at it! :laugh:
1978 Z1-R
Please Log in or Create an account to join the conversation.
- larrycavan
-
- User
-

Public
- Thanks: 0
Please Log in or Create an account to join the conversation.
- JakeB
-
 Topic Author
- Offline
- User
-

Registered
- Posts: 174
- Thanks: 0
Re: 78 Z1R Winter Project
24 May 2010 19:59
Hey thanks Larry! I really appreciate that.
Thanks Richard, I think it's pretty cool myself!
Thanks Richard, I think it's pretty cool myself!
1978 Z1-R
Please Log in or Create an account to join the conversation.
- JakeB
-
 Topic Author
- Offline
- User
-

Registered
- Posts: 174
- Thanks: 0
Re: 78 Z1R Winter Project
25 May 2010 14:13
Alright guys, this is how the cylinder, head, and valve cover turned out. I still have to sand the paint off of the fin edges on the head, but you get the idea.
1978 Z1-R
Please Log in or Create an account to join the conversation.
- zippy
-
- Offline
- User
-

Registered
- Posts: 131
- Thanks: 0
Re: 78 Z1R Winter Project
25 May 2010 14:46
Really nice job. Keep up the good work and keep the updates comin !!  As you can see - I'm a Z1R lover myself
Please Log in or Create an account to join the conversation.
Moderators: Street Fighter LTD

