- Posts: 323
- Thank you received: 0
Still learning upholstery...
- ronboskz650sr
- Topic Author
- Offline
- User
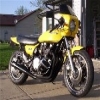
1. Resin layer on the bottom of the pan to fill the staple holes from all the experiments. There will also be a two layer pan over the battery and tool kit molded, and attached to my seatpan to give me a more rigid pan, and make the side lines straight at the bottom along the frame.
2. final smoothing of the tailpiece front section where the cushion meets the tail (this section will be satin black, not gloss.
3. Paint (duh), including underside edges of tailpiece.
4. Build-up of the cushion to final size and carve to shape.
5. Attach cushion with Goop marine contact adhesive.
6. Scotchguard the inside of the vinyl, after sewing the cover.
7. Attach cover.
8. Install completed unit..getting pretty good at this one.
Sounds like alot, but it's just a process with steps. Those steps may change, like custom stuff often does. Still not going to do any work that disables the bike for riding until the weather turns bad again. Then the paint will happen quickly on the next available warm day.
Please Log in or Create an account to join the conversation.
- indykaw77
-

- Offline
- User
- Posts: 510
- Thank you received: 4
I like yer attitude...."Nothing ventured....nothing gained"
What ya end up deciding to use for the seat cover material???? And keep up the posts for the "How to" upholstery. We may need another forum!!
Post edited by: indykaw77, at: 2005/10/27 20:31
Kawasaki Motorcycles...because cars lean th wrong way!
Please Log in or Create an account to join the conversation.
- ronboskz650sr
- Topic Author
- Offline
- User
- Posts: 323
- Thank you received: 0
Please Log in or Create an account to join the conversation.
- ronboskz650sr
- Topic Author
- Offline
- User
- Posts: 323
- Thank you received: 0
The seatpan/tailpiece I have'nt totalled up at all, but it's a one-off piece, so that makes it pretty special to me. It has been through three distinct trial and error stages, as you all know, so the cost is probably elevated compared to a commercial piece, although stage one was also scrounged materials, to a large degree.
The blue seat sets the black bike off with just enough variation to really look good out in the sun.
Please Log in or Create an account to join the conversation.
- GargantuChet
- Offline
- User
- Posts: 296
- Thank you received: 1
ronboskz650sr wrote:
There will also be a two layer pan over the battery and tool kit molded, and attached to my seatpan to give me a more rigid pan, and make the side lines straight at the bottom along the frame.
How are you doing this? Are you making your own pan somehow?
Another question, with the frame rails exposed, are your legs against them at all when using the passenger pegs? It's hard to picture your riding posture, although I suppose it's a bit hard to take an action shot of yourself on the bike. :side:
Please Log in or Create an account to join the conversation.
- ronboskz650sr
- Topic Author
- Offline
- User
- Posts: 323
- Thank you received: 0
The frame rails haven't presented themselves as a comfort issue to me while riding, so I'm not really sure. I'll take note of that and get back to you.
Please Log in or Create an account to join the conversation.
- ronboskz650sr
- Topic Author
- Offline
- User
- Posts: 323
- Thank you received: 0
Please Log in or Create an account to join the conversation.
- galaxian
-

- Offline
- User
- Posts: 335
- Thank you received: 0
1977 KZ1000A1, 1979 KZ650 C3
Please Log in or Create an account to join the conversation.
- ronboskz650sr
- Topic Author
- Offline
- User
- Posts: 323
- Thank you received: 0
Please Log in or Create an account to join the conversation.
- ronboskz650sr
- Topic Author
- Offline
- User
- Posts: 323
- Thank you received: 0
Please Log in or Create an account to join the conversation.


