
Search Results (Searched for: gs swing arm)
Replied by Kz900Pablo on topic Introducing myself - 76 Kz 900
05 Jul 2016 11:03
@KZJoe900, Thanks, I feel very lucky to have found this bike. It has 21000 miles and it is mostly original, it's a survivor. It has been garage kept since 1976. Yes, that's a Kerker exhaust pipe in perfect condition. There are some scratches and one dent in the tank that's small but includes a gouge in the paint. The engine covers don't have rashes thanks to what I think are called 'case savers'. The tires are the original Avon tires! Clearly they will need replacement.
It runs well enough. I think a carb bowl is leaking because it's leaving a gas stain under the engine if I leave the petcock open when parked.. The bike feels nervous at freeway speeds. I'm guessing that the swingarm and front fork bearings need attention, and new tires will help the cause.
It's going to stay as-is for now. I'll service it and make it road-ready. I'm guessing it will end up in Arizona with my brother but I'm going to have some summer fun with it for now.
bluej58 wrote: That is going to look very cool
So are you going to stay with the original wheel base?
I think that will help keeping the original geometry as far as the ride goes.
I do like the way it looks stretched out :evil: but I think it would need to be raked and longer tubes and who knows how it would handle then.
")
I'm going to keep it as close to the original wheelbase as I can. Lacking a reverse it's already going to be a bearcat to turn around. If I let it get too long I'll need a whole parking lot to get it maneuvered around.
I laid out the cuts on the swing arms and drew the spreaders with my CAD program. I've got to go to Boston next week but not before I send the drawings off to the lazer cutter. Hopefully they'll be done when I return home.
Thanks
Bill
Nice bike! Welcome aboard!
Here are some tips that you may find helpful:
Many newbies and not so newbies run into or issues with their bikes which could be easily avoided with a little preparation or information. Here are a couple recommendations that I hope you will find useful.
Before riding your KZ you should take a little time to become familiar with it. Simple things like checking the oil, tire pressures, etc. are explained in the Kawasaki Owner's Manual. If you bike didn't come with one (they normally are in a little holder on the bottom of the seat) you can usually find one on eBay - be sure to get one for your exact year/model.
MANUAL
You really should consider buying the Kawasaki Factory Service Manual for your bike. The factory service manual provides instructions on the various maintenance procedures and schedules for your bike, procedures for diagnosing problems, proper torque values for the various fasteners (VERY IMPORTANT), and insight into how each system on your bike works even if you are not repairing that system. Studying the manual before you attempt performing service on your bike will impart an understanding of the system you are working on which will increase the odds of success.
The manuals usually are readily available for most models on eBay and other sources; but be sure to get one that has your specific year and model in it as there are differences between the various KZ650 models. I do not recommend Clymers, Haynes, or other aftermarket manuals as I have seen instances where they provide inaccurate advice. You may decide to use those to supplement the factory manual, but in my opinion they are not a suitable substitute. If you have trouble finding one for your model ask us to help.
TOOLS
WARNING! Do not even try to use Phillips screwdrivers on the Kawasaki cross head screws. Despite their appearance they are not Phillips screws. They are Japanese Industrial Standard (JIS) screws. The tips of Phillips screwdrivers are too long & pointed to allow the 4 blades of the screwdriver to properly engage the screws, so when you apply force the screw head slots will deform and look like crap. The fact is that Phillips screws were deliberately designed to have the screwdriver bit "cam out." This was done to prevent production line assembly from over-tightening, stripping, or breaking the screws. JIS screws do not have this problem. A proper fitting JIS bit can tighten a JIS screw to and beyond the torque spec without camming out. Here's the good news - you can easily modify standard Phillips screwdriver tips to fit the JIS screws.
I have ground down the tips of DeWalt #2 and DeWalt #3 Phillips to make them fit JIS screws. The large crosshead screws on the cases take modified #3 bits (or genuine #3 JIS bits). To modify the DeWalt bits you need to grind the very tip a little, then test fit, then grind a little more and test fit, etc. until the bit no longer "rocks" back and forth in the screwhead. Picture 1 below shows how a DeWalt #3 bit fits the case screws of my KZ650 after being ground properly. The #2 DeWalt bits can be modified the same way to fit smaller JIS screws. Pictures 2 and 3 below shows DeWalt #2 and #3 modified bits.
I did find a place that sells authentic JIS bits. They don't list the #3 bit, but if you contact them they can provide the #3 JIS bits even though they are not listed on the website. These folks were very easy to work with, and the authentic bits do work great. Here's their site:
www.rjrcooltools.com/shop_item_detail.cfm?subcat_ID=89
Pictures 4 & 5 below show a comparison between my home made modified bits with the authentic JIS bits, and picture 6 shows a comparison between Philips and JIS bit tips.
PICTURE 1

PICTURE 2

PICTURE 3

PICTURE 4

PICTURE 5

PICTURE 6
Before reaching for that wrench or ratchet consider the following. The bolts are steel, but your engine and front forks are aluminum. The bolts are much tougher than the aluminum and if over tightened will strip the aluminum threads. Although these can be repaired, preventing damage by applying proper torque will save you grief, time, and money. Tightening fasteners properly requires torque wrenches. Various vendors, including Snap-on, CDI, Sears, etc., market torque wrenches. The two most popular types are the bar type and micrometer type. Either will work, but the micrometer type is a bit easier to use, especially if you are tightening several fasteners with the same torque - such as cylinder head covers. You will need a torque wrench calibrated in INCH POUNDS for many of the bolts. You will also need a torque wrench calibrated in FOOT POUNDS for the larger bolts. Don't try to use the foot pounds wrench on the smaller bolts as it will not be sensitive enough at low torque settings to provide accurate torque. There are many fasteners that require low torque. These include such things as 6mm oil pan bolts, cylinder head cover bolts, etc. for which the torque in 61-78 inch pounds. These low torque bolts require a wrench that is accurate at low settings and this wrench should be graduated in inch pounds. In addition, there are numerous high torque fasteners such as the front axle nuts (51 - 65 foot pounds) or swing arm pivot shaft nuts (58 - 87 foot pounds). These require a wrench that is accurate at higher settings; this wrench should be graduated in foot pounds. Using the proper torque wrenches to correctly tighten fasteners will help prevent damage and contribute to a safe bike. The Kawasaki Service Manual will list the various torque specs for the bolts. I suggest you get the manual before buying the torque wrenches so you can decide which wrenches best meet the torque specs.
Consider buying a can of Kroil penetrating oil and use it to soak stubborn fasteners for a couple days before trying to loosen them. Remember, the original screws and bolts were installed on your bike when Jimmy Carter was President, so many of them may be hard to remove. Kroil can be bought online, at guns shows, and at some other venues.
MOTOR OIL
The ingredients in oils have changed over the years. For example, today's Castrol GTX oil (and pretty much all other AUTOMOBILE oil) is not the same as it was in the 1980's. Back then it worked great in KZ bikes. But, things have changed. Early AUTOMOBILE oils contained zinc phosphorus compounds (ZDDP) to protect engine components from metal to metal contact. This was good for engines, but it was found to be destructive to catalytic converters. Consequently, in AUTOMOBILE oils ZDDP was virtually eliminated and replaced with different chemistry generically referred to as "Friction Modifiers." These work fine and offer good protection for normal AUTOMOBILE engines. However, today's AUTOMOBILE oil "Friction Modifiers" are destructive to wet clutches. KZ bikes (and many other brands) have wet clutches. As a result of these oil chemistry changes a distinction needed to be made between those oils which are suitable for wet clutches and those which are not. That distinction was documented by the Japanese Engine Oil Standards Implementation Panel (JASO). JASO developed a number of different oil specifications for different applications. The specifications that apply to 4 stroke motorcycles fall under the "4T Specifications." Within the 4T specifications the JASO MA class oils are specifically formulated for 4 stroke motorcycles with wet clutches.
There are synthetic, semi-synthetic, and non-synthetic oils that meet the JASO-MA standard and any of them will work ok. However, using oils that are not designated as meeting the JASO-MA standard is destructive to KZ clutches.
Good luck with your bike. Ed
Here are some tips that you may find helpful:
Many newbies and not so newbies run into or issues with their bikes which could be easily avoided with a little preparation or information. Here are a couple recommendations that I hope you will find useful.
Before riding your KZ you should take a little time to become familiar with it. Simple things like checking the oil, tire pressures, etc. are explained in the Kawasaki Owner's Manual. If you bike didn't come with one (they normally are in a little holder on the bottom of the seat) you can usually find one on eBay - be sure to get one for your exact year/model.
MANUAL
You really should consider buying the Kawasaki Factory Service Manual for your bike. The factory service manual provides instructions on the various maintenance procedures and schedules for your bike, procedures for diagnosing problems, proper torque values for the various fasteners (VERY IMPORTANT), and insight into how each system on your bike works even if you are not repairing that system. Studying the manual before you attempt performing service on your bike will impart an understanding of the system you are working on which will increase the odds of success.
The manuals usually are readily available for most models on eBay and other sources; but be sure to get one that has your specific year and model in it as there are differences between the various KZ650 models. I do not recommend Clymers, Haynes, or other aftermarket manuals as I have seen instances where they provide inaccurate advice. You may decide to use those to supplement the factory manual, but in my opinion they are not a suitable substitute. If you have trouble finding one for your model ask us to help.
TOOLS
WARNING! Do not even try to use Phillips screwdrivers on the Kawasaki cross head screws. Despite their appearance they are not Phillips screws. They are Japanese Industrial Standard (JIS) screws. The tips of Phillips screwdrivers are too long & pointed to allow the 4 blades of the screwdriver to properly engage the screws, so when you apply force the screw head slots will deform and look like crap. The fact is that Phillips screws were deliberately designed to have the screwdriver bit "cam out." This was done to prevent production line assembly from over-tightening, stripping, or breaking the screws. JIS screws do not have this problem. A proper fitting JIS bit can tighten a JIS screw to and beyond the torque spec without camming out. Here's the good news - you can easily modify standard Phillips screwdriver tips to fit the JIS screws.
I have ground down the tips of DeWalt #2 and DeWalt #3 Phillips to make them fit JIS screws. The large crosshead screws on the cases take modified #3 bits (or genuine #3 JIS bits). To modify the DeWalt bits you need to grind the very tip a little, then test fit, then grind a little more and test fit, etc. until the bit no longer "rocks" back and forth in the screwhead. Picture 1 below shows how a DeWalt #3 bit fits the case screws of my KZ650 after being ground properly. The #2 DeWalt bits can be modified the same way to fit smaller JIS screws. Pictures 2 and 3 below shows DeWalt #2 and #3 modified bits.
I did find a place that sells authentic JIS bits. They don't list the #3 bit, but if you contact them they can provide the #3 JIS bits even though they are not listed on the website. These folks were very easy to work with, and the authentic bits do work great. Here's their site:
www.rjrcooltools.com/shop_item_detail.cfm?subcat_ID=89
Pictures 4 & 5 below show a comparison between my home made modified bits with the authentic JIS bits, and picture 6 shows a comparison between Philips and JIS bit tips.
PICTURE 1
PICTURE 2
PICTURE 3
PICTURE 4
PICTURE 5
PICTURE 6
Before reaching for that wrench or ratchet consider the following. The bolts are steel, but your engine and front forks are aluminum. The bolts are much tougher than the aluminum and if over tightened will strip the aluminum threads. Although these can be repaired, preventing damage by applying proper torque will save you grief, time, and money. Tightening fasteners properly requires torque wrenches. Various vendors, including Snap-on, CDI, Sears, etc., market torque wrenches. The two most popular types are the bar type and micrometer type. Either will work, but the micrometer type is a bit easier to use, especially if you are tightening several fasteners with the same torque - such as cylinder head covers. You will need a torque wrench calibrated in INCH POUNDS for many of the bolts. You will also need a torque wrench calibrated in FOOT POUNDS for the larger bolts. Don't try to use the foot pounds wrench on the smaller bolts as it will not be sensitive enough at low torque settings to provide accurate torque. There are many fasteners that require low torque. These include such things as 6mm oil pan bolts, cylinder head cover bolts, etc. for which the torque in 61-78 inch pounds. These low torque bolts require a wrench that is accurate at low settings and this wrench should be graduated in inch pounds. In addition, there are numerous high torque fasteners such as the front axle nuts (51 - 65 foot pounds) or swing arm pivot shaft nuts (58 - 87 foot pounds). These require a wrench that is accurate at higher settings; this wrench should be graduated in foot pounds. Using the proper torque wrenches to correctly tighten fasteners will help prevent damage and contribute to a safe bike. The Kawasaki Service Manual will list the various torque specs for the bolts. I suggest you get the manual before buying the torque wrenches so you can decide which wrenches best meet the torque specs.
Consider buying a can of Kroil penetrating oil and use it to soak stubborn fasteners for a couple days before trying to loosen them. Remember, the original screws and bolts were installed on your bike when Jimmy Carter was President, so many of them may be hard to remove. Kroil can be bought online, at guns shows, and at some other venues.
MOTOR OIL
The ingredients in oils have changed over the years. For example, today's Castrol GTX oil (and pretty much all other AUTOMOBILE oil) is not the same as it was in the 1980's. Back then it worked great in KZ bikes. But, things have changed. Early AUTOMOBILE oils contained zinc phosphorus compounds (ZDDP) to protect engine components from metal to metal contact. This was good for engines, but it was found to be destructive to catalytic converters. Consequently, in AUTOMOBILE oils ZDDP was virtually eliminated and replaced with different chemistry generically referred to as "Friction Modifiers." These work fine and offer good protection for normal AUTOMOBILE engines. However, today's AUTOMOBILE oil "Friction Modifiers" are destructive to wet clutches. KZ bikes (and many other brands) have wet clutches. As a result of these oil chemistry changes a distinction needed to be made between those oils which are suitable for wet clutches and those which are not. That distinction was documented by the Japanese Engine Oil Standards Implementation Panel (JASO). JASO developed a number of different oil specifications for different applications. The specifications that apply to 4 stroke motorcycles fall under the "4T Specifications." Within the 4T specifications the JASO MA class oils are specifically formulated for 4 stroke motorcycles with wet clutches.
There are synthetic, semi-synthetic, and non-synthetic oils that meet the JASO-MA standard and any of them will work ok. However, using oils that are not designated as meeting the JASO-MA standard is destructive to KZ clutches.
Good luck with your bike. Ed
Spoke wheels for '81 Z650 D4 was created by TheBaron
02 Jul 2016 00:23 TheBaron
Hey there,
Im looking into replacing the mags on my '81 Z650 D4 with a set of spoke wheels, Keeping in mind that i have a 16" mag rear with single disc, and 19" Front dual disc, and apparently the '81 Z650 D4 shares the same forks and a Z750E. I would like the swap to finish up as single disc rear, dual front. Would anyone please be able to tell me which model of Z650 disc brake spoke wheel hubs will be a direct swap and fit up to the bike and if there will be extra parts i will need for the swap? Please also consider that i want to use the swing arm, current disc brake calipers and the axles if possible for the conversion. Once I figure out what works I would like to use the hubs and lace aluminium 19" rims front and rear. Has anyone had experience with particular rim and spoke kits, as in part numbers or suppliers that they have actually found to work,
Thanks so much for the guidance, this forum is a wealth of knowledge!
Baron.
VM24-SS-anity Check. was created by wrenchmonkey
30 Jun 2016 20:20
Finally got a second crack at trying to get KZombie to fire-up tonight and stwange things were afoot.
First a sanity check for me, since all of my manuals do not show the vacuum ports connected to these VM24SS carbs and any exploded views I found searching here (over an hour now), still leave me wondering if perhaps my vacuum lines are wrong?
So here's the carbs in question, in situ:
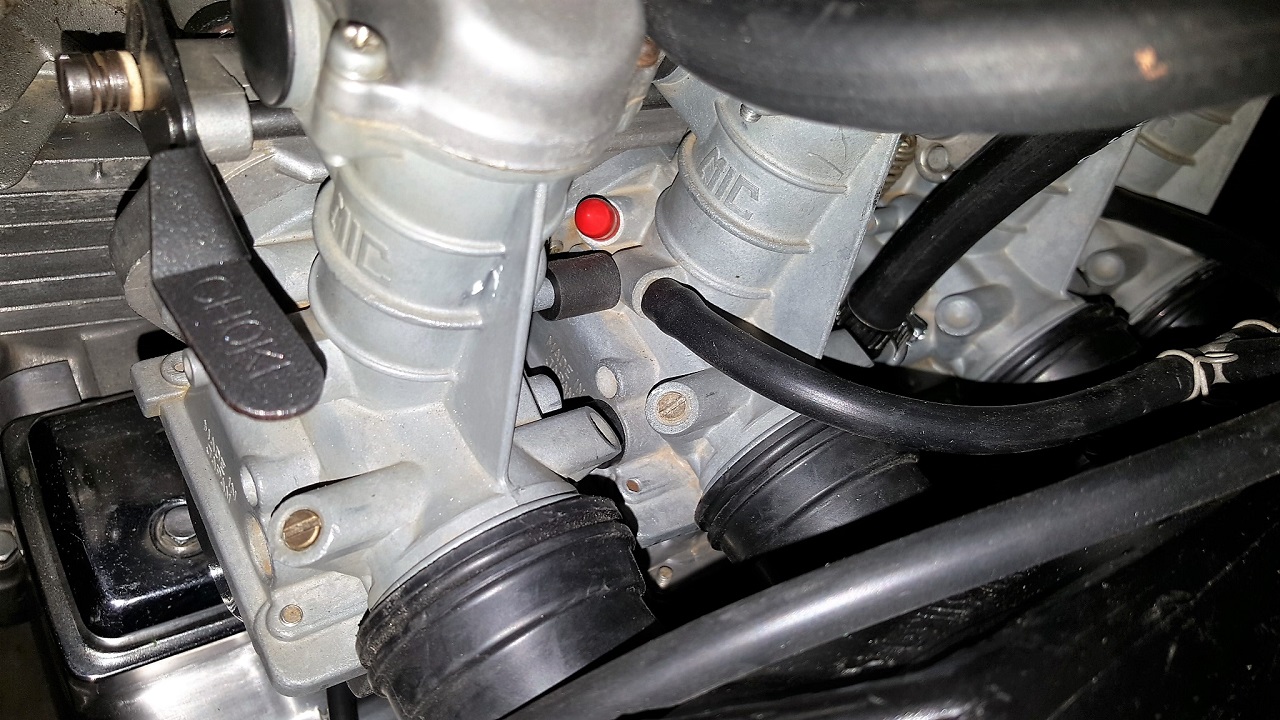
Do I have my vacuum lines connected properly?
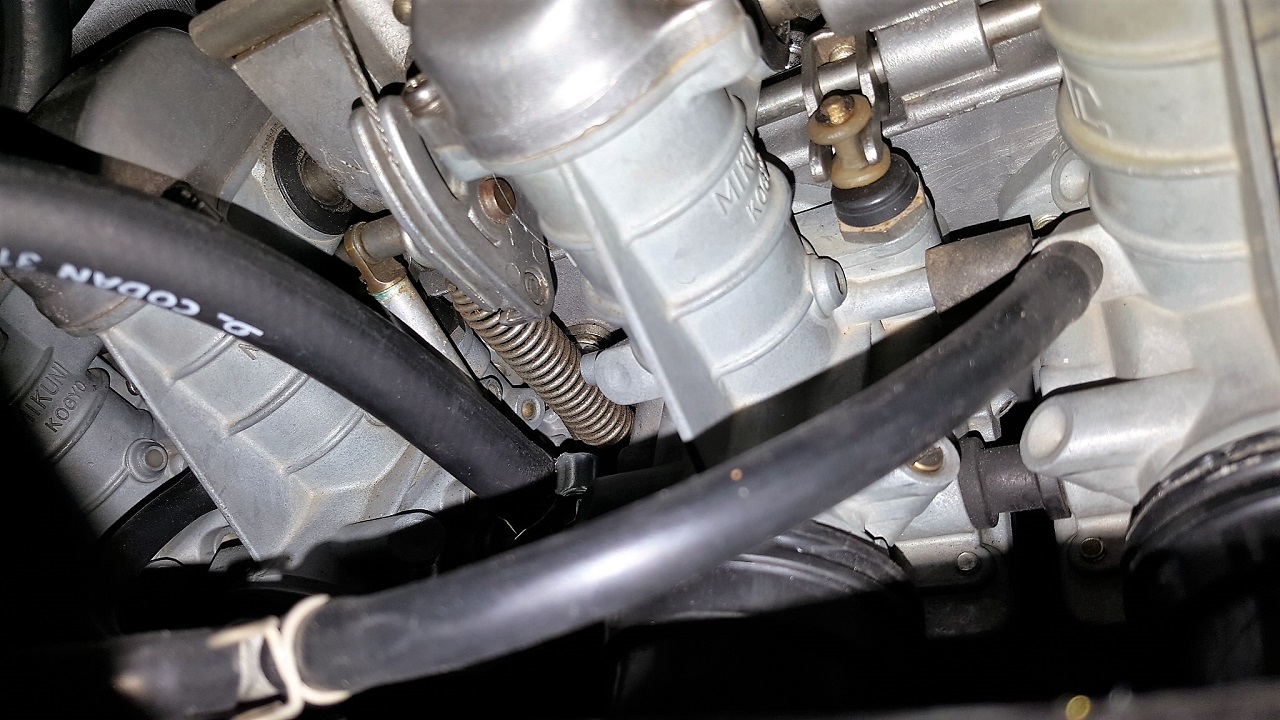
Pic one above, RED cap on carb 2, is plugging one port which I thought was connected to the emissions reed valve setup. Black hose below it routes to a "T" connector which is connected to carb 4 seen in Picture two. From the T connector the vacuum line is routed to the petcock although the hose is currently plugged without the tank on at the moment.
I connected the fuel line (seen in the second picture) to a bottle of fuel for test run. When I filled the bottle, every carb gushed gasoline out of the over-flow tubes and down to the garage floor at the center stand (ie: the over flow tubes are all routed to behind the engine, between the center stand and swing arm.
This never happened on Sunday when I tried to start the engine. I had exactly the same setup without any drama (or engine start).
In the searching tonight I found [ Nessim's Notes on these carbs problems ] about the floats jamming up and the jets clogging easily.
I'm just puzzled because none of this happened on Sunday and the bike has only sat in the garage since then until tonight's attempt.
Additionally, as I was trying to start the engine, I noticed gasoline was dripping from the carb mounts - all of them - :ohmy:
So basically, I'm assuming I was flooding the engine as it tried to start. My thought was - OK, this is obviously too rich... and then shut off the choke and went WOT and rolled on the starter. Amazingly, the engine behaved like it was going to start for about 2 seconds until eventually my battery dropped below 10vdc.
I replaced my plugs tonight because I discovered I made the blunder of installing BR7ES plugs before and read recently that was a no no. I confirmed spark at all four B7ES plugs and with the ignition cover off, I could clearly see the points sparking during rotation. I also confirmed the points for 1 and 4 had the black wire and points for 2 and 3 had the green wire (so points to coils is wired correctly - I thought maybe this was the problem on Sunday).
I am going to pull the carbs AGAIN! argh! and completely dismantle them to see why they all poured fuel out the over-flow tubes (this happened all night. I dried up the floor and next attempt to start, more fuel on the floor). So the bowls are obviously full and based upon gas dripping from all four of the carb mounts, I'm flooding the engine; right?
Am I missing anything else? I need the sanity check here. Thanks in advance for any wisdom y'all can impart.
First a sanity check for me, since all of my manuals do not show the vacuum ports connected to these VM24SS carbs and any exploded views I found searching here (over an hour now), still leave me wondering if perhaps my vacuum lines are wrong?
So here's the carbs in question, in situ:
Do I have my vacuum lines connected properly?
Pic one above, RED cap on carb 2, is plugging one port which I thought was connected to the emissions reed valve setup. Black hose below it routes to a "T" connector which is connected to carb 4 seen in Picture two. From the T connector the vacuum line is routed to the petcock although the hose is currently plugged without the tank on at the moment.
I connected the fuel line (seen in the second picture) to a bottle of fuel for test run. When I filled the bottle, every carb gushed gasoline out of the over-flow tubes and down to the garage floor at the center stand (ie: the over flow tubes are all routed to behind the engine, between the center stand and swing arm.
This never happened on Sunday when I tried to start the engine. I had exactly the same setup without any drama (or engine start).
In the searching tonight I found [ Nessim's Notes on these carbs problems ] about the floats jamming up and the jets clogging easily.
I'm just puzzled because none of this happened on Sunday and the bike has only sat in the garage since then until tonight's attempt.
Additionally, as I was trying to start the engine, I noticed gasoline was dripping from the carb mounts - all of them - :ohmy:
So basically, I'm assuming I was flooding the engine as it tried to start. My thought was - OK, this is obviously too rich... and then shut off the choke and went WOT and rolled on the starter. Amazingly, the engine behaved like it was going to start for about 2 seconds until eventually my battery dropped below 10vdc.
I replaced my plugs tonight because I discovered I made the blunder of installing BR7ES plugs before and read recently that was a no no. I confirmed spark at all four B7ES plugs and with the ignition cover off, I could clearly see the points sparking during rotation. I also confirmed the points for 1 and 4 had the black wire and points for 2 and 3 had the green wire (so points to coils is wired correctly - I thought maybe this was the problem on Sunday).
I am going to pull the carbs AGAIN! argh! and completely dismantle them to see why they all poured fuel out the over-flow tubes (this happened all night. I dried up the floor and next attempt to start, more fuel on the floor). So the bowls are obviously full and based upon gas dripping from all four of the carb mounts, I'm flooding the engine; right?
Am I missing anything else? I need the sanity check here. Thanks in advance for any wisdom y'all can impart.
That wobble can be caused by bad tires, worn or improperly adjusted steering stem bearings or swingarm bearings. If the tires are more than five years old or are showing signs of cracking, they should be replaced.
How about front wheel bearings, also a cause? Do you recommend All Balls bearings as quality?
How about front wheel bearings, also a cause? Do you recommend All Balls bearings as quality?
Replied by SWest on topic Kiwi Z1R
23 Jun 2016 05:38
PO's suck. My Z1 has brass swing arm bushings. Stock was steel. I put them in. The needle bearing kit was available but too expensive at the time.
Steve
Steve
Went to rip out the bearings from the swingarm today so I can send it to get blasted and powder coated and found this set up. Brass bushes and no bearings? Can anyone enlighten me as to why? I have never come across this before.
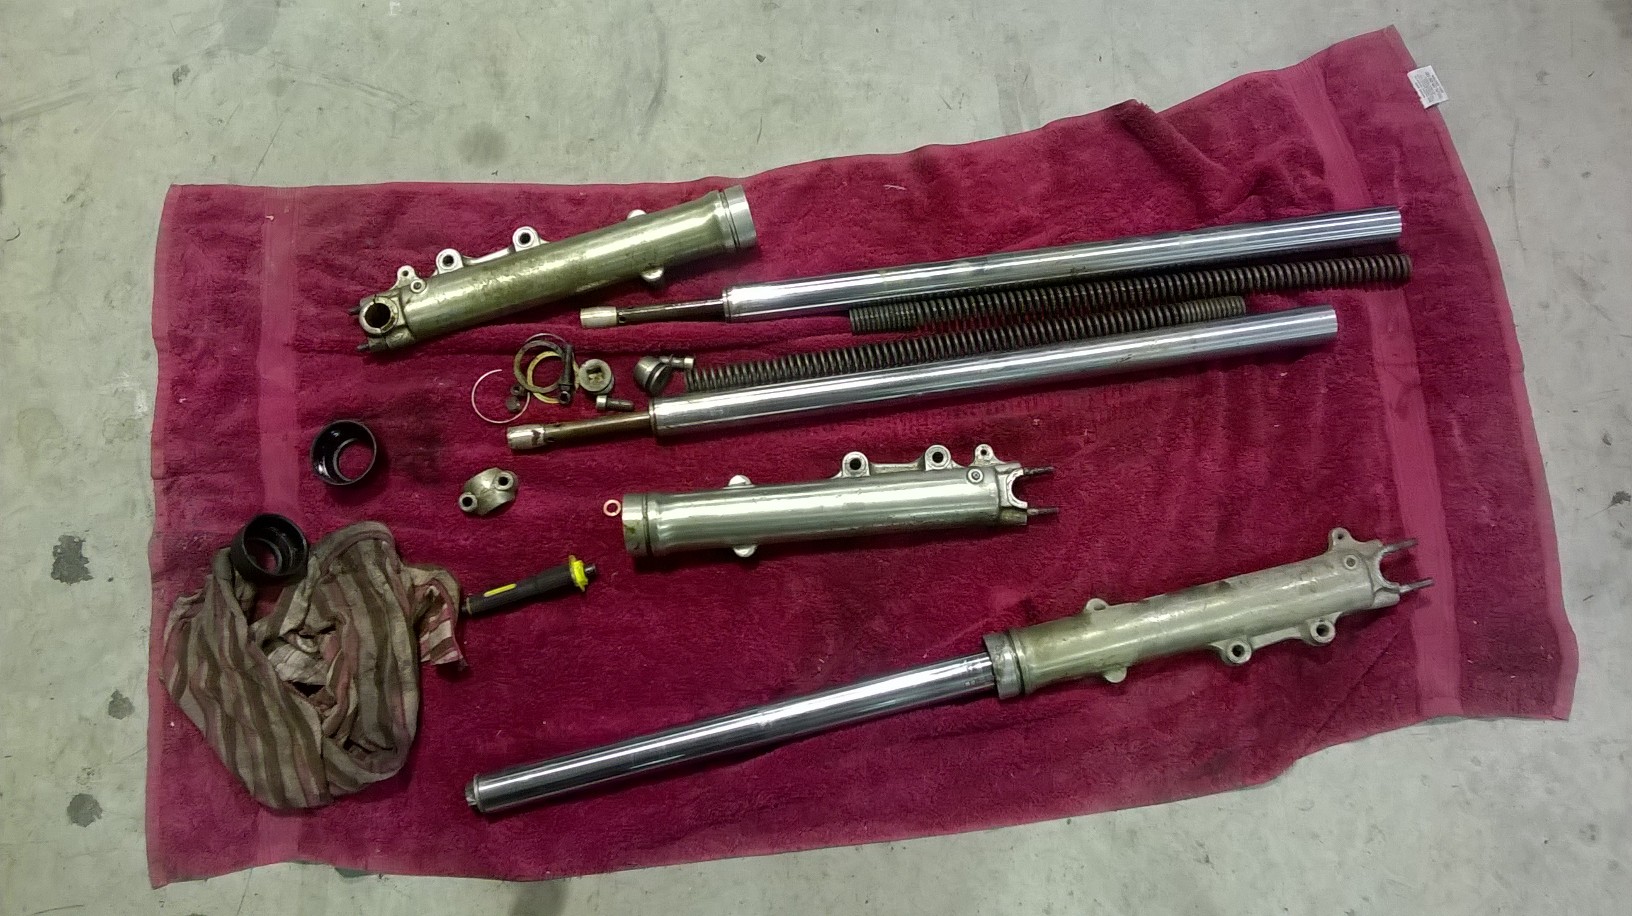
I also hooked into the random parts that are going to make up my front forks. The forks that came on the bike aren't correct for a Z1R but they did have good stanchions. In one of my many contra deals I scored a set of correct Z1R forks but with buggered stanchions. Fingers crossed I was hoping that I could mix and match the two sets and end up with a working set.
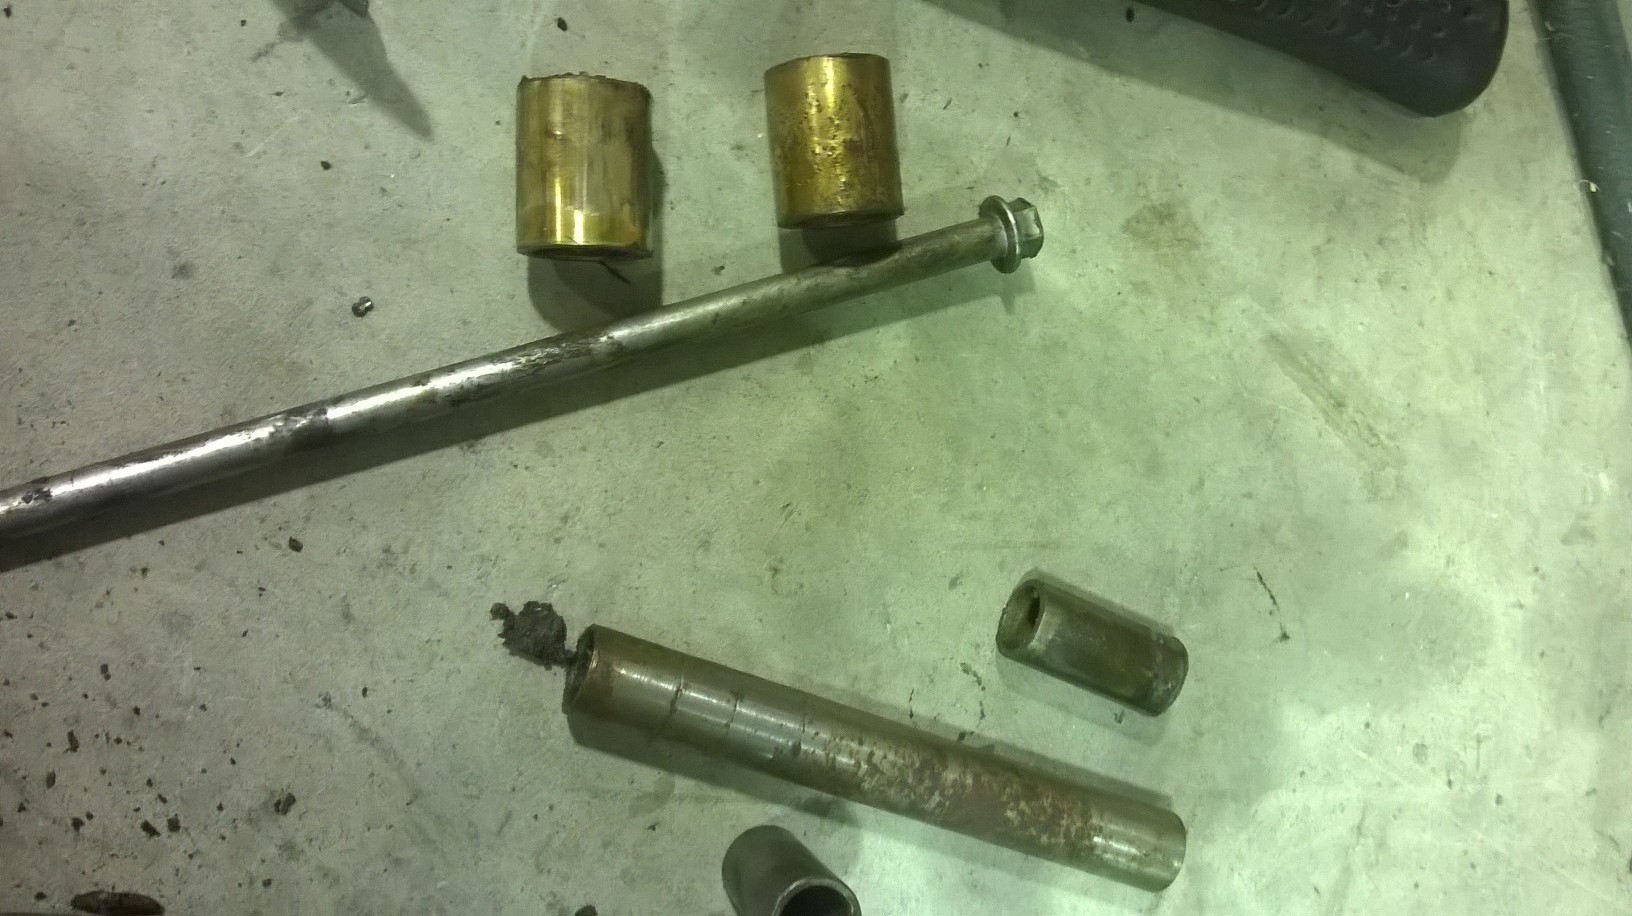
Some bugger had fully muntered the caps on the set of my rolling chasis!
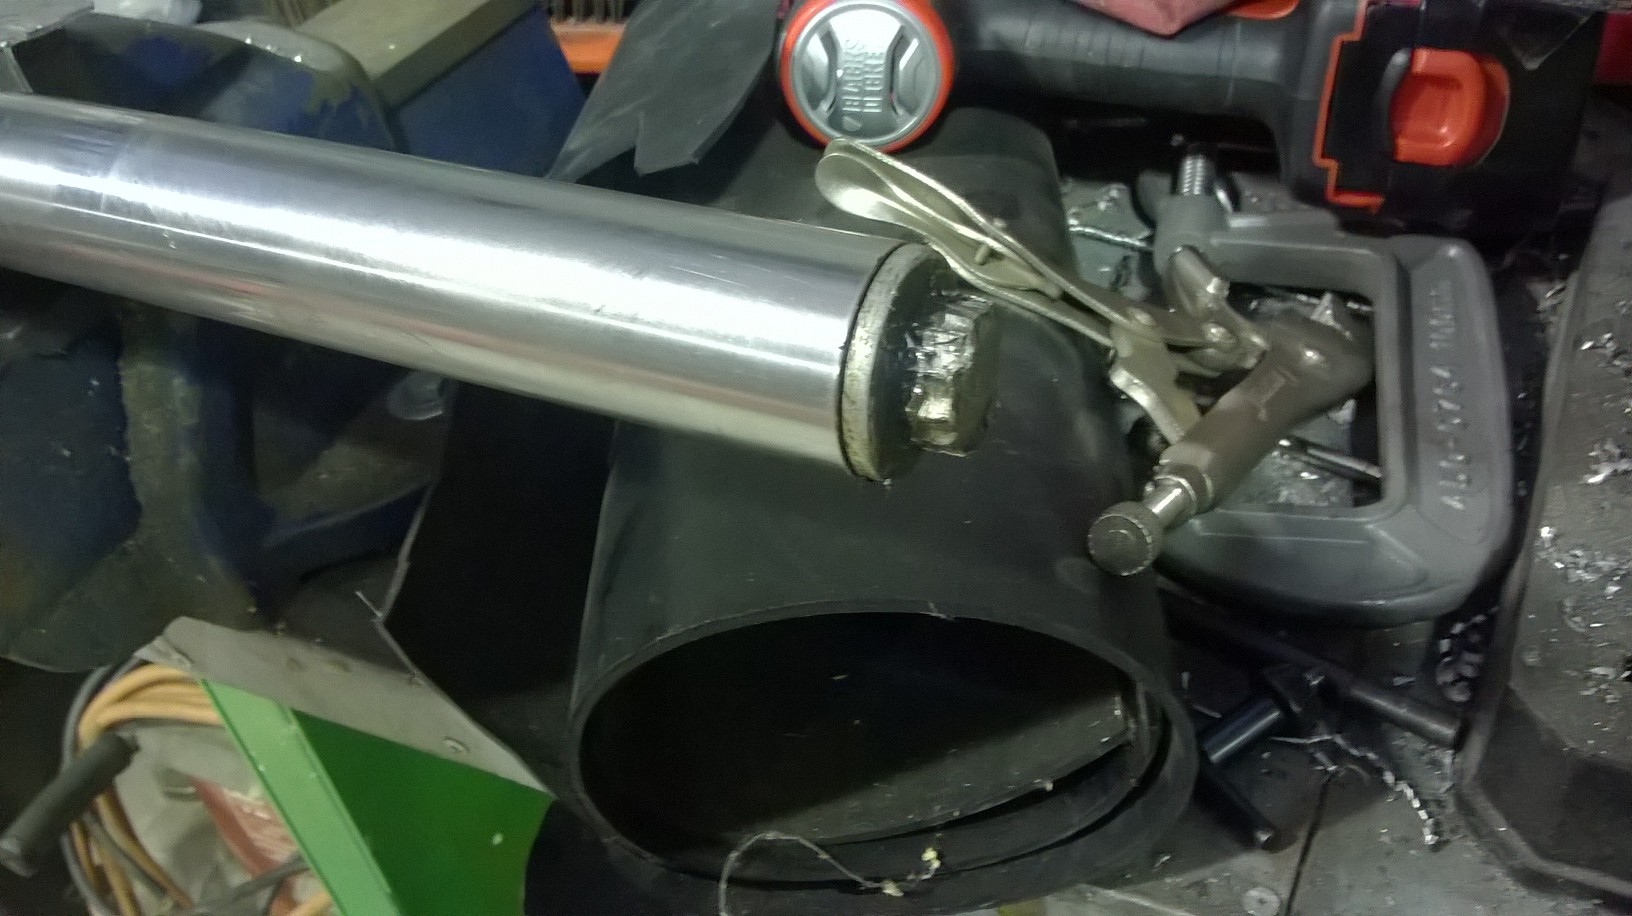
They also had the old cut off bit of pipe jammed down the top to compress the completely shagged fork springs to.
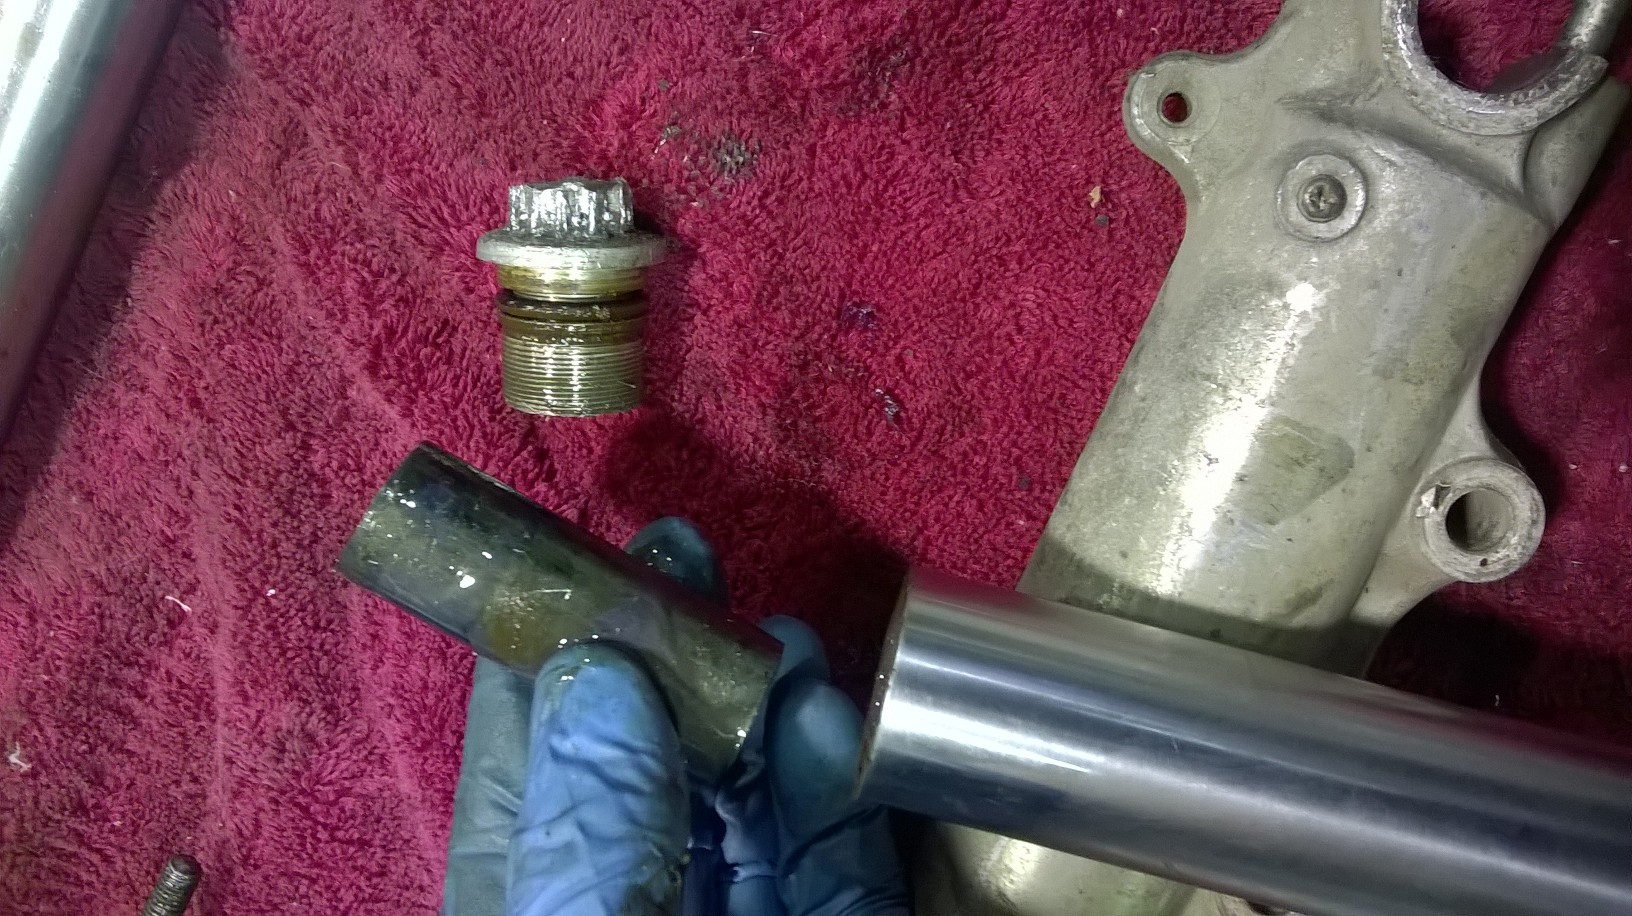
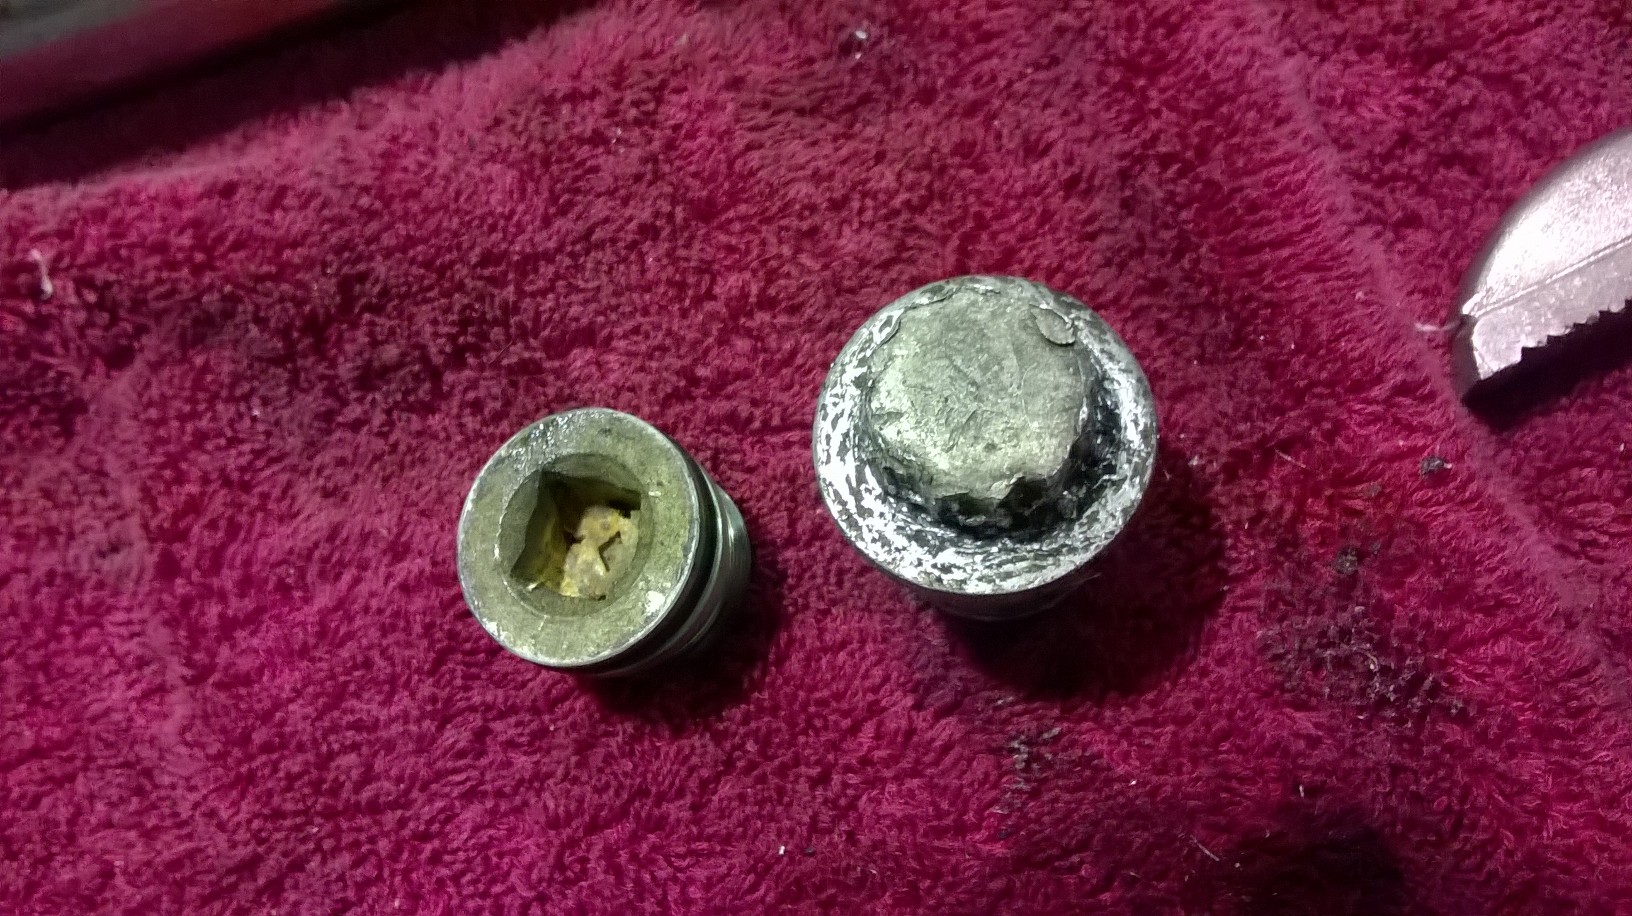
Cap on the left is correct for Z1R, one on the left is off and earlier (K)Zed.
I also hooked into the random parts that are going to make up my front forks. The forks that came on the bike aren't correct for a Z1R but they did have good stanchions. In one of my many contra deals I scored a set of correct Z1R forks but with buggered stanchions. Fingers crossed I was hoping that I could mix and match the two sets and end up with a working set.
Some bugger had fully muntered the caps on the set of my rolling chasis!
They also had the old cut off bit of pipe jammed down the top to compress the completely shagged fork springs to.
Cap on the left is correct for Z1R, one on the left is off and earlier (K)Zed.
Replied by SWEKZ on topic KZ750 L4 - café-/ brat project
20 Jun 2016 02:32
SWEKZ
Shaved off some of the fins and installed the engine
Swingarm, footrests and brake pedal installed
Sandblasted and sanded the parts that was left to paint, the lower fork legs and front fender I painted black followed by a 2k satin clear. Calipers were painted with a black glossy caliper paint.
Attachment resized_2016-05-0518.18.43.jpg not found
Swingarm, footrests and brake pedal installed
Attachment resized_2016-05-1119.35.09.jpg not found
Sandblasted and sanded the parts that was left to paint, the lower fork legs and front fender I painted black followed by a 2k satin clear. Calipers were painted with a black glossy caliper paint.
Attachment resized_2016-05-1518.53.11.jpg not found
Attachment resized_2016-06-0415.48.33.jpg not found
Replied by wrenchmonkey on topic KZombie
19 Jun 2016 21:58
Greetings fellow KZR's
It's still not too late to in this part of the country to wish y'all a Happy Father's Day!")
It was a great Dad's day at my house but I'll get to that in a minute.
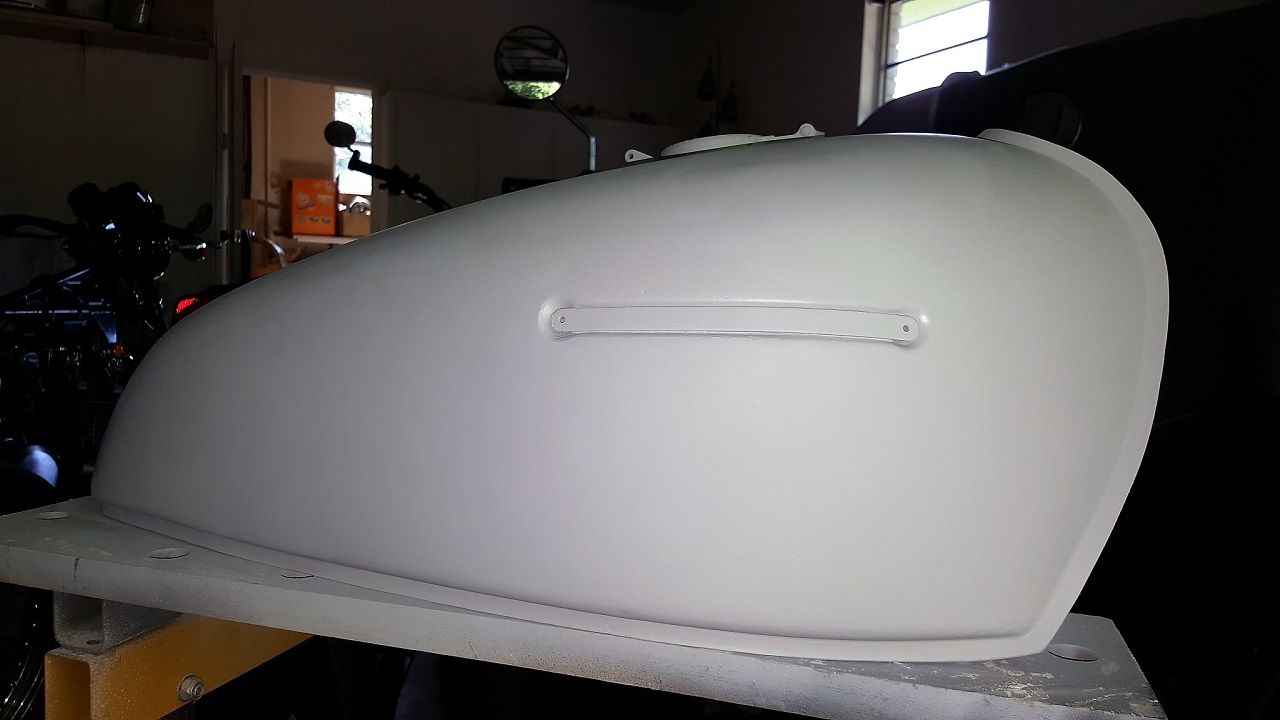
First the details and pics of the past week's efforts on KZombie which carried on with the tank's body work. I think I've mentioned previously my absolute love for block sanding haven't I? No? Well, I lied. I hate it. I hate it even more when it's near triple digits outside which is where I have to do all the block sanding. Still I persisted and finally got to what looked acceptable and ready for priming and paint:
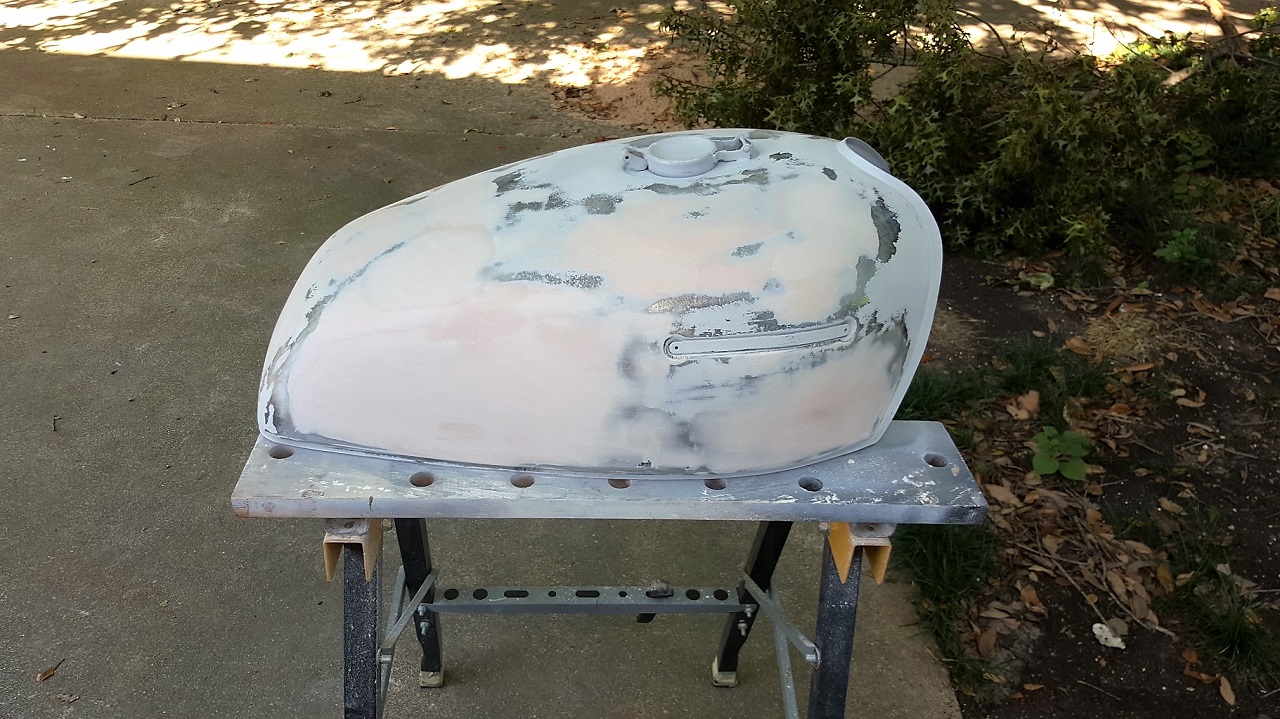
That picture there represents about five evenings of body working and block sanding on that tank. Geez, I hope it's worth it all in the end! By late week I was able to get the tank into primer and ready for color:
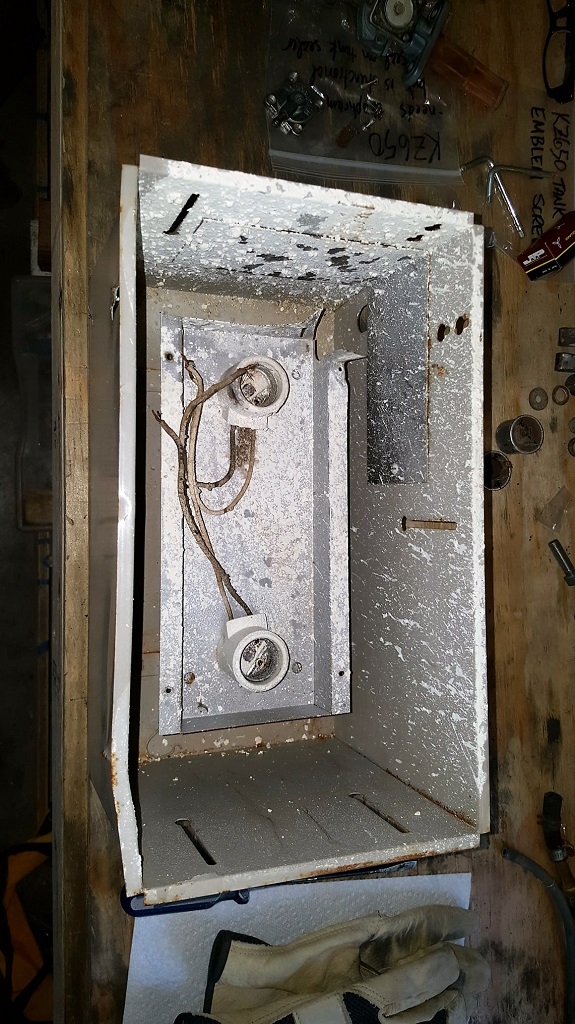
So now, the tank had caught up with all the other panels - sides and duck tail and lucky me, a new seat kit and something special I ordered with it showed up on my front steps and you'll get to see some of this a bit later, however, I had stripped the old seat down early in the week to discover it had a lot of rust termites and new I was going to have to resolve the pan. While at work on Friday, I happened to notice this 1950's era double bulb, ceiling heat lamp assembly that was tossed in the trash. I picked up the fixture and realized it was made of some stout metal about the same thickness as my seat pan so I chunked it in the back of the truck for later consideration. I got home that evening and immediately set it on my bench:
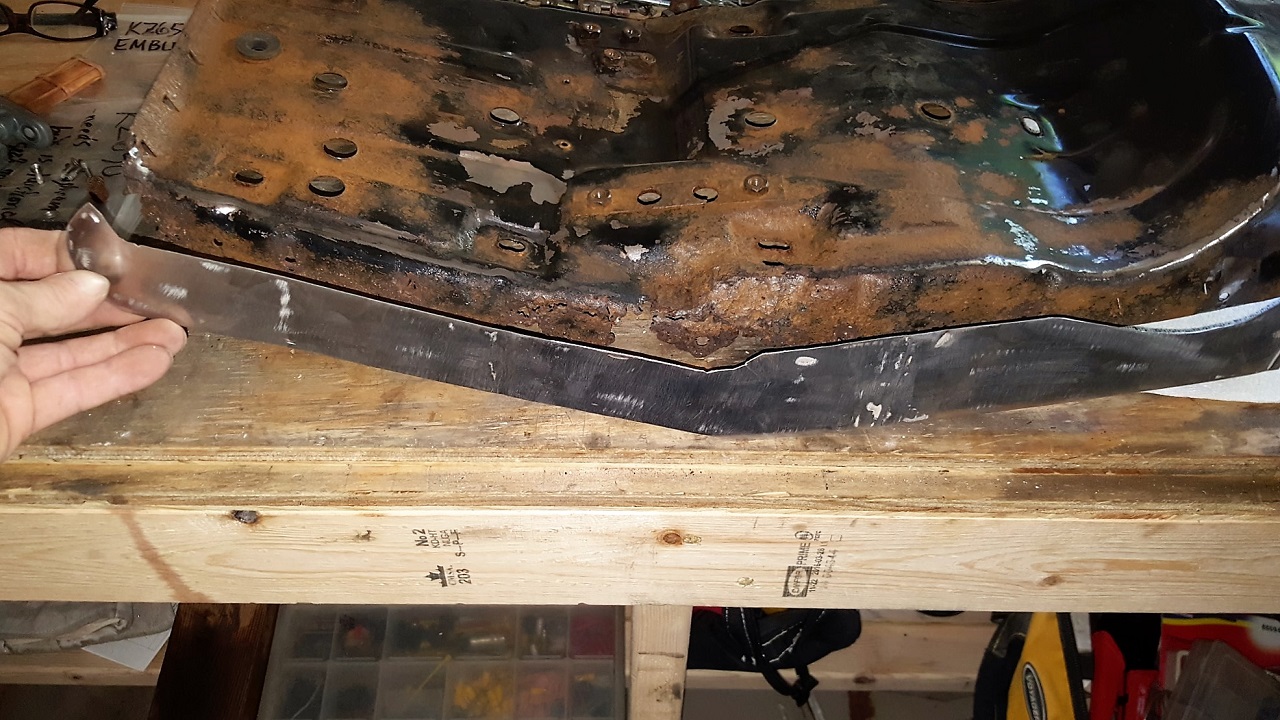
Definitely not pretty but that's okay, it only needs to be strong and I cut it up with my angle grinder removing all the tabs and flattening it out into sheet stock, then slid my seat pan on edge along it and traced the good side of the pan onto it:
Good fit!
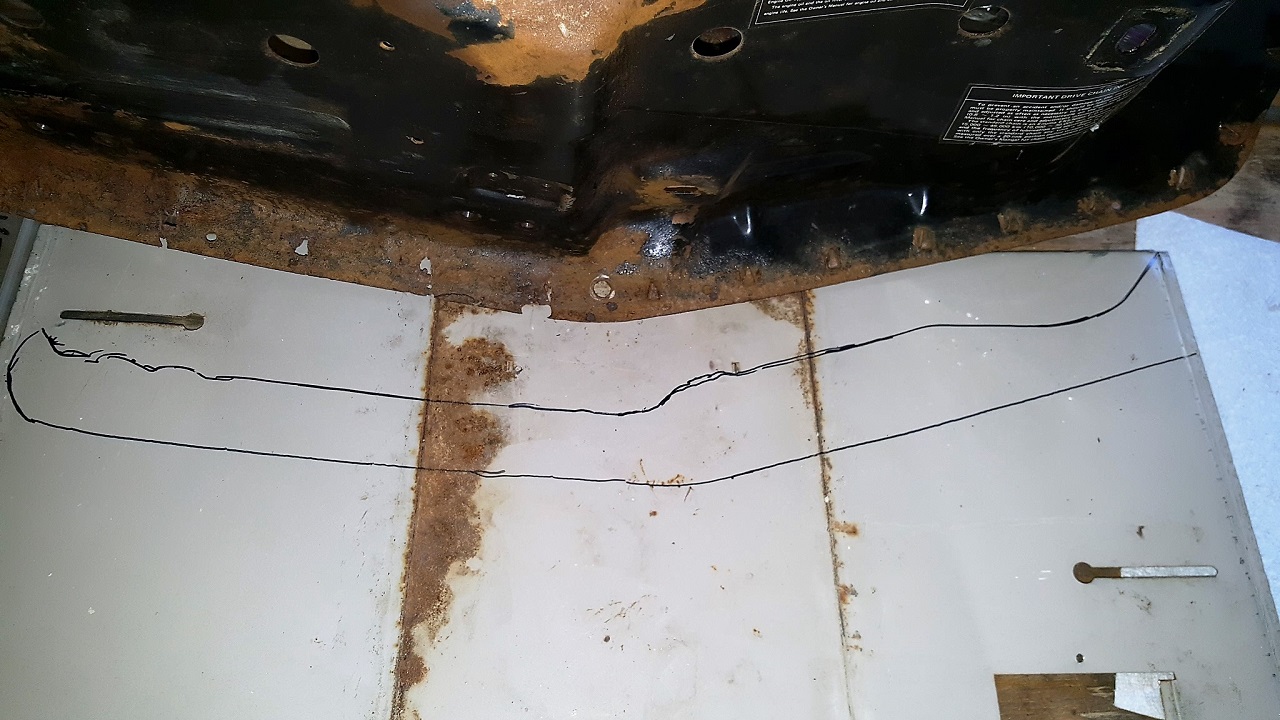
It took me about 30 minutes to cut out the shape I traced and transfer it to the rusted-out side of the seat pan:
You can see how rusted-out the pan is along the mid-lower section but the reality is the entire side was weakened and needed work which is why the patch panel I cut from the old ceiling lamp is so long. Well, I didn't have my MIG welder setup yet so that was it for the night.
Saturday morning I rushed into the garage to prepare for painting the panels and tank and a little something else that needed some quick, minor attention. The idea was to get the painting all done before noon when the heat would be too much. And so it went. Smoothly even! By noon I had all the panels painted and clear coated. Here's some pics of the first stage before clear was applied:
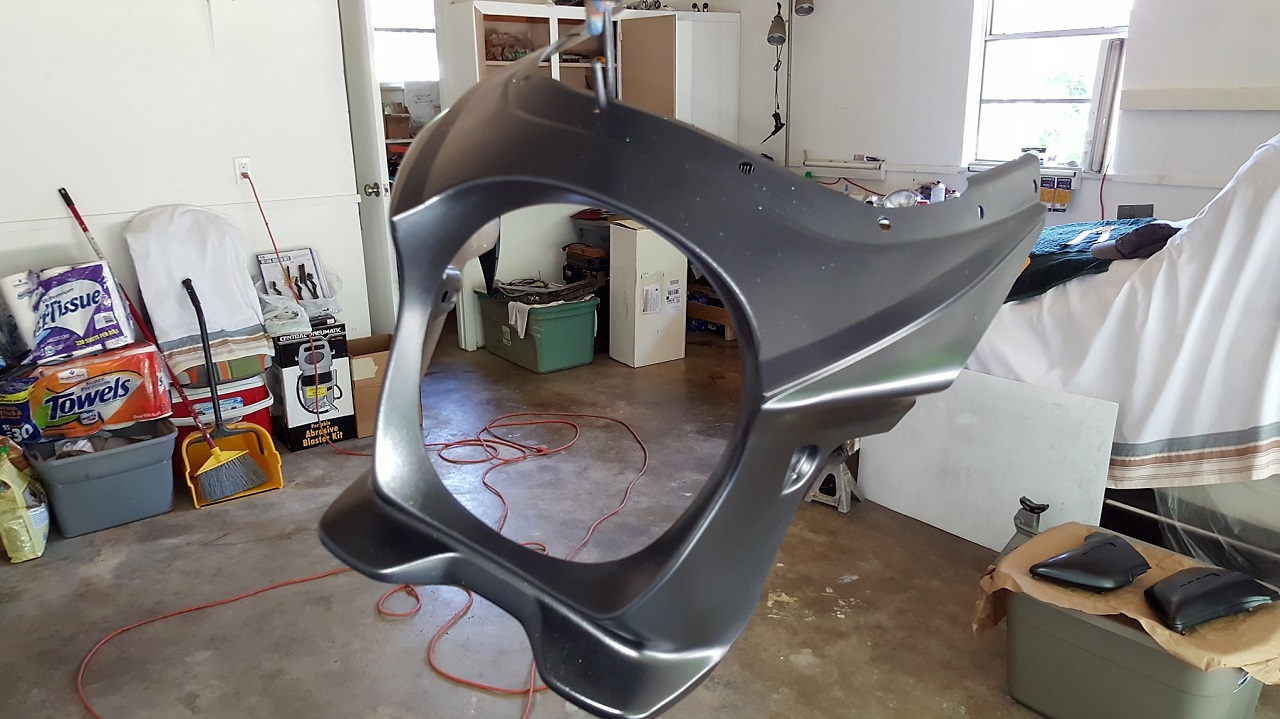
Ooooh! What's this? This ain't stock?
I've always liked the look of the speedy, smaller fairings and saw this one when I was buying my seat kit online and took the chance on it mainly because it looked different from most yet still small and worked with the stock 7" headlamp.
In the bottom right you can see the two side covers and through the headlamp hole is a tall box that contains my new seat kit")
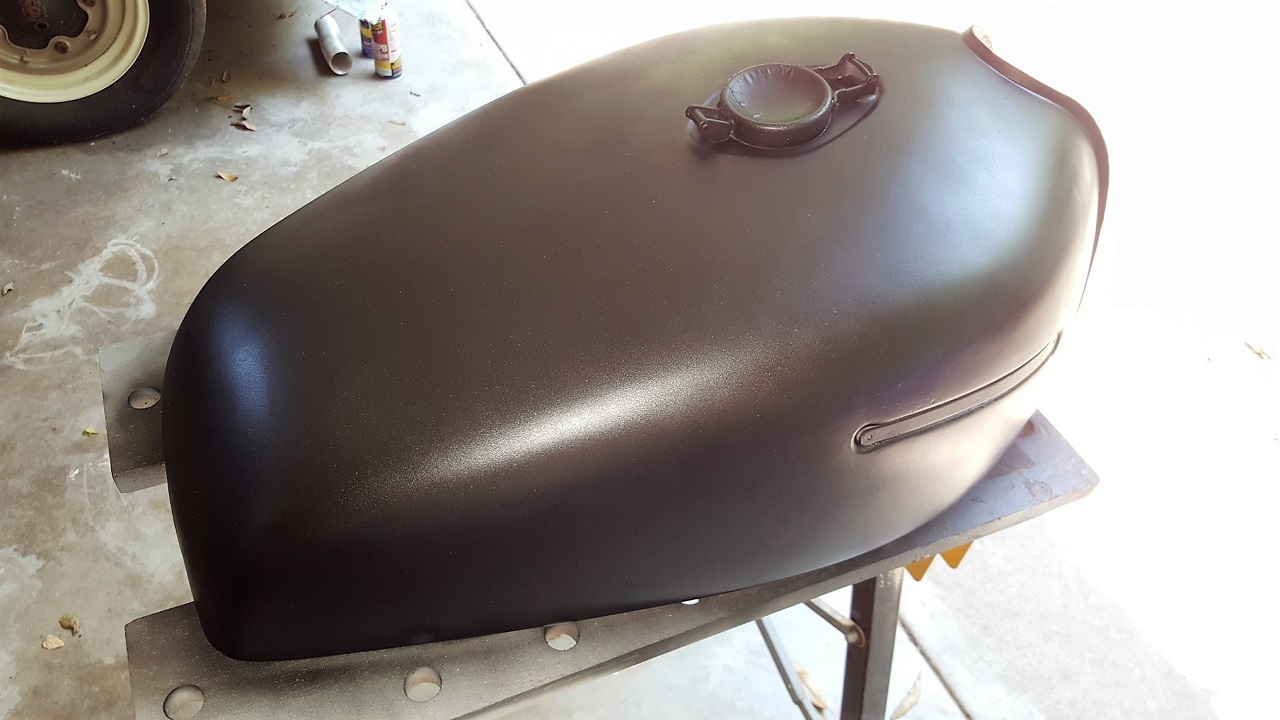
Here's the tank. Not bad. It came out pretty straight if I do say so myself. But what's up with that blue metallic? Yeah, about that. When I test fit the new fairing the evening before, I had a change of heart on the color. The metallic blue is beautiful and pretty close to the stock color KZombie was born with but adding the fairing worried me it might be too much. I checked my paint supply and I had 2 cans of the metallic blue and 3 cans of the black pearl metallic. Hmmm? Do I chance it?
Nah!
I shot everything in the black pearl metallic because I knew I would have enough vs the blue which I just might not. In the end, I used every ounce of the black paint so it was a good decision or I wouldn't have been able to complete all the painting. I guess, I'll save the metallic blue for the 1000 CSR project.
While the skins were all drying I went back to the seat pan and began tacking the new metal onto the eroded side. I kinda' felt like a caveman bashing rocks again in my garage because I didn't have any of my dollies or body hammers. Just a small ball peen and a big hammer used for pipe work but it served pretty good as a dollie and the old MIG welder worked great too. Here's the pan after an hour of welding and metal bashing:
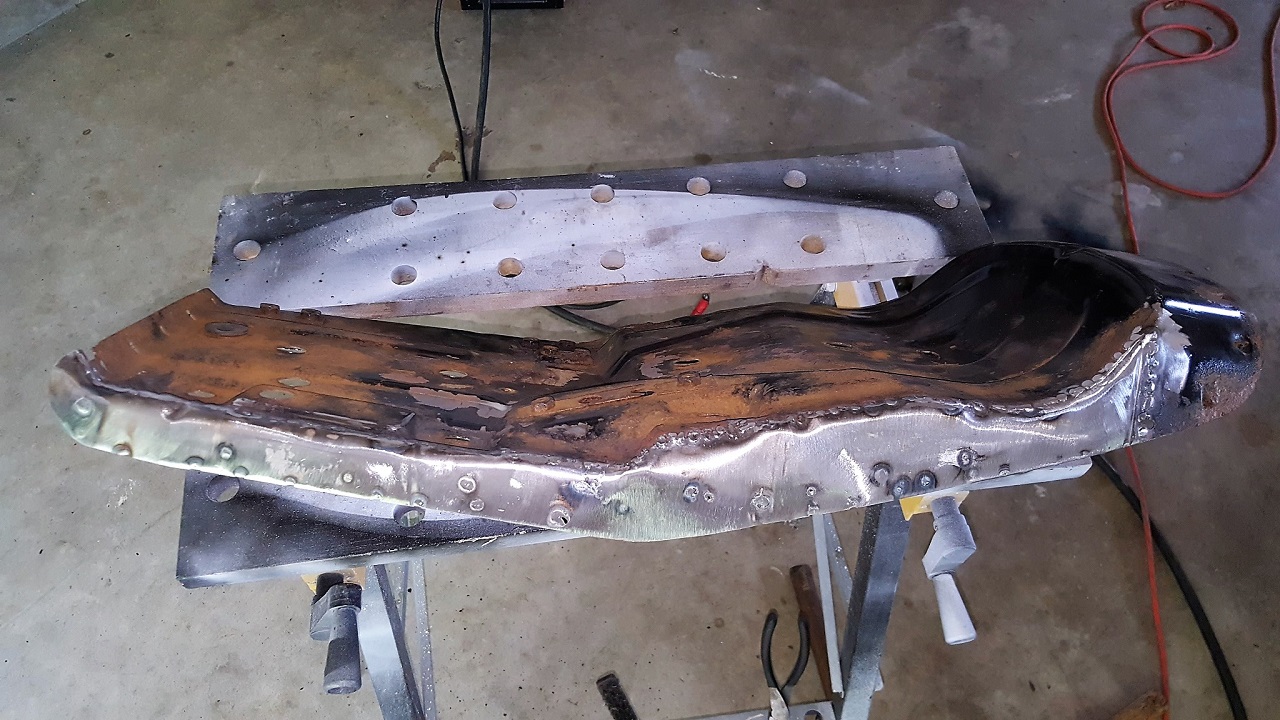
I did discover that my seat pan's metal cleats or triangle points or whatever the heck they're called were pretty gnarly and not up for re-upholstery. Problem is I didn't have any tooling to punch metal cleanly to make new, sharp points so I basically had to stop at this point. Just flap disc'd and wire wheeled the surface rusty areas and shot it with some black paint for now. I've been given some good pointers by the gents here in another thread on how to make my own tack strips so that'll be on the workbench soon and with luck I can finally get my new seat kit installed.
Today. Father's Day. I slept in and not even my dodgie dog stirred to wake me with the sunrise. Nice!
Came downstairs late and made a coffee and sat outside on the back patio with the darling wife. She asked me if I wouldn't mind going shopping with her this morning? She said she needed to pickup some fabric to make the granddaughters some dresses but also had to stop by HFT for some saw blades for another project and maybe I might need something there? I agreed. I keep forgetting to get a grease gun and grease the swing arm and I wanted a few other odd ball bits. Then she has me unload the back of the car. :huh: Why? I say, fabric and a few bits I need will fit just fine in the back. Just leave it all the other junk in there. But noooo, I hadda clean out all the boxes and stuff and put it inside at her insistence. Whatever. Women. I'm in a good mood and not looking to rock any boats so I oblige and we're off. Turns out, her reasoning for emptying the back of the car was because she knew there was a sale on a rolling tool box at HFT. Nice, big, 5" wheels that don't stutter over every little bit of dirt. Lots of shelves, locking and has the top cover closed at almost the exact height I was going to build my rolling work bench at. Hmmmm? Sweet! Thanks hun!
So, I guess having kept my reluctance to empty the car to myself was a good thing. Scored a Father's Day gift which I've already assembled and put to good use in the garage!
The rest of the day, I worked on assembling more of KZombie. The new grease gun saw the swing arm greased up nicely. I bought some rubber caps for the grease fitting and the brake calipers. I picked up some dual element bulb holders to finally make my front turn signals both running lights and turn signals and rewired them into place and then slapped some of the new panels on too. The sides are just temporary, as is the gas tank which is waiting for the petcock rebuild parts. I have the new fuel line and vacuum hose too.
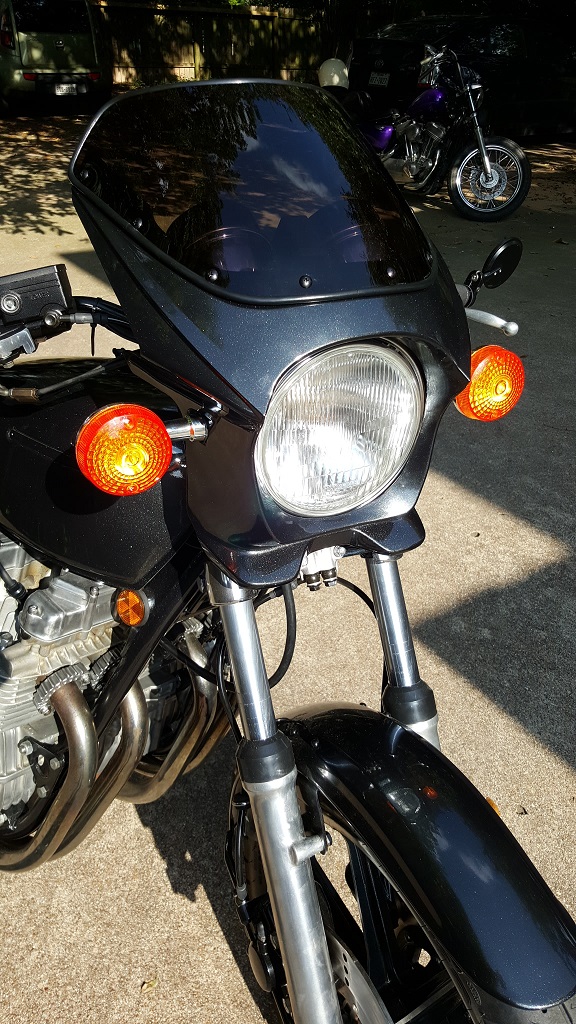
The new fairing worked out great although I must say it is a tough installation that required extra hands ala my darling better half to hold things while I fished wires from the front turn signals through it, the fork ears, the headlamp bucket etc..
Yeah, yeah.Shut up and show us the pics already.
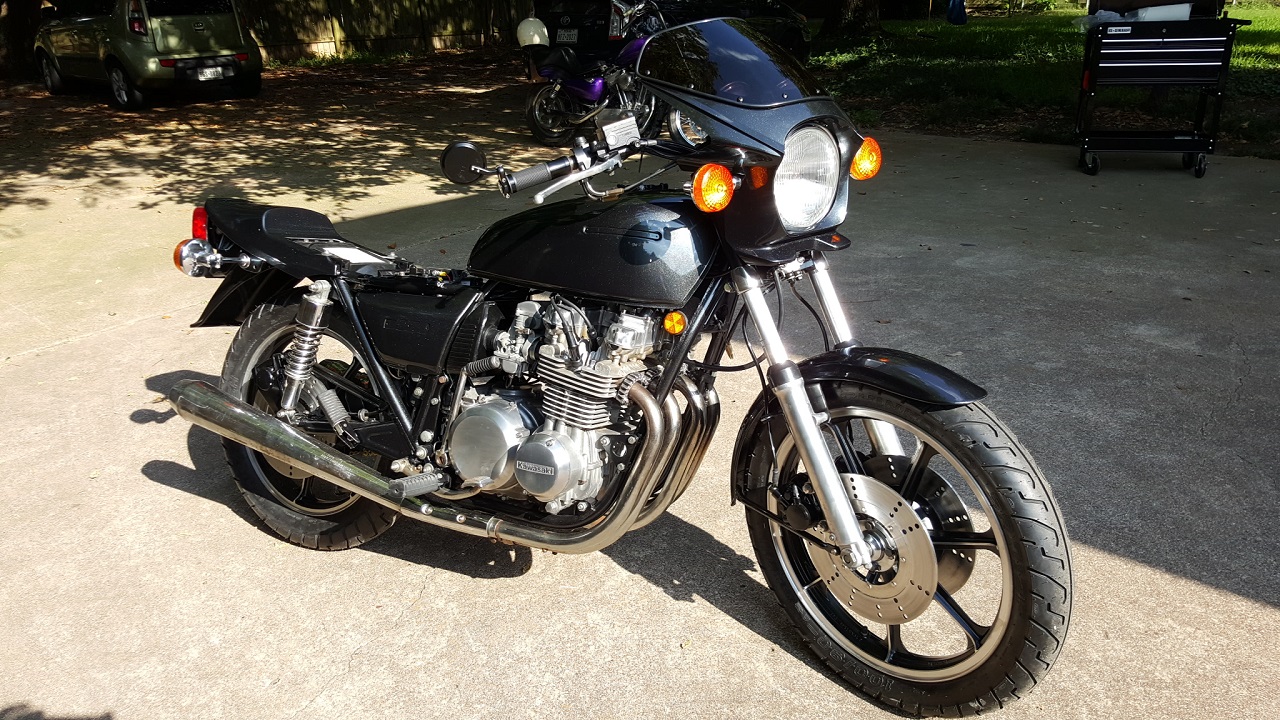
The new fairing installed and functional (although I need to fab a small bracket for the bottom):
Side view, mocked-up with no seat but notice that cool, rolling tool chest in the background? :laugh:
Of course it was only moments later when I went to roll the bike into the garage that I discovered my handlebars were slightly too low and instantly I dinged the throttle cable into the tank. Doh! :pinch:
So the first ceremonious dent has already been achieved in my nearly flawless-straight tank. Sigh.
i also picked up some fine tipped artist's paint brushes today so I can apply a small bit of gold paint to the side cover emblems. I'm not sure if I'm going to do any pin striping or not now. I can't seem to come to terms with a color that goes with black pearl metallic which sorta has every color in it due to the pearlized elements. We'll see.
It's still not too late to in this part of the country to wish y'all a Happy Father's Day!
It was a great Dad's day at my house but I'll get to that in a minute.
First the details and pics of the past week's efforts on KZombie which carried on with the tank's body work. I think I've mentioned previously my absolute love for block sanding haven't I?
No? Well, I lied. I hate it. I hate it even more when it's near triple digits outside which is where I have to do all the block sanding. Still I persisted and finally got to what looked acceptable and ready for priming and paint:That picture there represents about five evenings of body working and block sanding on that tank. Geez, I hope it's worth it all in the end! By late week I was able to get the tank into primer and ready for color:
So now, the tank had caught up with all the other panels - sides and duck tail and lucky me, a new seat kit and something special I ordered with it showed up on my front steps and you'll get to see some of this a bit later, however, I had stripped the old seat down early in the week to discover it had a lot of rust termites and new I was going to have to resolve the pan. While at work on Friday, I happened to notice this 1950's era double bulb, ceiling heat lamp assembly that was tossed in the trash. I picked up the fixture and realized it was made of some stout metal about the same thickness as my seat pan so I chunked it in the back of the truck for later consideration. I got home that evening and immediately set it on my bench:
Definitely not pretty but that's okay, it only needs to be strong and I cut it up with my angle grinder removing all the tabs and flattening it out into sheet stock, then slid my seat pan on edge along it and traced the good side of the pan onto it:
Good fit!
It took me about 30 minutes to cut out the shape I traced and transfer it to the rusted-out side of the seat pan:
You can see how rusted-out the pan is along the mid-lower section but the reality is the entire side was weakened and needed work which is why the patch panel I cut from the old ceiling lamp is so long. Well, I didn't have my MIG welder setup yet so that was it for the night.
Saturday morning I rushed into the garage to prepare for painting the panels and tank and a little something else that needed some quick, minor attention. The idea was to get the painting all done before noon when the heat would be too much. And so it went. Smoothly even! By noon I had all the panels painted and clear coated. Here's some pics of the first stage before clear was applied:
Ooooh! What's this? This ain't stock?
I've always liked the look of the speedy, smaller fairings and saw this one when I was buying my seat kit online and took the chance on it mainly because it looked different from most yet still small and worked with the stock 7" headlamp.
In the bottom right you can see the two side covers and through the headlamp hole is a tall box that contains my new seat kit
Here's the tank. Not bad. It came out pretty straight if I do say so myself. But what's up with that blue metallic? Yeah, about that. When I test fit the new fairing the evening before, I had a change of heart on the color. The metallic blue is beautiful and pretty close to the stock color KZombie was born with but adding the fairing worried me it might be too much. I checked my paint supply and I had 2 cans of the metallic blue and 3 cans of the black pearl metallic. Hmmm? Do I chance it?
Nah!
I shot everything in the black pearl metallic because I knew I would have enough vs the blue which I just might not. In the end, I used every ounce of the black paint so it was a good decision or I wouldn't have been able to complete all the painting. I guess, I'll save the metallic blue for the 1000 CSR project.
While the skins were all drying I went back to the seat pan and began tacking the new metal onto the eroded side. I kinda' felt like a caveman bashing rocks again in my garage because I didn't have any of my dollies or body hammers. Just a small ball peen and a big hammer used for pipe work but it served pretty good as a dollie and the old MIG welder worked great too. Here's the pan after an hour of welding and metal bashing:
I did discover that my seat pan's metal cleats or triangle points or whatever the heck they're called were pretty gnarly and not up for re-upholstery. Problem is I didn't have any tooling to punch metal cleanly to make new, sharp points so I basically had to stop at this point. Just flap disc'd and wire wheeled the surface rusty areas and shot it with some black paint for now. I've been given some good pointers by the gents here in another thread on how to make my own tack strips so that'll be on the workbench soon and with luck I can finally get my new seat kit installed.
Today. Father's Day. I slept in and not even my dodgie dog stirred to wake me with the sunrise. Nice!
Came downstairs late and made a coffee and sat outside on the back patio with the darling wife. She asked me if I wouldn't mind going shopping with her this morning? She said she needed to pickup some fabric to make the granddaughters some dresses but also had to stop by HFT for some saw blades for another project and maybe I might need something there? I agreed. I keep forgetting to get a grease gun and grease the swing arm and I wanted a few other odd ball bits. Then she has me unload the back of the car. :huh: Why? I say, fabric and a few bits I need will fit just fine in the back. Just leave it all the other junk in there. But noooo, I hadda clean out all the boxes and stuff and put it inside at her insistence. Whatever. Women. I'm in a good mood and not looking to rock any boats so I oblige and we're off. Turns out, her reasoning for emptying the back of the car was because she knew there was a sale on a rolling tool box at HFT. Nice, big, 5" wheels that don't stutter over every little bit of dirt. Lots of shelves, locking and has the top cover closed at almost the exact height I was going to build my rolling work bench at. Hmmmm? Sweet! Thanks hun!
So, I guess having kept my reluctance to empty the car to myself was a good thing. Scored a Father's Day gift which I've already assembled and put to good use in the garage!
The rest of the day, I worked on assembling more of KZombie. The new grease gun saw the swing arm greased up nicely. I bought some rubber caps for the grease fitting and the brake calipers. I picked up some dual element bulb holders to finally make my front turn signals both running lights and turn signals and rewired them into place and then slapped some of the new panels on too. The sides are just temporary, as is the gas tank which is waiting for the petcock rebuild parts. I have the new fuel line and vacuum hose too.
The new fairing worked out great although I must say it is a tough installation that required extra hands ala my darling better half to hold things while I fished wires from the front turn signals through it, the fork ears, the headlamp bucket etc..
Yeah, yeah.Shut up and show us the pics already.
The new fairing installed and functional (although I need to fab a small bracket for the bottom):
Side view, mocked-up with no seat but notice that cool, rolling tool chest in the background? :laugh:
Of course it was only moments later when I went to roll the bike into the garage that I discovered my handlebars were slightly too low and instantly I dinged the throttle cable into the tank. Doh! :pinch:
So the first ceremonious dent has already been achieved in my nearly flawless-straight tank. Sigh.
i also picked up some fine tipped artist's paint brushes today so I can apply a small bit of gold paint to the side cover emblems. I'm not sure if I'm going to do any pin striping or not now. I can't seem to come to terms with a color that goes with black pearl metallic which sorta has every color in it due to the pearlized elements. We'll see.
Displaying 991 - 1000 out of 7257 results.