
Search Results (Searched for: gs swing arm)
So I have finally found the time to assemble my bottom end now that my connecting rod bearings showed up. So that means I finally got to fully assemble the 6-speed transmission and seal the cases so its time to document what I did.
First what I needed for the swap:
1. zr/kz/gpz550 6-speed transmission. (They all have the same gear ratios. I had two ’84 gpz550 transmissions in my basement so that is the only reason I used that particular model. The zr550 has a 10mm longer output shaft in case you have a really wide rear tire.)
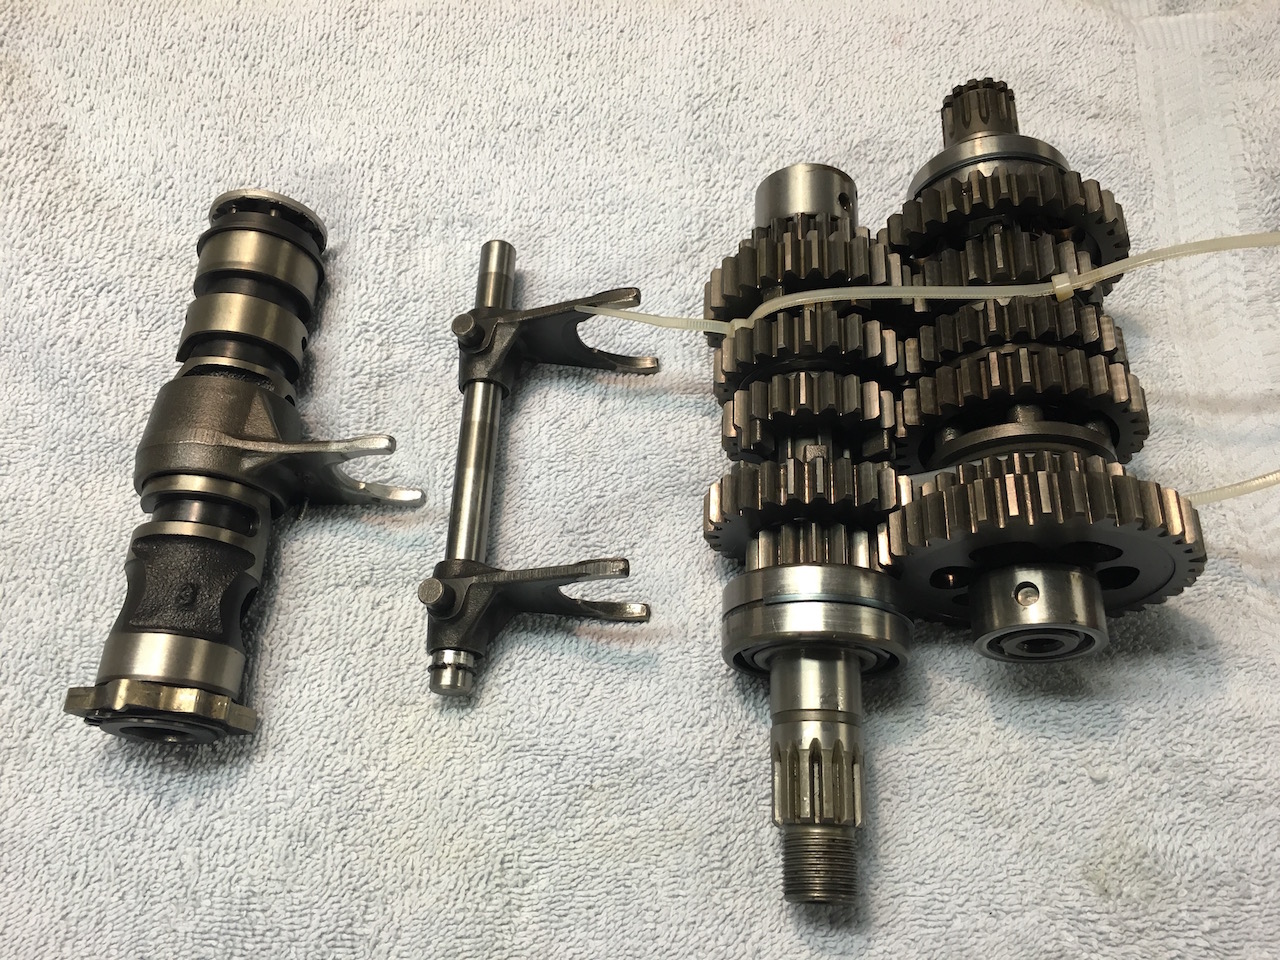
2. Shift drum and selector forks and rod from corresponding 6-speed transmission.
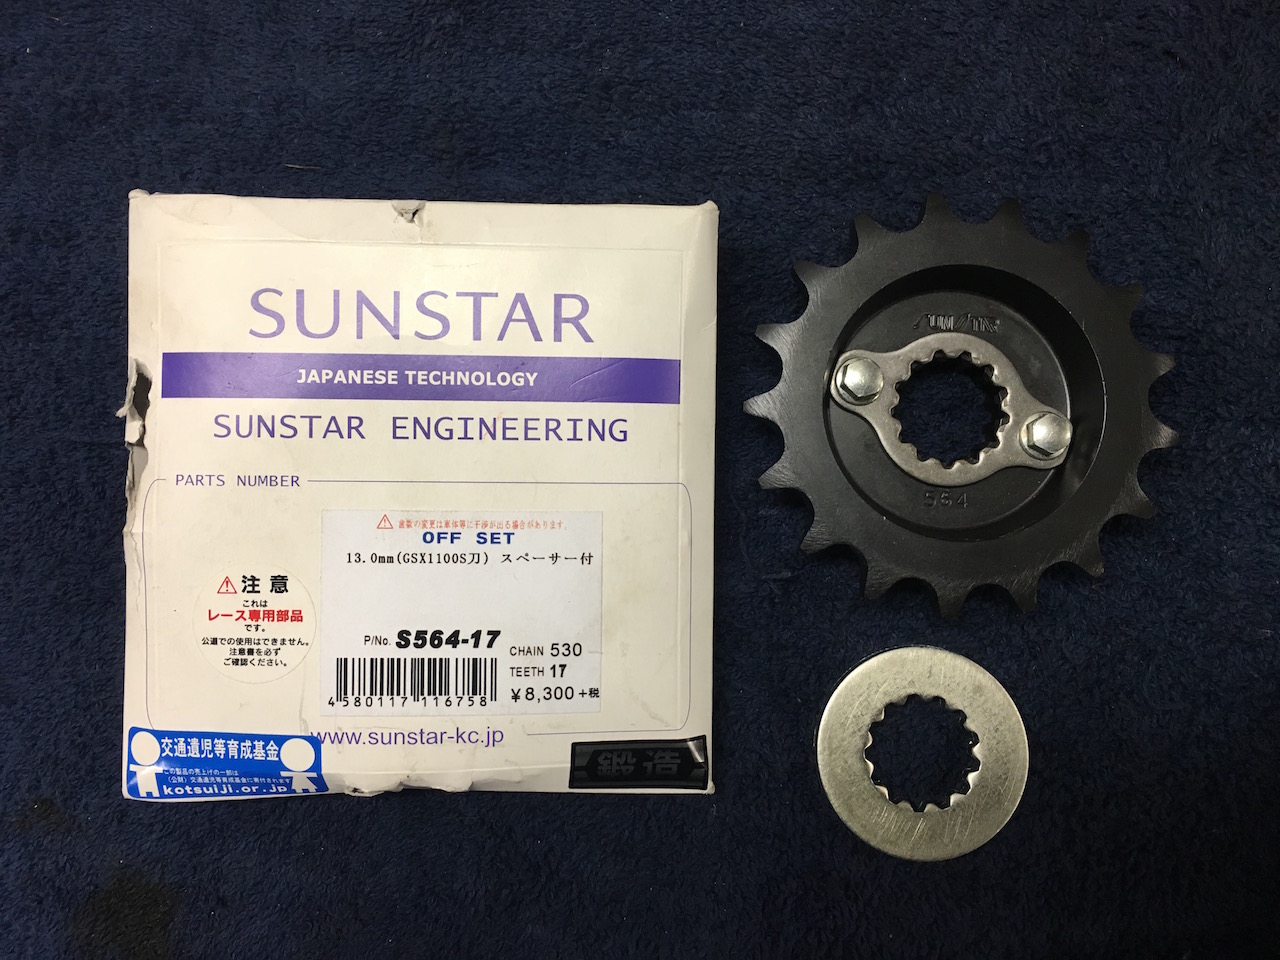
3. 550 style sprocket and splined retaining ring and bolts. ( I used a 530 17-Tooth 13mm offset sprocket. I have a non stock swingarm and rear wheel that required the offset sprocket)
What I also needed but can be reused from the 750:
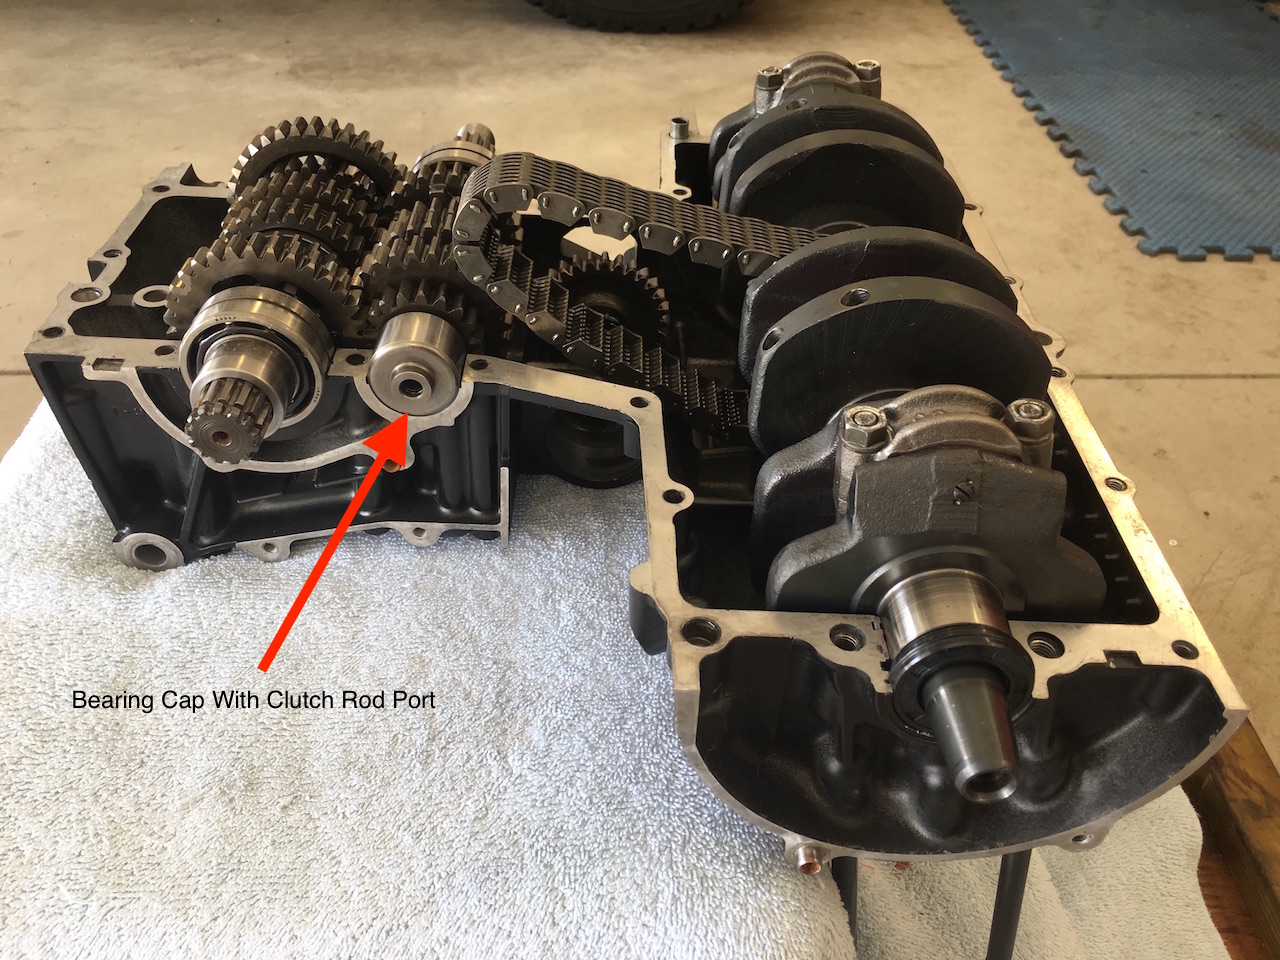
1. Transmission bearing cap with clutch pushrod port. ( The gpz transmission I used is not a pushrod clutch, so the bearing cap was the wrong style. If you are doing this on a later model 750 with the lever type clutch release mechanism, then this not needed.)
2. Gear selector linkage.
3. Transmission cover.
4. Clutch assembly
5. Neutral spring and plunger
6. Shift drum alignment bolt
The transmission is simply installed in place just like the 750 transmission, only making sure that you have the correct style bearing cap installed for your particular clutch release type.
The 550 shift drum installs in exactly the same way as the original, BUT TAKE NOTE OF THE ORIENTATION OF THE SHIFT FORKS! The 550 shift forks install facing different directions from the 750 ones, so get a 550 manual to make sure you are installing the forks properly!!
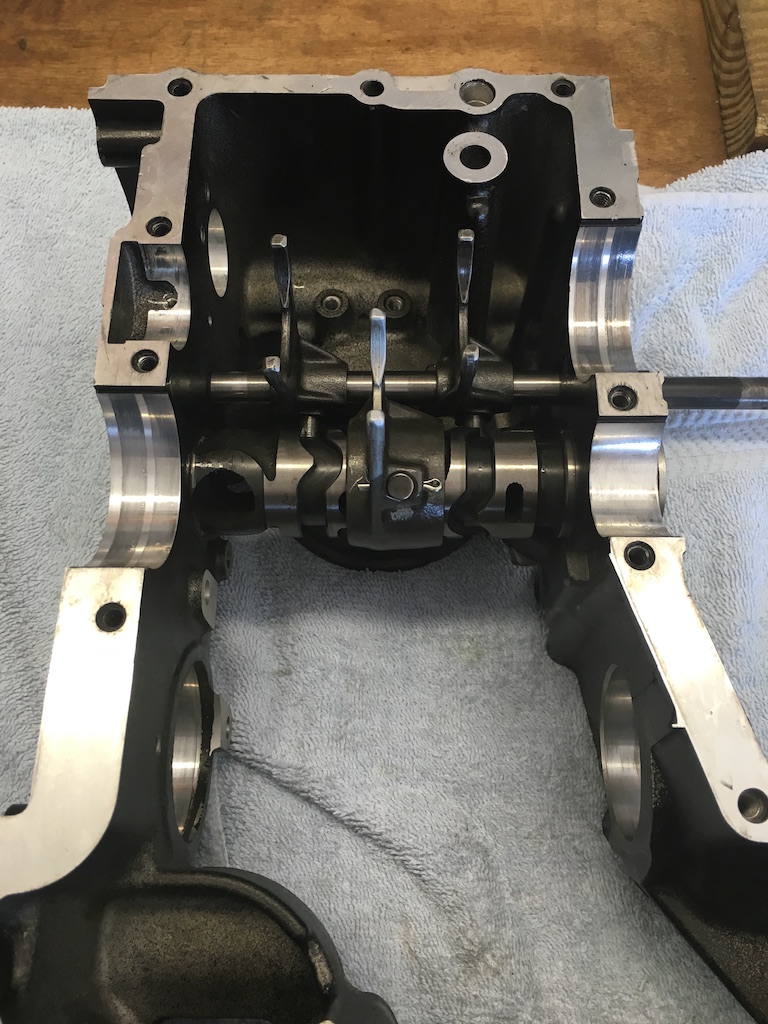
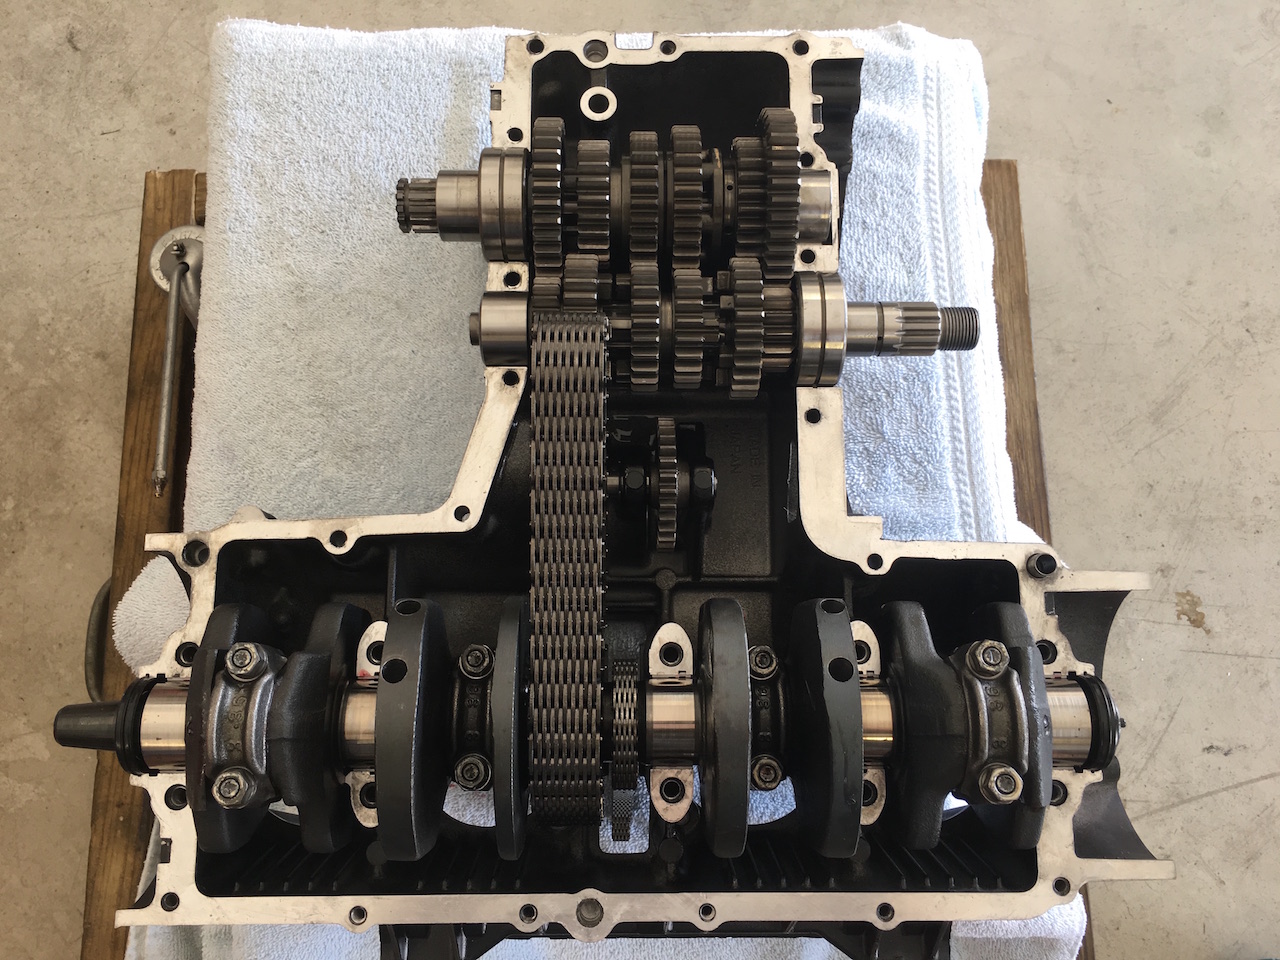
Assemble the upper and lower case halves (making sure the shift drum is in the neutral position) and make sure that the transmission spins freely. There are shims that can be swapped out on the input shaft in the event that the transmission binds when the case is bolted together. The directions for this are in the service manual.
I luckily had no issues.
Install the gear shift mechanism to the shift drum. I then spun the input shaft with a cordless drill so I could get past the neutral lock out and made sure I could select all six gears before going any further.
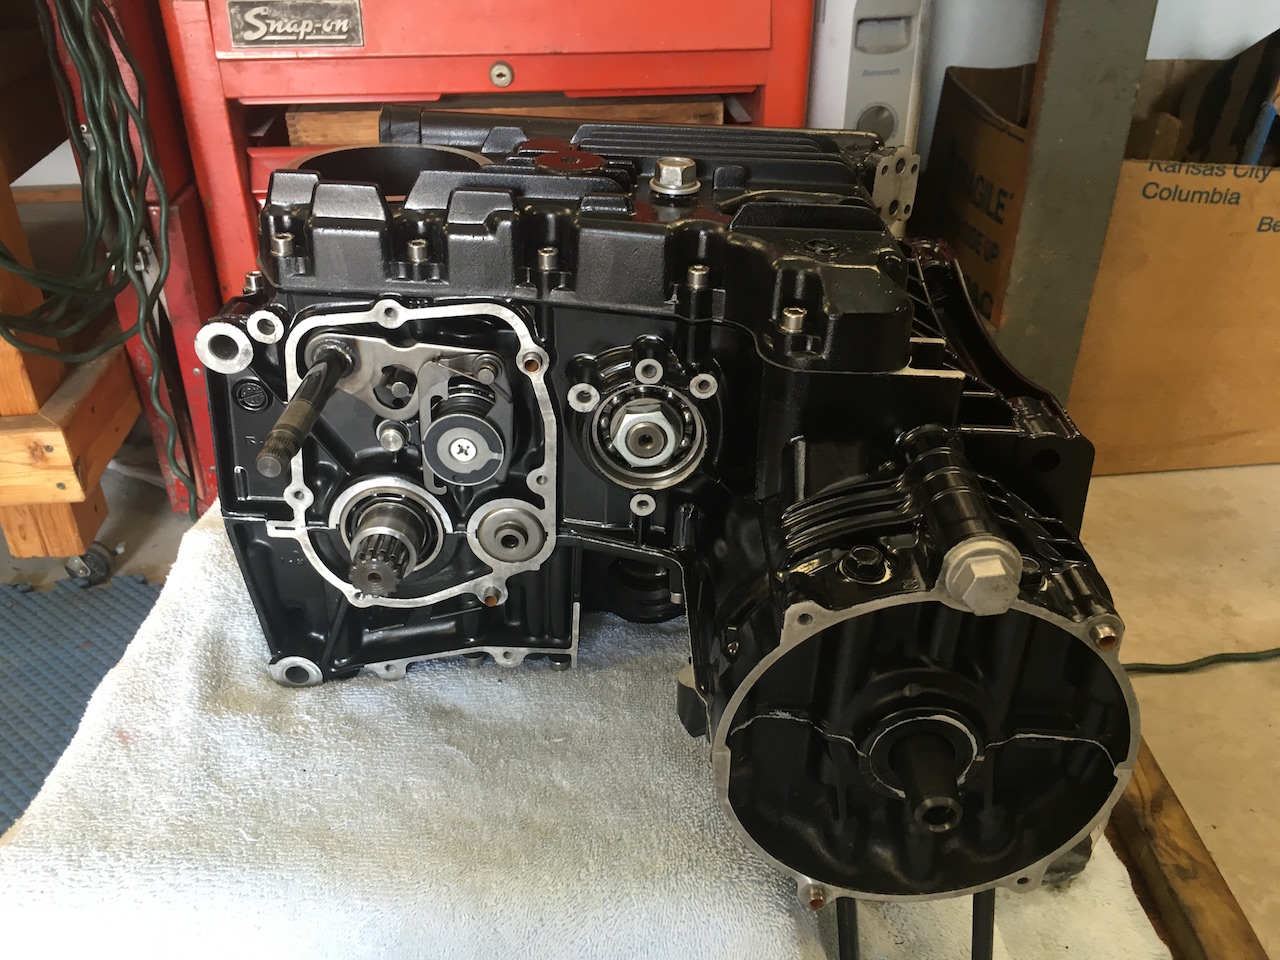
Install the transmission cover as normal. On the kz750e I installed this on, the neutral indicator lamp switch and contact on the shift drum lined up perfectly and no modifications were needed to make it work. ( It is possible that other models with out the push rod clutch may need to have the shift drum contact plate unscrewed and re-indexed to align with the neutral switch on the transmission cover. Again…Possibly.)
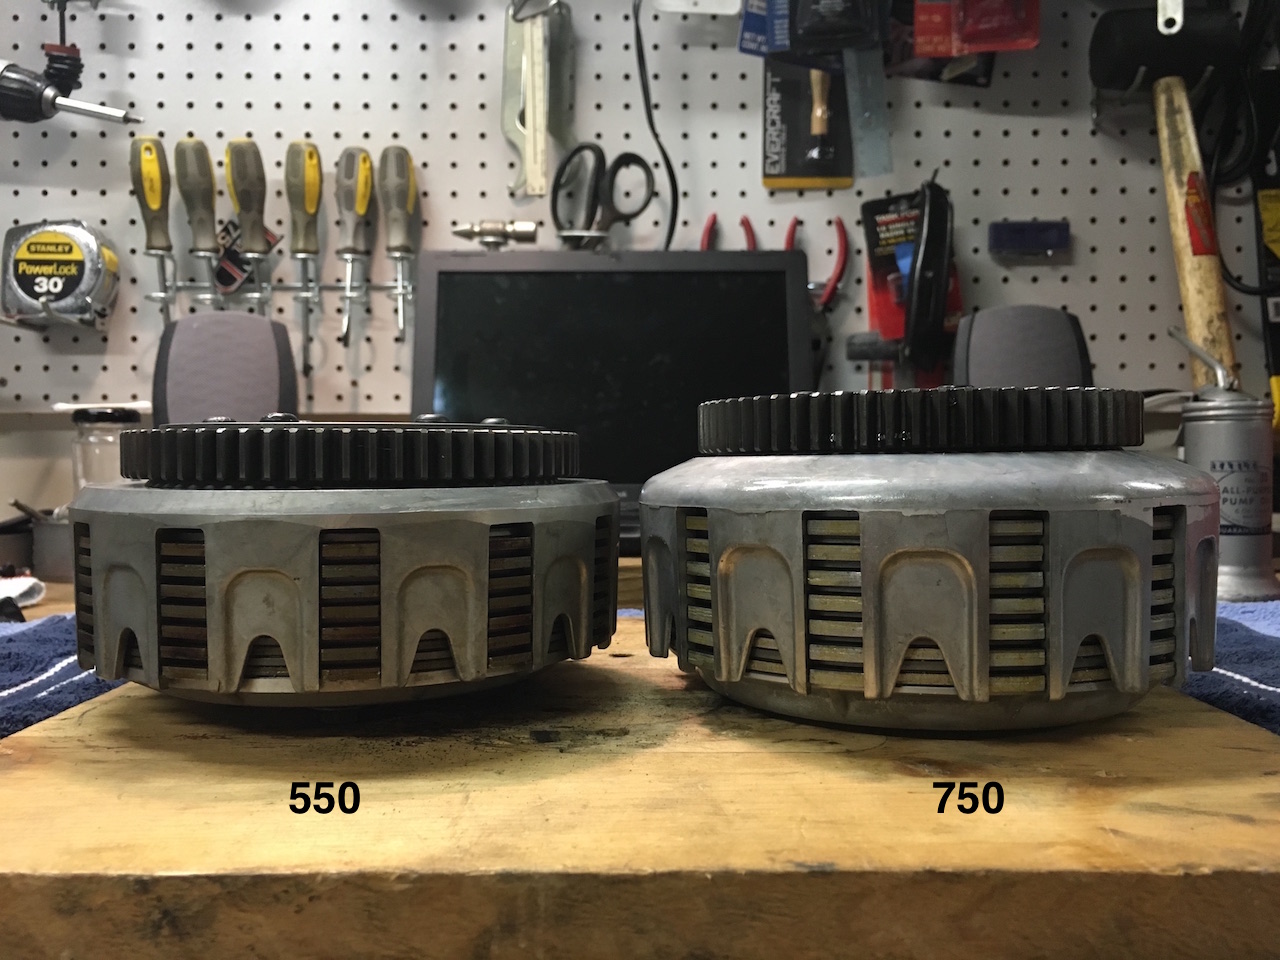
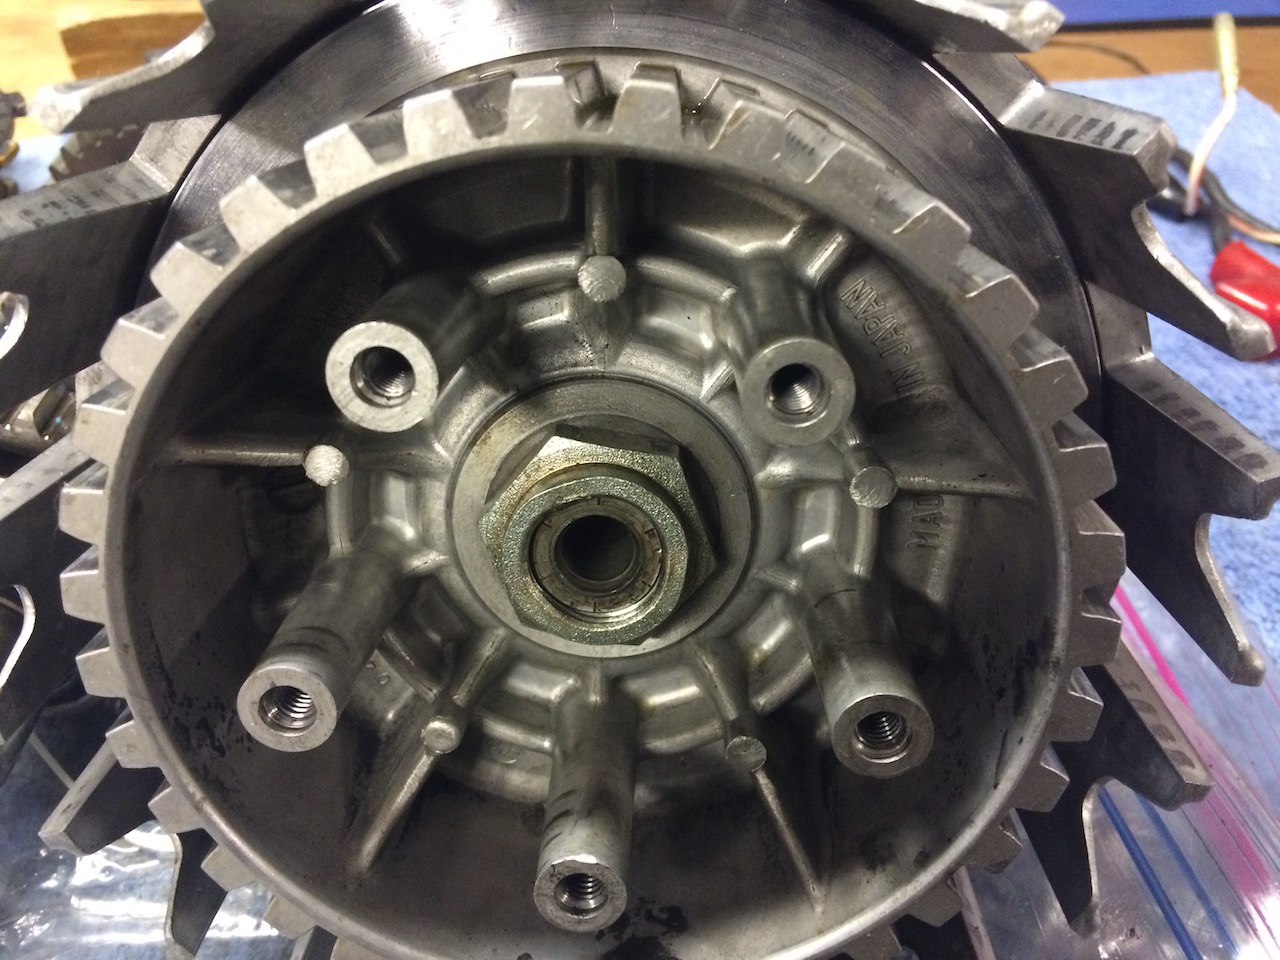
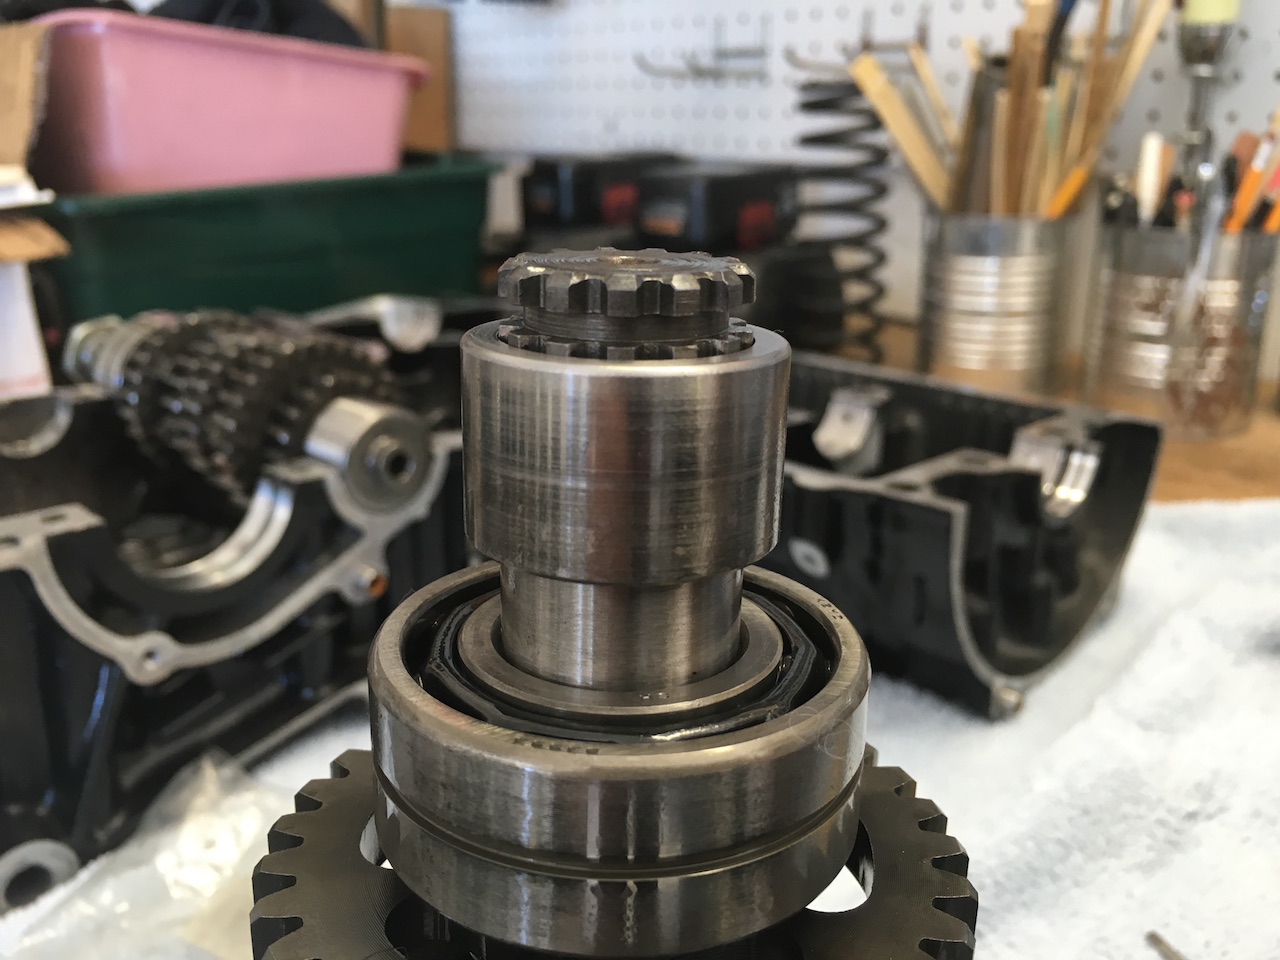
The clutch for the 550 transmissions are much smaller and as a result the input shafts are shorter and there aren’t enough threads to fully bolt on the 750 clutch hub.
The 550 clutches will work but they have a totally different primary gear ratio (2.934) than the 750 (2.55)
So different that it is would negate and benefits of swapping to a 6-speed.
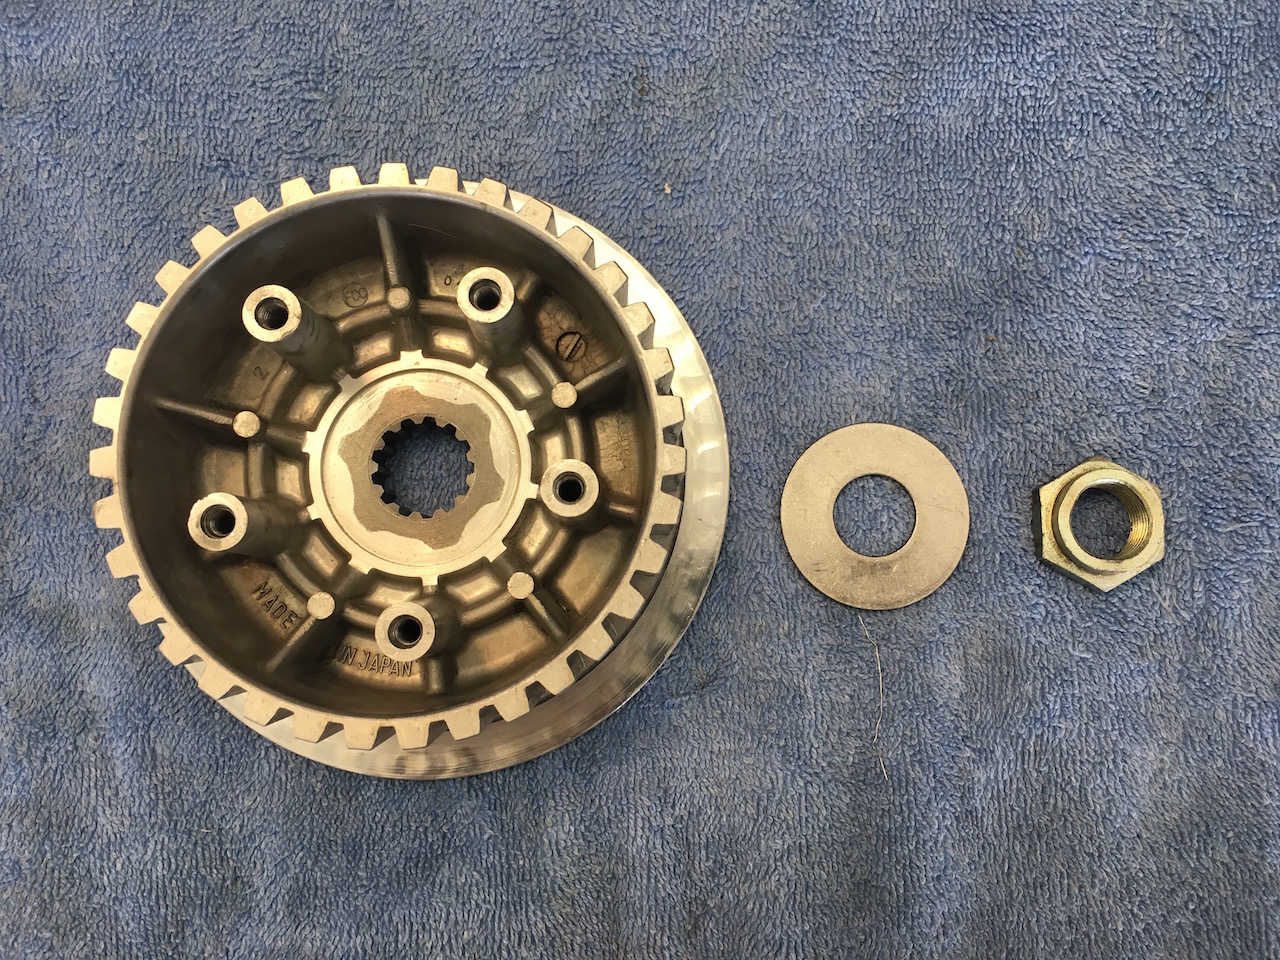
The nut is 3mm short from fully threading onto the input shaft. So I had a machinist remove 3mm from the inside of the hub. There was a washer originally under the clutch nut, so for some reason I got it into my head I should also make room for a washer, so I had the machinist remove another 2mm to make room for a 47x16x2mm stainless washer for a total of 5mm of material removed from the inside of the hub. I used such a wide washer as I didn’t want to recess the washer and nut into a hole that I couldn’t get an impact socket into.
If I was to do this again, I would not make room for a washer and only remove the 3mm and not use a washer at all.
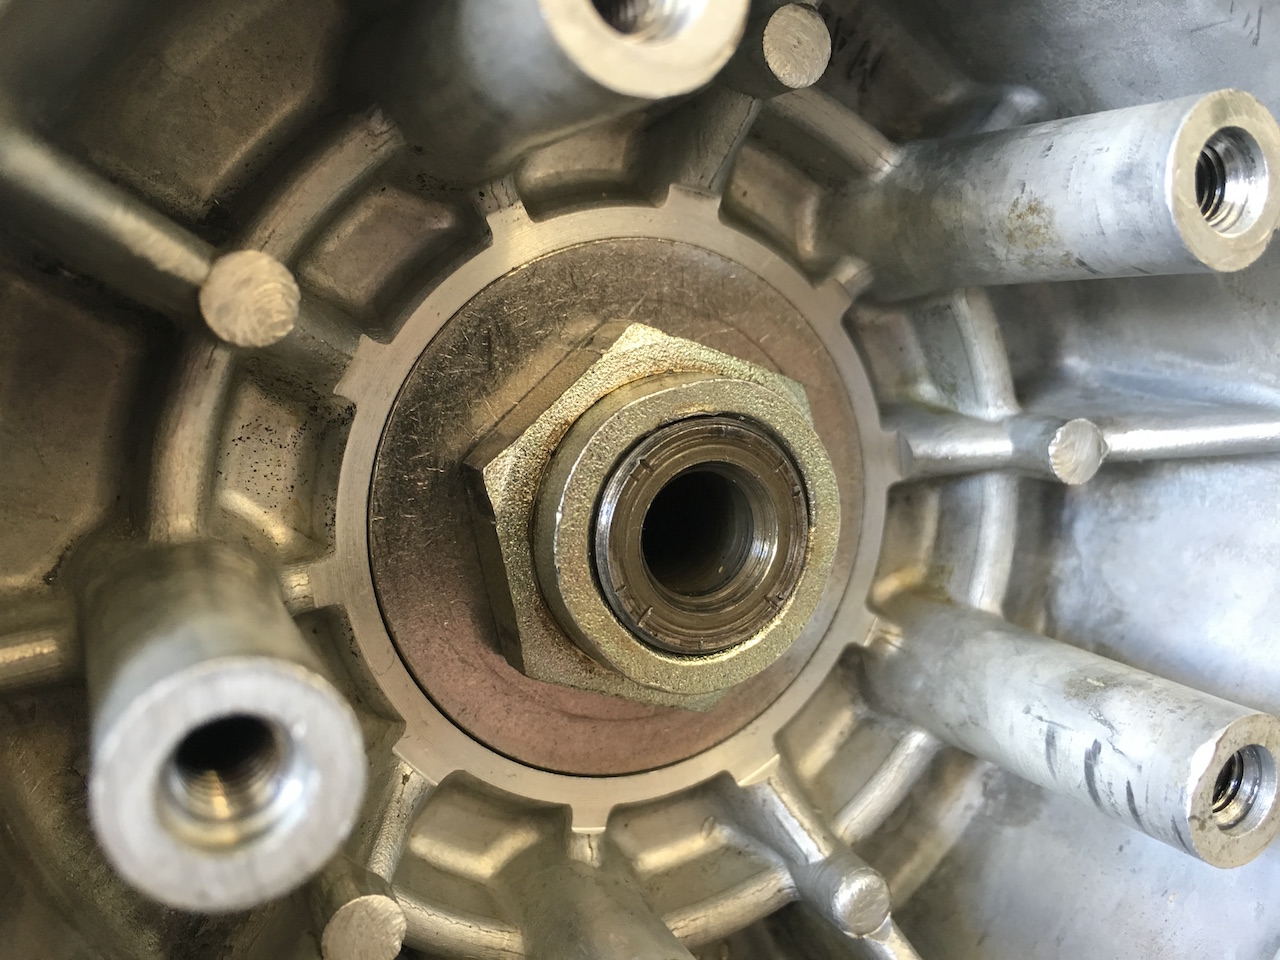
I then bolted the clutch inner and outer hub onto the input shaft using loctite. Only time will tell if this holds up to the rigors of normal usage.
Note that nut is not fully able to thread on shaft.
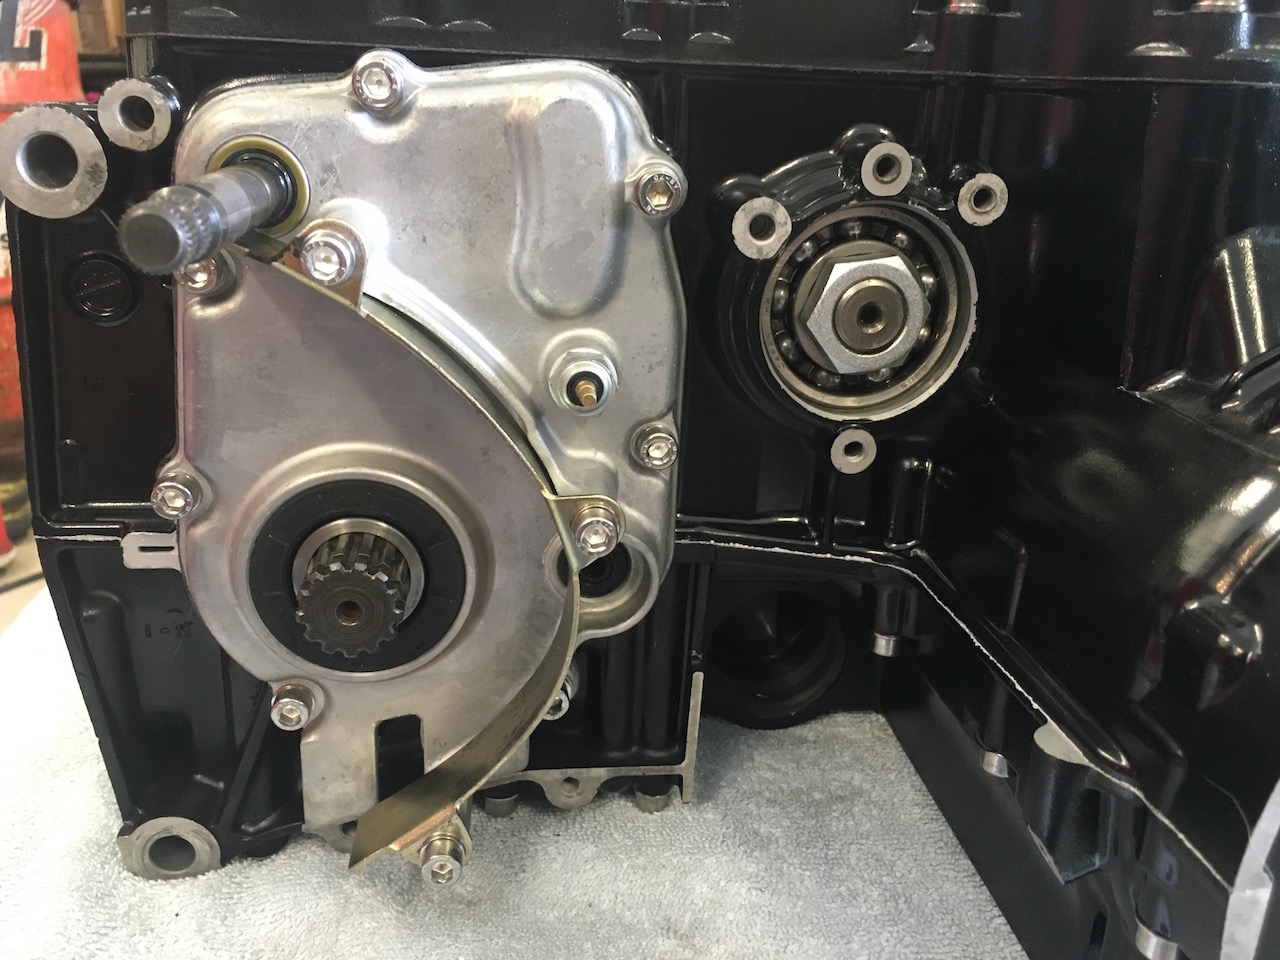
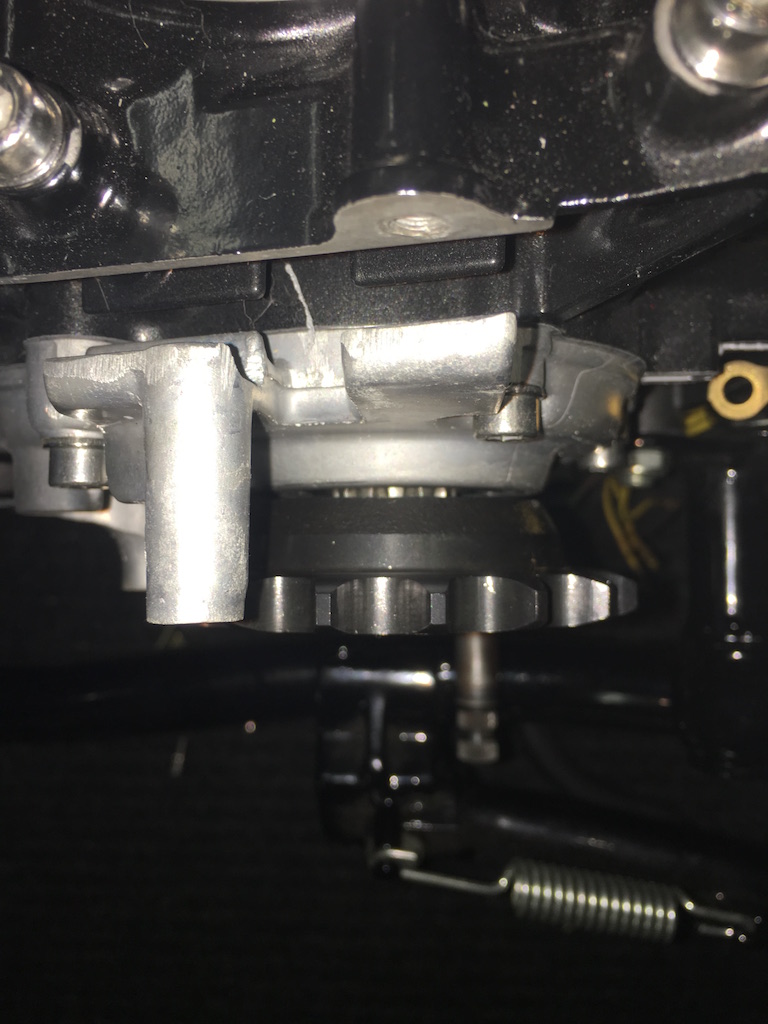
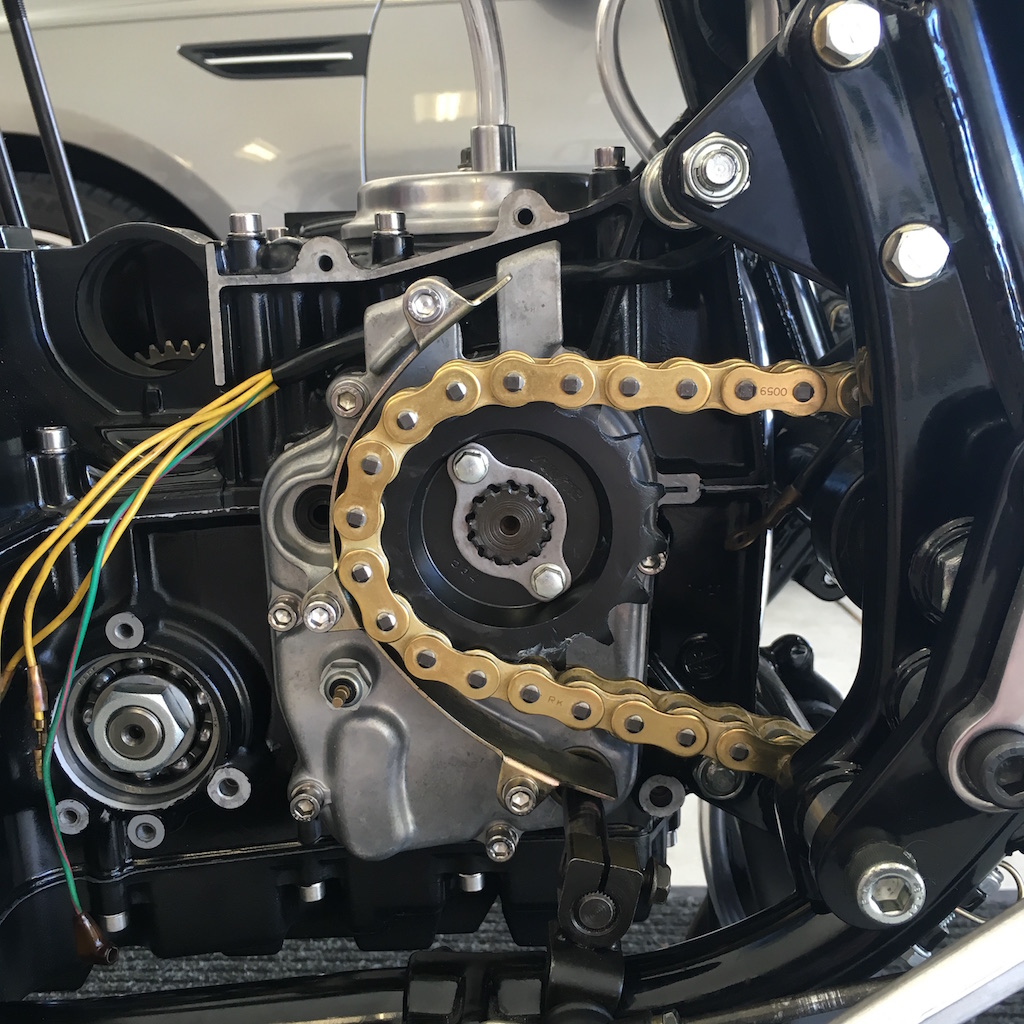
The only issue I had with my sprocket is that the offset sprocket had a much wider splined area and it would not fit onto the output shaft. There is a collar that is on the shaft that the transmission cover seal rides on that is taking up to much space.
On the 750 transmissions this collar is held on by the sprocket which is bolted in place and once the sprocket is removed, the collar slides right off. But the 550 collar is pressed in place as the sprocket is held on by a splined collar that allows the sprocket to “float” on the output shaft. The 550 collar is designed to be removed by pulling off the outer bearing. Instead of doing this, I wedged the collar away from the bearing with a jewelers screwdriver just enough that I could fit a bearing puller on the collar and pull it off. I then had to have 3mm of the collar machined off to make room for the new sprocket and give it room to float. Then I pressed it back on and it sits just flush with the outer edge of the seal.
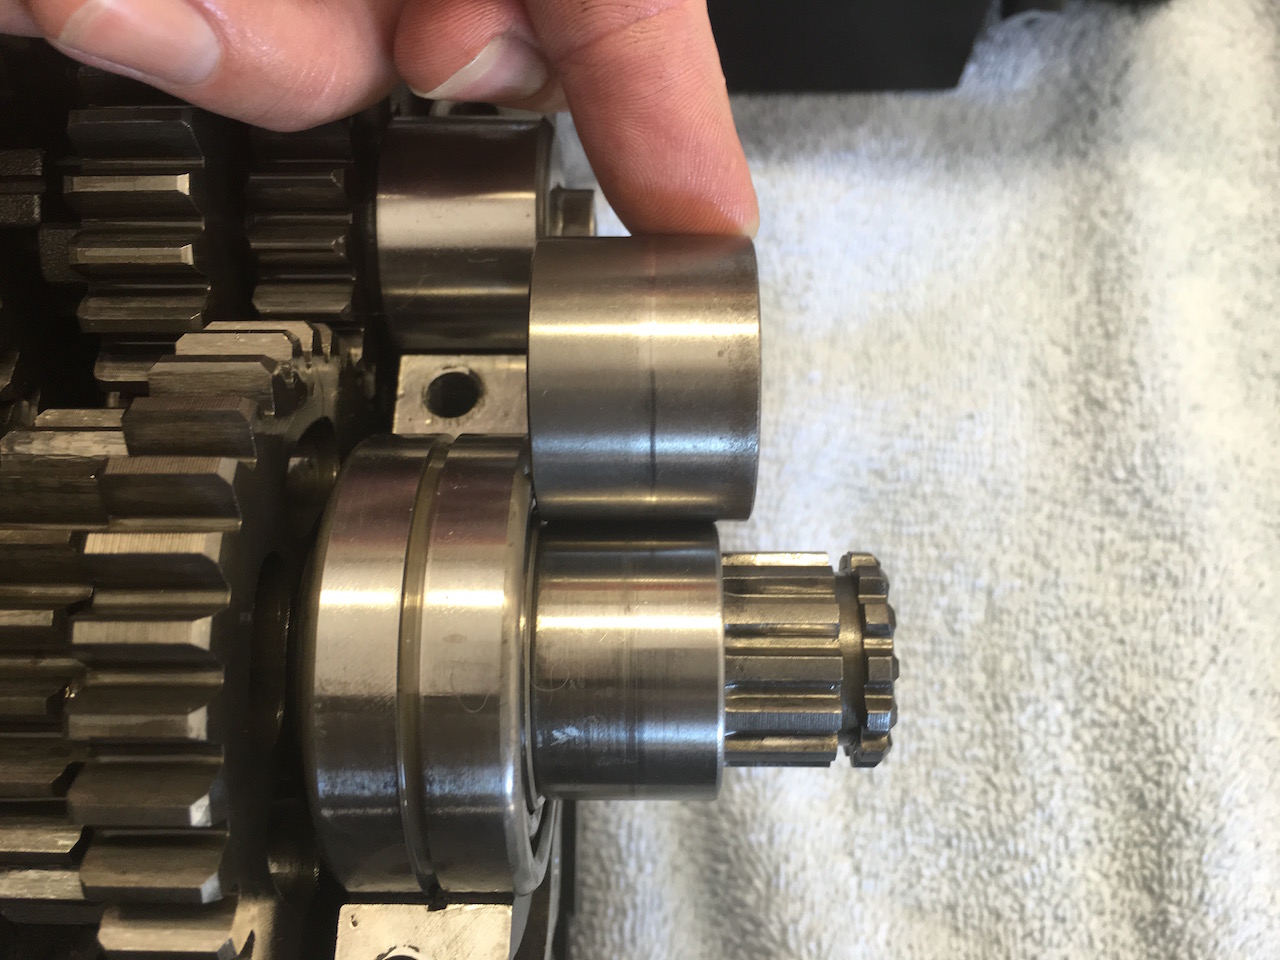
Note gap between sprocket and cover
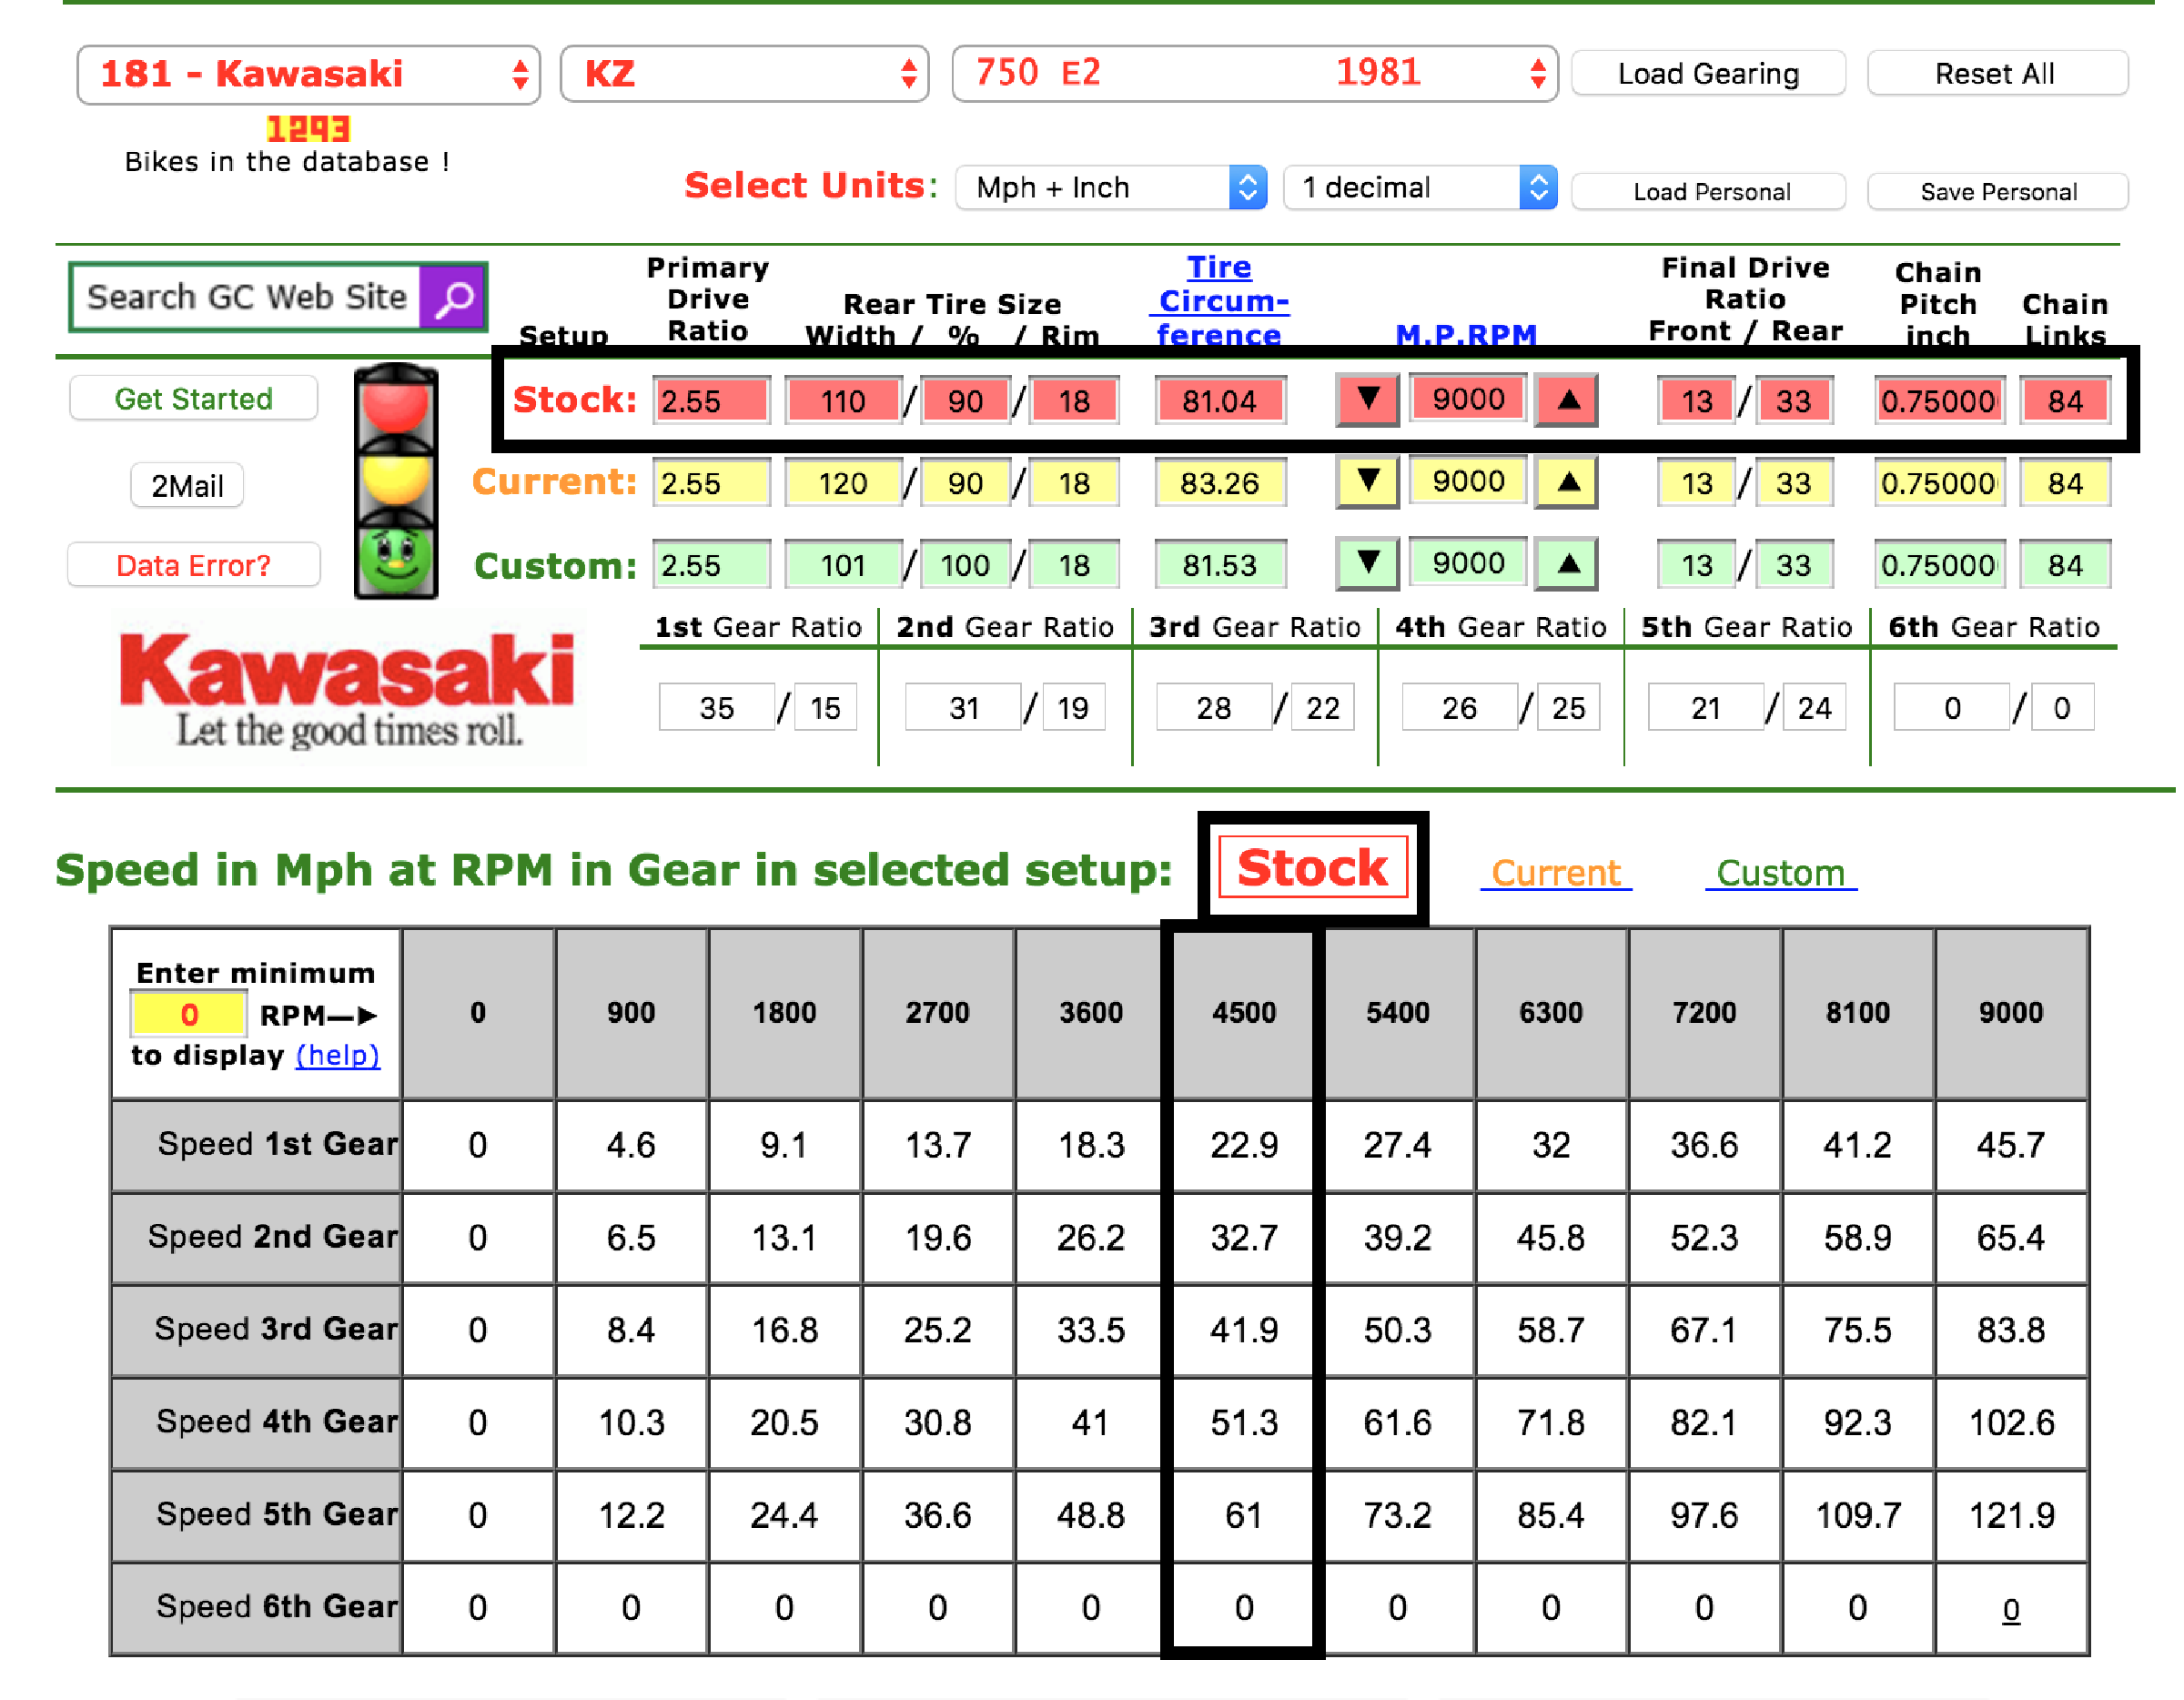
When I was researching this swap I got on gearingcommander.com and started running all the numbers to see if what kind of RPM’s and speed benefits could be made.
This is the factory kz750e gearing stats:
This is what ended up using to keep close to the factory gearing yet adding a usable 6th gear:
1. 6- speed transmission
2. 530 pitch chain
3. 750 clutch with 2.55 primary ratio
4. 17 tooth front sprocket
5. 39 tooth rear sprocket
6. 140/70-18 rear tire
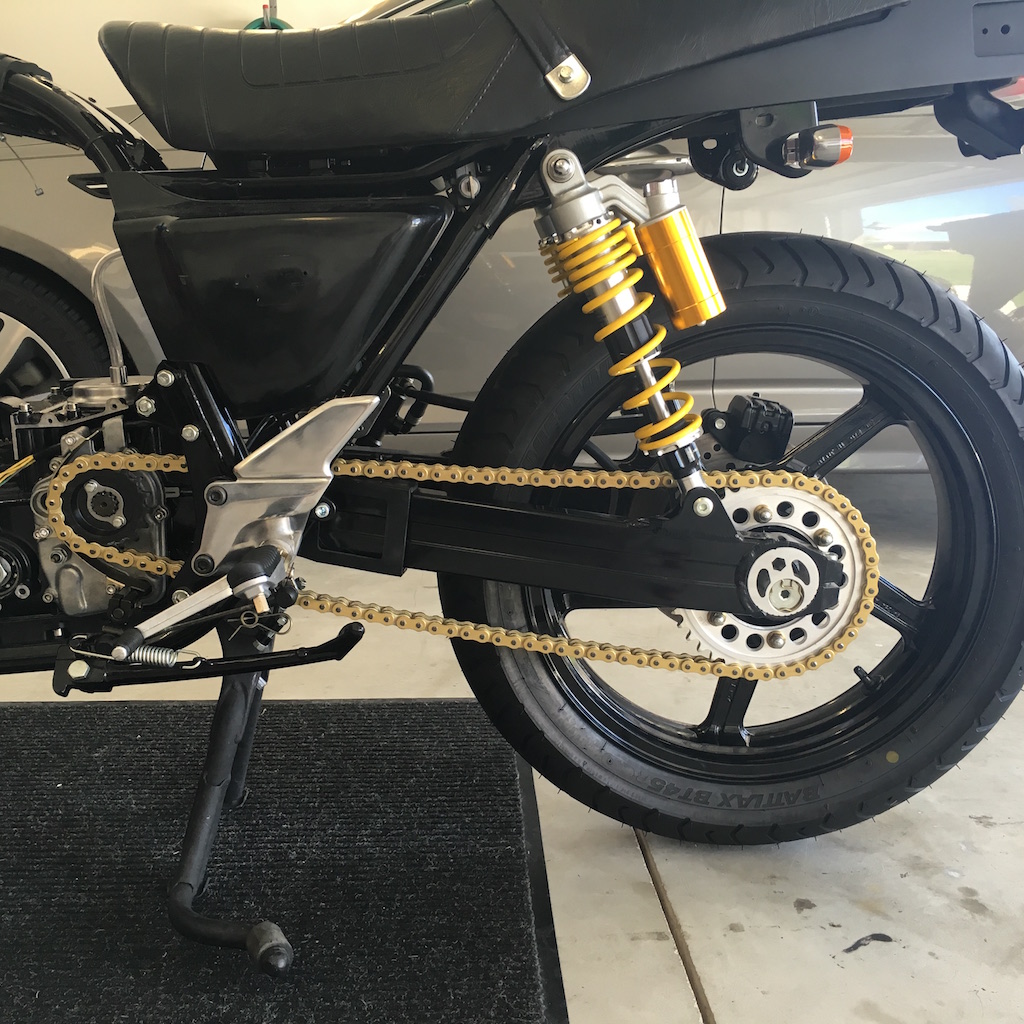
For a final result of:
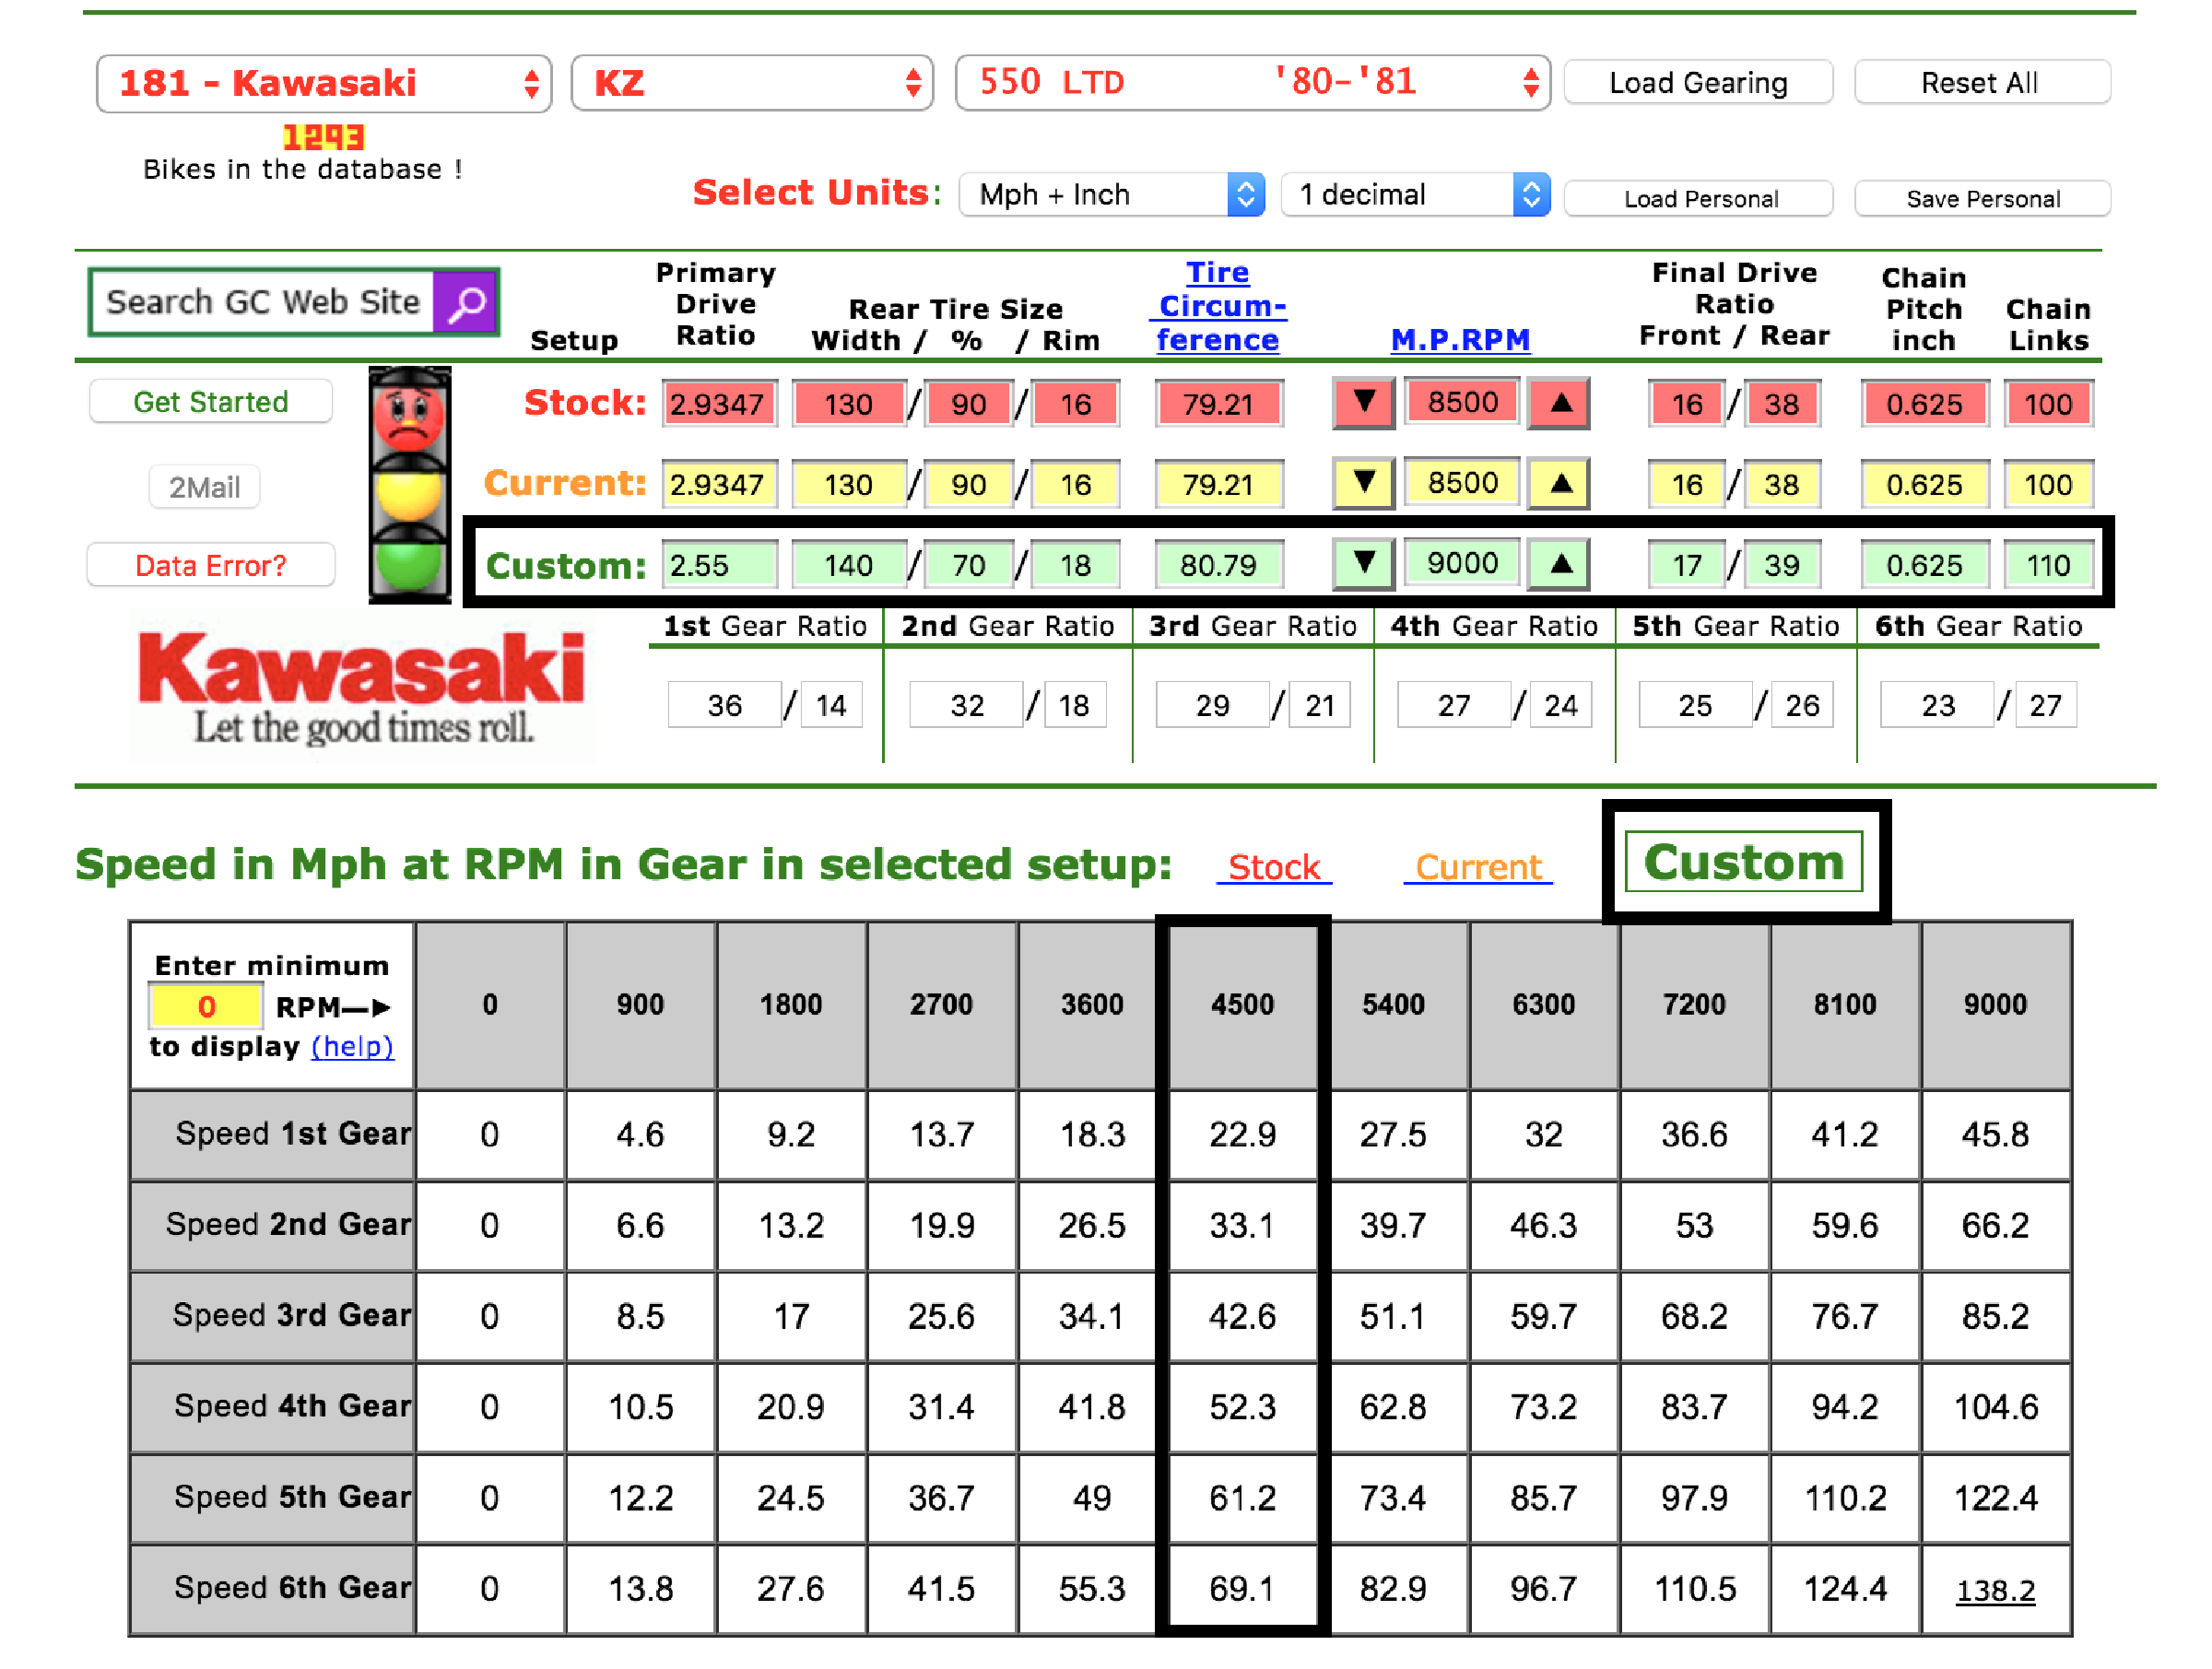
I need to adjust chain slack yet.
First what I needed for the swap:
1. zr/kz/gpz550 6-speed transmission. (They all have the same gear ratios. I had two ’84 gpz550 transmissions in my basement so that is the only reason I used that particular model. The zr550 has a 10mm longer output shaft in case you have a really wide rear tire.)
2. Shift drum and selector forks and rod from corresponding 6-speed transmission.
3. 550 style sprocket and splined retaining ring and bolts. ( I used a 530 17-Tooth 13mm offset sprocket. I have a non stock swingarm and rear wheel that required the offset sprocket)
What I also needed but can be reused from the 750:
1. Transmission bearing cap with clutch pushrod port. ( The gpz transmission I used is not a pushrod clutch, so the bearing cap was the wrong style. If you are doing this on a later model 750 with the lever type clutch release mechanism, then this not needed.)
2. Gear selector linkage.
3. Transmission cover.
4. Clutch assembly
5. Neutral spring and plunger
6. Shift drum alignment bolt
The transmission is simply installed in place just like the 750 transmission, only making sure that you have the correct style bearing cap installed for your particular clutch release type.
The 550 shift drum installs in exactly the same way as the original, BUT TAKE NOTE OF THE ORIENTATION OF THE SHIFT FORKS! The 550 shift forks install facing different directions from the 750 ones, so get a 550 manual to make sure you are installing the forks properly!!
Assemble the upper and lower case halves (making sure the shift drum is in the neutral position) and make sure that the transmission spins freely. There are shims that can be swapped out on the input shaft in the event that the transmission binds when the case is bolted together. The directions for this are in the service manual.
I luckily had no issues.
Install the gear shift mechanism to the shift drum. I then spun the input shaft with a cordless drill so I could get past the neutral lock out and made sure I could select all six gears before going any further.
Install the transmission cover as normal. On the kz750e I installed this on, the neutral indicator lamp switch and contact on the shift drum lined up perfectly and no modifications were needed to make it work. ( It is possible that other models with out the push rod clutch may need to have the shift drum contact plate unscrewed and re-indexed to align with the neutral switch on the transmission cover. Again…Possibly.)
The clutch for the 550 transmissions are much smaller and as a result the input shafts are shorter and there aren’t enough threads to fully bolt on the 750 clutch hub.
The 550 clutches will work but they have a totally different primary gear ratio (2.934) than the 750 (2.55)
So different that it is would negate and benefits of swapping to a 6-speed.
The nut is 3mm short from fully threading onto the input shaft. So I had a machinist remove 3mm from the inside of the hub. There was a washer originally under the clutch nut, so for some reason I got it into my head I should also make room for a washer, so I had the machinist remove another 2mm to make room for a 47x16x2mm stainless washer for a total of 5mm of material removed from the inside of the hub. I used such a wide washer as I didn’t want to recess the washer and nut into a hole that I couldn’t get an impact socket into.
If I was to do this again, I would not make room for a washer and only remove the 3mm and not use a washer at all.
I then bolted the clutch inner and outer hub onto the input shaft using loctite. Only time will tell if this holds up to the rigors of normal usage.
Note that nut is not fully able to thread on shaft.
The only issue I had with my sprocket is that the offset sprocket had a much wider splined area and it would not fit onto the output shaft. There is a collar that is on the shaft that the transmission cover seal rides on that is taking up to much space.
On the 750 transmissions this collar is held on by the sprocket which is bolted in place and once the sprocket is removed, the collar slides right off. But the 550 collar is pressed in place as the sprocket is held on by a splined collar that allows the sprocket to “float” on the output shaft. The 550 collar is designed to be removed by pulling off the outer bearing. Instead of doing this, I wedged the collar away from the bearing with a jewelers screwdriver just enough that I could fit a bearing puller on the collar and pull it off. I then had to have 3mm of the collar machined off to make room for the new sprocket and give it room to float. Then I pressed it back on and it sits just flush with the outer edge of the seal.
Note gap between sprocket and cover
When I was researching this swap I got on gearingcommander.com and started running all the numbers to see if what kind of RPM’s and speed benefits could be made.
This is the factory kz750e gearing stats:
This is what ended up using to keep close to the factory gearing yet adding a usable 6th gear:
1. 6- speed transmission
2. 530 pitch chain
3. 750 clutch with 2.55 primary ratio
4. 17 tooth front sprocket
5. 39 tooth rear sprocket
6. 140/70-18 rear tire
For a final result of:
I need to adjust chain slack yet.
Attachment image1.JPG not found
Attachment IMG_0357.JPG not found
Attachment IMG_0595.JPG not found
Attachment IMG_0610.JPG not found
Gonna give this a go here... KZ1R Modified/clone from a 1976 KZ1000A
Got a really poor shape KZ for the cost of a cup of coffee and should of been paid to haul it away... I went ahead against my better judgement and pulled the motor down to see inside. Well boy was I surprised, the internals are in as good a shape as anyone could hope for.
I will load up all the pics to date, but leave out much of the conversation, and start from where I am now.
To summarize:
Bike as purchased, then just tear down as usual, motor inspection, parts assessment bla bla bla... Then the hairbrain idea to do a clone Z1R with modified suspension (I had some parts around) went with the GSXR legs I had and another modified FZ6 swingarm with custom machined pivot, new devon steering stem and one off custom top tree to raise and run superbike bars. Then I went about gathering plastic, seat pan and a tank which all came together faster than I could of hoped for.
Replied by NakedFun on topic KZ1000 Muscle Bike Build - ZRX Swingarm, ZX9R Fork
06 Aug 2016 06:13 - 06 Aug 2016 06:19
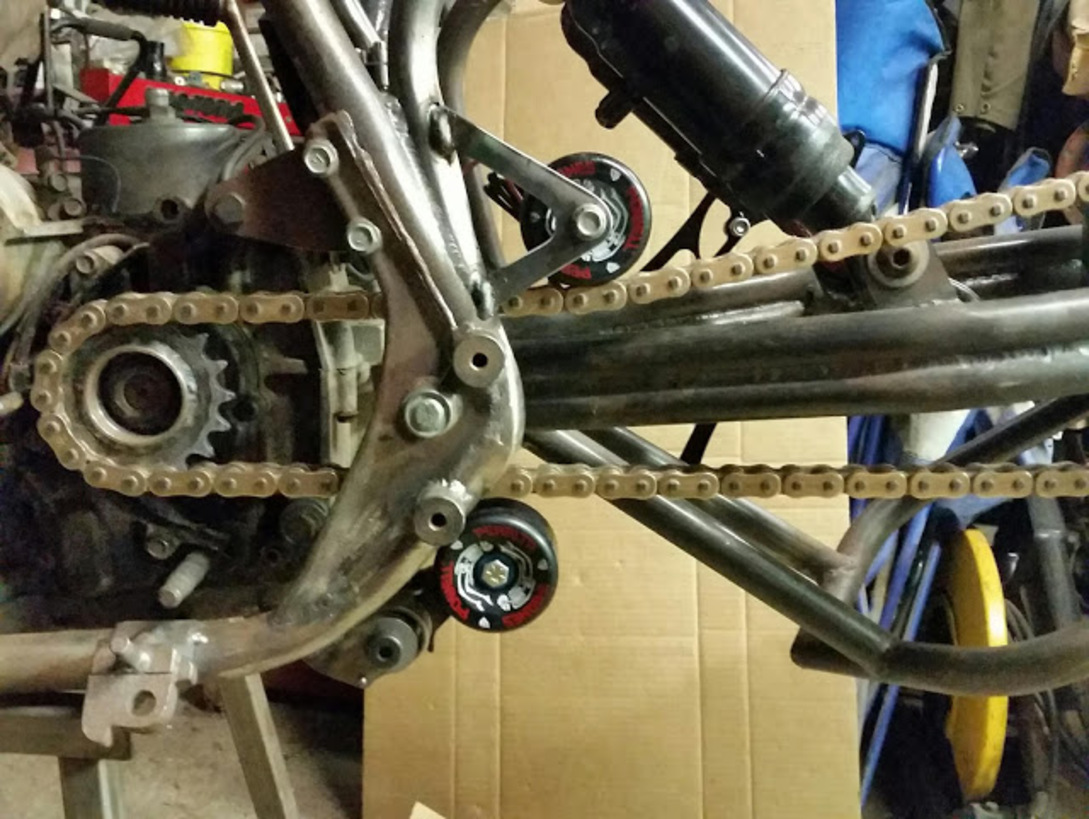
So it looks good. There are a couple things to keep in mind with your chain ratio. A stock ZRX1100 with a 170 rear tire is 17:45. So since you are running a 170 rear tire, you have dropped the front sprocket 1 tooth which is like adding 3 teeth to the rear all by itself. Now you have also added 4 teeth to the rear. It is going to be (3.06:1) geared DEEP in my honest opinion. I would have chose a 17:45-47 if it was me. Now if you find the combination you picked to be too deep for your modern tire size, you can pick up an 18 tooth drive sprocket and probable even it out a bit. The 49 tooth radius will help keep the chain up off the pivot from a wear perspective though.
On here is a KZ900/1000 gearing chart from back in the day and the 17/45 ratio was considered hot street.
kzrider.com/forum/5-chassis/270333-kz900-gear-ratios
This was with the larger OD of the original tire and wheel though, so with the smaller OD of the modern setup, you would run a slightly higher RPM for a given speed. Good luck.
Cory
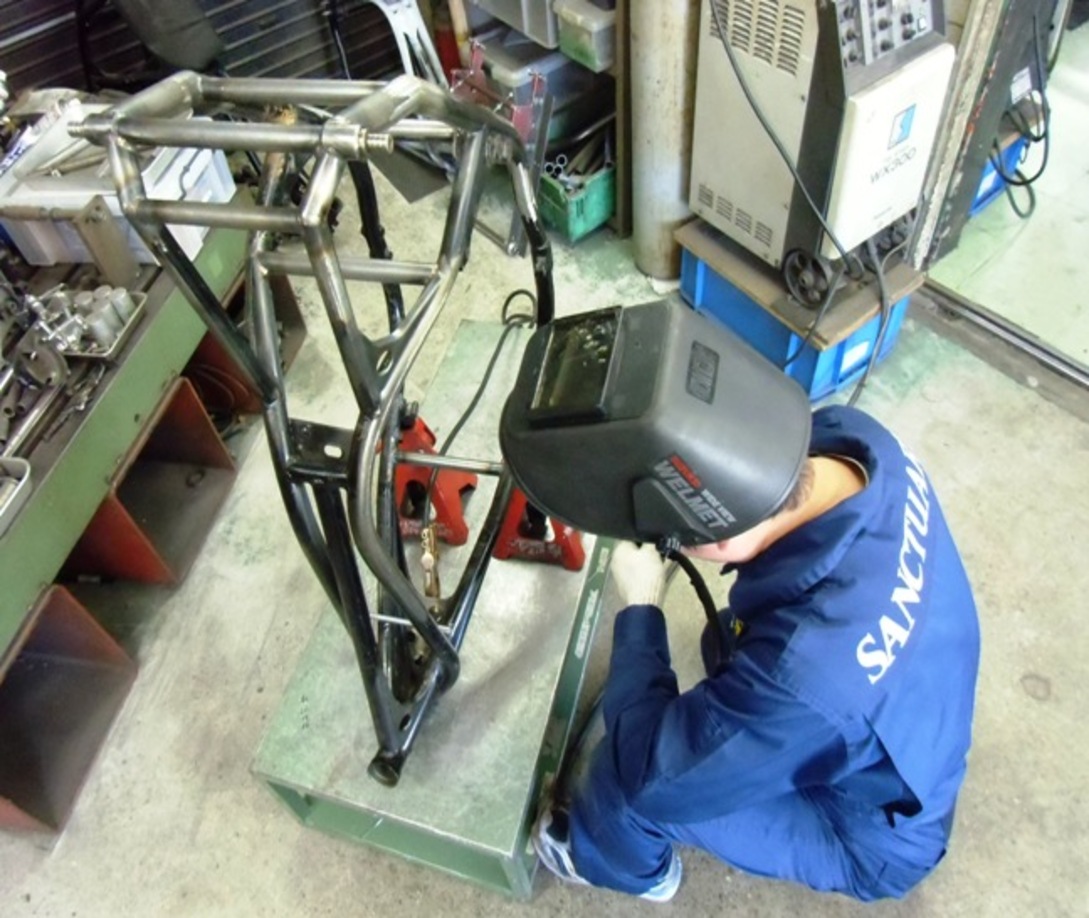
what is funny is if you look over the sanctuary blogs you will see various picture of them welding bracing into bare frames that they are rolling around the floor.
i have used skate board rollers on a build i did with an extended swingarm of my own construction.
skateboard wheels are readily available material if you have access to a lathe,they seem to cut like any other plastic.
sharp tool steel seems to cut the best.
but i have machined poly with a carbide when i wasn't concerned with the finish.
super cool build you have going sir.
keep us posted,
leon
New member introduction was created by Givusaclue
02 Aug 2016 14:52 Givusaclue
Hi all
My name's Steve
I own amongst my small fleet a 1985 z750l4 & a couple of late 80's zx10b's.
I'm planning on doing a Lawson style z as I've owned reds, blue, & black kawasakis in my 30 years of riding, but never green, yet!
I'm a car tech. By profession, I've got a plan, mechmachex swing arm, marzocchi shocks or zephyr ones , motad neta pipes (can't afford Kerker!)& bikini fairing plus green paint of course, I owned this particular z in the late 80's , went to the tt in 1989 on it, sold it in 1991 & bought it back off eBay 3 years ago & 130 miles away in a fit of nostalgia but not quite finished doing up my house yet.
Welcome aboard - NICE BIKE!!!! I'm glad to see you plan to keep it stock since really nice stock examples are so rare!
The good news is that the 1979 KZ650-C3 did not have less HP than the earlier KZ650 models. It had 64 hp @ 8,500 rpm as did all 1977 and 1978 KZ650-B and C models - this info is directly from the Kawasaki Service Manual. There was an error in one version of the manual that shows the B3 and C3 as having 62 HP @ 8,000 rpm, but this error appears to have been made by the manual writer copying info from the 1979 KZ650-D2 which did have 2 HP less (62 @ 8,000 rpm). This lower HP was the result of the different exhaust system (criss-cross) the D2 came with.
Here are some tips that you may find helpful:
Many newbies and not so newbies run into or issues with their bikes which could be easily avoided with a little preparation or information. Here are a couple recommendations that I hope you will find useful.
Before riding your KZ you should take a little time to become familiar with it. Simple things like checking the oil, tire pressures, etc. are explained in the Kawasaki Owner's Manual. If you bike didn't come with one (they normally are in a little holder on the bottom of the seat) you can usually find one on eBay - be sure to get one for your exact year/model.
MANUAL
You really should consider buying the Kawasaki Factory Service Manual for your bike. The factory service manual provides instructions on the various maintenance procedures and schedules for your bike, procedures for diagnosing problems, proper torque values for the various fasteners (VERY IMPORTANT), and insight into how each system on your bike works even if you are not repairing that system. Studying the manual before you attempt performing service on your bike will impart an understanding of the system you are working on which will increase the odds of success.
The manuals usually are readily available for most models on eBay and other sources; but be sure to get one that has your specific year and model in it as there are differences between the various KZ650 models. I do not recommend Clymers, Haynes, or other aftermarket manuals as I have seen instances where they provide inaccurate advice. You may decide to use those to supplement the factory manual, but in my opinion they are not a suitable substitute. If you have trouble finding one for your model ask us to help.
TOOLS
WARNING! Do not even try to use Phillips screwdrivers on the Kawasaki cross head screws. Despite their appearance they are not Phillips screws. They are Japanese Industrial Standard (JIS) screws. The tips of Phillips screwdrivers are too long & pointed to allow the 4 blades of the screwdriver to properly engage the screws, so when you apply force the screw head slots will deform and look like crap. The fact is that Phillips screws were deliberately designed to have the screwdriver bit "cam out." This was done to prevent production line assembly from over-tightening, stripping, or breaking the screws. JIS screws do not have this problem. A proper fitting JIS bit can tighten a JIS screw to and beyond the torque spec without camming out. Here's the good news - you can easily modify standard Phillips screwdriver tips to fit the JIS screws.
I have ground down the tips of DeWalt #2 and DeWalt #3 Phillips to make them fit JIS screws. The large crosshead screws on the cases take modified #3 bits (or genuine #3 JIS bits). To modify the DeWalt bits you need to grind the very tip a little, then test fit, then grind a little more and test fit, etc. until the bit no longer "rocks" back and forth in the screwhead. Picture 1 below shows how a DeWalt #3 bit fits the case screws of my KZ650 after being ground properly. The #2 DeWalt bits can be modified the same way to fit smaller JIS screws. Pictures 2 and 3 below shows DeWalt #2 and #3 modified bits.
I did find a place that sells authentic JIS bits. They don't list the #3 bit, but if you contact them they can provide the #3 JIS bits even though they are not listed on the website. These folks were very easy to work with, and the authentic bits do work great. Here's their site:
www.rjrcooltools.com/shop_item_detail.cfm?subcat_ID=89
Pictures 4 & 5 below show a comparison between my home made modified bits with the authentic JIS bits, and picture 6 shows a comparison between Philips and JIS bit tips.
PICTURE 1

PICTURE 2

PICTURE 3

PICTURE 4

PICTURE 5

PICTURE 6
Before reaching for that wrench or ratchet consider the following. The bolts are steel, but your engine and front forks are aluminum. The bolts are much tougher than the aluminum and if over tightened will strip the aluminum threads. Although these can be repaired, preventing damage by applying proper torque will save you grief, time, and money. Tightening fasteners properly requires torque wrenches. Various vendors, including Snap-on, CDI, Sears, etc., market torque wrenches. The two most popular types are the bar type and micrometer type. Either will work, but the micrometer type is a bit easier to use, especially if you are tightening several fasteners with the same torque - such as cylinder head covers. You will need a torque wrench calibrated in INCH POUNDS for many of the bolts. You will also need a torque wrench calibrated in FOOT POUNDS for the larger bolts. Don't try to use the foot pounds wrench on the smaller bolts as it will not be sensitive enough at low torque settings to provide accurate torque. There are many fasteners that require low torque. These include such things as 6mm oil pan bolts, cylinder head cover bolts, etc. for which the torque in 61-78 inch pounds. These low torque bolts require a wrench that is accurate at low settings and this wrench should be graduated in inch pounds. In addition, there are numerous high torque fasteners such as the front axle nuts (51 - 65 foot pounds) or swing arm pivot shaft nuts (58 - 87 foot pounds). These require a wrench that is accurate at higher settings; this wrench should be graduated in foot pounds. Using the proper torque wrenches to correctly tighten fasteners will help prevent damage and contribute to a safe bike. The Kawasaki Service Manual will list the various torque specs for the bolts. I suggest you get the manual before buying the torque wrenches so you can decide which wrenches best meet the torque specs.
Consider buying a can of Kroil penetrating oil and use it to soak stubborn fasteners for a couple days before trying to loosen them. Remember, the original screws and bolts were installed on your bike when Jimmy Carter was President, so many of them may be hard to remove. Kroil can be bought online, at guns shows, and at some other venues.
MOTOR OIL
The ingredients in oils have changed over the years. For example, today's Castrol GTX oil (and pretty much all other AUTOMOBILE oil) is not the same as it was in the 1980's. Back then it worked great in KZ bikes. But, things have changed. Early AUTOMOBILE oils contained zinc phosphorus compounds (ZDDP) to protect engine components from metal to metal contact. This was good for engines, but it was found to be destructive to catalytic converters. Consequently, in AUTOMOBILE oils ZDDP was virtually eliminated and replaced with different chemistry generically referred to as "Friction Modifiers." These work fine and offer good protection for normal AUTOMOBILE engines. However, today's AUTOMOBILE oil "Friction Modifiers" are destructive to wet clutches. KZ bikes (and many other brands) have wet clutches. As a result of these oil chemistry changes a distinction needed to be made between those oils which are suitable for wet clutches and those which are not. That distinction was documented by the Japanese Engine Oil Standards Implementation Panel (JASO). JASO developed a number of different oil specifications for different applications. The specifications that apply to 4 stroke motorcycles fall under the "4T Specifications." Within the 4T specifications the JASO MA class oils are specifically formulated for 4 stroke motorcycles with wet clutches.
There are synthetic, semi-synthetic, and non-synthetic oils that meet the JASO-MA standard and any of them will work ok. However, using oils that are not designated as meeting the JASO-MA standard is destructive to KZ clutches.
Good luck with your bike; its a beauty! Ed
The good news is that the 1979 KZ650-C3 did not have less HP than the earlier KZ650 models. It had 64 hp @ 8,500 rpm as did all 1977 and 1978 KZ650-B and C models - this info is directly from the Kawasaki Service Manual. There was an error in one version of the manual that shows the B3 and C3 as having 62 HP @ 8,000 rpm, but this error appears to have been made by the manual writer copying info from the 1979 KZ650-D2 which did have 2 HP less (62 @ 8,000 rpm). This lower HP was the result of the different exhaust system (criss-cross) the D2 came with.
Here are some tips that you may find helpful:
Many newbies and not so newbies run into or issues with their bikes which could be easily avoided with a little preparation or information. Here are a couple recommendations that I hope you will find useful.
Before riding your KZ you should take a little time to become familiar with it. Simple things like checking the oil, tire pressures, etc. are explained in the Kawasaki Owner's Manual. If you bike didn't come with one (they normally are in a little holder on the bottom of the seat) you can usually find one on eBay - be sure to get one for your exact year/model.
MANUAL
You really should consider buying the Kawasaki Factory Service Manual for your bike. The factory service manual provides instructions on the various maintenance procedures and schedules for your bike, procedures for diagnosing problems, proper torque values for the various fasteners (VERY IMPORTANT), and insight into how each system on your bike works even if you are not repairing that system. Studying the manual before you attempt performing service on your bike will impart an understanding of the system you are working on which will increase the odds of success.
The manuals usually are readily available for most models on eBay and other sources; but be sure to get one that has your specific year and model in it as there are differences between the various KZ650 models. I do not recommend Clymers, Haynes, or other aftermarket manuals as I have seen instances where they provide inaccurate advice. You may decide to use those to supplement the factory manual, but in my opinion they are not a suitable substitute. If you have trouble finding one for your model ask us to help.
TOOLS
WARNING! Do not even try to use Phillips screwdrivers on the Kawasaki cross head screws. Despite their appearance they are not Phillips screws. They are Japanese Industrial Standard (JIS) screws. The tips of Phillips screwdrivers are too long & pointed to allow the 4 blades of the screwdriver to properly engage the screws, so when you apply force the screw head slots will deform and look like crap. The fact is that Phillips screws were deliberately designed to have the screwdriver bit "cam out." This was done to prevent production line assembly from over-tightening, stripping, or breaking the screws. JIS screws do not have this problem. A proper fitting JIS bit can tighten a JIS screw to and beyond the torque spec without camming out. Here's the good news - you can easily modify standard Phillips screwdriver tips to fit the JIS screws.
I have ground down the tips of DeWalt #2 and DeWalt #3 Phillips to make them fit JIS screws. The large crosshead screws on the cases take modified #3 bits (or genuine #3 JIS bits). To modify the DeWalt bits you need to grind the very tip a little, then test fit, then grind a little more and test fit, etc. until the bit no longer "rocks" back and forth in the screwhead. Picture 1 below shows how a DeWalt #3 bit fits the case screws of my KZ650 after being ground properly. The #2 DeWalt bits can be modified the same way to fit smaller JIS screws. Pictures 2 and 3 below shows DeWalt #2 and #3 modified bits.
I did find a place that sells authentic JIS bits. They don't list the #3 bit, but if you contact them they can provide the #3 JIS bits even though they are not listed on the website. These folks were very easy to work with, and the authentic bits do work great. Here's their site:
www.rjrcooltools.com/shop_item_detail.cfm?subcat_ID=89
Pictures 4 & 5 below show a comparison between my home made modified bits with the authentic JIS bits, and picture 6 shows a comparison between Philips and JIS bit tips.
PICTURE 1
PICTURE 2
PICTURE 3
PICTURE 4
PICTURE 5
PICTURE 6
Attachment JISvs.PhillipsAngles-2-3-4-5-6-7-8.jpg not found
Before reaching for that wrench or ratchet consider the following. The bolts are steel, but your engine and front forks are aluminum. The bolts are much tougher than the aluminum and if over tightened will strip the aluminum threads. Although these can be repaired, preventing damage by applying proper torque will save you grief, time, and money. Tightening fasteners properly requires torque wrenches. Various vendors, including Snap-on, CDI, Sears, etc., market torque wrenches. The two most popular types are the bar type and micrometer type. Either will work, but the micrometer type is a bit easier to use, especially if you are tightening several fasteners with the same torque - such as cylinder head covers. You will need a torque wrench calibrated in INCH POUNDS for many of the bolts. You will also need a torque wrench calibrated in FOOT POUNDS for the larger bolts. Don't try to use the foot pounds wrench on the smaller bolts as it will not be sensitive enough at low torque settings to provide accurate torque. There are many fasteners that require low torque. These include such things as 6mm oil pan bolts, cylinder head cover bolts, etc. for which the torque in 61-78 inch pounds. These low torque bolts require a wrench that is accurate at low settings and this wrench should be graduated in inch pounds. In addition, there are numerous high torque fasteners such as the front axle nuts (51 - 65 foot pounds) or swing arm pivot shaft nuts (58 - 87 foot pounds). These require a wrench that is accurate at higher settings; this wrench should be graduated in foot pounds. Using the proper torque wrenches to correctly tighten fasteners will help prevent damage and contribute to a safe bike. The Kawasaki Service Manual will list the various torque specs for the bolts. I suggest you get the manual before buying the torque wrenches so you can decide which wrenches best meet the torque specs.
Consider buying a can of Kroil penetrating oil and use it to soak stubborn fasteners for a couple days before trying to loosen them. Remember, the original screws and bolts were installed on your bike when Jimmy Carter was President, so many of them may be hard to remove. Kroil can be bought online, at guns shows, and at some other venues.
MOTOR OIL
The ingredients in oils have changed over the years. For example, today's Castrol GTX oil (and pretty much all other AUTOMOBILE oil) is not the same as it was in the 1980's. Back then it worked great in KZ bikes. But, things have changed. Early AUTOMOBILE oils contained zinc phosphorus compounds (ZDDP) to protect engine components from metal to metal contact. This was good for engines, but it was found to be destructive to catalytic converters. Consequently, in AUTOMOBILE oils ZDDP was virtually eliminated and replaced with different chemistry generically referred to as "Friction Modifiers." These work fine and offer good protection for normal AUTOMOBILE engines. However, today's AUTOMOBILE oil "Friction Modifiers" are destructive to wet clutches. KZ bikes (and many other brands) have wet clutches. As a result of these oil chemistry changes a distinction needed to be made between those oils which are suitable for wet clutches and those which are not. That distinction was documented by the Japanese Engine Oil Standards Implementation Panel (JASO). JASO developed a number of different oil specifications for different applications. The specifications that apply to 4 stroke motorcycles fall under the "4T Specifications." Within the 4T specifications the JASO MA class oils are specifically formulated for 4 stroke motorcycles with wet clutches.
There are synthetic, semi-synthetic, and non-synthetic oils that meet the JASO-MA standard and any of them will work ok. However, using oils that are not designated as meeting the JASO-MA standard is destructive to KZ clutches.
Good luck with your bike; its a beauty! Ed
Replied by Johnno on topic KZ1000 Muscle Bike Build - ZRX Swingarm, ZX9R Fork
01 Aug 2016 19:47
Thanks guys!
No pictures tonight, I'll grab some later. I just did some light futzing around. I moved the tach mount underneath the top triple tree brace, so it now sits almost flush with the brace.
I also checked out the rearset linkage. I was originally planning on having the linkage run underneath the shifter pedal, but it ran into the kick stand when it was in the upright position. I flipped the linkage to run over the shifter pedal, and now it clears fine. Because of the parts I picked up, I'm faced with an issue with the linkage rod itself. It is about two inches too long. Both sides of the linkage are reverse threaded, and the rod from the GSXR is too long. I don't have reverse thread taps to make a new one, so I'm probably going to be picking one of those up and doing a modification.
On the plus side, the exhaust mount worked out great. I'll have pictures of that soon.
-John
Replied by floivanus on topic 1980 KZ1000E ST project
01 Aug 2016 13:26
Bad tires, tire balance, swingarm bearings, loose axles, loose triple trees and steering neck bearings are pretty typical issues. Not sure your lighter front end would be the cause, otherwise anyone riding two up would die.
Also shaft jacking and bad/improper shocks could play a role
Also shaft jacking and bad/improper shocks could play a role
Replied by larslykkegaard on topic Turbo KZ
30 Jul 2016 15:11
larslykkegaard
Thanks for all the feed back and yes im quite exited to see what its hidding.
The bike is and kz1000a1 and i got the stock engine with it- it dropped a valve so head and piston al fucked, but around 500km before that he had the tranny fixed at a dealer with bearings, gears etc....
The turbo engine is a Z1E110xxx and well yes cant wait to see whats inside - he only did some small trips but since it was put into a stock frame/bike it was all wopperly so he took it to his friends garage to upgrade stearing, frame and so on, but been standing ever since - 7years....
I got an extended drag swing arm (was told it's a Vance&hinse - but how do i check??) and an oldschool 18x6" Dymag magnesium wheel i wanna ad - the rest is yet to come....
pictures on its way")
The bike is and kz1000a1 and i got the stock engine with it- it dropped a valve so head and piston al fucked, but around 500km before that he had the tranny fixed at a dealer with bearings, gears etc....
The turbo engine is a Z1E110xxx and well yes cant wait to see whats inside - he only did some small trips but since it was put into a stock frame/bike it was all wopperly so he took it to his friends garage to upgrade stearing, frame and so on, but been standing ever since - 7years....
I got an extended drag swing arm (was told it's a Vance&hinse - but how do i check??) and an oldschool 18x6" Dymag magnesium wheel i wanna ad - the rest is yet to come....
pictures on its way
I suggest before buying replacement parts you first look to see if any replacement parts are needed. Replacing parts just for grins can be a big mistake because many aftermarket replacement parts are not as precise as the original parts, so they can cause problems rather than fix them. If you disassemble the carbs be SURE to keep each carb's parts in a container marked with the number of that carb. Mixing parts between carbs can cause problems since parts tend to wear together. Frankly, considering the bike is barely broken in, I would be surprised if any parts are needed. The carbs on a a KZ650 with a mere 8.1k miles on it should be like new inside other than needed to be cleaned if the previous owner let them sit with fuel in them.
Here are some tips that you may find helpful:
Many newbies and not so newbies run into or issues with their bikes which could be easily avoided with a little preparation or information. Here are a couple recommendations that I hope you will find useful.
Before riding your KZ you should take a little time to become familiar with it. Simple things like checking the oil, tire pressures, etc. are explained in the Kawasaki Owner's Manual. If you bike didn't come with one (they normally are in a little holder on the bottom of the seat) you can usually find one on eBay - be sure to get one for your exact year/model.
MANUAL
You really should consider buying the Kawasaki Factory Service Manual for your bike. The factory service manual provides instructions on the various maintenance procedures and schedules for your bike, procedures for diagnosing problems, proper torque values for the various fasteners (VERY IMPORTANT), and insight into how each system on your bike works even if you are not repairing that system. Studying the manual before you attempt performing service on your bike will impart an understanding of the system you are working on which will increase the odds of success.
The manuals usually are readily available for most models on eBay and other sources; but be sure to get one that has your specific year and model in it as there are differences between the various KZ650 models. I do not recommend Clymers, Haynes, or other aftermarket manuals as I have seen instances where they provide inaccurate advice. You may decide to use those to supplement the factory manual, but in my opinion they are not a suitable substitute. If you have trouble finding one for your model ask us to help.
TOOLS
WARNING! Do not even try to use Phillips screwdrivers on the Kawasaki cross head screws. Despite their appearance they are not Phillips screws. They are Japanese Industrial Standard (JIS) screws. The tips of Phillips screwdrivers are too long & pointed to allow the 4 blades of the screwdriver to properly engage the screws, so when you apply force the screw head slots will deform and look like crap. The fact is that Phillips screws were deliberately designed to have the screwdriver bit "cam out." This was done to prevent production line assembly from over-tightening, stripping, or breaking the screws. JIS screws do not have this problem. A proper fitting JIS bit can tighten a JIS screw to and beyond the torque spec without camming out. Here's the good news - you can easily modify standard Phillips screwdriver tips to fit the JIS screws.
I have ground down the tips of DeWalt #2 and DeWalt #3 Phillips to make them fit JIS screws. The large crosshead screws on the cases take modified #3 bits (or genuine #3 JIS bits). To modify the DeWalt bits you need to grind the very tip a little, then test fit, then grind a little more and test fit, etc. until the bit no longer "rocks" back and forth in the screwhead. Picture 1 below shows how a DeWalt #3 bit fits the case screws of my KZ650 after being ground properly. The #2 DeWalt bits can be modified the same way to fit smaller JIS screws. Pictures 2 and 3 below shows DeWalt #2 and #3 modified bits.
I did find a place that sells authentic JIS bits. They don't list the #3 bit, but if you contact them they can provide the #3 JIS bits even though they are not listed on the website. These folks were very easy to work with, and the authentic bits do work great. Here's their site:
www.rjrcooltools.com/shop_item_detail.cfm?subcat_ID=89
Pictures 4 & 5 below show a comparison between my home made modified bits with the authentic JIS bits, and picture 6 shows a comparison between Philips and JIS bit tips.
PICTURE 1
PICTURE 2
PICTURE 3
PICTURE 4
PICTURE 5
PICTURE 6
Before reaching for that wrench or ratchet consider the following. The bolts are steel, but your engine and front forks are aluminum. The bolts are much tougher than the aluminum and if over tightened will strip the aluminum threads. Although these can be repaired, preventing damage by applying proper torque will save you grief, time, and money. Tightening fasteners properly requires torque wrenches. Various vendors, including Snap-on, CDI, Sears, etc., market torque wrenches. The two most popular types are the bar type and micrometer type. Either will work, but the micrometer type is a bit easier to use, especially if you are tightening several fasteners with the same torque - such as cylinder head covers. You will need a torque wrench calibrated in INCH POUNDS for many of the bolts. You will also need a torque wrench calibrated in FOOT POUNDS for the larger bolts. Don't try to use the foot pounds wrench on the smaller bolts as it will not be sensitive enough at low torque settings to provide accurate torque. There are many fasteners that require low torque. These include such things as 6mm oil pan bolts, cylinder head cover bolts, etc. for which the torque in 61-78 inch pounds. These low torque bolts require a wrench that is accurate at low settings and this wrench should be graduated in inch pounds. In addition, there are numerous high torque fasteners such as the front axle nuts (51 - 65 foot pounds) or swing arm pivot shaft nuts (58 - 87 foot pounds). These require a wrench that is accurate at higher settings; this wrench should be graduated in foot pounds. Using the proper torque wrenches to correctly tighten fasteners will help prevent damage and contribute to a safe bike. The Kawasaki Service Manual will list the various torque specs for the bolts. I suggest you get the manual before buying the torque wrenches so you can decide which wrenches best meet the torque specs.
Consider buying a can of Kroil penetrating oil and use it to soak stubborn fasteners for a couple days before trying to loosen them. Remember, the original screws and bolts were installed on your bike when Jimmy Carter was President, so many of them may be hard to remove. Kroil can be bought online, at guns shows, and at some other venues.
MOTOR OIL
The ingredients in oils have changed over the years. For example, today's Castrol GTX oil (and pretty much all other AUTOMOBILE oil) is not the same as it was in the 1980's. Back then it worked great in KZ bikes. But, things have changed. Early AUTOMOBILE oils contained zinc phosphorus compounds (ZDDP) to protect engine components from metal to metal contact. This was good for engines, but it was found to be destructive to catalytic converters. Consequently, in AUTOMOBILE oils ZDDP was virtually eliminated and replaced with different chemistry generically referred to as "Friction Modifiers." These work fine and offer good protection for normal AUTOMOBILE engines. However, today's AUTOMOBILE oil "Friction Modifiers" are destructive to wet clutches. KZ bikes (and many other brands) have wet clutches. As a result of these oil chemistry changes a distinction needed to be made between those oils which are suitable for wet clutches and those which are not. That distinction was documented by the Japanese Engine Oil Standards Implementation Panel (JASO). JASO developed a number of different oil specifications for different applications. The specifications that apply to 4 stroke motorcycles fall under the "4T Specifications." Within the 4T specifications the JASO MA class oils are specifically formulated for 4 stroke motorcycles with wet clutches.
There are synthetic, semi-synthetic, and non-synthetic oils that meet the JASO-MA standard and any of them will work ok. However, using oils that are not designated as meeting the JASO-MA standard is destructive to KZ clutches.
Good luck with your bike. Ed
Here are some tips that you may find helpful:
Many newbies and not so newbies run into or issues with their bikes which could be easily avoided with a little preparation or information. Here are a couple recommendations that I hope you will find useful.
Before riding your KZ you should take a little time to become familiar with it. Simple things like checking the oil, tire pressures, etc. are explained in the Kawasaki Owner's Manual. If you bike didn't come with one (they normally are in a little holder on the bottom of the seat) you can usually find one on eBay - be sure to get one for your exact year/model.
MANUAL
You really should consider buying the Kawasaki Factory Service Manual for your bike. The factory service manual provides instructions on the various maintenance procedures and schedules for your bike, procedures for diagnosing problems, proper torque values for the various fasteners (VERY IMPORTANT), and insight into how each system on your bike works even if you are not repairing that system. Studying the manual before you attempt performing service on your bike will impart an understanding of the system you are working on which will increase the odds of success.
The manuals usually are readily available for most models on eBay and other sources; but be sure to get one that has your specific year and model in it as there are differences between the various KZ650 models. I do not recommend Clymers, Haynes, or other aftermarket manuals as I have seen instances where they provide inaccurate advice. You may decide to use those to supplement the factory manual, but in my opinion they are not a suitable substitute. If you have trouble finding one for your model ask us to help.
TOOLS
WARNING! Do not even try to use Phillips screwdrivers on the Kawasaki cross head screws. Despite their appearance they are not Phillips screws. They are Japanese Industrial Standard (JIS) screws. The tips of Phillips screwdrivers are too long & pointed to allow the 4 blades of the screwdriver to properly engage the screws, so when you apply force the screw head slots will deform and look like crap. The fact is that Phillips screws were deliberately designed to have the screwdriver bit "cam out." This was done to prevent production line assembly from over-tightening, stripping, or breaking the screws. JIS screws do not have this problem. A proper fitting JIS bit can tighten a JIS screw to and beyond the torque spec without camming out. Here's the good news - you can easily modify standard Phillips screwdriver tips to fit the JIS screws.
I have ground down the tips of DeWalt #2 and DeWalt #3 Phillips to make them fit JIS screws. The large crosshead screws on the cases take modified #3 bits (or genuine #3 JIS bits). To modify the DeWalt bits you need to grind the very tip a little, then test fit, then grind a little more and test fit, etc. until the bit no longer "rocks" back and forth in the screwhead. Picture 1 below shows how a DeWalt #3 bit fits the case screws of my KZ650 after being ground properly. The #2 DeWalt bits can be modified the same way to fit smaller JIS screws. Pictures 2 and 3 below shows DeWalt #2 and #3 modified bits.
I did find a place that sells authentic JIS bits. They don't list the #3 bit, but if you contact them they can provide the #3 JIS bits even though they are not listed on the website. These folks were very easy to work with, and the authentic bits do work great. Here's their site:
www.rjrcooltools.com/shop_item_detail.cfm?subcat_ID=89
Pictures 4 & 5 below show a comparison between my home made modified bits with the authentic JIS bits, and picture 6 shows a comparison between Philips and JIS bit tips.
PICTURE 1
PICTURE 2
PICTURE 3
PICTURE 4
PICTURE 5
PICTURE 6
Attachment JISvs.PhillipsAngles-2-3-4-5-6.jpg not found
Before reaching for that wrench or ratchet consider the following. The bolts are steel, but your engine and front forks are aluminum. The bolts are much tougher than the aluminum and if over tightened will strip the aluminum threads. Although these can be repaired, preventing damage by applying proper torque will save you grief, time, and money. Tightening fasteners properly requires torque wrenches. Various vendors, including Snap-on, CDI, Sears, etc., market torque wrenches. The two most popular types are the bar type and micrometer type. Either will work, but the micrometer type is a bit easier to use, especially if you are tightening several fasteners with the same torque - such as cylinder head covers. You will need a torque wrench calibrated in INCH POUNDS for many of the bolts. You will also need a torque wrench calibrated in FOOT POUNDS for the larger bolts. Don't try to use the foot pounds wrench on the smaller bolts as it will not be sensitive enough at low torque settings to provide accurate torque. There are many fasteners that require low torque. These include such things as 6mm oil pan bolts, cylinder head cover bolts, etc. for which the torque in 61-78 inch pounds. These low torque bolts require a wrench that is accurate at low settings and this wrench should be graduated in inch pounds. In addition, there are numerous high torque fasteners such as the front axle nuts (51 - 65 foot pounds) or swing arm pivot shaft nuts (58 - 87 foot pounds). These require a wrench that is accurate at higher settings; this wrench should be graduated in foot pounds. Using the proper torque wrenches to correctly tighten fasteners will help prevent damage and contribute to a safe bike. The Kawasaki Service Manual will list the various torque specs for the bolts. I suggest you get the manual before buying the torque wrenches so you can decide which wrenches best meet the torque specs.
Consider buying a can of Kroil penetrating oil and use it to soak stubborn fasteners for a couple days before trying to loosen them. Remember, the original screws and bolts were installed on your bike when Jimmy Carter was President, so many of them may be hard to remove. Kroil can be bought online, at guns shows, and at some other venues.
MOTOR OIL
The ingredients in oils have changed over the years. For example, today's Castrol GTX oil (and pretty much all other AUTOMOBILE oil) is not the same as it was in the 1980's. Back then it worked great in KZ bikes. But, things have changed. Early AUTOMOBILE oils contained zinc phosphorus compounds (ZDDP) to protect engine components from metal to metal contact. This was good for engines, but it was found to be destructive to catalytic converters. Consequently, in AUTOMOBILE oils ZDDP was virtually eliminated and replaced with different chemistry generically referred to as "Friction Modifiers." These work fine and offer good protection for normal AUTOMOBILE engines. However, today's AUTOMOBILE oil "Friction Modifiers" are destructive to wet clutches. KZ bikes (and many other brands) have wet clutches. As a result of these oil chemistry changes a distinction needed to be made between those oils which are suitable for wet clutches and those which are not. That distinction was documented by the Japanese Engine Oil Standards Implementation Panel (JASO). JASO developed a number of different oil specifications for different applications. The specifications that apply to 4 stroke motorcycles fall under the "4T Specifications." Within the 4T specifications the JASO MA class oils are specifically formulated for 4 stroke motorcycles with wet clutches.
There are synthetic, semi-synthetic, and non-synthetic oils that meet the JASO-MA standard and any of them will work ok. However, using oils that are not designated as meeting the JASO-MA standard is destructive to KZ clutches.
Good luck with your bike. Ed
Displaying 941 - 950 out of 7255 results.