
Search Results (Searched for: gs swing arm)
Replied by Nebr_Rex on topic 80 KZ 440 LTD little rough lol
06 May 2014 09:14
Yes , a running bike for $250 :cheer is always worth it. Just perform all the regular maintenance
including fork seals, brakes, steering stem bearings and swingarm pivot point. This will give a solid
foundation to build upon.
.
including fork seals, brakes, steering stem bearings and swingarm pivot point. This will give a solid
foundation to build upon.
.
Replied by 650mod on topic 650 Mod's 78 Fighter Build
04 May 2014 16:55
Alright. So we got a bit more done today. We almost got the offset fully finished up, but ran into a clearance issue before we went to tack the sprocket together. I'm scraping the frame a slight little bit just above the swingarm. We're going to get this sorted out tomorrow- shave down the cush drive hub a little bit to give me the needed clearance.
First up- the inner sprocket all machined down and welded into the tube. We didn't torch the outer edge off of the sprocket, so it took a little longer to machine down. Thanks to Leon with the genius mandrel idea- I took a hex cap bolt and machined the head of it down to accept the ID of the sprocket. Locked it down with the nut, and we're good to go.
The drive sprocket locked into the lathe to get opened up.
All machined and slipped over the tube.
Cut the tube length down a little so we could lock the sprocket in place. Chain locked on, time to give it a spin.
A quick peek at the frame clearance. As you can see, using the O-ring chain was probably not the best idea. It's a little wider, so it scrapes a little but. It's not too bad, but definitely needs to be fixed. Off to the lathe with the cush drive to get spun down a little...
Having the chain on the bike really gives a good idea of how much longer the wheelbase now is. I believe it's 4.5" over the stock wheelbase.
As you can see, the rivet is JUST brushing the frame welds- this is right above where the foot rest is welded in.
One more quick peek. I think that an eighth of an inch should make for plenty of room on the frame and tire side. More pictures will be up with the progress from tomorrow's work.
ALMOST there.... Finish the sprocket up, then get the steering stops and foot rest mounts welded in. One more thing to check off the list of things to do...
First up- the inner sprocket all machined down and welded into the tube. We didn't torch the outer edge off of the sprocket, so it took a little longer to machine down. Thanks to Leon with the genius mandrel idea- I took a hex cap bolt and machined the head of it down to accept the ID of the sprocket. Locked it down with the nut, and we're good to go.
Attachment IMGP2717800x600.jpg not found
The drive sprocket locked into the lathe to get opened up.
Attachment IMGP2718800x600.jpg not found
All machined and slipped over the tube.
Attachment IMGP2719800x600.jpg not found
Cut the tube length down a little so we could lock the sprocket in place. Chain locked on, time to give it a spin.
Attachment IMGP2720800x600.jpg not found
A quick peek at the frame clearance. As you can see, using the O-ring chain was probably not the best idea. It's a little wider, so it scrapes a little but. It's not too bad, but definitely needs to be fixed. Off to the lathe with the cush drive to get spun down a little...
Attachment IMGP2722800x600.jpg not found
Having the chain on the bike really gives a good idea of how much longer the wheelbase now is. I believe it's 4.5" over the stock wheelbase.
Attachment IMGP2723800x600.jpg not found
As you can see, the rivet is JUST brushing the frame welds- this is right above where the foot rest is welded in.
Attachment IMGP2724800x600.jpg not found
One more quick peek. I think that an eighth of an inch should make for plenty of room on the frame and tire side. More pictures will be up with the progress from tomorrow's work.
Attachment IMGP2725800x600.jpg not found
ALMOST there.... Finish the sprocket up, then get the steering stops and foot rest mounts welded in. One more thing to check off the list of things to do...
78 kz650 SR BURNING OIL was created by Kawilk01
03 May 2014 21:33 Kawilk01
Hey all this is my first post here. So bear with me!
I've got a 78 kz650 SR model with 10,000 original miles that seems to be burning oil and I cant figure out why.
Motor mods:
MAC 4-1 no baffle
Dyna electronic ignition
Pod filters with crank vent ran to behind the swingarm
Ive checked all 4 plugs and they are all perfect tan color which makes sense because the carbs have been jetted and synched darn near perfect. The oil level is dead center between the marks on the window. The bike still pulls hard and has no issues running whatsoever. I also just ran a compression test and came up right at 155 psi in all cylinders. I have correct timing etc.
On to the symptoms:
ive been riding the bike for about a week now with no problems or blue smoke. However, today I noticed at a red light that there was blue smoke steadily coming from the pipe, not like a two stroke but enough you can see it, it puffs more every time I goose the throttle and a friendly driver caught me and said he could smell something burning behind me.
My question is, if I have solid compression on all cylinders and the plugs look fine, what would make me burn oil while riding? normally i would think valve seals if it just smoked on startup but it worries me that it smokes after its warmed and all. partially blown head gasket maybe?
sorry for the book guys but I would like to get to the bottom of this quickly
Replied by diego092409 on topic Swingarm Center Offset
30 Apr 2014 08:30
Leon,
Thanks, this helps me a lot. 3/8" is the most that I can do but I think it will help with getting the chain aligned. Have you heard of putting a 525 chain on these bikes? The existing wheel came with a 525 sprocket on it and the horsepower of the 600 GSXR has to be comparable to the old GPZ. I guess the other option would be putting a 630 sprocket on the rear wheel and keeping my stock sprocket..
Jeff
Swingarm Center Offset was created by diego092409
29 Apr 2014 14:26
I have a 2006 GSXR 600 Swing arm that I am grafting onto my 1982 GPZ1100. The GPZ1100's opening is 7/8" Wider than the swingarm of GSXR. I am looking at the chain guide that runs on top of the swingarm, I am looking at having to put the swingarm an 1/8" offcenter so that the chain clears the inside of the GPZ frame. I am curious as to whether, I could offset it by as much as 3/8" to eliminate/minimize the offset in the drive sprocket? The new tire is a 180 55/R17 so how much would 3/8" effect the driveability?
Replied by Scootjockey on topic Goodbye LTD, Hello MKII !
28 Apr 2014 19:13 Scootjockey
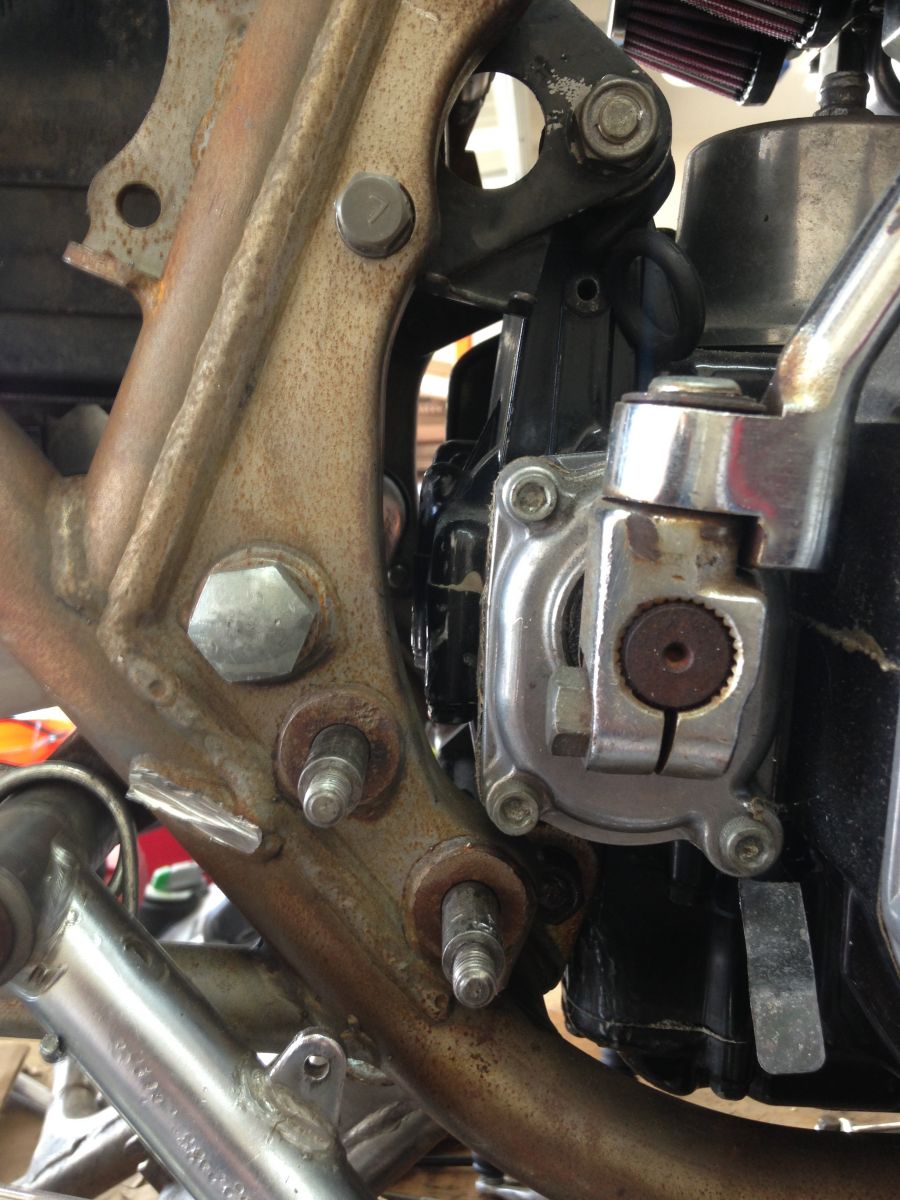
Alright, I'm back! I've gotten quite a bit done since my last post, I'll be putting up some pics and thoughts in the next few days. I think I'll start with my adapted rearsets and what I've been doing to make them fit.
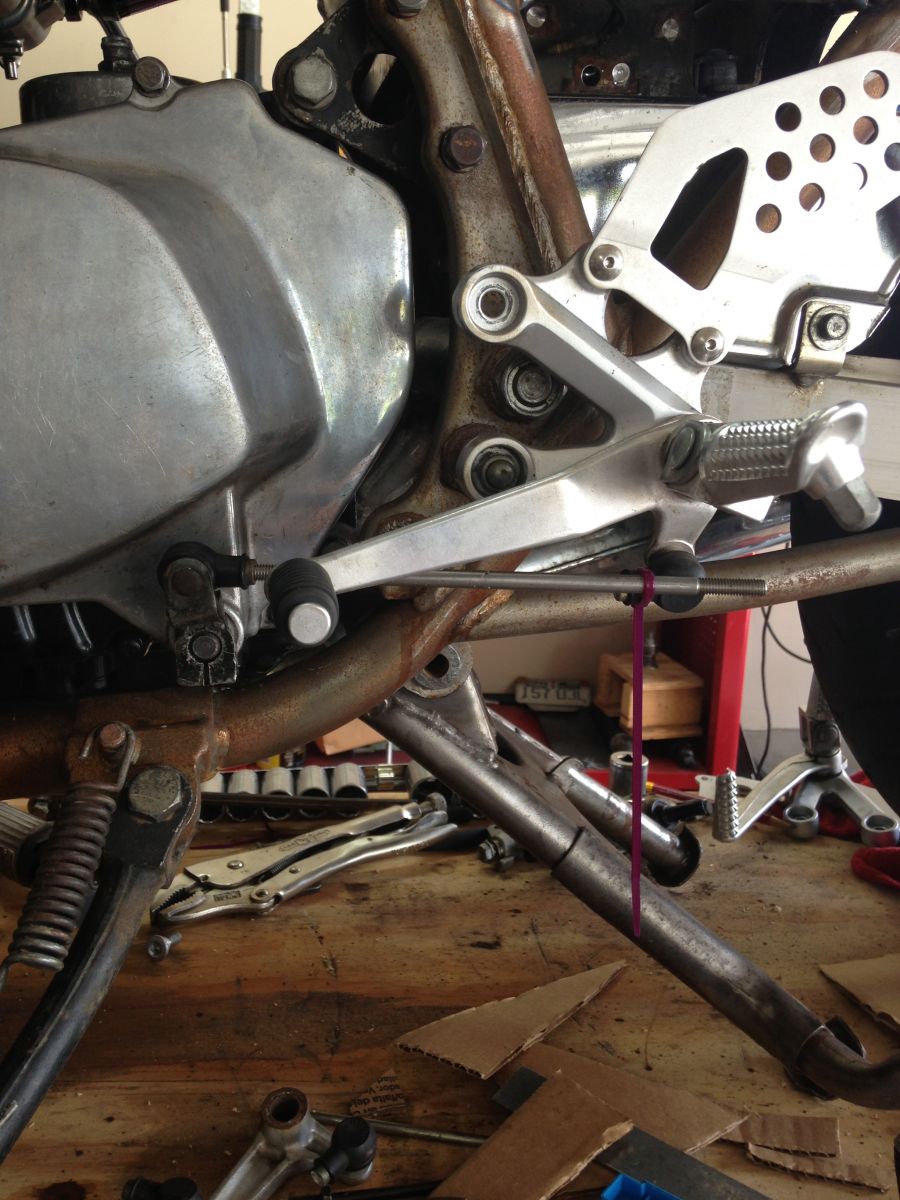
This should be pretty familiar-bare mounting pegs. I'm going to use them to mount the new rearsets and bracket.
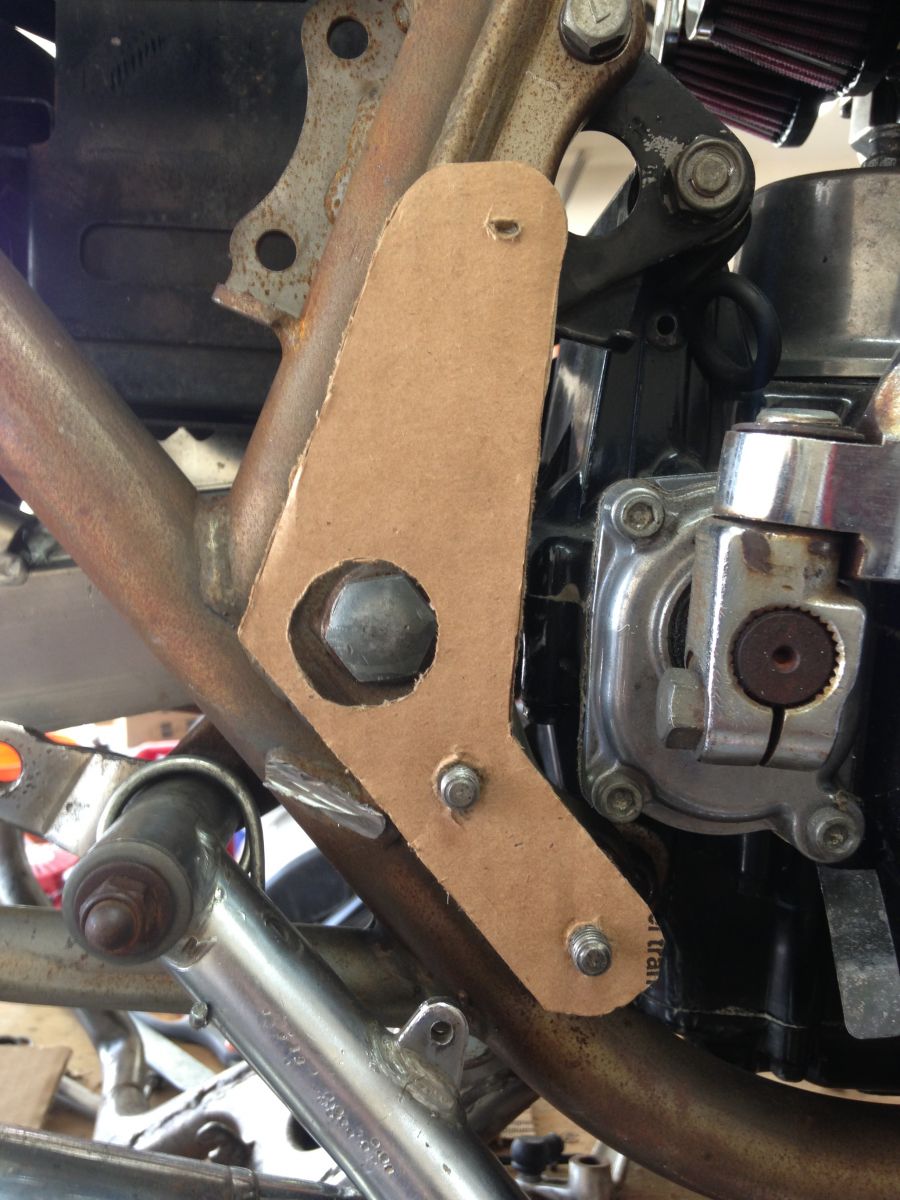
This is my cardboard template for the bracket. It will be made of 5/16 aluminum plate, and will slip onto the stock mount pegs at the bottom, and use a motor mount bolt at the top. The hole for the swingarm pivot bolt is just for aesthetics, the rearsets will have to come off to remove the swingarm.
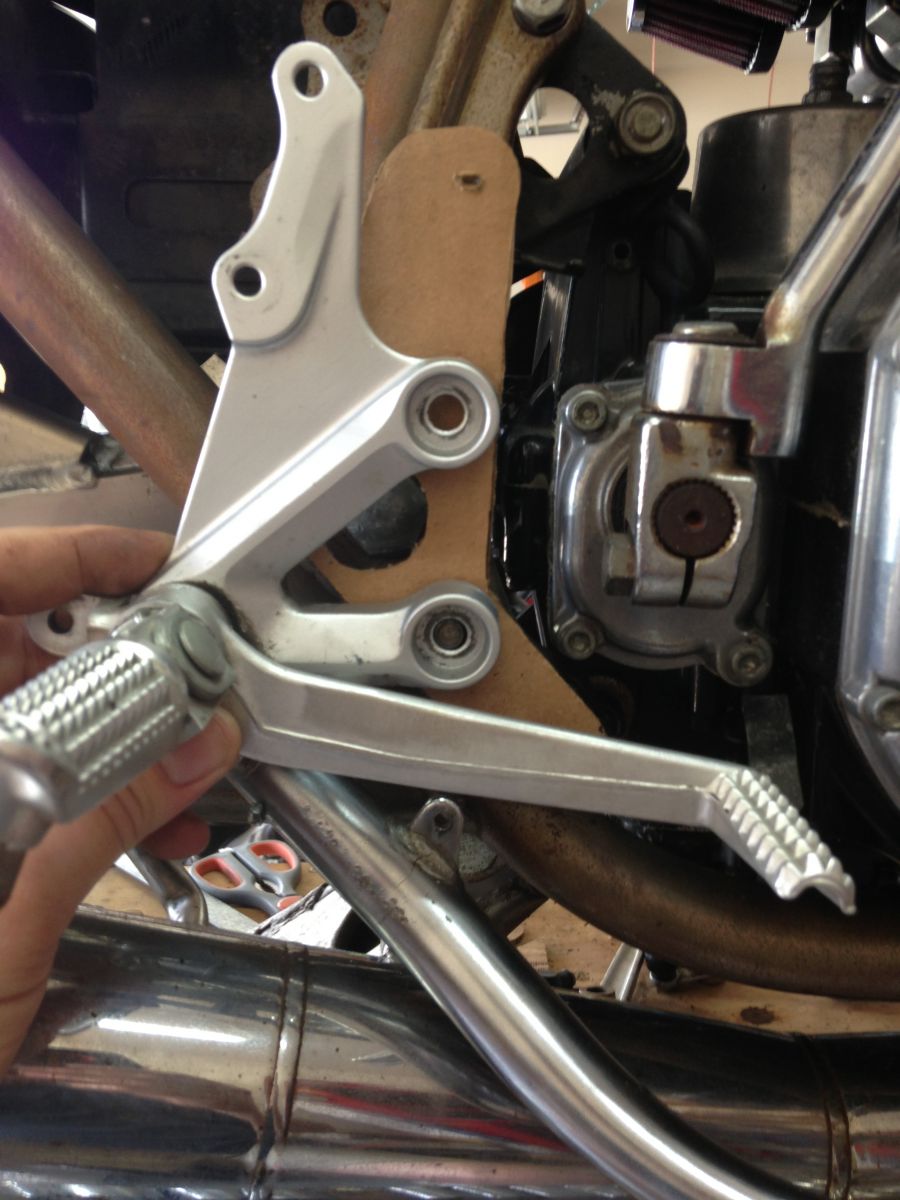
This is how everything will line up. The lower rearset mount point will attach to the upper stock peg. I'm going to remove the threaded end and drill and tap it for an allen head bolt. The bottom peg will use a nut on the stock threads. The top will use a longer bolt which will thread into the upper motor mount bracket. I'll fashion spacers to go behind once I've got everything where I want it.
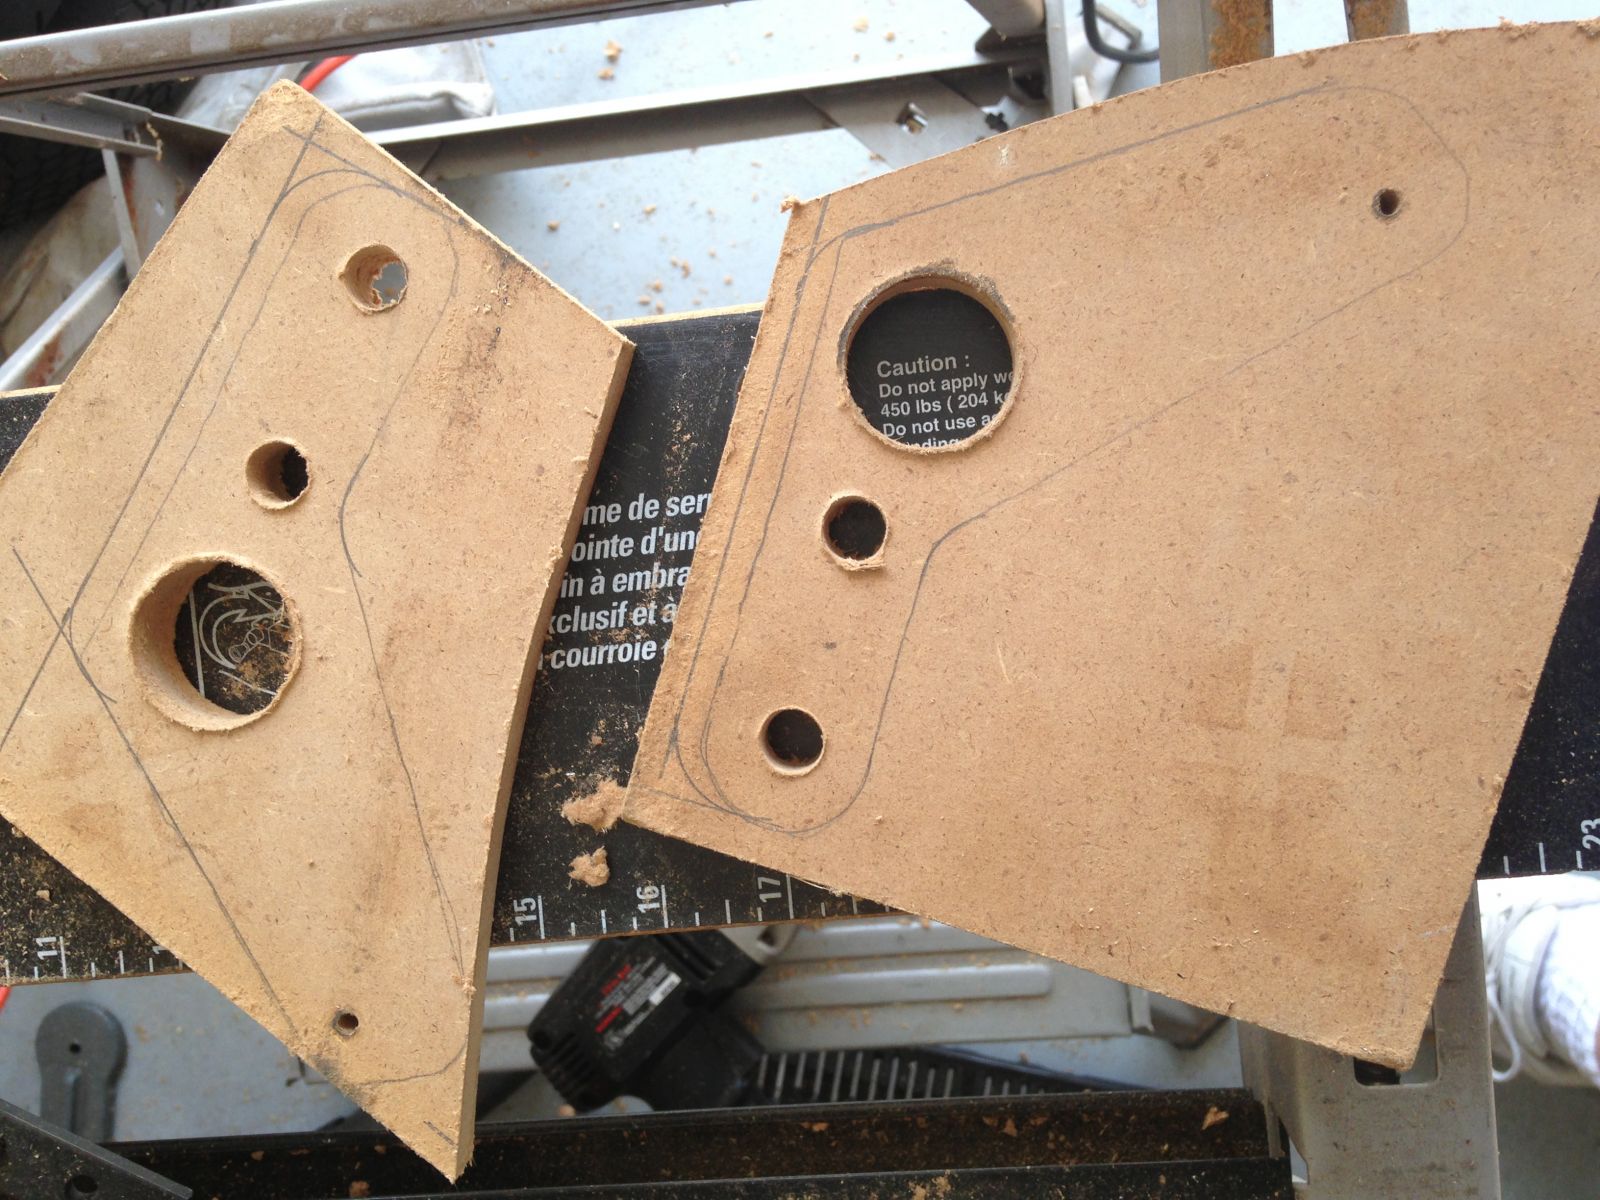
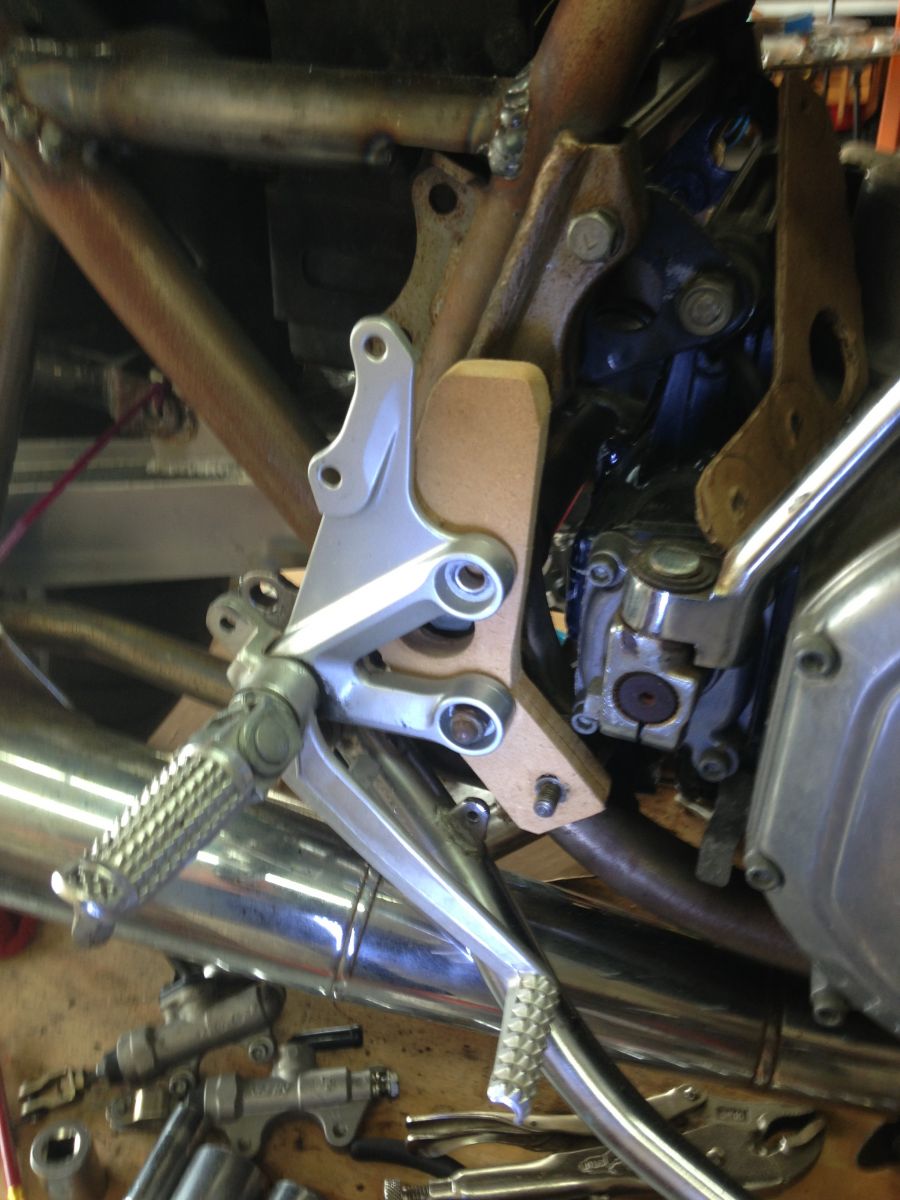
I'm making my mock-up brackets with MDF. It's easy to cut and shape, and will be reasonably sturdy for me to sit on the bike and see if I like the foot position.
So, this is how the shift linkage is going together. As it sits, it is now a reverse pattern, 1-up, four-down. I think I'm going to leave it that way, I've always wanted to try it. I can always redesign it later if it doesn't suit me. The linkage pieces are mid 80s Ninja 600.
The next two pics are the mock-up brackets installed, without the upper holes finalized. They fit tightly over the pegs and seem very sturdy.
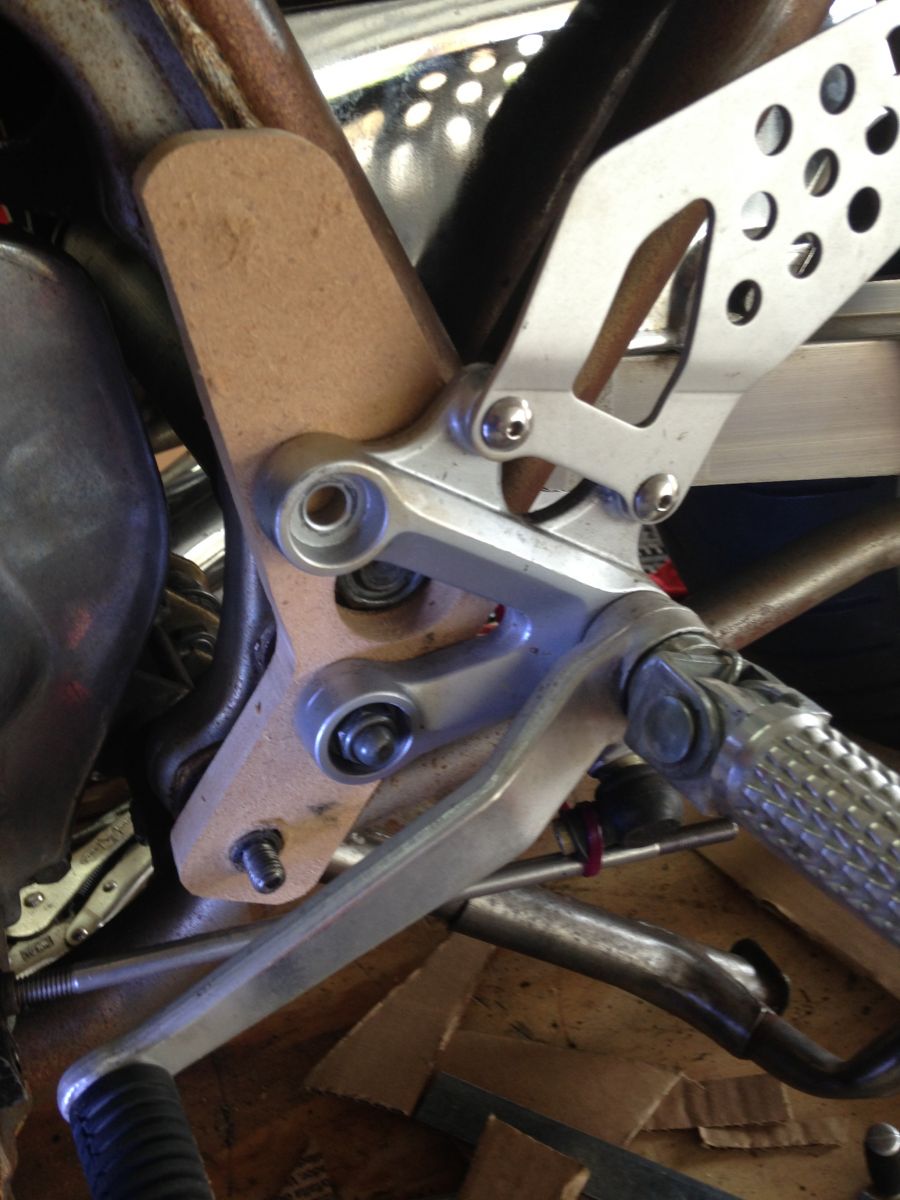
The rearset is designed to hold the rear M/C, but it interferes with the sidecover (more about that soon), plus, I think it looks a little cluttered. I'm going to remove the mounts for the M/C and heel guards on both sides, leaving just the triangular brackets. I'll also go into how I'm going to use the new brake pedal to actuate the original rear M/C in it's original position in another post soon.
One final pic:
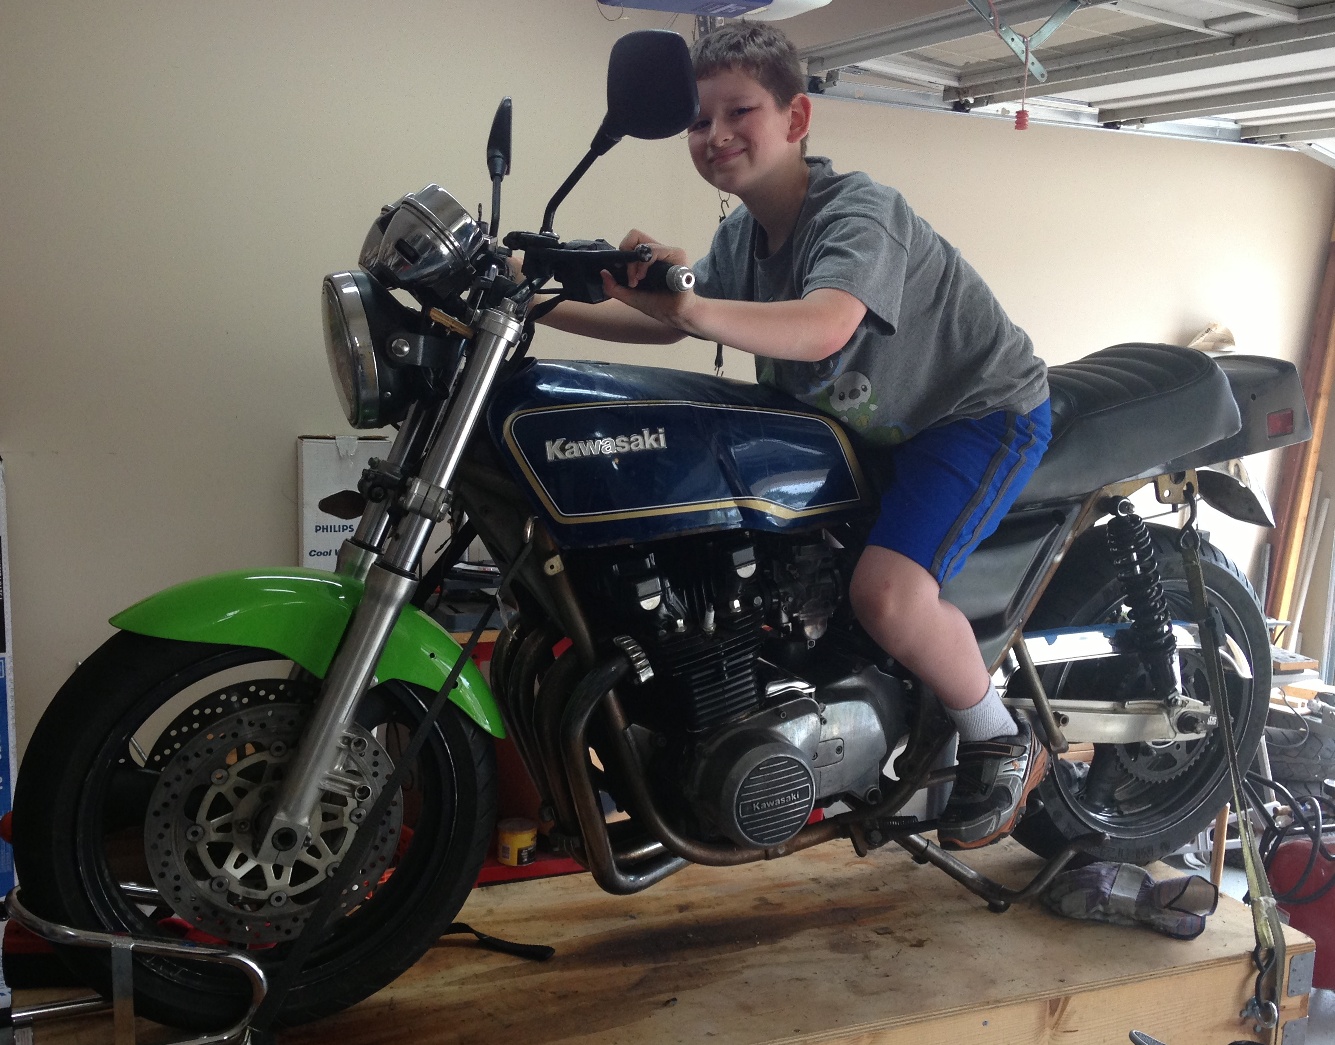
The boy is diggin' it! Almost 9, and nearly big enough to ride it!!
This should be pretty familiar-bare mounting pegs. I'm going to use them to mount the new rearsets and bracket.
This is my cardboard template for the bracket. It will be made of 5/16 aluminum plate, and will slip onto the stock mount pegs at the bottom, and use a motor mount bolt at the top. The hole for the swingarm pivot bolt is just for aesthetics, the rearsets will have to come off to remove the swingarm.
This is how everything will line up. The lower rearset mount point will attach to the upper stock peg. I'm going to remove the threaded end and drill and tap it for an allen head bolt. The bottom peg will use a nut on the stock threads. The top will use a longer bolt which will thread into the upper motor mount bracket. I'll fashion spacers to go behind once I've got everything where I want it.
I'm making my mock-up brackets with MDF. It's easy to cut and shape, and will be reasonably sturdy for me to sit on the bike and see if I like the foot position.
So, this is how the shift linkage is going together. As it sits, it is now a reverse pattern, 1-up, four-down. I think I'm going to leave it that way, I've always wanted to try it. I can always redesign it later if it doesn't suit me. The linkage pieces are mid 80s Ninja 600.
The next two pics are the mock-up brackets installed, without the upper holes finalized. They fit tightly over the pegs and seem very sturdy.
The rearset is designed to hold the rear M/C, but it interferes with the sidecover (more about that soon), plus, I think it looks a little cluttered. I'm going to remove the mounts for the M/C and heel guards on both sides, leaving just the triangular brackets. I'll also go into how I'm going to use the new brake pedal to actuate the original rear M/C in it's original position in another post soon.
One final pic:
The boy is diggin' it! Almost 9, and nearly big enough to ride it!!
Replied by pete greek1 on topic KZ1000 should I?
24 Apr 2014 08:31
Just adding 1 more thing to 650ed's list that can cause high speed wobble...swingarm bearings ...PETE
Replied by 531blackbanshee on topic Fixing the pivot point for the swingarm
24 Apr 2014 05:30
they are meant to be centered.
now,
given manufacturing tolerances whether they are all truly on center i can't confirm.
if you have your complete rear wheel swingarm brake spacers axle assembly together square up the frame mountings and slip it all into the frame on the swingarm pivot bolt and let the chain line tell you where it want's to be.then just get some spacers made to fill the gaps") .
.
leon
now,
given manufacturing tolerances whether they are all truly on center i can't confirm.
if you have your complete rear wheel swingarm brake spacers axle assembly together square up the frame mountings and slip it all into the frame on the swingarm pivot bolt and let the chain line tell you where it want's to be.then just get some spacers made to fill the gaps
.leon
Replied by 531blackbanshee on topic Fixing the pivot point for the swingarm
23 Apr 2014 13:38 - 23 Apr 2014 13:39
it can be fixed.
if you could get it flattened out a couple spacers would make it usable again.
if i had it in my hands i would cut out whats left of the original mounts and machine some new ones and weld them back in so it looked just like factory.
you being in mass. means i'm not going to get it in my hands most probably !
!
all is still not lost tho.
you need a set of dial calipers.cheap ones are fine
. www.amazon.com/TEKTON-7165-6-Inch-Dial-C...id=1398285076&sr=1-4
use them to measure top bottom front back of each hole and file the frame mountings until they are as square as you can get them.
then measure your frames inside dimension and subtract the swingarm width (with dust caps)from that,divide that number in two and that is the dimension of the width of the spacers you will need.
let me know if i can be of any further assistance.
you can tap the "billybiltit workshop" add and get my contact info.
leon
if you could get it flattened out a couple spacers would make it usable again.
if i had it in my hands i would cut out whats left of the original mounts and machine some new ones and weld them back in so it looked just like factory.
you being in mass. means i'm not going to get it in my hands most probably
!all is still not lost tho.
you need a set of dial calipers.cheap ones are fine
. www.amazon.com/TEKTON-7165-6-Inch-Dial-C...id=1398285076&sr=1-4
use them to measure top bottom front back of each hole and file the frame mountings until they are as square as you can get them.
then measure your frames inside dimension and subtract the swingarm width (with dust caps)from that,divide that number in two and that is the dimension of the width of the spacers you will need.
let me know if i can be of any further assistance.
you can tap the "billybiltit workshop" add and get my contact info.
leon
Replied by K.D. HART on topic 1974 Z1A with 1995 GSXR 750 suspension build.
11 Apr 2014 07:54 - 16 Jun 2014 07:34
Mockup is set at the correct height now.
z1wiz did a stem swap to my triple trees over the winter and I just ordered 1'' fork extension from cycle one off.
Next I need to have some swingarms bushings made.
z1wiz did a stem swap to my triple trees over the winter and I just ordered 1'' fork extension from cycle one off.
Next I need to have some swingarms bushings made.

Displaying 1921 - 1930 out of 7258 results.