Welcome, Guest
Username: Password: Remember me
  • Page:
  • 1
  • 2

TOPIC:

Tailpaint and seatcover 03 Nov 2005 20:32 #6366

  • ronboskz650sr
  • ronboskz650sr's Avatar Topic Author
  • Offline
  • User
  • Posts: 323
  • Thank you received: 0
Since I've been basically documenting the whole seat/tail project in paint/body, here's the seat cover installation. I'll be posting links of seatpan construction in chassis for ratmiester in a day or two.
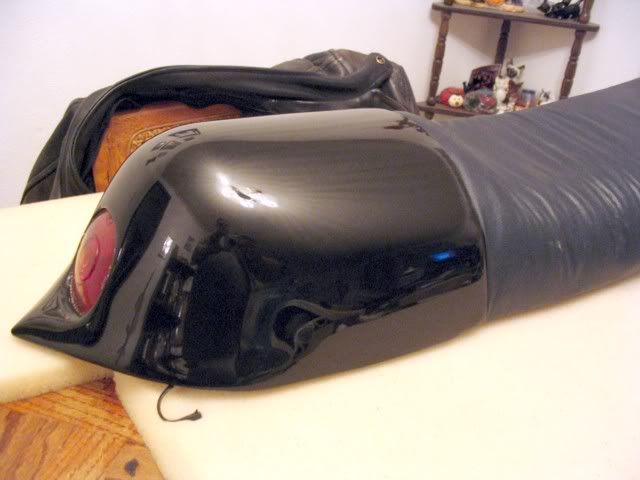
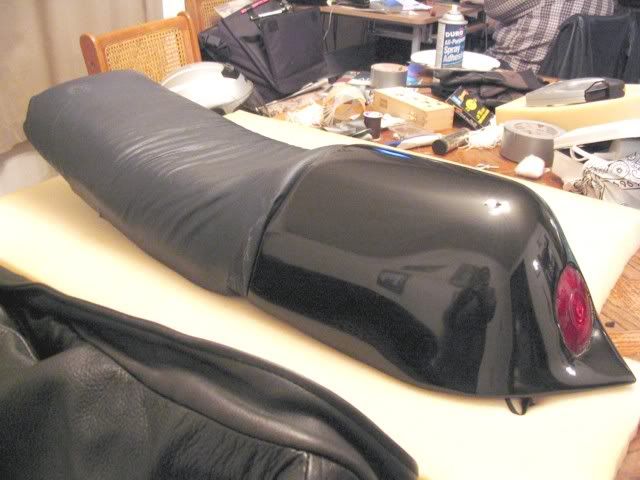
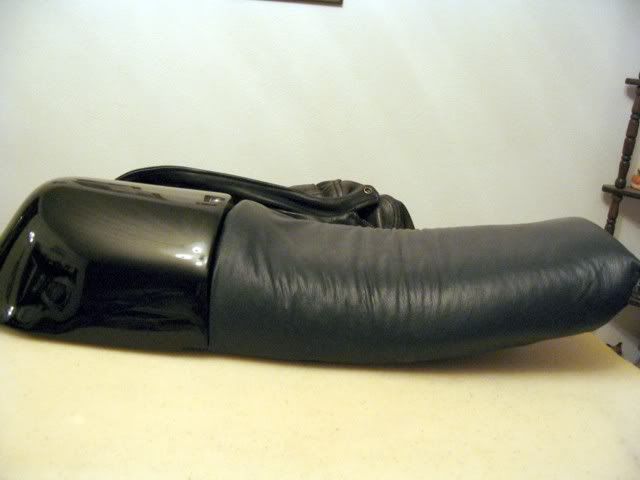
First off, a couple of pics showing the reflectivity of the tailpiece (gloat). You can see the bumps in the cieling and the rays of shadows from the light fixture (gloat again)


Okay, enough of that (paint and body, you know).

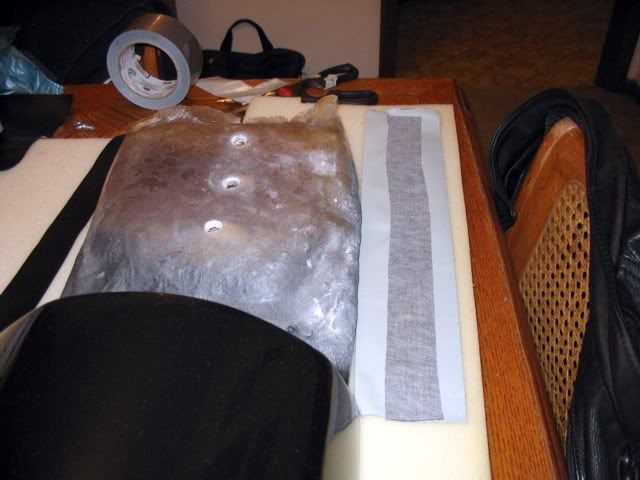
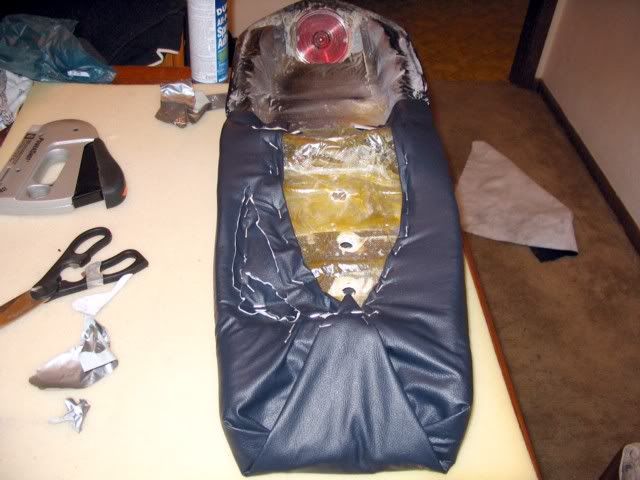
Here you can see where I drilled four 3/4 inch holes to let the foam breath. You can also see a vinyl strip on the left, and one attached to duct tape on the right. These are to relieve any remaining stress from any slight irregularities in the seatpan on the edges. You can see the edges have been sanded smooth, but this still helps smooth the vinyl when you staple it.

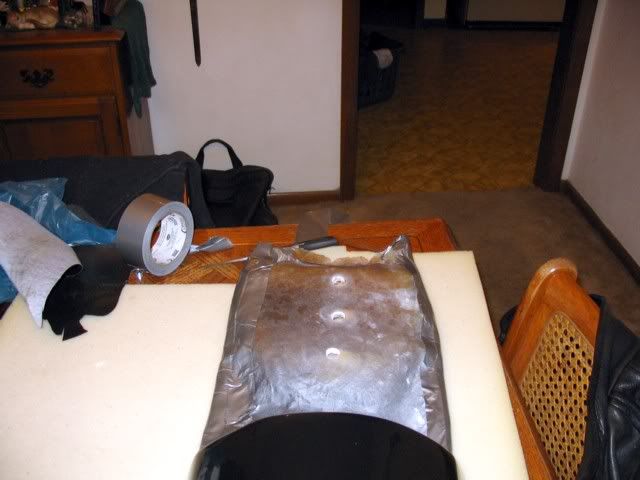
Here's what it looks like after both stress strips are installed..


After that, the cushion is usually glued to the pan. I didn't do this, because my cusion is cut to fit the contours in the pan exactly, and doesn't even move when I sit on it without a cover. I've been riding it for hundreds of miles just attached by the cover stapled to the seat. I am also sitting on the vinyl right on the frame rails under the pan. So glue it if you doubt its stability. If you do, use Goop marine contact cement. Great stuff.

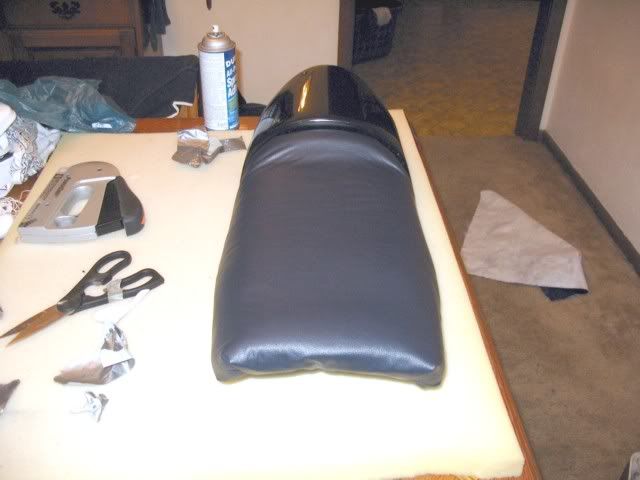
After attaching the cushion, I stretched the vinyl tight using duct tape the first time just to get it squared up on the cushion. Spray adhesive helps the top conform to the contours..I have a layer of batting material over the cushion, then the spray, then apply the vinyl. Lift and reposition it as needed as you stretch it. Don't spray the cushion and the cover or you'll never get it apart. After attaching with the duct tape, go around pulling the wrinkles out and stapling ...


You'll notice I still haven't sewn a cover. You can see, though where cuts will need to be. The folded and taped areas will be sliced and sewn together like pleats that will stay under the nose when it's done. I don't have the energy tonight. I will probably put a couple in the back, too. For now, given the amount of money my truck is taking (over 800 dollars today), I'm going to just enjoy the "homemeade" effect the cover imparts to the bike.

Still, you can see it gets better everytime...
earlier...


latest version...

Tomorrow, I'll probably restretch it to take a few more wrinkles out near the back. Once I get one sewn up, it will just lay flat in those areas.

Please Log in or Create an account to join the conversation.

Tailpaint and seatcover 03 Nov 2005 21:20 #6372

  • kawasakikid38
  • kawasakikid38's Avatar
  • Offline
  • User
  • Posts: 65
  • Thank you received: 0
did you use a rattlecan or spray gun. sorry but i just looked at this post and wanted to know.:silly:

Please Log in or Create an account to join the conversation.

Tailpaint and seatcover 03 Nov 2005 21:22 #6373

  • ronboskz650sr
  • ronboskz650sr's Avatar Topic Author
  • Offline
  • User
  • Posts: 323
  • Thank you received: 0
Rattlecan...no problem.
Here's a slight restretch, couldn't wait until tomorrow.

Please Log in or Create an account to join the conversation.

Tailpaint and seatcover 03 Nov 2005 21:45 #6382

  • Bud1
  • Bud1's Avatar
  • Offline
  • User
  • Posts: 149
  • Thank you received: 0
Looking good! Can't wait to see the final product!

Please Log in or Create an account to join the conversation.

Tailpaint and seatcover 03 Nov 2005 21:52 #6383

  • ronboskz650sr
  • ronboskz650sr's Avatar Topic Author
  • Offline
  • User
  • Posts: 323
  • Thank you received: 0
Thanks Bud! I have to trim a little material from the back of the cover to get rid of the slight bunch right there...just too much to stuff in the available space. I think it's really going to look nice once I do that, and get the front pleated to fit. There's a little extra there at the tank/seat junction, that will flatten out after slicing it up and sewing the new shapes together.

Please Log in or Create an account to join the conversation.

Tailpaint and seatcover 04 Nov 2005 08:57 #6451

  • ltdrider
  • ltdrider's Avatar
  • Offline
  • User
  • Posts: 1232
  • Thank you received: 17
Ron:
Your results with a rattle can are very impressive. Is the fender in the last pictures clearcoated?
'76 KZ900 LTD (Blaze)
'96 Voyager XII (Dark Star)
'79 KZ650 Cafe Project (Dirty Kurt)
Greensboro, NC

Please Log in or Create an account to join the conversation.

Tailpaint and seatcover 04 Nov 2005 11:26 #6481

  • ronboskz650sr
  • ronboskz650sr's Avatar Topic Author
  • Offline
  • User
  • Posts: 323
  • Thank you received: 0
Nothing is clearcoated. The tail section above is painted with Krylon interior/exterior srpay paint..then treated like automotive paint with regard to sanding and buffing. I painted the whole bike with it, except the side covers, where I used Krylon fusion because I exposed the plastic when I took out the two edge contours and made them smooth. I can't wait to see how it looks waxed!

Post edited by: ronboskz650sr, at: 2005/11/04 14:29

Please Log in or Create an account to join the conversation.

Tailpaint and seatcover 04 Nov 2005 19:46 #6594

  • indykaw77
  • indykaw77's Avatar
  • Offline
  • User
  • Posts: 510
  • Thank you received: 4
Man.....I'm gonna 'glass me a pan and have YOU make me a "Gunfighter solo" knock off!
Good job dude.....sorry to hear 'bout the truck....:(
Kawasaki Motorcycles...because cars lean th wrong way!

Please Log in or Create an account to join the conversation.

Tailpaint and seatcover 04 Nov 2005 19:50 #6597

  • ronboskz650sr
  • ronboskz650sr's Avatar Topic Author
  • Offline
  • User
  • Posts: 323
  • Thank you received: 0
Thanks, Pat. $863 later, I'm back on the road. :(

Please Log in or Create an account to join the conversation.

Tailpaint and seatcover 16 Nov 2005 19:45 #8568

  • Kawozaki
  • Kawozaki's Avatar
  • Offline
  • User
  • Posts: 113
  • Thank you received: 2
ronboskz650sr wrote:

Thanks, Pat. $863 later, I'm back on the road. :(


Oh! That stinks, Ron! $863? I hope it was a newer truck that you sunk that cash into! Believe me...I feel your pain!!! My auto is almost belly-up (only firing on 3 cylinders outta 4) and I don't have ANY money to get a new ride :pinch: But, the dude abides, brother! BTW, NICE lookin' paint-jobB)


Oz

Please Log in or Create an account to join the conversation.

Tailpaint and seatcover 16 Nov 2005 19:51 #8569

  • ronboskz650sr
  • ronboskz650sr's Avatar Topic Author
  • Offline
  • User
  • Posts: 323
  • Thank you received: 0
Thanks, Oz! For the compliment, and the sympathy. The week before, I spent $493 on a roadside call for a rear tire blow-out...just replaced both tires, as they were due anyway. I wasn't expecting the cooling fan clutch to burn up a week later. The truck is a 94 freightliner..pretty good truck, but some stuff is just wearing out. This week I have to replace a clutch cable on my bike... 16.99 before my good customer discount..much better.

Please Log in or Create an account to join the conversation.

Tailpaint and seatcover 16 Nov 2005 21:02 #8572

  • The Milkman
  • The Milkman's Avatar
  • Offline
  • User
  • Posts: 794
  • Thank you received: 194
Look BBEEAAUUTTIIFFUULL, you should be "gloating",,:cheer: :cheer:
Ride safe,
Les
78 650-C2, Stock engine, Jardine 4-2 Exh., 17-38 sprockets, dyna ignition and coils, coil wiring mod, carb mod.

Please Log in or Create an account to join the conversation.

  • Page:
  • 1
  • 2
Powered by Kunena Forum