
Custom Air Box for KZ440.
- Smallzphoto
-

- Offline
- User
-

Registered
- Posts: 58
- Thanks: 8
Re: Custom Air Box for KZ440.
31 Aug 2017 20:55
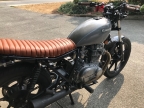
Hey all! So I've been searching around for more info on this custom airbox for a while now and it seems as if the OP is MIA haha. I even went as far as to find my way to his website and tried emailing him but hadn't received a response. Hopefully he is somewhere enjoying his kz440! ") Anyway, since his original posts from years ago provided enough information for me to wrap my head around the basics of this airbox build.... I figured I'd take the chance, build one for myself, and gather the last pieces of the puzzle in order to make life easier on other kz owners who want to build one but weren't sure about the missing details.
Anyway, since his original posts from years ago provided enough information for me to wrap my head around the basics of this airbox build.... I figured I'd take the chance, build one for myself, and gather the last pieces of the puzzle in order to make life easier on other kz owners who want to build one but weren't sure about the missing details.
Here is a summary of my journey so far:
The OP seemed to know a lot more information than I do about the factory airbox flow etc so I purchased the aluminum air box from Amazon that he recommended as well as the short air filter he recommended (it was for a moped haha). He also used the rubber boots that would have gone with a factory airbox. They have a special taper and are slightly angled which made fitting this airbox on the bike work. I was lucky to find some on eBay for $20. With straight boots or radiator hose etc. it probably would've been a bit harder to get it to fit right. That said… It was still a tight squeeze and a bit of stretching was needed in the end to get them to fit over the carbs from their position on the airbox. The reason why? Because the aluminum box, while it does fit between the frame rails, is just barely big enough to allow enough width between the holes I drilled for the boots to fit over the carbs. I drilled the holes for them to be as far apart as possible while still giving them enough space from the edge to make a good seal. It was a tight squeeze getting them to fit but it worked. I used a 1 3/4 inch hole saw to drill the hole in the front and two holes in the back of the aluminum box. The holes were a perfect fit for the carb boots in the back. Make sure to sand them a tiny bit after drilling to make them smooth as The freshly drilled holes were sharp and could cut the boots after a while if not sanded. I used a plastic 1 1/2 inch trap adaptor from Home Depot (plumbing section) to attach the filter to the front of the box.
The OP might have mounted their adaptor with epoxy or something else but I wasn't sure so I bought the trap adapter that has threading on one side. Then I used a grinding bit to open up the hole a tiny bit on the front in order to screw the threads from the trap adapter in. I then used the cap from the back of the trap adapter to secure it to the box and didn't need any glue or epoxy. The cool thing about this approach… You can either use the 1 1/2 inch wide cap that came with this adapter or buy one that's 1 1/4 inch wide (from a 1 1/2 to 1 1/4 step down adaptor) that still screws onto the original threads. This could come in handy if the engine is still getting a bit too much air. I'll be able to dial it in once the bike is completely safe to ride (still needs brakes and fork seals etc). In one of my photos, you'll see the 1 1/2 cap next to one that is 1 1/4 for comparison.
I'm not sure what the OP used to seal up the box but I've just used electrical tape for now as a temporary seal incase I need to tinker with it some more. I'll also add the brackets to it to mount it to the frame when I get a free day. It also looks like the OP used a round Tupperware cup as a windscreen. I'll prob add one as well once I get a chance. When I started the bike it fired up in a half of a second and purred like a kitten immediately. It has never sounded as good. It idles stable. I took it out on my block and rode it up and down a couple times just to see what it was like to run through the range of RPMs. Before, it would stumble over itself from 1/4 throttle and up. Now, smooth as silk. I'm attaching pics so you can see what I saw. Feel free to contact me with any questions. I'll give more updates if I find anything new as I go!
Anyway, since his original posts from years ago provided enough information for me to wrap my head around the basics of this airbox build.... I figured I'd take the chance, build one for myself, and gather the last pieces of the puzzle in order to make life easier on other kz owners who want to build one but weren't sure about the missing details.Here is a summary of my journey so far:
The OP seemed to know a lot more information than I do about the factory airbox flow etc so I purchased the aluminum air box from Amazon that he recommended as well as the short air filter he recommended (it was for a moped haha). He also used the rubber boots that would have gone with a factory airbox. They have a special taper and are slightly angled which made fitting this airbox on the bike work. I was lucky to find some on eBay for $20. With straight boots or radiator hose etc. it probably would've been a bit harder to get it to fit right. That said… It was still a tight squeeze and a bit of stretching was needed in the end to get them to fit over the carbs from their position on the airbox. The reason why? Because the aluminum box, while it does fit between the frame rails, is just barely big enough to allow enough width between the holes I drilled for the boots to fit over the carbs. I drilled the holes for them to be as far apart as possible while still giving them enough space from the edge to make a good seal. It was a tight squeeze getting them to fit but it worked. I used a 1 3/4 inch hole saw to drill the hole in the front and two holes in the back of the aluminum box. The holes were a perfect fit for the carb boots in the back. Make sure to sand them a tiny bit after drilling to make them smooth as The freshly drilled holes were sharp and could cut the boots after a while if not sanded. I used a plastic 1 1/2 inch trap adaptor from Home Depot (plumbing section) to attach the filter to the front of the box.
The OP might have mounted their adaptor with epoxy or something else but I wasn't sure so I bought the trap adapter that has threading on one side. Then I used a grinding bit to open up the hole a tiny bit on the front in order to screw the threads from the trap adapter in. I then used the cap from the back of the trap adapter to secure it to the box and didn't need any glue or epoxy. The cool thing about this approach… You can either use the 1 1/2 inch wide cap that came with this adapter or buy one that's 1 1/4 inch wide (from a 1 1/2 to 1 1/4 step down adaptor) that still screws onto the original threads. This could come in handy if the engine is still getting a bit too much air. I'll be able to dial it in once the bike is completely safe to ride (still needs brakes and fork seals etc). In one of my photos, you'll see the 1 1/2 cap next to one that is 1 1/4 for comparison.
I'm not sure what the OP used to seal up the box but I've just used electrical tape for now as a temporary seal incase I need to tinker with it some more. I'll also add the brackets to it to mount it to the frame when I get a free day. It also looks like the OP used a round Tupperware cup as a windscreen. I'll prob add one as well once I get a chance. When I started the bike it fired up in a half of a second and purred like a kitten immediately. It has never sounded as good. It idles stable. I took it out on my block and rode it up and down a couple times just to see what it was like to run through the range of RPMs. Before, it would stumble over itself from 1/4 throttle and up. Now, smooth as silk. I'm attaching pics so you can see what I saw. Feel free to contact me with any questions. I'll give more updates if I find anything new as I go!
Attachment not found
Attachment not found
Attachment not found
Attachment not found
Attachment not found
Attachment not found
The following user(s) said Thank You: diggerdanh, downloadking007
Please Log in or Create an account to join the conversation.
- Smallzphoto
-
- Offline
- User
-
Registered
- Posts: 58
- Thanks: 8
Attachments:
The following user(s) said Thank You: diggerdanh
Please Log in or Create an account to join the conversation.
- Smallzphoto
-
- Offline
- User
-
Registered
- Posts: 58
- Thanks: 8
Attachments:
The following user(s) said Thank You: JR, diggerdanh, Rustyhama
Please Log in or Create an account to join the conversation.
- Cj1951
-
- Offline
- User
-
Registered
- Posts: 2
- Thanks: 0
Re: Custom Air Box for KZ440.
08 Oct 2017 05:49
Great job. I'm building one now for my 81 kz440 ltd. Which filter mount worked best 1-1/2 or 1-1/4?
Please Log in or Create an account to join the conversation.
- Smallzphoto
-
- Offline
- User
-
Registered
- Posts: 58
- Thanks: 8
Re: Custom Air Box for KZ440.
08 Oct 2017 08:20
The 1 1/2 adapter has worked out good so far. I haven't ridden it much to get it really dialed in but it seems to be getting the right amount of air so far.
On another note… If you haven't cut the holes yet for the back of the box, make sure you cut them to be as far as they can be apart from each other while still fitting on the box. The width of this box is just barely wide enough to be able to fit the carb boots on the carbs them self. I could've used another 2 mm on each side of with to make my life a bit easier getting it off and back on again ha ha Ha. I think if The outer edge of your holes end up at about 5 mm from the edge of the box, it should be good to go. Just be prepared to use a little bit of elbow grease to slip them on each time. Additionally… make sure your holesaw is straight and cut precisely so that the width of the Hole is exactly 1 3/4. This will help the boots get a good seal in the box.
On another note… If you haven't cut the holes yet for the back of the box, make sure you cut them to be as far as they can be apart from each other while still fitting on the box. The width of this box is just barely wide enough to be able to fit the carb boots on the carbs them self. I could've used another 2 mm on each side of with to make my life a bit easier getting it off and back on again ha ha Ha. I think if The outer edge of your holes end up at about 5 mm from the edge of the box, it should be good to go. Just be prepared to use a little bit of elbow grease to slip them on each time. Additionally… make sure your holesaw is straight and cut precisely so that the width of the Hole is exactly 1 3/4. This will help the boots get a good seal in the box.
The following user(s) said Thank You: Cj1951, brandonncali5
Please Log in or Create an account to join the conversation.
- Cj1951
-
- Offline
- User
-
Registered
- Posts: 2
- Thanks: 0
Re: Custom Air Box for KZ440.
09 Oct 2017 17:15
Thanks for the tip about spreading boot holes. Will post after mine is done.
Please Log in or Create an account to join the conversation.
- Neffy812
-
- Offline
- User
-
Registered
- Posts: 11
- Thanks: 0
Re: Custom Air Box for KZ440.
10 Jun 2018 09:53 - 11 Jun 2018 06:17
I came up with another solution that might be easier for some people, and I believe it costs a lot less than the other solutions that I’ve seen so far. I got a solid cover plate for a 2 gang outdoor electrical junction box, cut out a 3”x4” piece, drilled screw holes in the corners, drilled smaller pilot holes in the air box, and used a 2” hole saw in the center of the plate. I attached a pvc trap adapter to the plate, put foam window seal on the back of the plate and ran some wood screws into the air box. Now, I can glue the nut on the back of the trap adapter to keep the nut from coming off and just clamp the filter on. It took maybe 30 minutes to complete.
1982 KZ305-A2
Attachments:
Last edit: 11 Jun 2018 06:17 by Neffy812.
Please Log in or Create an account to join the conversation.
- hugorruss
-
- Offline
- User
-
Registered
- Posts: 31
- Thanks: 1
Re: Custom Air Box for KZ440.
29 Jun 2018 06:50 - 29 Jun 2018 06:51
I did this and it worked out great. The only difference is I used a 48mm Emgo pod filter since I had the space as I had moved my battery. Worked out great!
Attachments:
Last edit: 29 Jun 2018 06:51 by hugorruss.
Please Log in or Create an account to join the conversation.
- ChristianP
-
- Offline
- User
-
Registered
- Posts: 2
- Thanks: 0
Re: Custom Air Box for KZ440.
06 Aug 2018 12:42
Hi guys,
I read this thread with great interest. I am in the exact same problem. I'm looking for an air box to my 440LTD. I can't get it to work properly on POD's. After reading this, I am wondering if I should make my own air box. I have a few things, I don't understand, tho.
Why is it that you built your air boxes much smaller than the original air box? Wouldn't that require rejetting?
Thanks
Christian
Please Log in or Create an account to join the conversation.
- hugorruss
-
- Offline
- User
-
Registered
- Posts: 31
- Thanks: 1
Re: Custom Air Box for KZ440.
24 Sep 2018 10:26
Hey Christian,
I didn't see this until just now, but I built the airbox described in this thread and it works just fine with the stock jets. I had some issues but it turned out they had to do with cleaning the carb and not the airbox. couple things to note:
1 - I attached a hose to the crankcase breather tube and ran it down to where the fuel overflow tubes come out instead of having it go into the new airbox. Not sure if that's correct, but it worked for me
2 - Get as close as you can to the edges when making your holes in the box for the rubber connectors that attach to the carb. The closer you get, the easier it will be to get the box on and off.
3 - I used this pod filter instead, it worked perfect, but I also relocated my battery and electrical stuff so may not fit if you don't do that. www.amazon.com/gp/product/B000VJSQ5Q
Cheers
Please Log in or Create an account to join the conversation.
- ChristianP
-
- Offline
- User
-
Registered
- Posts: 2
- Thanks: 0
Re: Custom Air Box for KZ440.
26 Sep 2018 08:27
Hi,
Thanks for your reply. I actually made a custom airbox myself. Much like yours but out of a plastic box like the original one in the post. I also used pod similar to yours, but unfortunately, I havn't relocated my battery, So the airbox won't fit.
Now Im not sure whether to move the battery or buy other pods. How easy is to move the battery?
Another thing that worries me, is the crankcase vent. I actually just put a crankcasebreather filter/pod on it. No idea if it messes up anything. But I am getting really tired of not being able to use my bike. Was looking forward to riding the summer, and now its too late.
-Christian
Please Log in or Create an account to join the conversation.
- hugorruss
-
- Offline
- User
-
Registered
- Posts: 31
- Thanks: 1
Re: Custom Air Box for KZ440.
26 Sep 2018 11:32
I'm pretty new to bikes so I can't really advise you on the crankcase breather thing, other than I have had the custom box with the breather going into the box and without and I can't tell the difference. I think for emissions it is supposed to go back into the airbox but it's not a big deal as far as functioning of the engine.
If you want to get it up and running just get the pod filter linked in this article. Moving the battery involved getting a 1/2 size battery, building a custom electrical box that tucked up under the custom seat I made, blah blah blah. Much cheaper and easier to get the shorter pod.
If you want to get it up and running just get the pod filter linked in this article. Moving the battery involved getting a 1/2 size battery, building a custom electrical box that tucked up under the custom seat I made, blah blah blah. Much cheaper and easier to get the shorter pod.
Please Log in or Create an account to join the conversation.
Moderators: Street Fighter LTD