
How to polish aluminum
- Kaylinator
-
 Topic Author
- Offline
- Sustaining Member
-

Registered
- Posts: 341
- Thanks: 74
How to polish aluminum
10 Feb 2021 14:43gazzz wrote: Thank you, Scirocco!
katit: I couldn't say how long it took to finish the cover as it wasn't continuous work: to run the project and workshop I make some parts and do the work to order.
Here is a copy of my answer about polishing:
Polishing" is 90% surface preparation and only 10% polishing itself. The better you prepare surface - the better is result. Usually I do it in this way: firstly I remove cast defects, seams and so on where it’s possible. This work I do with help of sandpaper wrapped around rubber blocks, delta sanders (have two of them) and Dremel. Then I sandpaper dry with sandpaper up to 800 grit manually and with delta sanders and Dremel. After dry sending I do wet sending (up to 3000 grit).
Then it’s time for first polishing. I use various headpieces for Dremel for hard to reach places. For other cases I mostly use buffing cloth wheels installed on bench grinder. Once surface polished all defects (traces of sandpaper and so on) became visible. I remove those of them that could be removed and do second polishing.
Some aluminum parts need to be polished long and in all directions to became perfect, while for other parts long polishing makes no good, as it exhibits tiny defects (like pores). Of polishing compounds I use two: mostly liquid Doctor Wax Metal Polish and solid past (supposed to be Diamond polishing compound , dunno of what concentration, but it works just good ).
Here are some additional tips and tricks:
www.gazzz-garage.com/2019/03/23/kz650-ca...ome-tips-and-tricks/
1978 KZ1000-A2
kzrider.com/forum/11-projects/613296-1978-kz1000-a2-barn-find
1978 KZ400-B1
2022 Z900RS SE
kzrider.com/forum/11-projects/613296-1978-kz1000-a2-barn-find
1978 KZ400-B1
2022 Z900RS SE
The following user(s) said Thank You: calum
Please Log in or Create an account to join the conversation.
- calum
-

- Offline
- User
-

Registered
- Posts: 1144
- Thanks: 415
Re: How to polish aluminum
10 Feb 2021 14:55
Thanks for making this easier to search for (except you spelt "aluminium" wrong  ). And thanks to gazzz for doing such an amazing job on aluminium parts.
). And thanks to gazzz for doing such an amazing job on aluminium parts.
KZ1000 Restomod (
www.kzrider.com/forum/11-projects/614517-1977-kz1000-restomod
)
1977 KZ1000A1 ( www.kzrider.com/forum/11-projects/616901...-spare-parts-project )
1980 KZ750H ( kzrider.com/forum/11-projects/612054-kz750h-restoration )
2000 BMW F650GS
1977 KZ1000A1 ( www.kzrider.com/forum/11-projects/616901...-spare-parts-project )
1980 KZ750H ( kzrider.com/forum/11-projects/612054-kz750h-restoration )
2000 BMW F650GS
Please Log in or Create an account to join the conversation.
- Nessism
-

- Offline
- Sustaining Member
-
Registered
- Posts: 8122
- Thanks: 3506
Re: How to polish aluminum
10 Feb 2021 15:28 - 10 Feb 2021 15:31
Gazzz's work is amazing. No doubt.
For those that aren't after a mirror polish look and just want to return their engine covers back to looking like they way they left the factory the following method works fine and is pretty fast.
Use a palm DA sander with 220 grit sandpaper to remove all the corrosion. Small sandpaper rolls on a spinning mandrel can be used in the small nooks and crannies if necessary.
Next is to use a sisal polishing wheel and black cutting compound. I use a cheap car polisher to spin the wheel. The aluminum will get HOT so heavy gloves will be needed. Bear down good and hard and get the wheel cutting. With this step we are trying to remove the sanding scratches made with the 220 and DA.
I usually stop right there, but if you want something brighter you can move to a stitched wheel and polishing rogue to get a brighter shine.
These photos show the finish left after the sisal wheel and black compound. The round portion around the Kawasaki lettering was masked and painted. After the paint dried a sanding block and 320 sandpaper was used to remove the paint on top of the letters.
 P1020640
by
nessism
, on Flickr
P1020640
by
nessism
, on Flickr
 P1020637
by
nessism
, on Flickr
P1020637
by
nessism
, on Flickr
For those that aren't after a mirror polish look and just want to return their engine covers back to looking like they way they left the factory the following method works fine and is pretty fast.
Use a palm DA sander with 220 grit sandpaper to remove all the corrosion. Small sandpaper rolls on a spinning mandrel can be used in the small nooks and crannies if necessary.
Next is to use a sisal polishing wheel and black cutting compound. I use a cheap car polisher to spin the wheel. The aluminum will get HOT so heavy gloves will be needed. Bear down good and hard and get the wheel cutting. With this step we are trying to remove the sanding scratches made with the 220 and DA.
I usually stop right there, but if you want something brighter you can move to a stitched wheel and polishing rogue to get a brighter shine.
These photos show the finish left after the sisal wheel and black compound. The round portion around the Kawasaki lettering was masked and painted. After the paint dried a sanding block and 320 sandpaper was used to remove the paint on top of the letters.
Ed
Carb O-ring Kits : www.kzrider.com/forum/14-vendor-forum/62...rburetor-o-ring-kits
www.kzrider.com/forum/faq-wiki/618026-new-owner-things-to-know
1981 KZ750E2
www.kzrider.com/forum/11-projects/604901...z750e-project-thread
Carb O-ring Kits : www.kzrider.com/forum/14-vendor-forum/62...rburetor-o-ring-kits
www.kzrider.com/forum/faq-wiki/618026-new-owner-things-to-know
1981 KZ750E2
www.kzrider.com/forum/11-projects/604901...z750e-project-thread
Last edit: 10 Feb 2021 15:31 by Nessism.
The following user(s) said Thank You: calum
Please Log in or Create an account to join the conversation.
- F64
-
- Offline
- User
-
Registered
- 81-KZ440D2
- Posts: 1177
- Thanks: 427
Re: How to polish aluminum
10 Feb 2021 17:56
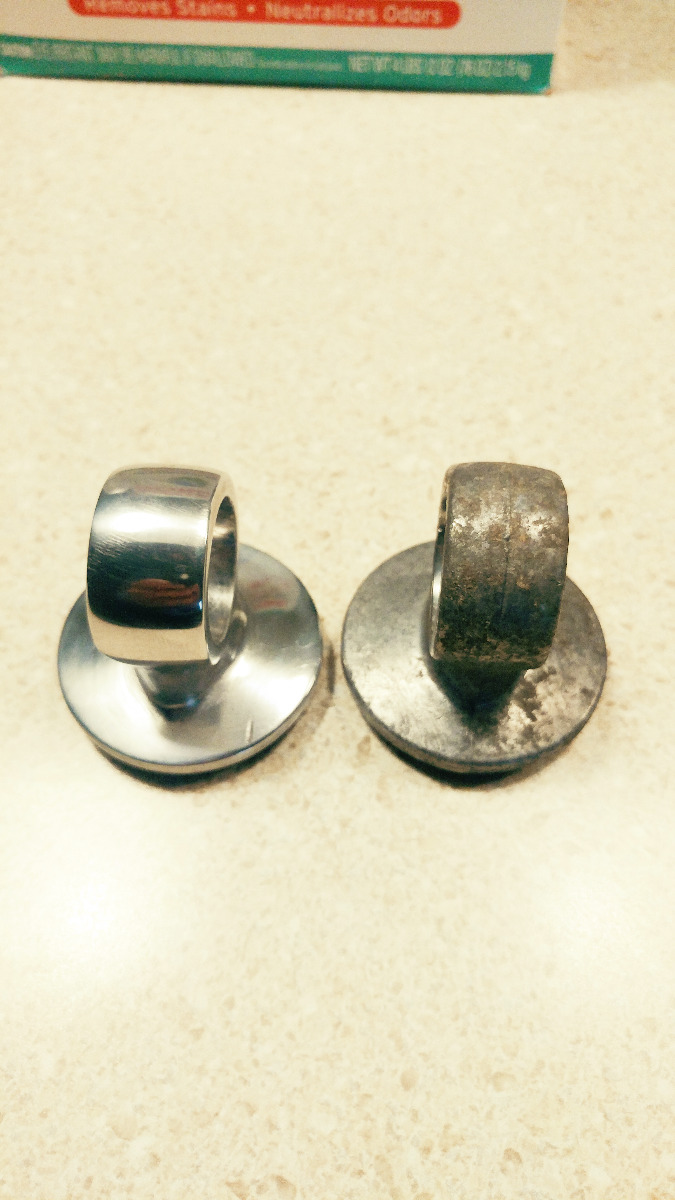
If you have a lot of time and sandpaper grits running from 36 to 3000, then you can do it by hand.
It just takes a long time.
This rear shock upper mount took a couple of hours.
Finished it with Mother's aluminum polish.
Klingspor abrasive bargain box helped for the grits from 36-240
www.woodworkingshop.com/category.aspx?id=61
3M took it from 400-3000
It just takes a long time.
This rear shock upper mount took a couple of hours.
Finished it with Mother's aluminum polish.
Klingspor abrasive bargain box helped for the grits from 36-240
www.woodworkingshop.com/category.aspx?id=61
3M took it from 400-3000
81-KZ440-D2.
Louis Dudzik's GM HEI ignitor conversion installed 2015 s3.amazonaws.com/gpzweb/Ignition/GPZgmHEImod.html
Motogadget m-unit blue installed 2017.
LIC, NY
Louis Dudzik's GM HEI ignitor conversion installed 2015 s3.amazonaws.com/gpzweb/Ignition/GPZgmHEImod.html
Motogadget m-unit blue installed 2017.
LIC, NY
The following user(s) said Thank You: sf4t7
Please Log in or Create an account to join the conversation.
Moderators: Street Fighter LTD