
kawasaki paint code
- david richard
-
 Topic Author
- Offline
- User
-

Registered
- Posts: 88
- Thanks: 17
kawasaki paint code
30 Oct 2020 11:56
hi as well as having a z1r i also have a 750 zephyr d1 its the spoke wheel model but im thinking of changing the colour to orange and brown ,my question is the new rs 900 looks the same would anyone know the paint code for it ,thanks in advance ,david
Please Log in or Create an account to join the conversation.
- PaintWorkz
-
- Offline
- User
-
Registered
- Posts: 376
- Thanks: 70
Re: kawasaki paint code
24 Nov 2020 06:03
The new RS900 is probably close to to the 73 color. The Kawasaki color code for the 73 did not give you a mixing formula. I will post color info soon.
www.paintworkz.com
84 Gpz900 street
77 KZ 1325 Turbo Dragbike barnfind
77 1135 KZ900 A5
79 CBX Pro Stock project
82 CBX Nostalgia Pro Stock
78 Z1R-TC AMA & ECTA LSR record holder
96 KZ1000 Police Superbike project
68 750 Enfield Brat project
82 750 Nourish Triumph LSR
Lake Havasu City, AZ
84 Gpz900 street
77 KZ 1325 Turbo Dragbike barnfind
77 1135 KZ900 A5
79 CBX Pro Stock project
82 CBX Nostalgia Pro Stock
78 Z1R-TC AMA & ECTA LSR record holder
96 KZ1000 Police Superbike project
68 750 Enfield Brat project
82 750 Nourish Triumph LSR
Lake Havasu City, AZ
Please Log in or Create an account to join the conversation.
- PaintWorkz
-
- Offline
- User
-
Registered
- Posts: 376
- Thanks: 70
Re: kawasaki paint code
24 Nov 2020 06:09
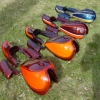
INSTRUCTIONS FOR 1973 BROWN/ORANGE LACQUER
This is a tri-coat paint system, which is how the factory did it back in 1973. You will need to have black, white, and clear acrylic lacquers, and thinner to complete the job. I supply the Candy Orange topcoat, and Silver Flake for the mid coat. The black and white are applied as the base coats. You mix the Silver Flake in the clear and apply it for the mid coat. The Candy Orange is applied for the topcoat, and since it is transparent, over the black area it looks brown and over the white area it looks orange.
One thing you need to be aware of is the plastic parts are sensitive to lacquer repainting. The original factory paint was applied without sanding or primer so it tends to lift or wrinkle, especially in areas you sand down through to plastic went feathering out scratches, when you shoot wet coats of lacquer over it. In the old days I used to prevent this by starting with light sealer coats before priming, light primer coats with a lot dry time between coats, sealer coat before color, and light color and clear coats again with longer dry time between coats. Now you can prevent the lifting by first using the more expensive two part epoxy primer/sealers (PPG DPLF), followed by a urethane primer/surfacer (Dupont URO, PPG K36 or K38). They also do a better job by not shrinking up over time, so any repair work areas will not look obvious over time. Spray a recommended sealer (PPG DPLF) after final sanding and you are ready for paint.
I would recommend Ditzler PPG DDL colors and clears since they are the only company to still have a good selection of acrylic lacquer products available. Reduce all lacquer colors and clears at least 200 percent (one part paint to two parts thinner) with a quality lacquer thinner to suit shop conditions. Adjust thinner percentage to suit your spraying style. Shooting the underneath side of the plastic parts with black lacquer color first will make it look like fresh plastic. Then try not to spray the underneath edge of these parts when shooting colors or clears. That is how the factory did it if you want the parts to look original.
The first paint step is to shoot tank and tail a pure white lacquer base coat, probably three coats white and one coat clear. Always allow a 10 min. flash off time between coats. Let dry overnight to reduce tape impressions. Very lightly wet sand with #600 just to remove any dust nibs and orange peel. Clean sanding residue and any fingerprints off with Wax & grease remover. Now you can layout where the orange stripes will go by tapping over and covering up the white base. I recommend 3M Fine Line tape because it leaves a cleaner edge than masking tape. Press tape down firmly at edge for a good seal to paint, and wipe with Wax & grease remover again, paying attention to clean off any glue left due to tape creep/pull back, mainly on tighter outside curves. Blow off and use a tack cloth to remove any dust. Now shoot the black base on the tank, tail section, and the two side covers, probably three coats of black and one coat of clear. The clear is only used to protect the black in the next sanding step. Let dry for an hour then remove tape and very, very, lightly wet sand the tank and tail with #600, just to remove any tape edge build up. Clean sanding and tape glue residue and any fingerprints off with Wax & Grease remover. Also wetting whole part with wax and grease remover makes it easy to inspect for any small spots of tape blow under which can be carefully sanded off.
For the middle coat mix about one and a quarter teaspoon of dry flake to one pint of reduced clear lacquer. Now shoot the flake mixed in clear on all for parts, keeping flake suspended in gun by agitating often. Dusting it on in multiple coats will help keep the flake on edge rather than laying it flat with wet coats. Get it on to an even coverage like the sample color chip shows, about half of the black base covered by flake. Clean gun real good to remove every last flake, and then shoot everything with the candy orange. Three or four coats should get the orange dark enough, again matching the color chip. Flash 10 minutes between coats, use medium coats to eliminate sags/runs, which will mess up/move stripes. Follow with six to ten coats of clear on tank, side covers, and tail section. Put on enough coats so it can be rubbed out without going through to the candy orange and leave some UV protection. Once you start spraying colors try not to let it sit for more than four days in between coats/colors/clear. Lacquer clear tends to crows foot/crack if it is half way cured and then subjected to recoating. Let it dry for a couple weeks minimum, preferably longer, I recommend at least 3 months; then wet sand with 2000 grit and polish out. It helps to wait this long only because of the flake mid coat particles don't shrink up like the rest of the paint.
Lacquer clear cures to a hard finish. This makes it brittle and it chips easily, so be careful with the parts. Don't bend the plastic side covers when removing, or lean on tail section near the side braces. For a more durable finish you can use A CATALYZED CLEAR URETHANE for only the final clear. You will not be able to repair it, but this tri-coat color is impossible to spot repair perfectly anyways. Any brand catalyzed clear, like House of Kolors should also work. I use PPG Shopline fast panel clear.
Feel free ask more questions. If you have a lot of question it might be easier to talk on the phone. Call weekdays 7am – 3pm at 586-495-2299 and leave a message if you get voice mail. I will get right back to you. I will be glad to help you with your project.
Thanks for your purchase, email a photo of your completed bike, RP
Visit our website for new color matches for classic motorcycles www.paintworkz.com
www.paintworkz.com
84 Gpz900 street
77 KZ 1325 Turbo Dragbike barnfind
77 1135 KZ900 A5
79 CBX Pro Stock project
82 CBX Nostalgia Pro Stock
78 Z1R-TC AMA & ECTA LSR record holder
96 KZ1000 Police Superbike project
68 750 Enfield Brat project
82 750 Nourish Triumph LSR
Lake Havasu City, AZ
84 Gpz900 street
77 KZ 1325 Turbo Dragbike barnfind
77 1135 KZ900 A5
79 CBX Pro Stock project
82 CBX Nostalgia Pro Stock
78 Z1R-TC AMA & ECTA LSR record holder
96 KZ1000 Police Superbike project
68 750 Enfield Brat project
82 750 Nourish Triumph LSR
Lake Havasu City, AZ
The following user(s) said Thank You: DOHC, Street Fighter LTD
Please Log in or Create an account to join the conversation.
- david richard
-
Topic Author
- Offline
- User
-
Registered
- Posts: 88
- Thanks: 17
Re: kawasaki paint code
24 Nov 2020 07:45
hi paintworkz thank you for that complete breakdown for painting above colours ,david
Please Log in or Create an account to join the conversation.
Moderators: Street Fighter LTD