
Applying body work decals to KZ900
- Robb2018
-
 Topic Author
- Offline
- User
-

Registered
- 76 KZ900 73 Z1 A
- Posts: 270
- Thanks: 28
Applying body work decals to KZ900
27 Sep 2019 09:28 - 27 Sep 2019 09:32
I'm getting ready to paint my new KZ900 project and was wondering if anyone had any tips on installing the tank and tail decals. I did this on my last KZ900 and found it very difficult, especially the "D" shaped decal on the top of the tank. I spent close to 3 hours trying to get them perfect but it ended up being a mess.. The main problem being there's not a lot of definitive places to measure from to check symmetry. Looking closely at other KZ900s that have been restored I can usually find spots where the decals are off a bit which I think makes the restoration look amateurish. The other problem is how to keep the parallel green and gold pin strips from separating while working with the decal. Anyone have any tips? I'm all ears, thanks.
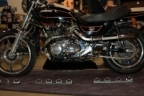
I'm attaching a pic of the top decal on my last bike. You can see how the right side has a slight arch while the left is straight the way it's supposed to be. This was after hours of frustratingly lifting and realigning. I thought it looked right when I finally called it quits and didn't notice the right side being off until after the decal had dried. Then that's the only thing I saw any time I looked at the bike.
I'm attaching a pic of the top decal on my last bike. You can see how the right side has a slight arch while the left is straight the way it's supposed to be. This was after hours of frustratingly lifting and realigning. I thought it looked right when I finally called it quits and didn't notice the right side being off until after the decal had dried. Then that's the only thing I saw any time I looked at the bike.
KZ900; Z1
Last edit: 27 Sep 2019 09:32 by Robb2018.
Please Log in or Create an account to join the conversation.
- Street Fighter LTD
-
- Offline
- Moderator
-

Registered
- TURBO, Its Better to be Blown than Injected
- Posts: 5069
- Thanks: 2275
Re: Applying body work decals to KZ900
27 Sep 2019 09:33
www.paintworkz.com
Ralph is a member here and a guru of all things dealing with paint and decals.
Check out his website
Dave
Ralph is a member here and a guru of all things dealing with paint and decals.
Check out his website
Dave
Original owner 78 1000 LTD
Mr Turbo Race Kit, MTC 1075 Turbo pistons by PitStop Performance , Falicon Ultra Lite Super Crank, APE everything. Les Holt @ PDM's Billet Goodies . Frame by Chuck Kurzawa @ Logghe Chassis . Deep sump 5qt oil pan. RIP Bill Hahn
The following user(s) said Thank You: Robb2018
Please Log in or Create an account to join the conversation.
- z1kzonly
-

- Offline
- User
-
Registered
- Sustaining Member
- Posts: 2818
- Thanks: 526
Re: Applying body work decals to KZ900
27 Sep 2019 11:22
I never worked with these aftermarket stripes for the Kaw's. I assume you will be clearing over them. I hope so.
I learned 40 yrs ago from my friend the painter. Who I learned from. To use clean warm water with 1 or 2 drops of IVORY liquid dish soap. Some guys use Johnson's baby shampoo also. Put in a spray bottle. Spray it liberally and keep it wet. This lets you slide the decals around for a few minutes. Then use a gentle, soft squeegee to get dry
Rinse it off, let dry then apply your clear coat. Use modern urethane clear, nice light dry coat a couple times before you spray it on wet. That's how I do my decals when I paint.
Livin in "CheektaVegas, NY
Went thru 25 of these in 40 yrs.
I SOLD OUT! THE KAW BARN IS EMPTY.
More room for The Old Girl, Harley 75 FLH Electra Glide,
Old faithful! Points ign. Bendix Orig. carb.
Starts everytime!
Went thru 25 of these in 40 yrs.
I SOLD OUT! THE KAW BARN IS EMPTY.
More room for The Old Girl, Harley 75 FLH Electra Glide,
Old faithful! Points ign. Bendix Orig. carb.
Starts everytime!
The following user(s) said Thank You: Robb2018
Please Log in or Create an account to join the conversation.
- Robb2018
-
Topic Author
- Offline
- User
-
Registered
- 76 KZ900 73 Z1 A
- Posts: 270
- Thanks: 28
Re: Applying body work decals to KZ900
27 Sep 2019 12:12
Yes I will be clearing over them with Eastman 2K (love that stuff). I pretty much did what you said.. used a spray bottle with a touch of dish soap, kept it nice and wet but still had trouble getting them centered and straight. I've got a couple ideas I'm going to try this time. First I'll find dead center of top of tank and mark that with a line of thin pin stripe tape. Then I plan on making an outline of the decal on parchment paper then will cut that out, wet it and center it as perfectly as I can on the tank. Then I'll take electrical tape and tape around the outline about a quarter of an inch all around. This way I'll have it framed out and just need to keep the space the same around it. Sounds easy enough... hope it works that way in the real world.
KZ900; Z1
Please Log in or Create an account to join the conversation.
- davido
-
- Offline
- User
-
Registered
- Posts: 1578
- Thanks: 291
Re: Applying body work decals to KZ900
27 Sep 2019 13:55
Dont know if itll work for your 900 decals but for symmetry I measured up from the bottom edge of the tank and used masking tape to give me lines to work from. For the centerline also,if you put masking tape in more or less the right position, then you can draw a line on it with a pen/pencil. Probably more accurate than a pin stripe ( and you can change it as much as you want).
www.kzrider.com/forum/11-projects/594313-csr1000-project-build
CB550 (1978)
CB500/4 (1972)*
KZ1000CSR (1981)
XT 600E (1999)
TDM900 (2003)
CB550 (1978)
CB500/4 (1972)*
KZ1000CSR (1981)
XT 600E (1999)
TDM900 (2003)
The following user(s) said Thank You: Robb2018
Please Log in or Create an account to join the conversation.
- Robb2018
-
Topic Author
- Offline
- User
-
Registered
- 76 KZ900 73 Z1 A
- Posts: 270
- Thanks: 28
Re: Applying body work decals to KZ900
27 Sep 2019 14:56
I think that will work. Measuring from the bottom lip I'll get a line going along the top on both sides, good idea on the pencil line. instead of pin striping... I'll use a dull pencil, then I think I'll still try to make a template and outline that in pencil on the tank also. Thanks for the suggestions everyone.
KZ900; Z1
Please Log in or Create an account to join the conversation.
- martin_csr
-

- Offline
- User
-
Registered
- Posts: 7994
- Thanks: 1644
Re: Applying body work decals to KZ900
28 Sep 2019 07:08
A cloth measuring tape used in sewing might be handy & shouldn't scratch the paint.
...
...
The following user(s) said Thank You: Robb2018
Please Log in or Create an account to join the conversation.
- Nessism
-

- Offline
- Sustaining Member
-

Registered
- Posts: 8070
- Thanks: 3454
Re: Applying body work decals to KZ900
29 Sep 2019 10:55
On a pattern like shown in the first post of this thread I'd start by drawing a line that bisects the tank across the top. You should be able to use the filler opening in the front and the tank hold down clamp in the back as guides. Then measure right/left relative to this centerline. Regardless of the measurements be sure to judge based on visual appearance. It's amazing how accurate the human eye can be when it comes to checking symmetry.
Ed
Carb O-ring Kits : www.kzrider.com/forum/14-vendor-forum/62...rburetor-o-ring-kits
www.kzrider.com/forum/faq-wiki/618026-new-owner-things-to-know
1981 KZ750E2
www.kzrider.com/forum/11-projects/604901...z750e-project-thread
Carb O-ring Kits : www.kzrider.com/forum/14-vendor-forum/62...rburetor-o-ring-kits
www.kzrider.com/forum/faq-wiki/618026-new-owner-things-to-know
1981 KZ750E2
www.kzrider.com/forum/11-projects/604901...z750e-project-thread
The following user(s) said Thank You: Robb2018
Please Log in or Create an account to join the conversation.
- PaintWorkz
-
- Offline
- User
-
Registered
- Posts: 376
- Thanks: 70
Re: Applying body work decals to KZ900
03 Oct 2019 14:38
All good suggestions and ideas to get them right from side to side and on applying them with soapy water. I found that the stripes are not always centered on the backing paper so take some measurements on that and trim paper if you have to in order to keep everything equal. Good idea to also find and mark centerlines on backing paper.
www.paintworkz.com
84 Gpz900 street
77 KZ 1325 Turbo Dragbike barnfind
77 1135 KZ900 A5
79 CBX Pro Stock project
82 CBX Nostalgia Pro Stock
78 Z1R-TC AMA & ECTA LSR record holder
96 KZ1000 Police Superbike project
68 750 Enfield Brat project
82 750 Nourish Triumph LSR
Lake Havasu City, AZ
84 Gpz900 street
77 KZ 1325 Turbo Dragbike barnfind
77 1135 KZ900 A5
79 CBX Pro Stock project
82 CBX Nostalgia Pro Stock
78 Z1R-TC AMA & ECTA LSR record holder
96 KZ1000 Police Superbike project
68 750 Enfield Brat project
82 750 Nourish Triumph LSR
Lake Havasu City, AZ
The following user(s) said Thank You: martin_csr, Robb2018
Please Log in or Create an account to join the conversation.
- Robb2018
-
Topic Author
- Offline
- User
-
Registered
- 76 KZ900 73 Z1 A
- Posts: 270
- Thanks: 28
Re: Applying body work decals to KZ900
03 Oct 2019 18:52 - 03 Oct 2019 18:55
Well I got the decals today and spent the afternoon installing them. It went pretty well actually. Two things I did differently this time... first I spent a long time last night finding an accurate center line and marked it with a pencil line on a piece of masking tape run down the middle (as per advice you all gave). The other thing was I left the backing paper on a lot longer than I did previously. This kept the gold and the green lines from separating... for the most part anyway. This is a double edged sword as the longer you leave the backing paper on the harder it is to get any bubbles out once you do take it off. But also was a good tip someone made about if the lines do separate run a 4 mm piece of pin stripe tape around the gold stripe as a guide for the green. This came in handy when doing the tail and I ended up pulling both stripes off and set them separately. I'll post some pics after I lay down the clear coat and buff it out. I also installed new 4 in 4 pipes from Z1Parts today and they really light up the bike. Hopefully I'll still get some riding in this fall.
KZ900; Z1
Last edit: 03 Oct 2019 18:55 by Robb2018.
Please Log in or Create an account to join the conversation.
- Robb2018
-
Topic Author
- Offline
- User
-
Registered
- 76 KZ900 73 Z1 A
- Posts: 270
- Thanks: 28
Re: Applying body work decals to KZ900
12 Oct 2019 14:56 - 15 Oct 2019 09:12
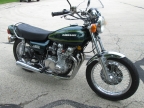
Here's the finished product. I thought it was perfect but looking at it today I think it's favoring the right side by maybe 1/8th to 3/16ths. Took me long enough to notice it so I can live with it. Better than the last one I did anyway. (2nd pic is first one I did)
I fixed your pictures , Nice work Dave
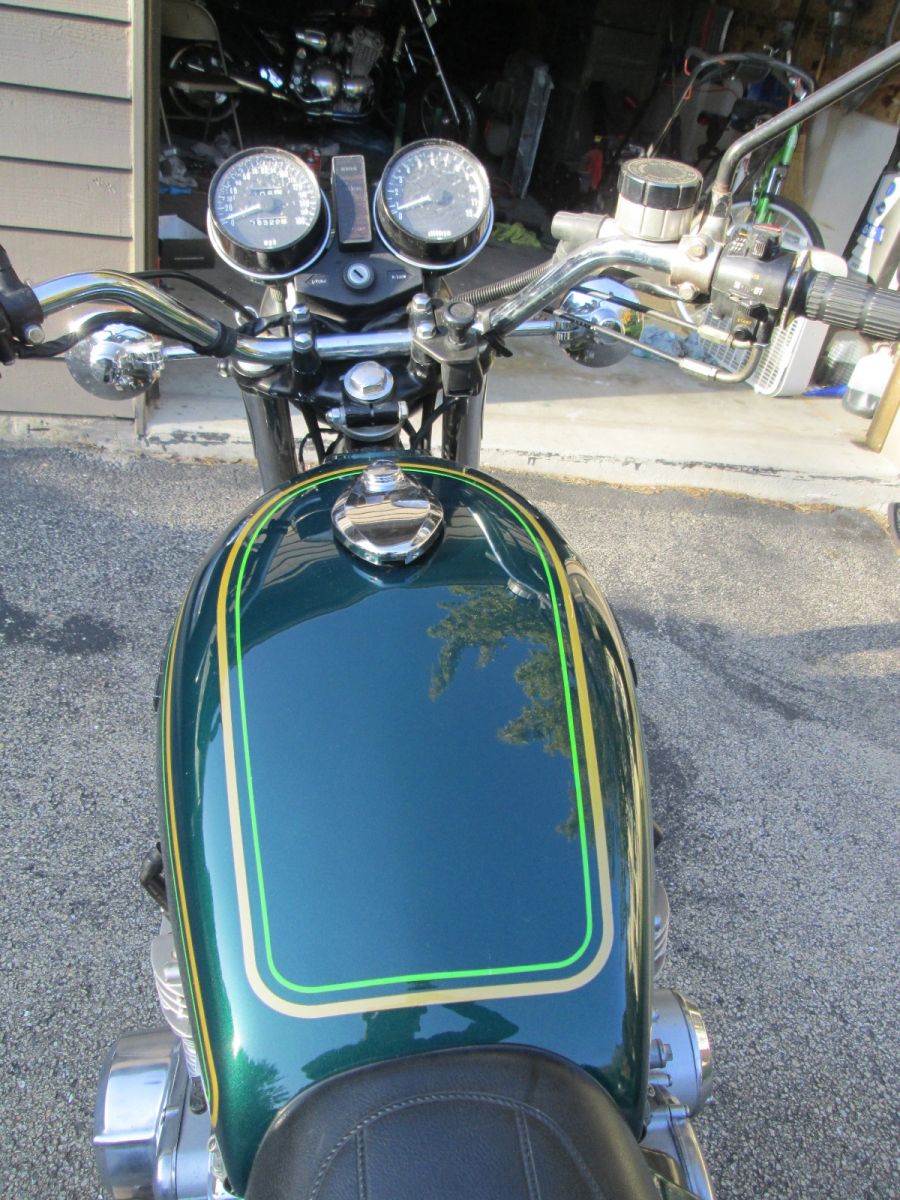
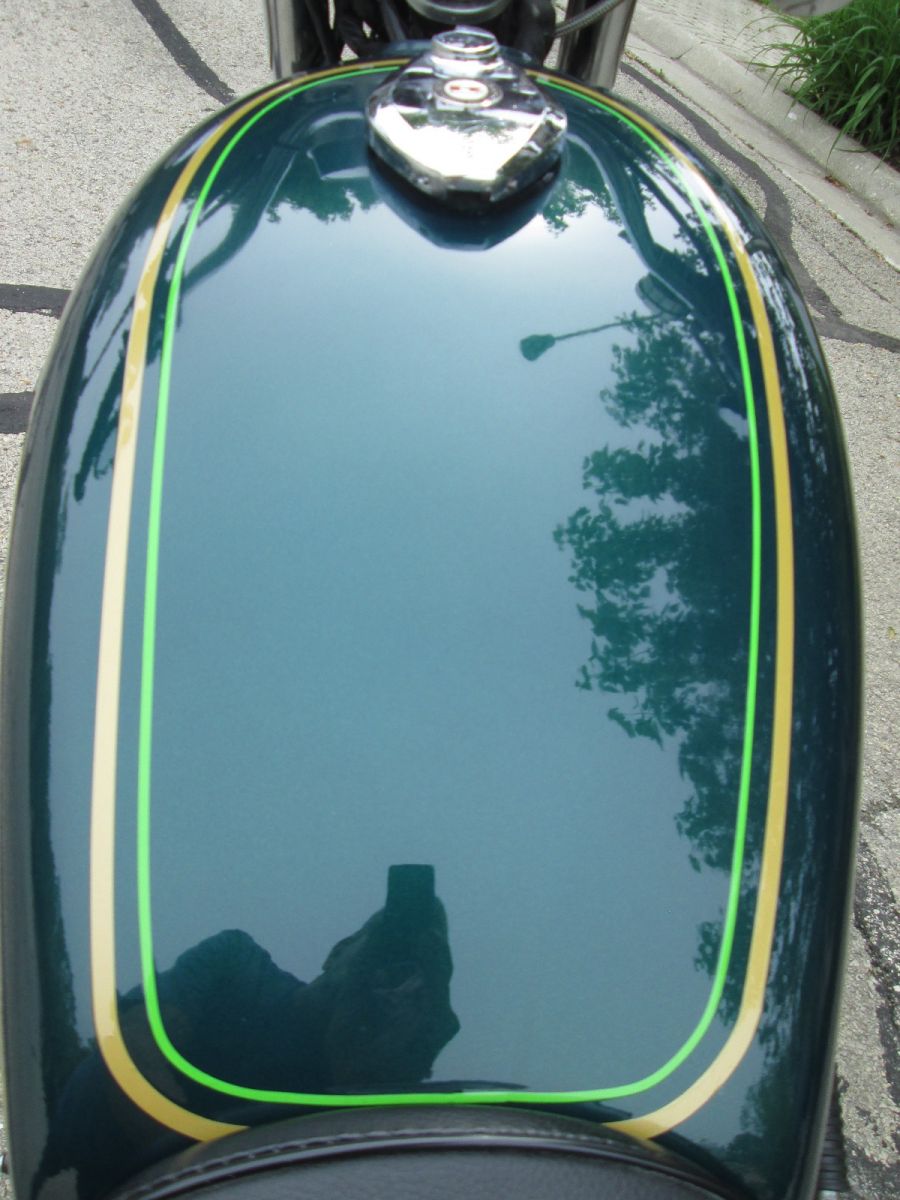
I fixed your pictures , Nice work Dave
KZ900; Z1
Last edit: 15 Oct 2019 09:12 by Street Fighter LTD.
The following user(s) said Thank You: martin_csr
Please Log in or Create an account to join the conversation.
- 531blackbanshee
-
- Offline
- Vendor
-
Vendors
- Posts: 7444
- Thanks: 796
Re: Applying body work decals to KZ900
15 Oct 2019 05:54
nice work!
leon
leon
skiatook,oklahoma 1980 z1r,1978 kz 1000 z1r x 3,
1976 kz 900 x 3
i make what i can,and save the rest!
billybiltit.blogspot.com/
www.kzrider.com/forum/5-chassis/325862-triple-tree-custom-work
kzrider.com/forum/5-chassis/294594-frame-bracing?limitstart=0
1976 kz 900 x 3
i make what i can,and save the rest!
billybiltit.blogspot.com/
www.kzrider.com/forum/5-chassis/325862-triple-tree-custom-work
kzrider.com/forum/5-chassis/294594-frame-bracing?limitstart=0
The following user(s) said Thank You: Robb2018
Please Log in or Create an account to join the conversation.
Moderators: Street Fighter LTD