
removing deep scratches from DOHC engine side cove
- newOld_kz1000
-
 Topic Author
- Offline
- User
-

Registered
- FlimFlamFlibbityFlee !! BoonFryedShickaMuhZee !!
- Posts: 751
- Thanks: 20
Re: removing deep scratches from DOHC engine side c
07 Dec 2009 01:18
Iron Duke wrote:
Wow, never thought of that! I've used orbital sanders for small sheetrock work, but have not heard of a 'random' orbital sander -- what is the difference, and is the one below from Harbor Freight what you're describing here?
www.harborfreight.com/cpi/ctaf/displayitem.taf?Itemnumber=93431
Random orbit sander, will not leave whirl marks, best damn sander I've ever used, and I use it in all applications,woodworking,auto body,just anything you sand this beats all other forms,belt, disc, block hands down. regards Duke
Wow, never thought of that! I've used orbital sanders for small sheetrock work, but have not heard of a 'random' orbital sander -- what is the difference, and is the one below from Harbor Freight what you're describing here?
www.harborfreight.com/cpi/ctaf/displayitem.taf?Itemnumber=93431
1978 kz1000 A2 with Kerker
1980 Z1 Classic with Kerker
1980 Z1 Classic with Kerker
Please Log in or Create an account to join the conversation.
- Qdude
-

- Offline
- User
-
Registered
- It is all good.
- Posts: 650
- Thanks: 2
Re: removing deep scratches from DOHC engine side c
07 Dec 2009 01:34
I followed the link and saw essentially what I have been using.
I believe the random part refers to the ability of the sanding surface to spin freely.
I used mine with 220 grit to get scratches out. Then i stepped it up as far as I could find (1200 grit) for the velcro sanding disks. It worked wonderfully, and I now am using it to help get rid of flashing on the aluminum castings.
A file also worked well, but I recommend cleaning the face of the file often, like every two strokes. I had problems with bits of aluminum getting stuck in the file. It would make a little knot, then drag new scratch marks across the work.
I need to second the random orbital sander suggestion.
Q
77 KZ 650 C1.
77 KZ 650 C1.
Crashed-Repaired, Pods, Kerker pipe, re-wired core bundle, lamp upgraded, homemade rectifier, solid state regulator , Dyna-s ignition, repainted, slightly modified, year-round commuter
Honda Metro 85 mpg Scooter. Dont laugh I will throw it at you
77 KZ 650 C1.
Crashed-Repaired, Pods, Kerker pipe, re-wired core bundle, lamp upgraded, homemade rectifier, solid state regulator , Dyna-s ignition, repainted, slightly modified, year-round commuter
Honda Metro 85 mpg Scooter. Dont laugh I will throw it at you
Please Log in or Create an account to join the conversation.
- PLUMMEN
-
- Offline
- User
-
Registered
- Posts: 7986
- Thanks: 104
Re: removing deep scratches from DOHC engine side c
07 Dec 2009 04:48
your alt cover is not flat ,its cast with a taper in it on top and on bottem .carefull not to remove too much material, if its too deep you might have to have it welded up then go back to sanding
Still recovering,some days are better than others.
Please Log in or Create an account to join the conversation.
- Kawickrice
-
- Offline
- User
-
Registered
- After Monday & Tuesday, even the calendar says WTF
- Posts: 2469
- Thanks: 18
Re: removing deep scratches from DOHC engine side c
07 Dec 2009 06:30
newOld_kz1000 wrote:
Being a drywaller for over 20 years this statement caught my eye. If you pull the mud tight you should only need a lite sanding by hand, I hate huffing the dust so an electric sander would not be my choice.
I have deep gouges on my alternator cover but I buff around them. They are trophy scratches from broadsiding a dumptruck in my youth. I did get the small ones out with the sanding though
Wow, never thought of that! I've used orbital sanders for small sheetrock work]
Being a drywaller for over 20 years this statement caught my eye. If you pull the mud tight you should only need a lite sanding by hand, I hate huffing the dust so an electric sander would not be my choice.
I have deep gouges on my alternator cover but I buff around them. They are trophy scratches from broadsiding a dumptruck in my youth.
I did get the small ones out with the sanding though
73 Kawasaki Z1
07 HD CVO Ultra Classic
82 Suzuki GS 1100
74 Yamaha RD 350 (My two stroke toy)
77 Kawasaki KZ 650B-1 (My putt around bike)
80 Indian Moped (My American Iron)
1
Long Gone
75 Suzuki GT550
74 GT 380
79 RD 400 Daytona Special
72 Honda CL 175
74 Honda QA 50
Tampa FL
07 HD CVO Ultra Classic
82 Suzuki GS 1100
74 Yamaha RD 350 (My two stroke toy)
77 Kawasaki KZ 650B-1 (My putt around bike)
80 Indian Moped (My American Iron)
1
Long Gone
75 Suzuki GT550
74 GT 380
79 RD 400 Daytona Special
72 Honda CL 175
74 Honda QA 50
Tampa FL
Please Log in or Create an account to join the conversation.
- YUKABODOS
-

- Offline
- User
-
Registered
- Posts: 103
- Thanks: 0
Re: removing deep scratches from DOHC engine side cove
07 Dec 2009 10:09 - 07 Dec 2009 10:10
Same problem that I had.
Used 80 to sand the gouges flat and then proceeded to use 320, 600, steel wool xxxx, and then used red then white cut polishing compound on a buffing wheel attached to a bench grinder.
It went from alost garbage to a show piece. It did take a while though and I still have a blister on my thumb.
Afterwards I washed with sunlight soap and windex to clean off the polishing residue.
Worth the work. Covers look brand new.
Last edit: 07 Dec 2009 10:10 by YUKABODOS.
Please Log in or Create an account to join the conversation.
- Iron Duke
-

- Offline
- User
-
Registered
- what are you rebelling against?
- Posts: 336
- Thanks: 0
Re: removing deep scratches from DOHC engine side c
07 Dec 2009 12:08
Yes the one at Harbor Fright is one of the sanders I use, got it last year does a good job, also have makada a de walt and black n decker, really love em and don't want to be with out, good luck know it will do the job for ya. regards Duke
1982 KZ550 LTD C-3
1979 XS1100 F Yamaha
1979 XS1100 F Yamaha
Please Log in or Create an account to join the conversation.
- jimmybon
-

- Offline
- User
-
Registered
- Posts: 209
- Thanks: 2
Re: removing deep scratches from DOHC engine side c
07 Dec 2009 12:33
Qdude wrote:
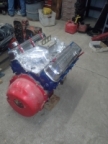
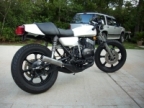
When I'm refurbishing a side cover I always start with a file. I have about 10 different grades of files and have found a fine warding file good for the job but you must clean the file with a wire brush regulaly Qdude mentioned.
you have to have a steady stroke with the files on aluminium.
To hold the cover in a vice, trace the cover o a flat peice of timber, say, 18mm malamine or a like, then cut the shape out on a bnd saw or with a jigsaw. Also cut out an extra peice opprox 20 x 20 x 100mm long then scew this peice to the flat peice to use for holding in the vice, then screw the cover to the timber
After getting any deep gaugers out start sandin with heavy then lighter grades of emery cloth till ready to polish

A file also worked well, but I recommend cleaning the face of the file often, like every two strokes. I had problems with bits of aluminum getting stuck in the file. It would make a little knot, then drag new scratch marks across the work.
Q
When I'm refurbishing a side cover I always start with a file. I have about 10 different grades of files and have found a fine warding file good for the job but you must clean the file with a wire brush regulaly Qdude mentioned.
you have to have a steady stroke with the files on aluminium.
To hold the cover in a vice, trace the cover o a flat peice of timber, say, 18mm malamine or a like, then cut the shape out on a bnd saw or with a jigsaw. Also cut out an extra peice opprox 20 x 20 x 100mm long then scew this peice to the flat peice to use for holding in the vice, then screw the cover to the timber
After getting any deep gaugers out start sandin with heavy then lighter grades of emery cloth till ready to polish
74 Z1A900 original
74 Z1A900 stone replica
74Z1A900 barn find
77 Z650B1 Hybrid
81 z650 PIG camp bike
06 ZRX1200R cafe racer project
S1000xr
74 Z1A900 stone replica
74Z1A900 barn find
77 Z650B1 Hybrid
81 z650 PIG camp bike
06 ZRX1200R cafe racer project
S1000xr
Attachments:
Please Log in or Create an account to join the conversation.
- jimmybon
-
- Offline
- User
-
Registered
- Posts: 209
- Thanks: 2
Re: removing deep scratches from DOHC engine side c
07 Dec 2009 12:34
and before

74 Z1A900 original
74 Z1A900 stone replica
74Z1A900 barn find
77 Z650B1 Hybrid
81 z650 PIG camp bike
06 ZRX1200R cafe racer project
S1000xr
74 Z1A900 stone replica
74Z1A900 barn find
77 Z650B1 Hybrid
81 z650 PIG camp bike
06 ZRX1200R cafe racer project
S1000xr
Attachments:
Please Log in or Create an account to join the conversation.
- newOld_kz1000
-
Topic Author
- Offline
- User
-
Registered
- FlimFlamFlibbityFlee !! BoonFryedShickaMuhZee !!
- Posts: 751
- Thanks: 20
Re: removing deep scratches from DOHC engine side c
07 Dec 2009 21:56
Okay guys, great suggestions!
I started with Plummen's sanding block suggestion, #80 grit paper and got it looking like this:
i604.photobucket.com/albums/tt125/GreatGoodTimes/DSCF0056.jpg [/img]
Here, you can see more clearly that I sanded the lower half mostly since that's where the grooves were:
i604.photobucket.com/albums/tt125/GreatGoodTimes/DSCF0057.jpg [/img]
This is the left side alternator cover, again -- showing I mostly worked the bottom half:
i604.photobucket.com/albums/tt125/GreatGoodTimes/DSCF0059.jpg [/img]
This deep groove to the top, right above DOHC won't be coming out any time soon -- it's the Grand Canyon of all the other grooves.
i604.photobucket.com/albums/tt125/GreatGoodTimes/DSCF0060.jpg [/img]
Thanks Plummen!
That's just the #80 sand paper on a sanding block.
Next I'm headed to Harbor Freight for the Orbital Random sander that was highly recommended -- I'll use that to do a really fast 100, 180, 220 etc. to clean up the scratches from the earlier work...looking good so far.
I wish I'd taken 'Before' photos but I did not, but trust me these 2 pieces were GROOVY...I mean that in a *bad* way.
Thanks to All! QUESTION -- what black paint type do I use for the DOHC backgrounds, and do I need to seal it with a clearcoat? Not sure if it's glossy or flat or satin, not sure if it's an acrylic or other type of paint, etc.
1978 kz1000 A2 with Kerker
1980 Z1 Classic with Kerker
1980 Z1 Classic with Kerker
Please Log in or Create an account to join the conversation.
- MFolks
-

- Offline
- User
-
Registered
- Posts: 6650
- Thanks: 541
Re: removing deep scratches from DOHC engine side c
07 Dec 2009 23:05
I've had good luck using the PJ-1 fast black spray paint to touch up areas on my black engined 82 GPz1100 B2.
1982 GPZ1100 B2
General Dynamics/Convair 1983-1993
GLCM BGM-109 Tomahawk, AGM-129A Advanced Cruise Missile (ACM)
General Dynamics/Convair 1983-1993
GLCM BGM-109 Tomahawk, AGM-129A Advanced Cruise Missile (ACM)
Please Log in or Create an account to join the conversation.
- PLUMMEN
-
- Offline
- User
-
Registered
- Posts: 7986
- Thanks: 104
Re: removing deep scratches from DOHC engine side c
07 Dec 2009 23:12
newOld_kz1000 wrote: ")
the big gouge will probably need to be welded up then filed/sanded to fix it.a black chisel tipped sharpie marker works good between the letters and is easy to touch up.i think the black paint looks kinda cheesey to outline the dohc,too bright/shiny to me anywayOkay guys, great suggestions!
I started with Plummen's sanding block suggestion, #80 grit paper and got it looking like this:
i604.photobucket.com/albums/tt125/GreatGoodTimes/DSCF0056.jpg [/img]
Here, you can see more clearly that I sanded the lower half mostly since that's where the grooves were:
i604.photobucket.com/albums/tt125/GreatGoodTimes/DSCF0057.jpg [/img]
This is the left side alternator cover, again -- showing I mostly worked the bottom half:
i604.photobucket.com/albums/tt125/GreatGoodTimes/DSCF0059.jpg [/img]
This deep groove to the top, right above DOHC won't be coming out any time soon -- it's the Grand Canyon of all the other grooves.
i604.photobucket.com/albums/tt125/GreatGoodTimes/DSCF0060.jpg [/img]
Thanks Plummen!
That's just the #80 sand paper on a sanding block.
Next I'm headed to Harbor Freight for the Orbital Random sander that was highly recommended -- I'll use that to do a really fast 100, 180, 220 etc. to clean up the scratches from the earlier work...looking good so far.
I wish I'd taken 'Before' photos but I did not, but trust me these 2 pieces were GROOVY...I mean that in a *bad* way.
Thanks to All! QUESTION -- what black paint type do I use for the DOHC backgrounds, and do I need to seal it with a clearcoat? Not sure if it's glossy or flat or satin, not sure if it's an acrylic or other type of paint, etc.
Still recovering,some days are better than others.
Please Log in or Create an account to join the conversation.
- kzr750r1
-
- Offline
- User
-
Registered
- Posts: 447
- Thanks: 9
Re: removing deep scratches from DOHC engine side c
08 Dec 2009 10:53 - 08 Dec 2009 10:58
Besactly the product I have been using...PJ1 works well. I touched up the ZR motor after the case repair and treated the used ingnition cover with a new finish after a fine sand to clean up and chips or scratches.
KZ750R1 + 1991 ZR750 = KZR750R1
Better to be shot out of a cannon then squeezed through a tube. - HST
Better to be shot out of a cannon then squeezed through a tube. - HST
Last edit: 08 Dec 2009 10:58 by kzr750r1.
Please Log in or Create an account to join the conversation.
Moderators: Street Fighter LTD