Question about rearsets
- adri4n
-
Topic Author
- Offline
- User
-

Registered
- Posts: 45
- Thanks: 1
Question about rearsets
09 Mar 2008 04:28
I'm just wondering about rearsets and how difficult they are to install. I just installed clubman bars on my z500 and I'm loving the new look. I still have the stock foot controls in place and I haven't had enough riding time with the new bars to say if they are comfortable enough.
Also wondering about who runs clubmans or similar lower type bars with the stock pegs in place or if everyone has gone for rearsets? I appreciate all input. cheers
Also wondering about who runs clubmans or similar lower type bars with the stock pegs in place or if everyone has gone for rearsets? I appreciate all input. cheers
Please Log in or Create an account to join the conversation.
- roy-b-boy-b
-
- Offline
- User
-

Registered
- Posts: 3246
- Thanks: 103
Re: Question about rearsets
09 Mar 2008 07:06
I made home rear set for my LTD by reversing the the stock foot peg mounts.Just remove the mounts and put them on the opposite side then take the foot rests off and put them back where they belong. I made a shifter linkage for mine that had to be welded to the frame. You probably could mount your stock shifter backwards and have a reverse shift pattern. It will give you a idea if you want rear sets or not. Roy
Post edited by: roy-b-boy-b, at: 2008/03/09 10:07
Post edited by: roy-b-boy-b, at: 2008/03/09 10:07
1979 LTD Street Fighter.1977 KZ1000
Please Log in or Create an account to join the conversation.
- rstnick
-

- Offline
- User
-

Registered
- Posts: 4502
- Thanks: 447
Re: Question about rearsets
09 Mar 2008 08:01 - 09 Mar 2008 16:58
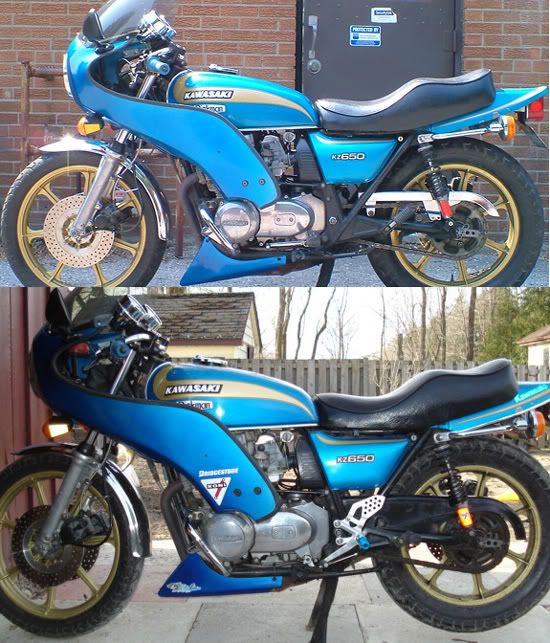
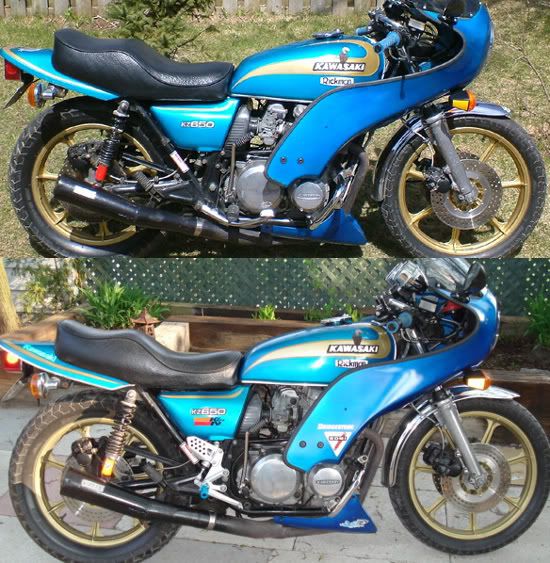
I have Clubman bars and rode for one full season plus a bit of the next like that with the stock peg set up. It's all a personal feel. I was not too uncomfortable like that.
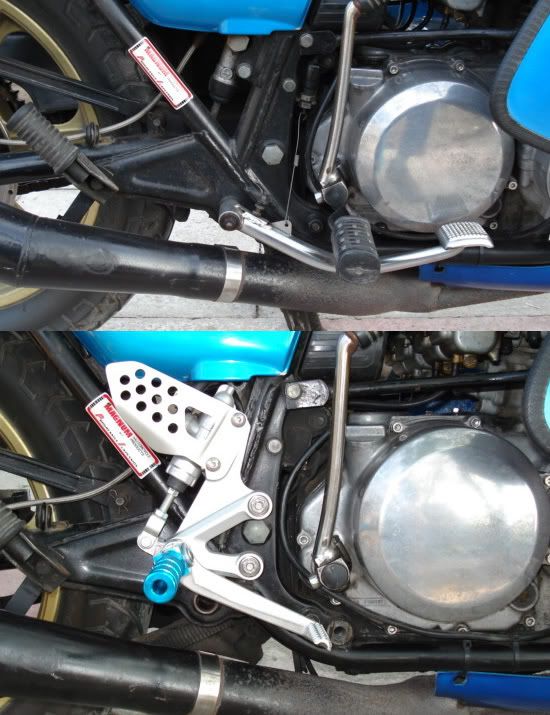
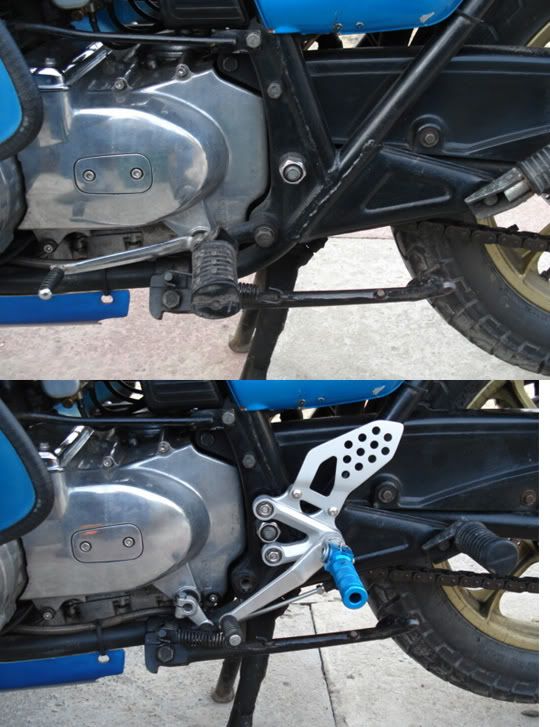
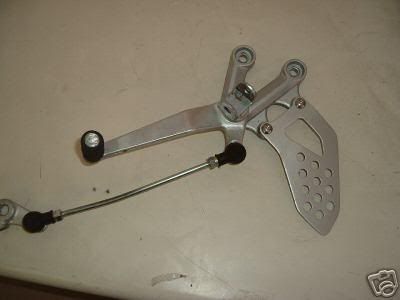
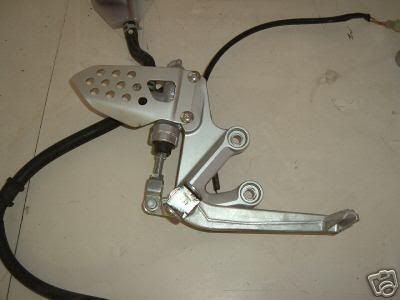
At the begining of last season, I found a set of '04 GSXR600 Rear sets. I had seen others use these, and similar ZX rearsets, so knew the challenges of mounting them. The rearsets move the pegs back about 6 inches and up slightly. The feel is very comfortable. I was a little worried about switching the possition, as I've had the bike over 20 years and you body gets somewhat molded to it's controls. Once change, I learned to adjust very quickly. Riding a friends kz650 after that, I found myself searching for his pegs.
The GSXR pieces were an easy swap. Two bolts to mount the brackets. The brake side had the Master Cylinder and brake light switch attached to the mounting bracket, so I didn't have to figure out how/where to mount them.
The gear shift side just needed the linkage shortened, and the two mounts attached.
There's a little more involved, but If I can do it with the limited amount of tools I have (mostly hand tools) I'm sure most can do it.
Rob
CANADA
Need a key for your Kawasaki? PM me
1978 KZ650 C2, 130K kms, Delkevic ex, EI, CVK32, PMC easy clutch, ATK fork brace, steering damper, braced swingarm, ZRX shocks, 18" Z1R front wheel.
2000 ZRX1100
2011 Ninja 250R - Wife's
2005 z750s
1978 KZ1000 project
1983 KZ1000R2 Project
CANADA
Need a key for your Kawasaki? PM me
1978 KZ650 C2, 130K kms, Delkevic ex, EI, CVK32, PMC easy clutch, ATK fork brace, steering damper, braced swingarm, ZRX shocks, 18" Z1R front wheel.
2000 ZRX1100
2011 Ninja 250R - Wife's
2005 z750s
1978 KZ1000 project
1983 KZ1000R2 Project
Last edit: 09 Mar 2008 16:58 by rstnick. Reason: Add pix.
Please Log in or Create an account to join the conversation.
- CruisingRam
-
- Offline
- User
-

Registered
- Posts: 643
- Thanks: 16
Re: Question about rearsets
09 Mar 2008 08:26
The Tarozi's from American Claxxics are bolt on affairs.
www.americanclassix.com/streetfighter_general.html
www.americanclassix.com/streetfighter_general.html
1975 Z1 B 900- soon to be heavily modded
Pahoa, Hawaii is my new hom
I am working hard to save up the shipping money to get my shop opened here in Hawaii
I hate electrical stuff.
Pahoa, Hawaii is my new hom
I am working hard to save up the shipping money to get my shop opened here in Hawaii
I hate electrical stuff.
Please Log in or Create an account to join the conversation.
- adri4n
-
Topic Author
- Offline
- User
-

Registered
- Posts: 45
- Thanks: 1
Re: Question about rearsets
10 Mar 2008 03:03 - 10 Mar 2008 03:04
So the gsxr rear sets are the closeset to the kz's bolt positions? I was looking at the ones on ebay...
cgi.ebay.com.au/ws/eBayISAPI.dll?ViewIte...e=ADME:X:RTQ:AU:1123
does anyone have any experience with these? I'm slightly concerned about the rear brake light switch and also the rear brake, things I should look out for? thanks
cgi.ebay.com.au/ws/eBayISAPI.dll?ViewIte...e=ADME:X:RTQ:AU:1123
does anyone have any experience with these? I'm slightly concerned about the rear brake light switch and also the rear brake, things I should look out for? thanks
Last edit: 10 Mar 2008 03:04 by adri4n.
Please Log in or Create an account to join the conversation.
- adri4n
-
Topic Author
- Offline
- User
-

Registered
- Posts: 45
- Thanks: 1
Re: Question about rearsets
10 Mar 2008 04:02
also, how did you bolt on the rearsets? did you drill new holes for them or did you fashion a mounting plate? I'm still relatively new to working on my own bike so please be patient with me. 
Please Log in or Create an account to join the conversation.
- rstnick
-

- Offline
- User
-

Registered
- Posts: 4502
- Thanks: 447
Re: Question about rearsets
10 Mar 2008 06:11
I drilled two holes in the frame to mount them on each side, further back than the KZ's bolt position.
The rearsets came with the mounting bracket, Master cylinder and brake switch, linkage for the gear shift and the blue pegs I bought separately.
The ones you linked to could work, but do not include a Master cylinder, brake switch and linkage for the gear shift, so that will all need to be sorced out.
Does your bike have a rear disk brake? Mine did. Drum brake will be different in set up.
Here are my installation instructions:
Read through all the instructions first.
I used 5/16 stainless steel bolts, washers and nuts. The length I estimated using a ruler and a another item like a screw driver or something. I believe the gear shift side were 2 1/2~ 2 3/4" long, and the brake side 3" long. I used 5/16 as that's what my local store had in Stainless Steel. HenryJ on KZR used 8 mm I believe. Just take a mount with you, and get the largest size diametre that will fit in the stock Gixxer holes. Two bolts for each side. I also used 2 larger sized nuts, 3/8 " I think, just as long as they slide over the 5/16 bolts easy, as spacers.
Using 8mm bolts, HenryJ mentioned he had to grind the heads of the bolts down for the swingarm to have clearance. I found I did'nt have to do anything to the 5/16 " bolt heads.
Here's a breakdown for each side:
Brake:
- Mark and centre punch the location for the two holes, evenly spaced on either side of the Swing Arm Pivot Bolt. Trying to stay on the flat area of the frame, away from the round tubular part enough so that the first washer does not touch the raised tubular area. Drill the 2 holes, starting small, then larger until your bolts will fit through. This flat section of the frame is hollow. Try to keep the drill stright and perpandicular (?) to the frame. You might want the bike on the centre stand while drilling and keep your drill level. I think I was a little off on one of my four holes, and used a Rat Tailed file to enlarge the hole on one side to line up with the Gixxer mounting bracket.
-I'm sure I bought 3" long bolts, but doing a quick measurement tonight, from the tip to the bottom of the head they are 2 1/2 inches. Although you know that a 3" nail is usually shorter than 3"s.
- I slipped the bolts in from the inside of the frame with a little finess. HenryJ mentioned he removed his Swing Arm, but I managed without removing mine.
- Bolts are through the holes - I then added two 5/16 SS washers to each bolt, then one of the larger 3/8 SS spacers nuts to each bolt just slid on, then one more 5/16 SS washer to each bolt, then one SS lock washer to each bolt, then a 5/16 SS bolt to each. I then tightened the 5/16 bolt, holding the nut head on the backside of frame with a wrench.
- You can now test fit the Gixxer bracket for fit. If OK, add one SS washer, one SS lock washer and one SS nut and tighten. I lost one nut on a ride, even with the lock washers on, so I added Blue Lock Tight to the threads of all four nuts after that.
- The brake line will need to be connected to the Master Cylinder (MC). Around the connection point of the MC are 3 posts. I cut off two, or maybe all three. The reason being that the posts are in the way for the brake hose, and they also hit the frame (the posts do).
- I aslo filed the squared area around the Brake Switch mount on the Gixxer braket on a bit of an angle to get closer to the KZ frame, as it hits the round portion of the frame tube. I only filed a little of the Gixxer bracket around the Brake Switch, leaving plenty of support for the switch.
- The stock KZ MC mount welded on the frame gets in the way of the Gixxer MC a bit. I needed to cut away part of the bottom portion of the KZ MC mount to clear the Gixxer MC and brake line connection. The two holes are still there for a stock KZ MC, but a good chunk of the KZ MC mount is in the way.
- Having a spare KZ brake light switch, I spliced the KZ wire connectors to the Gixxer switch wires, soldering them and using shrink wrap. Now it just plugs in. Doesn't matter which wire gets connected to which plug, as it's just a contact switch.
- The resevoir I mounted to my air box. I drilled an 1/8 hole, after holding the resevoir against the air box and marking it with a pencil, brake line connected. Then used a self tapping screw to mount the resevoir.
- Once every thing is hooked up, new fluid was blead through the resevoir and lines. I rebuilt my caliper because I was using DOT5 fluid before, and the Gixxer uses DOT4, and you can't mix the two. I believe you can mix DOT3 and 4, but check on that to be sure, and bleed the system well.
Now the Gear Shift side:
- Mark and drill the holes like above.
- Again, I'm sure I bought at least 2 1/2" bolts, but doing a measurement on them tonight, they measure 2" from tip to bottom of head. The Gear Shift side's bolts are shorter, because you don't have to make clearance for the MC etc. You could use the same length bolts as used on the Brake side I guess, but I did not.
- I slipped the bolts in from the inside of the frame with a little finess.
- Bolts are through the holes - I then added one 5/16 SS washer, one 5/16 SS lock washer, and one 5/16 SS bolt. I then tightened the 5/16 bolt, holding the nut head on the backside of frame with a wrench.
- You can now test fit the Gixxer bracket for fit. If OK, add one SS washer, one SS lock washer and one SS nut and tighten.
- The KZ gear shift rod/spline has two areas that are splinded/knurled, because of where the stock shifter's holding bolt sits on the shaft, there's a cut out on the shaft with no spline. The Gixxer's piece will only go onto the shaft as far as the first section of splined area, because if you tap it on futher, the Gixxer piece will hit the KZ frame. So really the Gixxer piece is only going onto the KZ shaft about 1/8~3/16" approx. I've had no trouble so far with it not being all the way on. Just make sure it stays tight. Remove the front Gixxer piece that connects to the KZ gear shift rod spline from the Gixxer pegs/linkage. The hole is too small in the Gixxer piece, and the spline is different. I filed the inside of the hole on the Gixxer piece a little with a Rat tailed file, but not much. Just enough for me to be able to hammer/tap it on to the KZ gear shift rod/spline.
- The shaft from the two elbows of the shifter is too long. It needs to be shortened by about and inch or more. Before cutting, find the right die for the rod, as you will need to re-thread it once cut. Mount the bracket and front piece that goes on the KZ shifter rod spline, and see how much will need to be cut off. Don't cut it too short! Better to be on the long side and cut it shorter if you need to than to cut it too short. Also, the ends of this rod are treaded differently. One end is normal thread, the other is reverse (left hand) thread. Make sure you cut the normal threaded end shorter, as you will need to re-tap the rod with the same thread once cut, to fit into it's respective connection. When I re-threaded the rod, I noticed that the thread didn't seem to cut like the factory thread (as deep). The factory probably rolled the threads or something. It worked fine even though the tread didn't look as deep.
- Once cut to length, mount it together and check for proper function. Making sure you can switch gears fully, and the front piece does not hit the frame.
- The side stand spring also needs to be reversed to clear the Gixxer shifter.
Well I hope that all makes sence to you. If not, let me know.
Rob.
Rob
CANADA
Need a key for your Kawasaki? PM me
1978 KZ650 C2, 130K kms, Delkevic ex, EI, CVK32, PMC easy clutch, ATK fork brace, steering damper, braced swingarm, ZRX shocks, 18" Z1R front wheel.
2000 ZRX1100
2011 Ninja 250R - Wife's
2005 z750s
1978 KZ1000 project
1983 KZ1000R2 Project
CANADA
Need a key for your Kawasaki? PM me
1978 KZ650 C2, 130K kms, Delkevic ex, EI, CVK32, PMC easy clutch, ATK fork brace, steering damper, braced swingarm, ZRX shocks, 18" Z1R front wheel.
2000 ZRX1100
2011 Ninja 250R - Wife's
2005 z750s
1978 KZ1000 project
1983 KZ1000R2 Project
Please Log in or Create an account to join the conversation.
- rstnick
-

- Offline
- User
-

Registered
- Posts: 4502
- Thanks: 447
Re: Question about rearsets
10 Mar 2008 06:13
Rob
CANADA
Need a key for your Kawasaki? PM me
1978 KZ650 C2, 130K kms, Delkevic ex, EI, CVK32, PMC easy clutch, ATK fork brace, steering damper, braced swingarm, ZRX shocks, 18" Z1R front wheel.
2000 ZRX1100
2011 Ninja 250R - Wife's
2005 z750s
1978 KZ1000 project
1983 KZ1000R2 Project
CANADA
Need a key for your Kawasaki? PM me
1978 KZ650 C2, 130K kms, Delkevic ex, EI, CVK32, PMC easy clutch, ATK fork brace, steering damper, braced swingarm, ZRX shocks, 18" Z1R front wheel.
2000 ZRX1100
2011 Ninja 250R - Wife's
2005 z750s
1978 KZ1000 project
1983 KZ1000R2 Project
Please Log in or Create an account to join the conversation.
- rstnick
-

- Offline
- User
-

Registered
- Posts: 4502
- Thanks: 447
Re: Question about rearsets
10 Mar 2008 06:15
Rob
CANADA
Need a key for your Kawasaki? PM me
1978 KZ650 C2, 130K kms, Delkevic ex, EI, CVK32, PMC easy clutch, ATK fork brace, steering damper, braced swingarm, ZRX shocks, 18" Z1R front wheel.
2000 ZRX1100
2011 Ninja 250R - Wife's
2005 z750s
1978 KZ1000 project
1983 KZ1000R2 Project
CANADA
Need a key for your Kawasaki? PM me
1978 KZ650 C2, 130K kms, Delkevic ex, EI, CVK32, PMC easy clutch, ATK fork brace, steering damper, braced swingarm, ZRX shocks, 18" Z1R front wheel.
2000 ZRX1100
2011 Ninja 250R - Wife's
2005 z750s
1978 KZ1000 project
1983 KZ1000R2 Project
Please Log in or Create an account to join the conversation.
- rstnick
-

- Offline
- User
-

Registered
- Posts: 4502
- Thanks: 447
Re: Question about rearsets
10 Mar 2008 06:27
Rob
CANADA
Need a key for your Kawasaki? PM me
1978 KZ650 C2, 130K kms, Delkevic ex, EI, CVK32, PMC easy clutch, ATK fork brace, steering damper, braced swingarm, ZRX shocks, 18" Z1R front wheel.
2000 ZRX1100
2011 Ninja 250R - Wife's
2005 z750s
1978 KZ1000 project
1983 KZ1000R2 Project
CANADA
Need a key for your Kawasaki? PM me
1978 KZ650 C2, 130K kms, Delkevic ex, EI, CVK32, PMC easy clutch, ATK fork brace, steering damper, braced swingarm, ZRX shocks, 18" Z1R front wheel.
2000 ZRX1100
2011 Ninja 250R - Wife's
2005 z750s
1978 KZ1000 project
1983 KZ1000R2 Project
Please Log in or Create an account to join the conversation.
- adri4n
-
Topic Author
- Offline
- User
-

Registered
- Posts: 45
- Thanks: 1
Re: Question about rearsets
10 Mar 2008 21:23
Thanks for all of the above rob, must have taken you a long time to type all of that out. I really appreciate it though cos it shows me how much work I might need to do to install rearsets. I was under the impression I might be able to customise the right side so that it would work with the existing rear master cylinder. (yes I have a single disk brake on the rear). Dunno if that will work, but I'll have a closer look through all that you have mentioned and try to see what works on my bike. Once again thanks.
*maybe the mods could make this a sticky of sorts? Like in a "how to" section? cheers
*maybe the mods could make this a sticky of sorts? Like in a "how to" section? cheers
Please Log in or Create an account to join the conversation.
- Yojymbo!
-

- Offline
- User
-

Registered
- Posts: 124
- Thanks: 0
Re: Question about rearsets
25 Jun 2009 22:25
Huzza!!!
Awsome write up and pics, thanks much this really helps me see what I need to do to mount my new (free!!!) rear sets on my 650. You just save me a lot of cigarettes and thinking. Gratsi!!!
Great pics!!! Just what I needed. I'm using my rear drum brake but have the cam and everything so it should not be much different.
Please Log in or Create an account to join the conversation.
Moderators: Street Fighter LTD

