
Tank emblem reconditioning ideas??
- harm
-
 Topic Author
- Offline
- User
-

Registered
- Tom
- Posts: 681
- Thanks: 13
Tank emblem reconditioning ideas??
20 Oct 2007 08:30
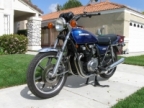
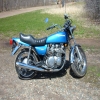
I have now painted my tank green:P My tank emblems don't look so hot:(
what should i do? It looks like someone tried to brush paint the white at one time. What color are the ELR emblems? Is that something i could do pretty easily? Can i sandblast these emblems?
Thanks for any help!!

what should i do? It looks like someone tried to brush paint the white at one time. What color are the ELR emblems? Is that something i could do pretty easily? Can i sandblast these emblems?
Thanks for any help!!
Tom
Holland, MI
1980 KZ550 ELR
2011 Concours14
2017 KX450 [/color]
Holland, MI
1980 KZ550 ELR
2011 Concours14
2017 KX450 [/color]
Attachments:
Please Log in or Create an account to join the conversation.
- harm
-
Topic Author
- Offline
- User
-
Registered
- Tom
- Posts: 681
- Thanks: 13
Re: Tank emblem reconditioning ideas??
20 Oct 2007 08:31
tank pic

Tom
Holland, MI
1980 KZ550 ELR
2011 Concours14
2017 KX450 [/color]
Holland, MI
1980 KZ550 ELR
2011 Concours14
2017 KX450 [/color]
Attachments:
Please Log in or Create an account to join the conversation.
- Bluemeanie
-
- Offline
- User
-
Registered
- Posts: 2516
- Thanks: 15
Re: Tank emblem reconditioning ideas??
20 Oct 2007 09:00
A set of those was on ebay and high bid was $10, I meant to grab them but forgot. I think they are made from a kind of pot metal so I guess you could "lightly" blast them? You'll lose the chrome though, and will need a steady hand at painting them. ")
1980 KZ650F1, Bought new out the door for $2,162.98!
Please Log in or Create an account to join the conversation.
- rdgrnr
-
- Offline
- User
-
Registered
- Posts: 342
- Thanks: 0
Re: Tank emblem reconditioning ideas??
20 Oct 2007 10:15
harm,
Don't sandblast them, If they are like mine, they are soft and pliable like lead. If you blast them, you will ruin them.
Use a paint remover and a Q-tip to remove the old paint. If you have a dremel type tool, use that to clean up the rough edges.
After that, get some model paint, and a fine modeling paintbrush. Get Chrome, Satin black, and based on the bright color of your tank, Bright White for the lettering inset. I have heard of taping the letters off, and spraying the outside areas in black. Automotive touch-up paint will not work as it is too thin and will run. You will need to have a steady hand to do the chrome letter outline. Did I mention a steady hand???:laugh:
Do the outline first, then after it dries, do the white inset. Keep a toothpick close by that you can use to clean-up any paint that ends up where you don't want it.
This takes time and patience, but you will be happy with the results.
77 KZ650B1
80 440 LTD Sold
78 GL1000 Naked Wing Sold
80 CM400E Sold
Brainerd, MN
80 440 LTD Sold
78 GL1000 Naked Wing Sold
80 CM400E Sold
Brainerd, MN
Please Log in or Create an account to join the conversation.
- JMKZHI
-

- Offline
- Platinum Member
-

Registered
- Posts: 2428
- Thanks: 48
Last edit: 22 Feb 2013 12:05 by JMKZHI.
Please Log in or Create an account to join the conversation.
- harm
-
Topic Author
- Offline
- User
-
Registered
- Tom
- Posts: 681
- Thanks: 13
Re: Tank emblem reconditioning ideas??
20 Oct 2007 12:57
Sounds good! Thanks for the ideasB)
Does anyone have any pics of what you did?
Do the ELR bikes have gold on there emblems?
Does anyone have any pics of what you did?
Do the ELR bikes have gold on there emblems?
Tom
Holland, MI
1980 KZ550 ELR
2011 Concours14
2017 KX450 [/color]
Holland, MI
1980 KZ550 ELR
2011 Concours14
2017 KX450 [/color]
Please Log in or Create an account to join the conversation.
- JMKZHI
-
- Offline
- Platinum Member
-
Registered
- Posts: 2428
- Thanks: 48
Last edit: 22 Feb 2013 12:05 by JMKZHI.
Please Log in or Create an account to join the conversation.
- wrenchmonkey
-
- Offline
- User
-
Registered
- Posts: 568
- Thanks: 75
Re: Tank emblem reconditioning ideas??
20 Oct 2007 21:54
harm,
this is a long reply but in the end, it'll be the fastest, best-results approach to take so hopefully you can bare with me here and read the whole post...
Emblem restoration.
Most emblems are made from alloys or "pot metal" and are easily cleaned-up.
First thing i normally do for this process is:
Wash the emblems really well with stiff plastic bristle brush (old tooth brush works pretty good too) and some soapy water to get cleaned into the "edges" of the emblem...
Next:
Use some triple-zero (000) steel wool to really polish-up the shiny, raised, trim edges which you should get looking pretty good.
If the emblem(s) are heavily oxidized or previously painted over, you might have to start off with some high-grit-number wet/dry sand papers to begin the polishing. Example: 600g, 800g, 1000grit - do this wet!
Then follow-up with the "angel hair" steel wool to really buff-up the edges' shine.
Avoid the temptation to use any wire-wheels on your drill press etc.. it'll burnish or mark-up the polished surfaces most likely with unsatisfactory results.
After polishing clean the emblems again with compressed air and or soapy water to remove any polishing residue or "angel hairs" and wash your own hands again since that angel hair will turn your fingers black.
Mask off:
Once dry, use some "easy release" masking tape ( it's the same colour as your bike!") ) and apply it across the entire emblem lengthwise and rub it on so it sticks well to the entire raised surfaces that you just polished-up so nice
) and apply it across the entire emblem lengthwise and rub it on so it sticks well to the entire raised surfaces that you just polished-up so nice  I usually just lay-out the masking tape across the emblem field and use my finger nail to gently trace the raised edges to help stick the tape to only the raised surfaces.
Cut-out:
Now using a NEW razor (the single sided, straight blades that come in boxes at your FLAPS for cheap) and trace the inner raised-edge of all the lettering so as to cut-out and expose the white areas for painting. If you do this carefully you can actually cut the masking tape EXACTLY along the raised edges by tilting the blade to match any bevels et cetera that may exist...
You will find using a dental pick or even a toothpick useful to lift up the extracted tape bits you cut-out of the letters and CHANGE your blade(s) as required to keep the cutting-edge clean and not ragged!
Paint:
Now you can EASILY spray the automotive white paint into the "inside" portions of the lettering. After the paint has dried sufficiently (based upon the type of automotive or rattle-can paint you chose) you can peel-off the green masking tape carefully and let the paint fully cure for any required time.
Repeat:
Then you repeat the process again, this time applying the masking tape across the emblem and using a new razor blade, cut-out the exterior sides of the letters' raised edges to reveal the black areas between the letters. Again, lay-down the coat(s) of black paint (flat, satin or gloss is yer call). Once dried sufficiently, peel off the masking tape again and let cure.
You want it to Really Shine?:
If you want, you can then spray the entire thing with some clear coat (even rattle can clear coat will work well here) to maintain it's uber-glossy and polished look.
The clear coat also helps to prevent the "bright work" from oxidizing in the future and maintain that just polished shine a lot longer.
Of course you'll have to treat that emblem as a painted surface and not "polish-able" metal forever more but Hey! it's on your tank so you will anyway right?
Last thing:
Before you attempt to install them back onto that awesome looking tank of yours, lay-out a few strips of that same green easy release masking tape across the "field" where the emblems will be installed eventually (you might even double-up the masking tape layers) and lay each emblem into position. If the emblems have become tweaked at all, they wont' wanna sit down flat/flush to the tank and you might otherwise risk denting or scratching the paint with an emblem edge.. The layered masking tape will allow you to carefully "shape" the emblem a bit without risk of paint damage on the tank. Kinda' like using the masked-off tank as an anvil to gently press-fit the emblem into flush, neat seating on it. (if you know what i mean?)
Hope that helps. I do this ALOT on classic cars all the time. It'll work and it's a less "jittery-handed" approach to the work which works better for me most days :S
this is a long reply but in the end, it'll be the fastest, best-results approach to take so hopefully you can bare with me here and read the whole post...
Emblem restoration.
Most emblems are made from alloys or "pot metal" and are easily cleaned-up.
First thing i normally do for this process is:
Wash the emblems really well with stiff plastic bristle brush (old tooth brush works pretty good too) and some soapy water to get cleaned into the "edges" of the emblem...
Next:
Use some triple-zero (000) steel wool to really polish-up the shiny, raised, trim edges which you should get looking pretty good.
If the emblem(s) are heavily oxidized or previously painted over, you might have to start off with some high-grit-number wet/dry sand papers to begin the polishing. Example: 600g, 800g, 1000grit - do this wet!
Then follow-up with the "angel hair" steel wool to really buff-up the edges' shine.
Avoid the temptation to use any wire-wheels on your drill press etc.. it'll burnish or mark-up the polished surfaces most likely with unsatisfactory results.
After polishing clean the emblems again with compressed air and or soapy water to remove any polishing residue or "angel hairs" and wash your own hands again since that angel hair will turn your fingers black.
Mask off:
Once dry, use some "easy release" masking tape ( it's the same colour as your bike!
) and apply it across the entire emblem lengthwise and rub it on so it sticks well to the entire raised surfaces that you just polished-up so nice I usually just lay-out the masking tape across the emblem field and use my finger nail to gently trace the raised edges to help stick the tape to only the raised surfaces.Cut-out:
Now using a NEW razor (the single sided, straight blades that come in boxes at your FLAPS for cheap) and trace the inner raised-edge of all the lettering so as to cut-out and expose the white areas for painting. If you do this carefully you can actually cut the masking tape EXACTLY along the raised edges by tilting the blade to match any bevels et cetera that may exist...
You will find using a dental pick or even a toothpick useful to lift up the extracted tape bits you cut-out of the letters and CHANGE your blade(s) as required to keep the cutting-edge clean and not ragged!
Paint:
Now you can EASILY spray the automotive white paint into the "inside" portions of the lettering. After the paint has dried sufficiently (based upon the type of automotive or rattle-can paint you chose) you can peel-off the green masking tape carefully and let the paint fully cure for any required time.
Repeat:
Then you repeat the process again, this time applying the masking tape across the emblem and using a new razor blade, cut-out the exterior sides of the letters' raised edges to reveal the black areas between the letters. Again, lay-down the coat(s) of black paint (flat, satin or gloss is yer call). Once dried sufficiently, peel off the masking tape again and let cure.
You want it to Really Shine?:
If you want, you can then spray the entire thing with some clear coat (even rattle can clear coat will work well here) to maintain it's uber-glossy and polished look.
The clear coat also helps to prevent the "bright work" from oxidizing in the future and maintain that just polished shine a lot longer.
Of course you'll have to treat that emblem as a painted surface and not "polish-able" metal forever more but Hey! it's on your tank so you will anyway right?
Last thing:
Before you attempt to install them back onto that awesome looking tank of yours, lay-out a few strips of that same green easy release masking tape across the "field" where the emblems will be installed eventually (you might even double-up the masking tape layers) and lay each emblem into position. If the emblems have become tweaked at all, they wont' wanna sit down flat/flush to the tank and you might otherwise risk denting or scratching the paint with an emblem edge.. The layered masking tape will allow you to carefully "shape" the emblem a bit without risk of paint damage on the tank. Kinda' like using the masked-off tank as an anvil to gently press-fit the emblem into flush, neat seating on it. (if you know what i mean?)
Hope that helps. I do this ALOT on classic cars all the time. It'll work and it's a less "jittery-handed" approach to the work which works better for me most days :S
Please Log in or Create an account to join the conversation.
- wrenchmonkey
-
- Offline
- User
-
Registered
- Posts: 568
- Thanks: 75
Re: Tank emblem reconditioning ideas??
20 Oct 2007 21:55
harm,
this is a long reply but in the end, it'll be the fastest, best-results approach to take so hopefully you can bare with me here and read the whole post...
Emblem restoration.
Most emblems are made from alloys or "pot metal" and are easily cleaned-up.
First thing i normally do for this process is:
Wash the emblems really well with stiff plastic bristle brush (old tooth brush works pretty good too) and some soapy water to get cleaned into the "edges" of the emblem...
Next:
Use some triple-zero (000) steel wool to really polish-up the shiny, raised, trim edges which you should get looking pretty good.
If the emblem(s) are heavily oxidized or previously painted over, you might have to start off with some high-grit-number wet/dry sand papers to begin the polishing. Example: 600g, 800g, 1000grit - do this wet!
Then follow-up with the "angel hair" steel wool to really buff-up the edges' shine.
Avoid the temptation to use any wire-wheels on your drill press etc.. it'll burnish or mark-up the polished surfaces most likely with unsatisfactory results.
After polishing clean the emblems again with compressed air and or soapy water to remove any polishing residue or "angel hairs" and wash your own hands again since that angel hair will turn your fingers black.
Mask off:
Once dry, use some "easy release" masking tape ( it's the same colour as your bike! ) and apply it across the entire emblem lengthwise and rub it on so it sticks well to the entire raised surfaces that you just polished-up so nice I usually just lay-out the masking tape across the emblem field and use my finger nail to gently trace the raised edges to help stick the tape to only the raised surfaces.
Cut-out:
Now using a NEW razor (the single sided, straight blades that come in boxes at your FLAPS for cheap) and trace the inner raised-edge of all the lettering so as to cut-out and expose the white areas for painting. If you do this carefully you can actually cut the masking tape EXACTLY along the raised edges by tilting the blade to match any bevels et cetera that may exist...
You will find using a dental pick or even a toothpick useful to lift up the extracted tape bits you cut-out of the letters and CHANGE your blade(s) as required to keep the cutting-edge clean and not ragged!
Paint:
Now you can EASILY spray the automotive white paint into the "inside" portions of the lettering. After the paint has dried sufficiently (based upon the type of automotive or rattle-can paint you chose) you can peel-off the green masking tape carefully and let the paint fully cure for any required time.
Repeat:
Then you repeat the process again, this time applying the masking tape across the emblem and using a new razor blade, cut-out the exterior sides of the letters' raised edges to reveal the black areas between the letters. Again, lay-down the coat(s) of black paint (flat, satin or gloss is yer call). Once dried sufficiently, peel off the masking tape again and let cure.
You want it to Really Shine?:
If you want, you can then spray the entire thing with some clear coat (even rattle can clear coat will work well here) to maintain it's uber-glossy and polished look.
The clear coat also helps to prevent the "bright work" from oxidizing in the future and maintain that just polished shine a lot longer.
Of course you'll have to treat that emblem as a painted surface and not "polish-able" metal forever more but Hey! it's on your tank so you will anyway right?
Last thing:
Before you attempt to install them back onto that awesome looking tank of yours, lay-out a few strips of that same green easy release masking tape across the "field" where the emblems will be installed eventually (you might even double-up the masking tape layers) and lay each emblem into position. If the emblems have become tweaked at all, they wont' wanna sit down flat/flush to the tank and you might otherwise risk denting or scratching the paint with an emblem edge.. The layered masking tape will allow you to carefully "shape" the emblem a bit without risk of paint damage on the tank. Kinda' like using the masked-off tank as an anvil to gently press-fit the emblem into flush, neat seating on it. (if you know what i mean?)
Hope that helps. I do this ALOT on classic cars all the time. It'll work and it's a less "jittery-handed" approach to the work which works better for me most days :S
this is a long reply but in the end, it'll be the fastest, best-results approach to take so hopefully you can bare with me here and read the whole post...
Emblem restoration.
Most emblems are made from alloys or "pot metal" and are easily cleaned-up.
First thing i normally do for this process is:
Wash the emblems really well with stiff plastic bristle brush (old tooth brush works pretty good too) and some soapy water to get cleaned into the "edges" of the emblem...
Next:
Use some triple-zero (000) steel wool to really polish-up the shiny, raised, trim edges which you should get looking pretty good.
If the emblem(s) are heavily oxidized or previously painted over, you might have to start off with some high-grit-number wet/dry sand papers to begin the polishing. Example: 600g, 800g, 1000grit - do this wet!
Then follow-up with the "angel hair" steel wool to really buff-up the edges' shine.
Avoid the temptation to use any wire-wheels on your drill press etc.. it'll burnish or mark-up the polished surfaces most likely with unsatisfactory results.
After polishing clean the emblems again with compressed air and or soapy water to remove any polishing residue or "angel hairs" and wash your own hands again since that angel hair will turn your fingers black.
Mask off:
Once dry, use some "easy release" masking tape ( it's the same colour as your bike!
) and apply it across the entire emblem lengthwise and rub it on so it sticks well to the entire raised surfaces that you just polished-up so nice I usually just lay-out the masking tape across the emblem field and use my finger nail to gently trace the raised edges to help stick the tape to only the raised surfaces.Cut-out:
Now using a NEW razor (the single sided, straight blades that come in boxes at your FLAPS for cheap) and trace the inner raised-edge of all the lettering so as to cut-out and expose the white areas for painting. If you do this carefully you can actually cut the masking tape EXACTLY along the raised edges by tilting the blade to match any bevels et cetera that may exist...
You will find using a dental pick or even a toothpick useful to lift up the extracted tape bits you cut-out of the letters and CHANGE your blade(s) as required to keep the cutting-edge clean and not ragged!
Paint:
Now you can EASILY spray the automotive white paint into the "inside" portions of the lettering. After the paint has dried sufficiently (based upon the type of automotive or rattle-can paint you chose) you can peel-off the green masking tape carefully and let the paint fully cure for any required time.
Repeat:
Then you repeat the process again, this time applying the masking tape across the emblem and using a new razor blade, cut-out the exterior sides of the letters' raised edges to reveal the black areas between the letters. Again, lay-down the coat(s) of black paint (flat, satin or gloss is yer call). Once dried sufficiently, peel off the masking tape again and let cure.
You want it to Really Shine?:
If you want, you can then spray the entire thing with some clear coat (even rattle can clear coat will work well here) to maintain it's uber-glossy and polished look.
The clear coat also helps to prevent the "bright work" from oxidizing in the future and maintain that just polished shine a lot longer.
Of course you'll have to treat that emblem as a painted surface and not "polish-able" metal forever more but Hey! it's on your tank so you will anyway right?
Last thing:
Before you attempt to install them back onto that awesome looking tank of yours, lay-out a few strips of that same green easy release masking tape across the "field" where the emblems will be installed eventually (you might even double-up the masking tape layers) and lay each emblem into position. If the emblems have become tweaked at all, they wont' wanna sit down flat/flush to the tank and you might otherwise risk denting or scratching the paint with an emblem edge.. The layered masking tape will allow you to carefully "shape" the emblem a bit without risk of paint damage on the tank. Kinda' like using the masked-off tank as an anvil to gently press-fit the emblem into flush, neat seating on it. (if you know what i mean?)
Hope that helps. I do this ALOT on classic cars all the time. It'll work and it's a less "jittery-handed" approach to the work which works better for me most days :S
Please Log in or Create an account to join the conversation.
- harm
-
Topic Author
- Offline
- User
-
Registered
- Tom
- Posts: 681
- Thanks: 13
Re: Tank emblem reconditioning ideas??
21 Oct 2007 11:38
Thanks for the ideas guys!
Wrenchmonkey, Thanks for the detailed instructions:)") That is what i am looking for!!
That is what i am looking for!!
Wrenchmonkey, Thanks for the detailed instructions:)
That is what i am looking for!!
Tom
Holland, MI
1980 KZ550 ELR
2011 Concours14
2017 KX450 [/color]
Holland, MI
1980 KZ550 ELR
2011 Concours14
2017 KX450 [/color]
Please Log in or Create an account to join the conversation.
- rt green
-

- Offline
- User
-
Registered
- Posts: 49
- Thanks: 0
Re: Tank emblem reconditioning ideas??
24 Oct 2007 17:52
i've always found to do the white letters, you get an eye droper, and mix up the white paint and a lot of thinner. put a few drops of the mixture in the letters, and be carefull not to go over the top of them. let it sit, and the thinner will evaporate, and leave the paint behind. it will be smooth and even. repeat as nessesary. bruce
Please Log in or Create an account to join the conversation.
- austin3119
-
- Offline
- User
-
Registered
- Posts: 487
- Thanks: 7
Re: Tank emblem reconditioning ideas??
24 Oct 2007 18:45
If the repro emblems are available at a reasonable price, my opinion is that it's not worth the hassle. Usually emblems can be had for about $37.50 a piece from what I have seen. On that beautiful tank, I would want my emblems to be perfect. That's just me though.
Please Log in or Create an account to join the conversation.
Moderators: Street Fighter LTD