
HELP! Clutch Not Engaging
- CaptainDarron
-
 Topic Author
- Offline
- User
-

Registered
- Posts: 3
- Thanks: 0
HELP! Clutch Not Engaging
29 Jul 2012 13:45
Hello there! First post, and it's a repair question. I know, weak.
So here's the story. A couple years ago I bought a very ugly 1982 KZ750 CSR-M1 Twin. And I mean ugly. After working on it for two years by myself and not being able to ride more than a block before it died, I realized that I was in over my head and got it to a friend who has a bike shop. He worked on it for about 2 months and got it back to me running smooth and still ugly, except for the one thing.
After riding for about 20 minutes, I started feeling a little extra play in the clutch, so I tightened it up at the lever, and went on. About 5 minutes and 4 or 5 more adjustments later, I knew I had a problem, and as soon as the realization hit me, POP, the clutch cable broke. I park the bike, hitchhike home, order a new one, and go to pick the bike up and get it back to my garage.
Now, a broken clutch cable I can fix, no big deal. I get the old cable off, the new cable on, and changed those god awful KZ handlebars for good measure. No big. Now we get to the new issue.
You see, my clutch is now not engaging at all. There's no tension in the lever, but the inner clutch arm is moving. I can't really tell if it's rising as much as it should be, but that's for lack of knowledge about clutch actuators more than anything else. I've disassembled the actuator and reassembled the actuator a couple times, according to the diagram and advice from my mechanic buddy, and still nothing.
Any advice would be super rad, as my mechanic can't get to the bike for another couple weeks, and my other bike is in pieces at the moment. I need some wheels under me! I can answer any questions, send pictures, talk to you on the phone, and if you're nearby and available, I'll feed you and give you beer for helping me fix it.
Please Log in or Create an account to join the conversation.
- Patton
-

- Offline
- KZr Legend
-

Registered
- Posts: 18564
- Thanks: 2103
Re: HELP! Clutch Not Engaging
29 Jul 2012 14:40 - 29 Jul 2012 14:43CaptainDarron wrote:...clutch cable broke. I park the bike, hitchhike home, order a new one, and go to pick the bike up and get it back to my garage...clutch is now not engaging....
Next time, just keep riding, as it's okay to shift gears without using the clutch.
In fact, many riders hardly ever use the clutch when shifting.
Starting off to get barely rolling from a dead stop without the clutch is a little tricky, but quickly learned and manageable.
No leaving the bike. No hitchhiking. No trailering. No towing.
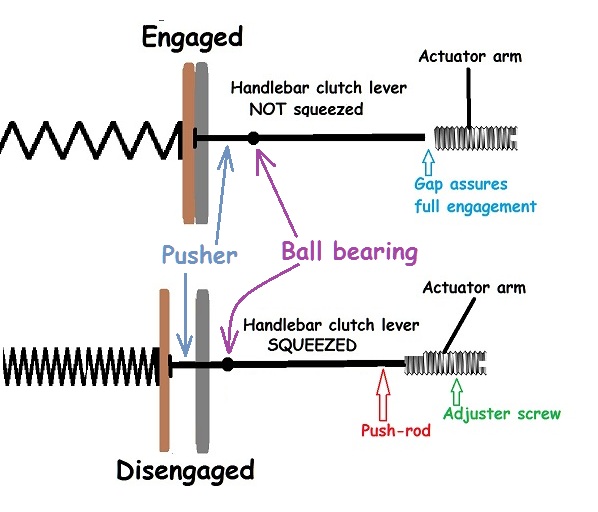
Perhaps needs a clutch pushrod adjustment to provide the gap needed for engagement.
Clutch push rod adjustment -- Need and Purpose
[This is a 1 minute job from start to finish, maybe 2 minutes the first time.]
The FSM covering Z1 and KZ900 includes a periodic maintenance chart requiring clutch push rod adjustment at 2000 mile (3000 km) intervals and explains the need therefor in separate text, which explanation is quoted verbatim as follows:
Besides cable stretch, clutch plate wear also causes the clutch to go out of adjustment, with a decrease in push rod play. Due to this wear, the push rod gradually moves closer to the clutch release lever (at the lower end of the clutch cable) until it touches the adjusting screw. When the rod is touching the screw and therefore has no play, the clutch will not engage fully and clutch slippage will occur. Note that the clutch push rod does not necessarily have play just because the clutch hand lever has play, and so hand lever play alone cannot be used to determine whether or not the clutch requires adjustment.
The FSM covering '77-'79 KZ1000's includes a periodic maintenance chart requiring clutch adjustment at 5000 km intervals, and explains the need therefor in slightly different language, which explanation is quoted verbatim as follows:
Clutch plate wear also causes the clutch to go out of adjustment. This wear causes the play between the push rod and the adjusting screw to gradually diminish until the push rod touches the adjusting screw. When this play is lost, the clutch will not engage fully, causing the clutch to slip.
NOTE: Even though the proper amount of play exists at the clutch lever, clutch lever play alone cannot be used to determine whether or not the clutch requires adjustment.
end of excerpt
While the clutch may indeed be worn out with plates needing replacement, it isn't uncommon to overlook or be unaware of the clutch pushrod adjustment feature, especially without a manual. It is worrisome to see anyone of unknown experience, without a manual or failing to consult a manual, proceed with clutch disassembly and plate replacement, without first being aware of and considering the clutch pushrod adjustment.
Where both (1) clutch cable slack adjustment is perfect, and (2) clutch pushrod adjustment is perfect, and the clutch still slips, suspicion is certainly toward the plates being worn and needing replacement. But other things can also cause slippage, even with proper adjustments and good plates, such as glazed plates or improper oil being used in the crankcase.
Routine clutch push rod adjustment.
Assure having some "slop" in the clutch cable, using adjustments at the handlebar lever perch and at mid-cable along left frame down tube near the exhaust header.
Removing the access plate should reveal the adjustment screw and locknut.
First, slightly loosen the locknut.
The hidden end of the screw interfaces with the pushrod.
The basic idea is to lightly seat the screw against the pushrod, then back the screw 1/4 turn away from the pushrod, to thereby provide a small gap between end of screw and pushrod.
Here's a possible snag ---
The screw is part of an actuator assembly.
On some designs (screw-type), the screw turns clockwise to seat before turning counter-clockwise to provide the gap.
On other designs (ball and ramp), the screw turns counter-clockwise to seat before turning clockwise to provide the gap.
Will now speculate that the bike at hand has the ball and ramp style, whereby the screw turns counter-clockwise to seat before turning clockwise to provide the gap. But I might be wrong. So if it doesn't work that way, adjust it the other way.
Remember to snug the locknut before finishing. Just snug is plenty tight enough.
Lastly, reduce "slop" in the cable to produce desired amount of free play in the lever at the perch.
With the clutch lever released (not being squeezed), the clutch is supposed to be fully engaged (plates pressed tightly together).
If the gap isn't there, the plates can't fully press together, which causes the clutch to "slip."
With the clutch lever squeezed, the clutch plates are supposed to be separated. When squeezed, the gap disappears and the push-rod is pressed inward to press the plates apart, overcoming the spring pressure, and thereby disengaging the clutch.
Too much gap wastes clutch lever movement as too much lever travel is expended to simply close the gap before starting pressure against the push-rod. Whereby the clutch may only partly disengage when the lever is fully squeezed, and produce the sensation of a "sticky" or "grabby" clutch.
Way too much gap may waste all the clutch lever movement, as all the lever travel is expended to simply close the gap, with no movement left to exert pressure against the push-rod.
No gap or too little gap may over-stress the actuator assembly when the clutch lever is squeezed and cause the actuator assembly to pop apart.
It's important to know exactly how to set the required gap.
The general rule is to lightly close the gap, then back off ¼~½ turn.
On some models the gap is closed by turning the adjustment screw clockwise. But on other models the gap is closed by turning the adjustment screw counter-clockwise.
Mistaking which direction to turn the adjustment screw could for example start with the gap wide open instead of lightly seated.
Here's a simplified illustration to help visualize what is supposed to happen as the mechanisms engage and disengage the clutch.
Good Fortune!
")
1973 Z1
KZ900 LTD
KZ900 LTD
Last edit: 29 Jul 2012 14:43 by Patton.
Please Log in or Create an account to join the conversation.
Moderators: Street Fighter LTD