
Upside Down Fork Rebuild 2.0
- testarossa
-
 Topic Author
- Offline
- User
-

Registered
- Attack life, it's only trying to kill you.
- Posts: 3674
- Thanks: 82
Upside Down Fork Rebuild 2.0
13 Mar 2010 20:14 - 13 Mar 2010 20:19
Here the completion of my original post about tearing down an upside down front fork. The original thread can be found here:
kzrider.com/index.php?option=com_kunena&...d=5&id=341303#341305
Much of the information is redundant, so I'll try to be more brief about the teardown. Once again, this particular fork is a 43mm Showa taken from a 1995 GSXR 750. Just about all of the newer sport bike front ends are very similar, so this info should get you through. I would advise you to have a copy of the service manual for the donor bike as it will have some specific info that you'll need.
Again, it goes without saying that you do this at your own risk. Any system that contains a compressed spring has stored potential energy, and if released at the wrong time, it will hurt.
One change from my first post is that I built myself some proper fork tools, and they are used for this teardown. Even if you don't need to replace the seals, you need to take the fork apart and remove the spring to properly refill the oil. Most service manuals require that you replace the oil every 12000 mi or so.
Step 1) Remove the forks from your bike.
Step 2) Back off of the preload adjuster. This is the smaller hex on the top of your fork. Don't try to completely unscrew it. There's usually a circlip at the top that prevents this. This makes it a little easer to unscrew the top cap.
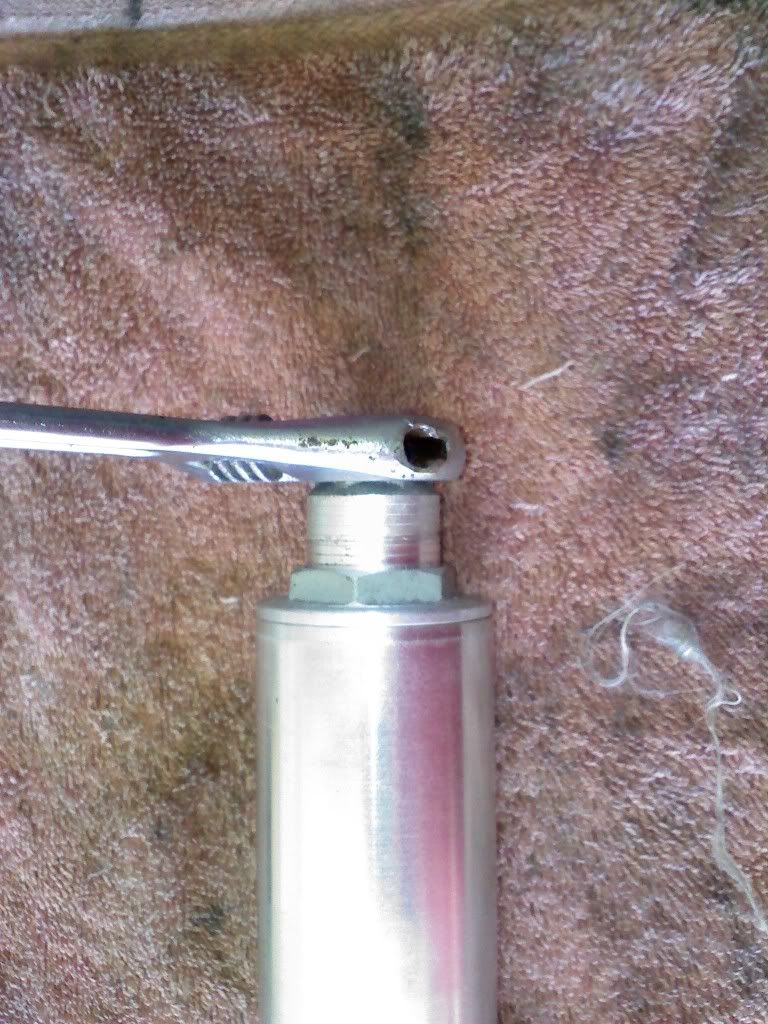
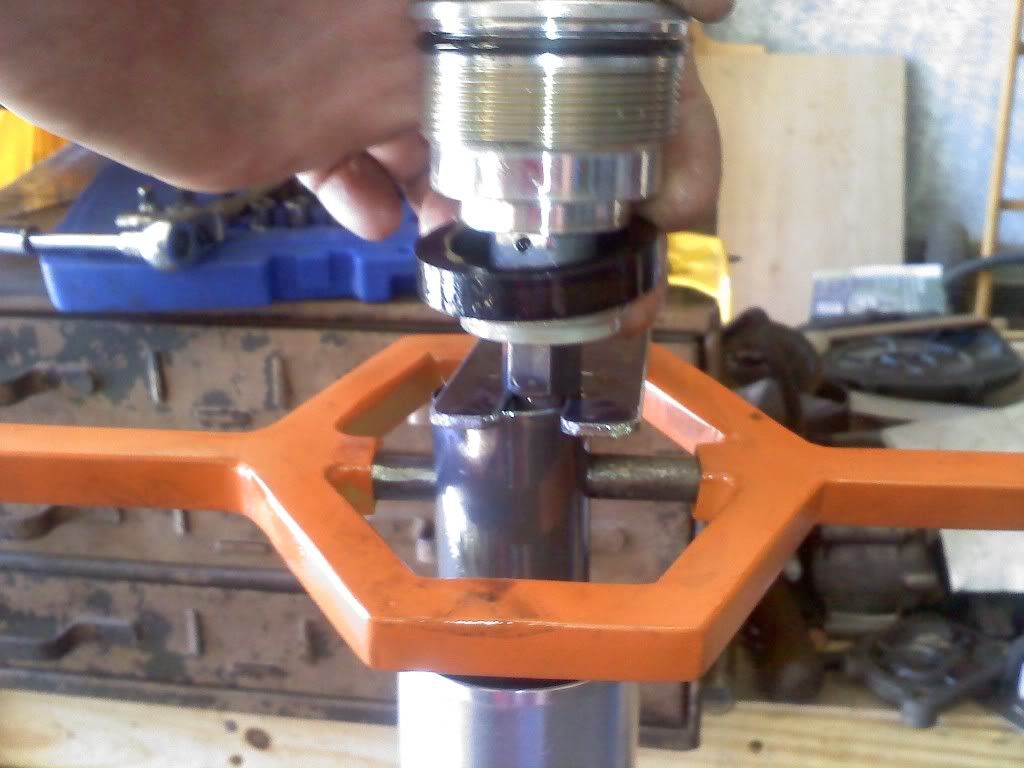
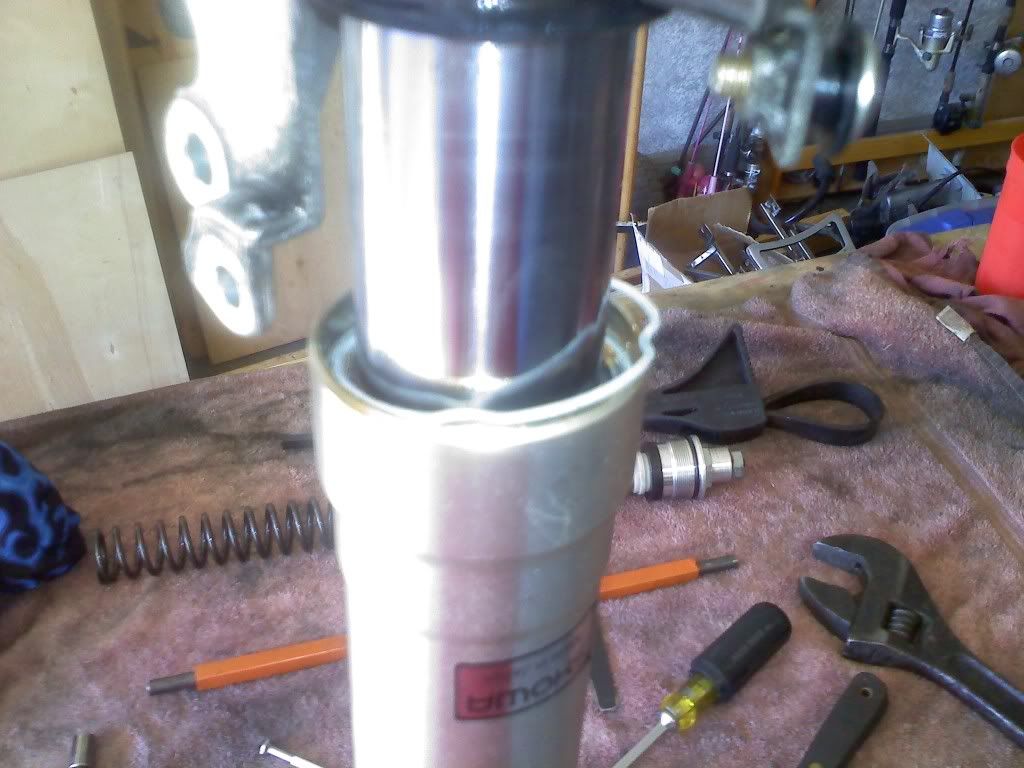
Step 3) Unscrew the top cap. You will need a large wrench here. It helps to crack this loose while the forks are still on the bike. I used a big crescent wrench and a strap wrench on the outer tube.
Once it comes loose the outer tube gets pushed all the way down and you should see a sleeve with two holes on opposite sides like this:
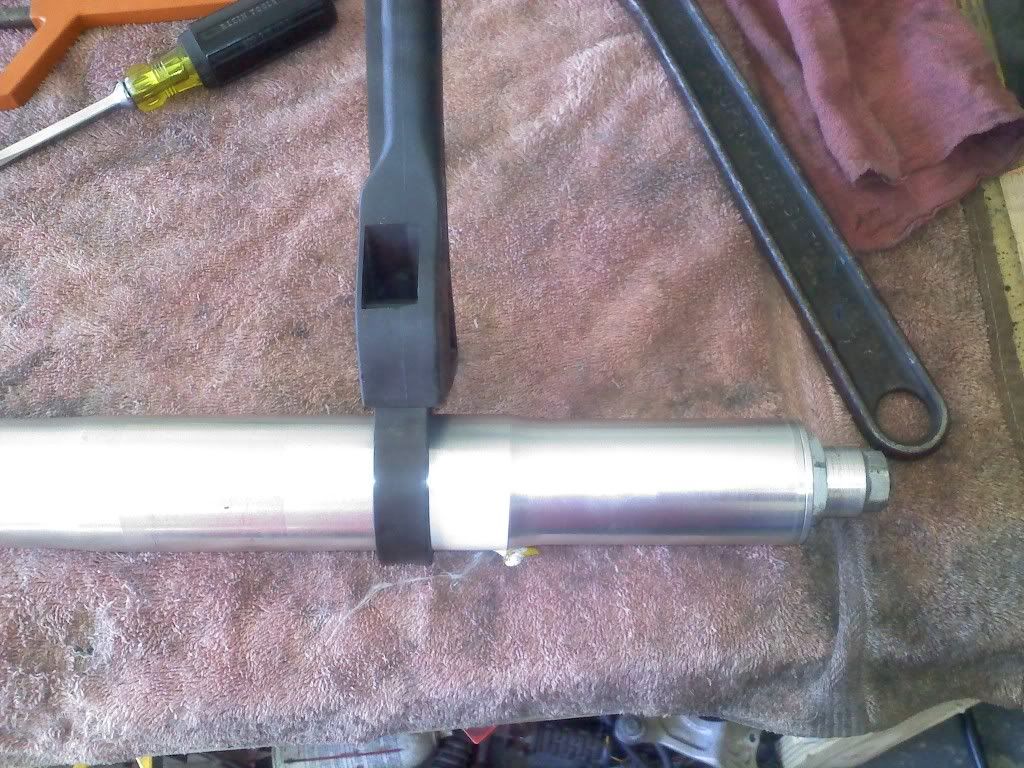
Step 4)Get your helper ready or prepare to use your third and forth arms. Put your fork spring compresser in those holes and push down.
Once you expose the jamb nut at the top of the dampner rod, then slip your spring retainer under the nut so that the spring will stop on the retainer like this:
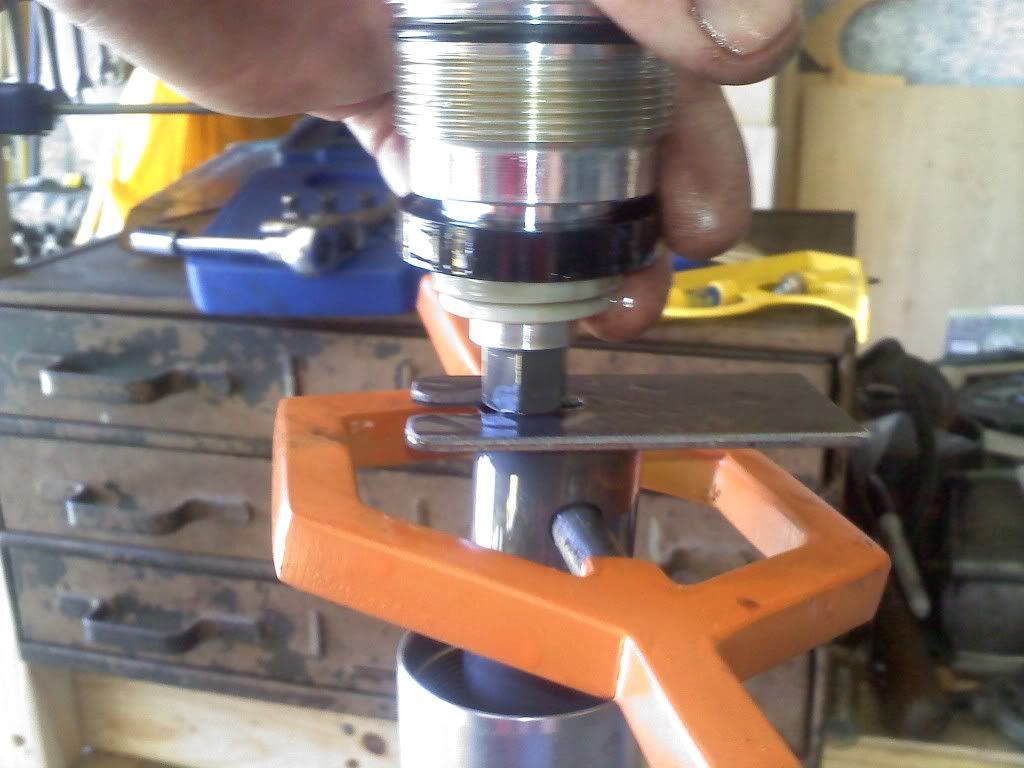
Now you can loosen the jamb nut and remove the top cap.
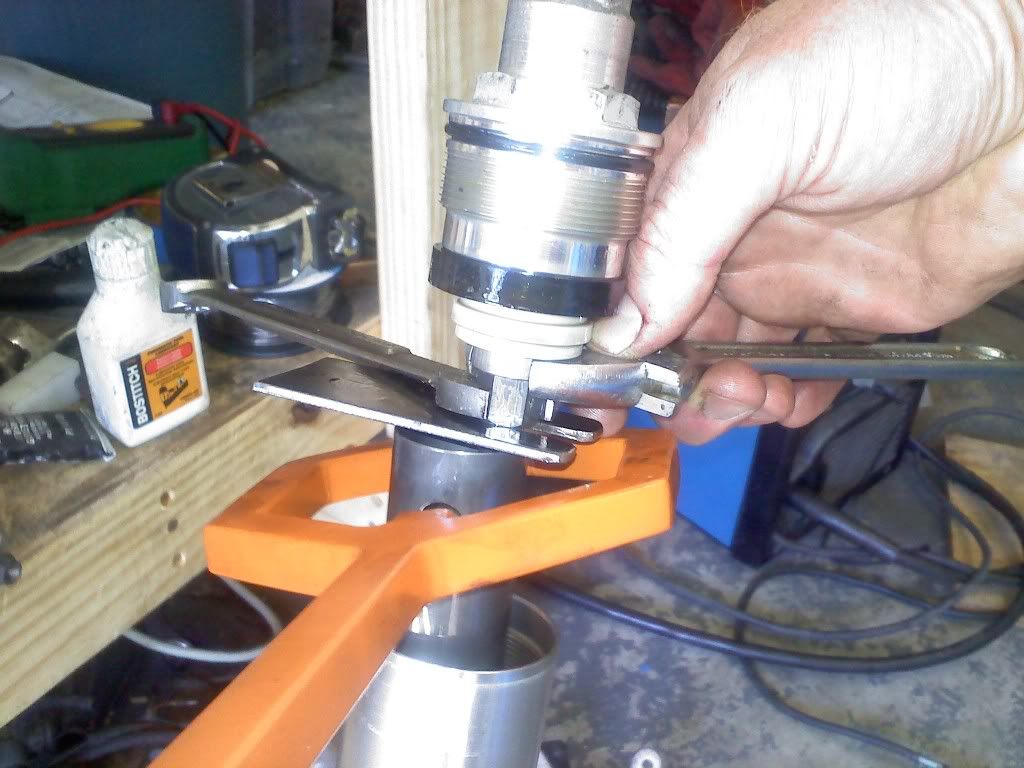
Next, push the compressor one more time, and remove the retainer tool. Just let the dampner rod fall down. Now remove the spring, and go dump out that stinky oil.
Step 5) Use something that has a wide, flat blade to carefully remove the dust boot. I used this scraper.
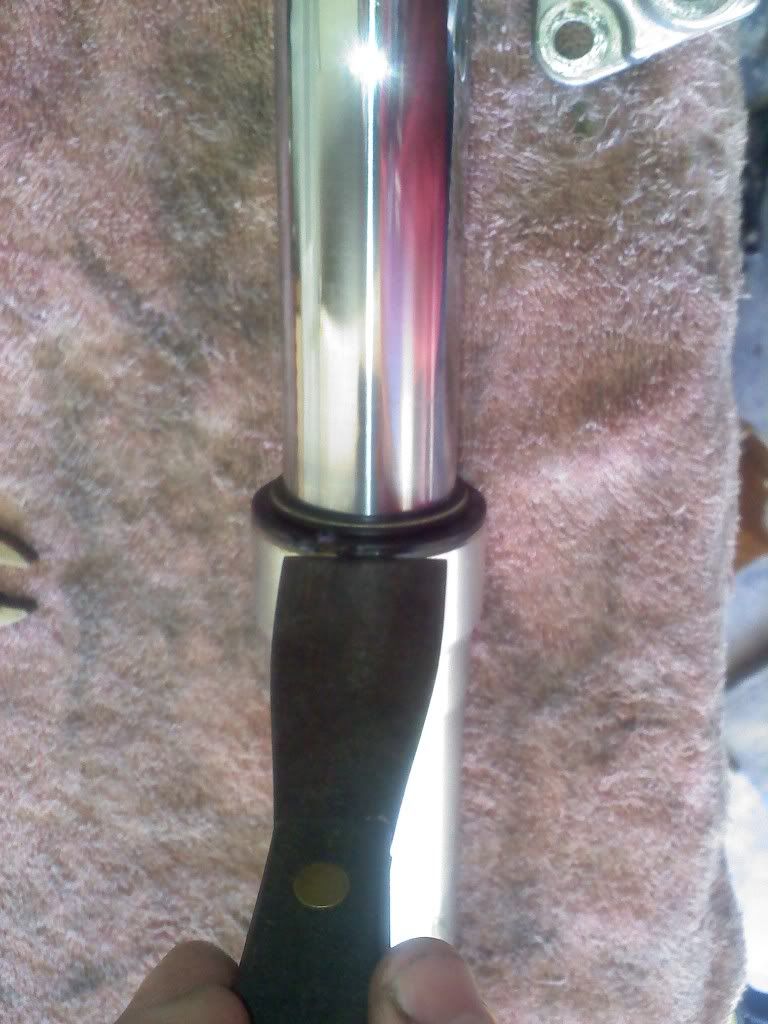
Just pry it up a bit, and work your way around. You have to be careful here since the outer tube is aluminum and easily scratched.
Step 6) Below the dust boot is a circlip that needs to be removed. Use a small flat screwdriver, and be careful not to scratch the lower fork tube.
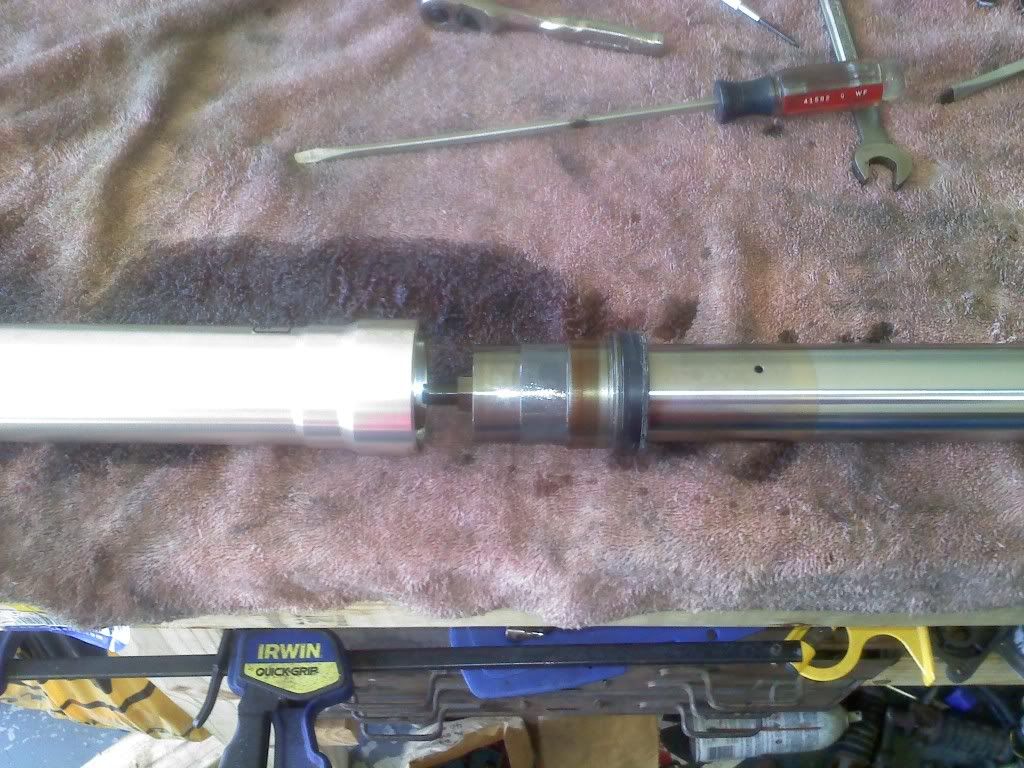
Step 7) Seperate the fork tubes. You will usually have to pull with some determination to get the lower tube out. At this point you will need to take pictures and possibly some notes as to how all of the various sliders and seals are arranged. Make sure that you have everthing organized so that it goes back, in same order that it came out. I recomend that you do one leg at a time, so that you can refer to the other leg if you do get mixed-up.
Step") Clean everthing! You have yourself a proper oily mess which will pick up loads of dirt. Any foreign matter that makes it in the oil will be trapped in there until the next rebuild, and it will play hell with seals and dampner valves.
Clean everthing! You have yourself a proper oily mess which will pick up loads of dirt. Any foreign matter that makes it in the oil will be trapped in there until the next rebuild, and it will play hell with seals and dampner valves.
Now the re-assembly is detailed in part two.
Much of the information is redundant, so I'll try to be more brief about the teardown. Once again, this particular fork is a 43mm Showa taken from a 1995 GSXR 750. Just about all of the newer sport bike front ends are very similar, so this info should get you through. I would advise you to have a copy of the service manual for the donor bike as it will have some specific info that you'll need.
Again, it goes without saying that you do this at your own risk. Any system that contains a compressed spring has stored potential energy, and if released at the wrong time, it will hurt.
One change from my first post is that I built myself some proper fork tools, and they are used for this teardown. Even if you don't need to replace the seals, you need to take the fork apart and remove the spring to properly refill the oil. Most service manuals require that you replace the oil every 12000 mi or so.
Step 1) Remove the forks from your bike.
Step 2) Back off of the preload adjuster. This is the smaller hex on the top of your fork. Don't try to completely unscrew it. There's usually a circlip at the top that prevents this. This makes it a little easer to unscrew the top cap.
Step 3) Unscrew the top cap. You will need a large wrench here. It helps to crack this loose while the forks are still on the bike. I used a big crescent wrench and a strap wrench on the outer tube.
Once it comes loose the outer tube gets pushed all the way down and you should see a sleeve with two holes on opposite sides like this:
Step 4)Get your helper ready or prepare to use your third and forth arms. Put your fork spring compresser in those holes and push down.
Once you expose the jamb nut at the top of the dampner rod, then slip your spring retainer under the nut so that the spring will stop on the retainer like this:
Now you can loosen the jamb nut and remove the top cap.
Next, push the compressor one more time, and remove the retainer tool. Just let the dampner rod fall down. Now remove the spring, and go dump out that stinky oil.
Step 5) Use something that has a wide, flat blade to carefully remove the dust boot. I used this scraper.
Just pry it up a bit, and work your way around. You have to be careful here since the outer tube is aluminum and easily scratched.
Step 6) Below the dust boot is a circlip that needs to be removed. Use a small flat screwdriver, and be careful not to scratch the lower fork tube.
Step 7) Seperate the fork tubes. You will usually have to pull with some determination to get the lower tube out. At this point you will need to take pictures and possibly some notes as to how all of the various sliders and seals are arranged. Make sure that you have everthing organized so that it goes back, in same order that it came out. I recomend that you do one leg at a time, so that you can refer to the other leg if you do get mixed-up.
Step
Clean everthing! You have yourself a proper oily mess which will pick up loads of dirt. Any foreign matter that makes it in the oil will be trapped in there until the next rebuild, and it will play hell with seals and dampner valves.Now the re-assembly is detailed in part two.
1978 KZ1000 A2 Click--->Build Thread
2004 ZX-10R
2007 Harley Sportster 1200
2020 Harley Street Glide Special
Angola, IN
2004 ZX-10R
2007 Harley Sportster 1200
2020 Harley Street Glide Special
Angola, IN
Last edit: 13 Mar 2010 20:19 by testarossa.
Please Log in or Create an account to join the conversation.
- porchev914
-

- Offline
- User
-
Registered
- Whats that? Half of my swingarm is missing?!?!?
- Posts: 2709
- Thanks: 19
Re: Upside Down Fork Rebuild 2.0
13 Mar 2010 20:44
Nicely done Josh- a great basic pictoral for anyone new to USD fork dissasembly.
FRANKEN Z!
1978 KZ1000 A2A with 08'Speed Triple SSSA and '06 GSXR1000 front end
1978 KZ1000 A2A with 08'Speed Triple SSSA and '06 GSXR1000 front end
Please Log in or Create an account to join the conversation.
- testarossa
-
Topic Author
- Offline
- User
-
Registered
- Attack life, it's only trying to kill you.
- Posts: 3674
- Thanks: 82
Re: Upside Down Fork Rebuild 2.0
13 Mar 2010 21:26
Part two. The rebuild...
There are a few things that you will need to have in order to be ready for the rebuild. Proper weight fork oil is the first. My fork uses 10 wt, and you will usually need just over one quart, damn! You may as well replace those seals and dust boots while you are in there. They are $40, and you will hate yourself if you change the oil, and later find a leak. FWIW, I have paid as much as $20/qt. for fork oil at the dealer, so I don't want to spill the liquid gold. The FSM for the bike which your fork came from will have some useful info. First is the spring free length. Next is the oil weight, and fill level. Finally is the correct factory suspension settings. These won't be correct for a KZ, but they give you a starting place. On to the rebuild.
Step 1) Put a film of new fork oil on the new seals and dust boots to facilitate their easy installation.
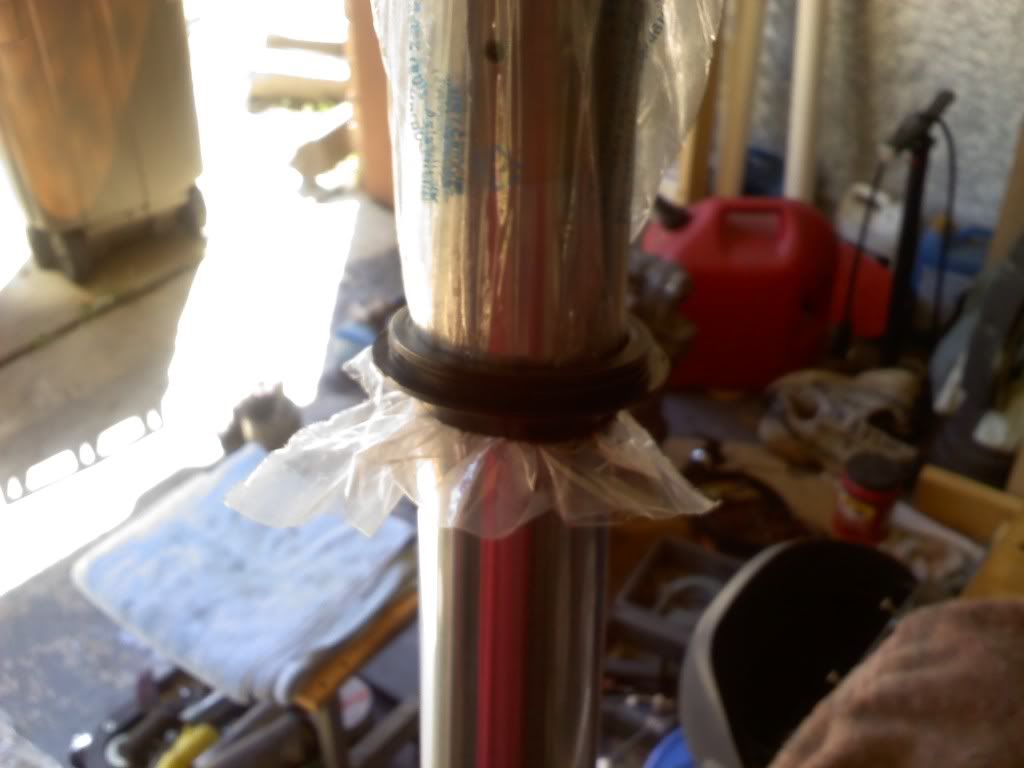
Step 2) Slip a plastic bag or some cling wrap over the end of the lower fork tube, and slide the new dust boot on the fork leg.
Step 3) Next is the circlip.
Step 4) Now install the seal just like the dust boot.

Sometimes there are steel or aluminum spacers that go in between the seal and dust boot, or on top of the seal.
Step 5) Now put the lower fork tube back into the upper, and work the seal down into its recess. I must note that on some forks, you will need to place the seal into the upper fork tube before you put the lower in. On these forks the seal is more of a press fit in the upper tube. You can use the old seal as a driver to carefully knock the new seal in place. Similar sized pvc pipe can also be used in lieu of a fork seal driver.
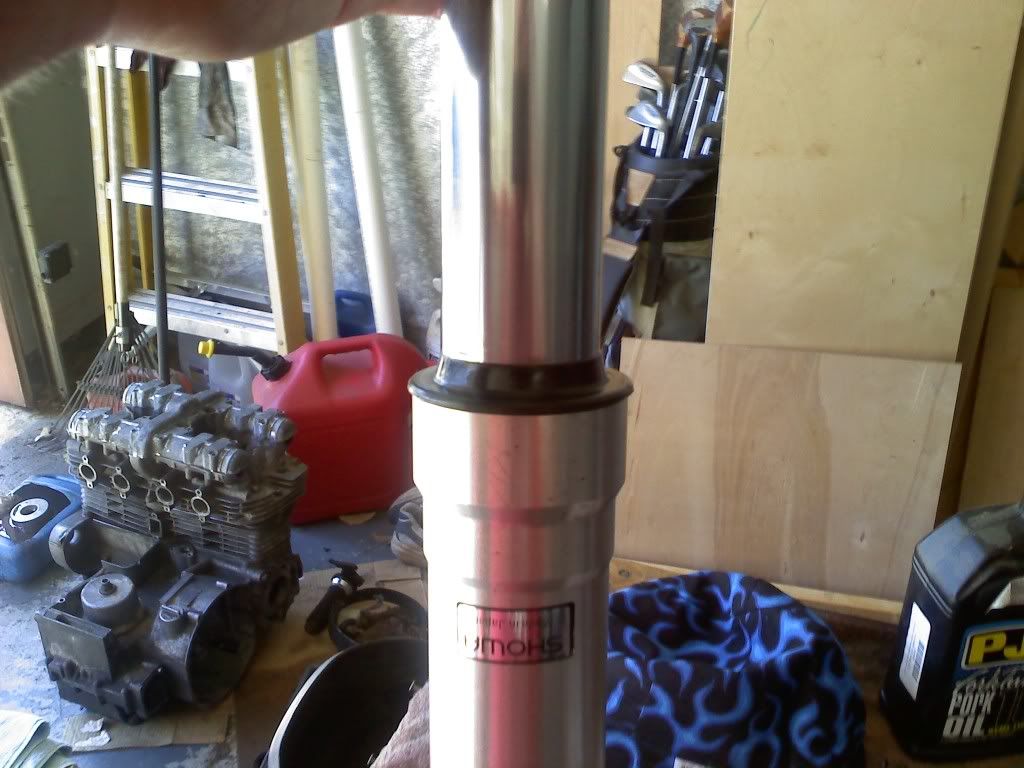
Step 6) Replace the circlip and then push the dust boot into place.
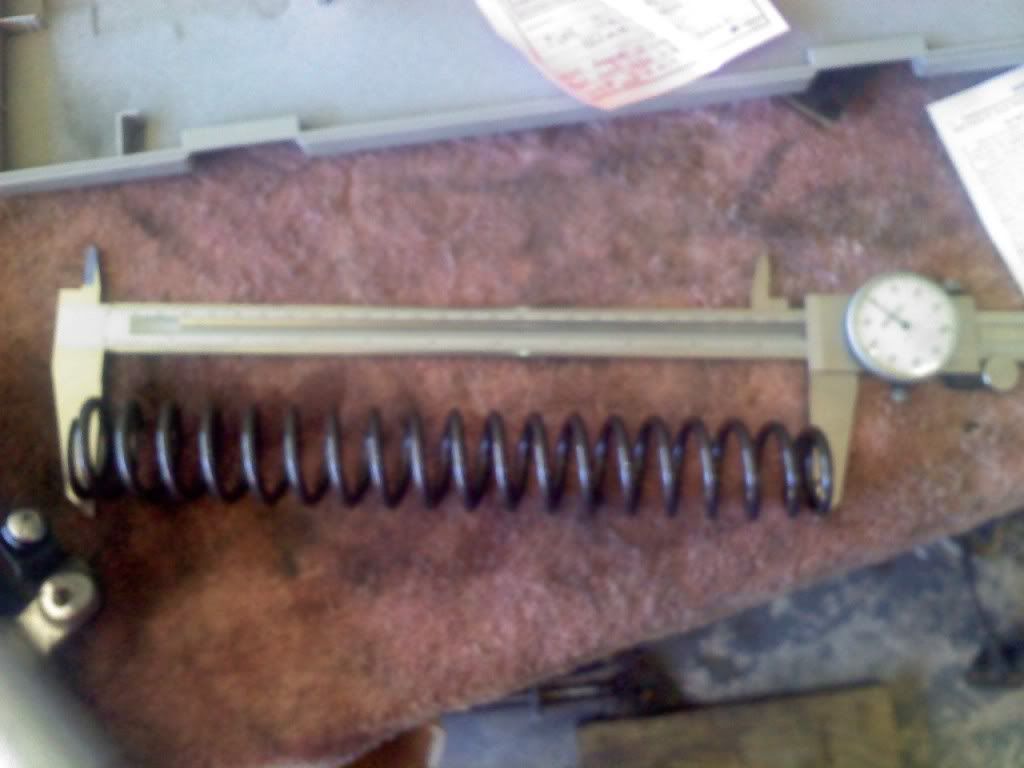
Step 7) Measure the free length of the spring. My FSM says minimum length is 10.5". Mine measured 10.7", so back in the hole they go.
Step Start filling the oil. Don't worry about adjusting the level yet.
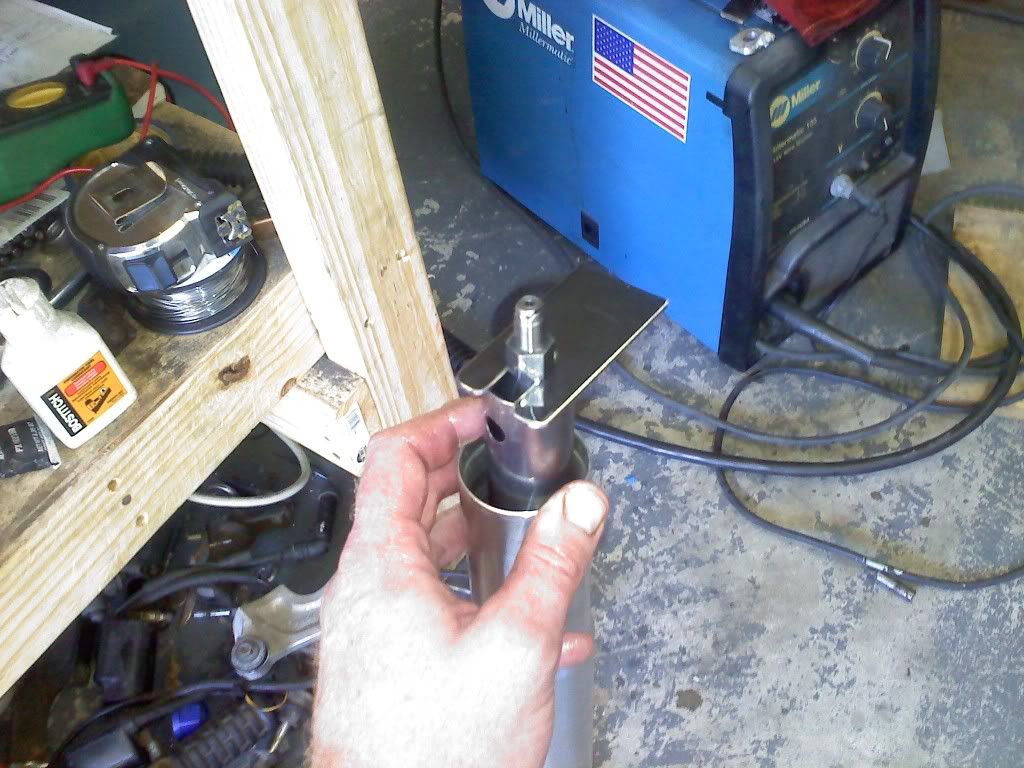
Step 9) Remove the trapped air pockets. You will need to pump the dampner up and down at least 10 times to properly fill it with oil. You will need to add some more oil at this point and repeat the dampner process until there are no bubbles coming out. Be careful to pump it slowly on the way up or you will have a volcano of oil shooting out. It helps to have something that will thread on the end of the dampner to help you grab it. It will bottom out about 2" below the tube, and will be oily and hard to hold. I drilled and tapped a piece of plastic for this purpose.
Step 10) Adjust the oil level. My FSM says that the oil should be 4.2" below the top tube with the spring removed. You can use a wooden dowel or a screwdriver as a dipstick. I like to put a piece of masking tape at the top of my dipstick. I'll stop the tape line level with the top of the fork. Just measure your oil level and adjust it to the factory spec. Don't overfill, as this will hydro-lock your fork and screw with the dampning.
Step 11) Replace the spring. Remember that the spring needs to be oriented just like it came out. Top and bottom are different.

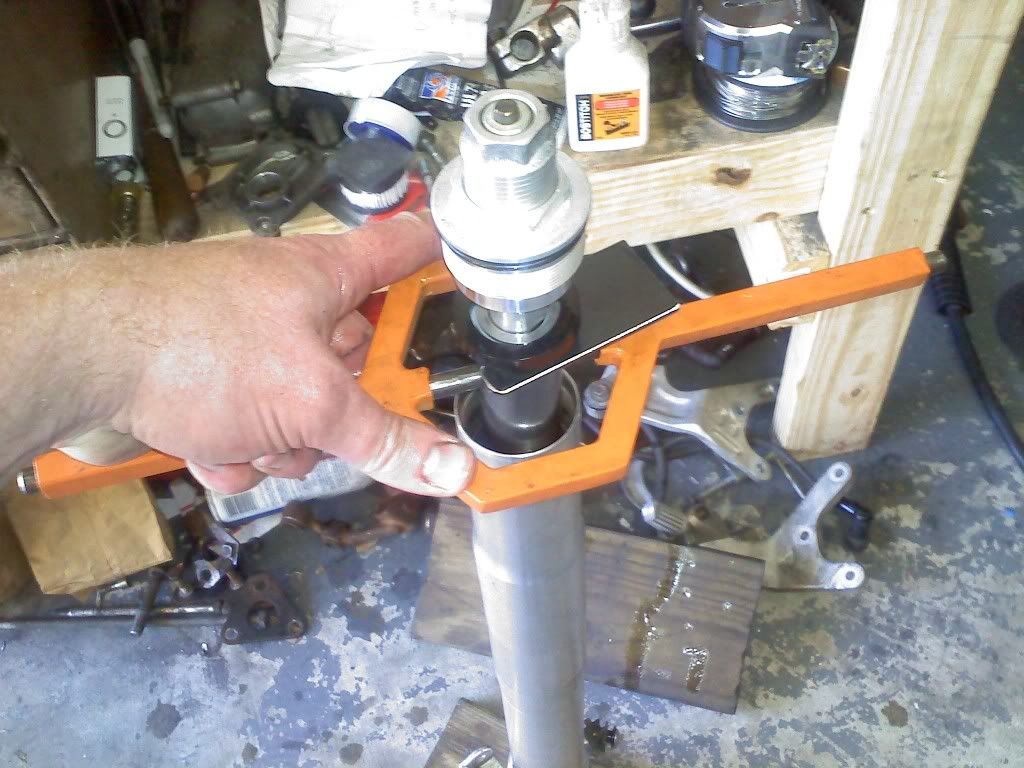
Step 12) Get your helper ready again. Now replace the sleeve, and get your compressor out. Basically you need to reverse the process of removal. It's not quite as simple as the removal. You are balancing on the head of a pin at this point. Anyway, compress the spring, and pull the dampner up until you can get the retainer tool under the jamb nut again.
Step 13) Once you get there, you're home free. Screw the top cap back on the dampner, and tighten it down.

Step 14) Now use that compressor one last time and release that retainer. You will have to get the sleeve properly seated on the top cap.
Step 15) Screw the top cap back down and put the fork back in the triple clamps. Make sure to retun the preload and dampner setting to what they were before you tore the fork apart. However those dampner settings will likely feel stiff, since the oil is at the proper viscosity.
Step 16) Unscrew the top off of two (or more) beers. You deserve it. Job well done. You saved yourself some serious coin, and you may have learned a little about the inner workings of that motorcyling enigma known as the fork.
There are a few things that you will need to have in order to be ready for the rebuild. Proper weight fork oil is the first. My fork uses 10 wt, and you will usually need just over one quart, damn! You may as well replace those seals and dust boots while you are in there. They are $40, and you will hate yourself if you change the oil, and later find a leak. FWIW, I have paid as much as $20/qt. for fork oil at the dealer, so I don't want to spill the liquid gold. The FSM for the bike which your fork came from will have some useful info. First is the spring free length. Next is the oil weight, and fill level. Finally is the correct factory suspension settings. These won't be correct for a KZ, but they give you a starting place. On to the rebuild.
Step 1) Put a film of new fork oil on the new seals and dust boots to facilitate their easy installation.
Step 2) Slip a plastic bag or some cling wrap over the end of the lower fork tube, and slide the new dust boot on the fork leg.
Step 3) Next is the circlip.
Step 4) Now install the seal just like the dust boot.
Sometimes there are steel or aluminum spacers that go in between the seal and dust boot, or on top of the seal.
Step 5) Now put the lower fork tube back into the upper, and work the seal down into its recess. I must note that on some forks, you will need to place the seal into the upper fork tube before you put the lower in. On these forks the seal is more of a press fit in the upper tube. You can use the old seal as a driver to carefully knock the new seal in place. Similar sized pvc pipe can also be used in lieu of a fork seal driver.
Step 6) Replace the circlip and then push the dust boot into place.
Step 7) Measure the free length of the spring. My FSM says minimum length is 10.5". Mine measured 10.7", so back in the hole they go.
Step
Start filling the oil. Don't worry about adjusting the level yet.Step 9) Remove the trapped air pockets. You will need to pump the dampner up and down at least 10 times to properly fill it with oil. You will need to add some more oil at this point and repeat the dampner process until there are no bubbles coming out. Be careful to pump it slowly on the way up or you will have a volcano of oil shooting out. It helps to have something that will thread on the end of the dampner to help you grab it. It will bottom out about 2" below the tube, and will be oily and hard to hold. I drilled and tapped a piece of plastic for this purpose.
Step 10) Adjust the oil level. My FSM says that the oil should be 4.2" below the top tube with the spring removed. You can use a wooden dowel or a screwdriver as a dipstick. I like to put a piece of masking tape at the top of my dipstick. I'll stop the tape line level with the top of the fork. Just measure your oil level and adjust it to the factory spec. Don't overfill, as this will hydro-lock your fork and screw with the dampning.
Step 11) Replace the spring. Remember that the spring needs to be oriented just like it came out. Top and bottom are different.
Step 12) Get your helper ready again. Now replace the sleeve, and get your compressor out. Basically you need to reverse the process of removal. It's not quite as simple as the removal. You are balancing on the head of a pin at this point. Anyway, compress the spring, and pull the dampner up until you can get the retainer tool under the jamb nut again.
Step 13) Once you get there, you're home free. Screw the top cap back on the dampner, and tighten it down.
Step 14) Now use that compressor one last time and release that retainer. You will have to get the sleeve properly seated on the top cap.
Step 15) Screw the top cap back down and put the fork back in the triple clamps. Make sure to retun the preload and dampner setting to what they were before you tore the fork apart. However those dampner settings will likely feel stiff, since the oil is at the proper viscosity.
Step 16) Unscrew the top off of two (or more) beers. You deserve it. Job well done. You saved yourself some serious coin, and you may have learned a little about the inner workings of that motorcyling enigma known as the fork.
1978 KZ1000 A2 Click--->Build Thread
2004 ZX-10R
2007 Harley Sportster 1200
2020 Harley Street Glide Special
Angola, IN
2004 ZX-10R
2007 Harley Sportster 1200
2020 Harley Street Glide Special
Angola, IN
Please Log in or Create an account to join the conversation.
- mark1122
-

- Offline
- User
-
Registered
- Keep twisting it
- Posts: 5359
- Thanks: 109
Re: Upside Down Fork Rebuild 2.0
14 Mar 2010 10:25
Thanks for taking the time to do another excellent write up. i will use it soon.") i have 2 of my own bikes to do, an 2 of my buds.
i have 2 of my own bikes to do, an 2 of my buds.
I am not clear on the reason for the plastic bag or Cling wrap, but I'm sure it will make sense when the time comes.
i have 2 of my own bikes to do, an 2 of my buds.I am not clear on the reason for the plastic bag or Cling wrap, but I'm sure it will make sense when the time comes.
76 KZ, frame gusset work,1200CC.Ported by Larry Cavanaugh, 1.5mm.over intakes, Carron Pipe, ZRX12 rear end, and seat,96zx9 front end.
01 CBR600F4i Track bike.
Cobourg, Ont. Can.
~ ~ ~_@
~ ~ _- \,
~ (k) / (z)
01 CBR600F4i Track bike.
Cobourg, Ont. Can.
~ ~ ~_@
~ ~ _- \,
~ (k) / (z)
Please Log in or Create an account to join the conversation.
- porchev914
-
- Offline
- User
-
Registered
- Whats that? Half of my swingarm is missing?!?!?
- Posts: 2709
- Thanks: 19
Re: Upside Down Fork Rebuild 2.0
14 Mar 2010 12:47 - 14 Mar 2010 12:48
The bottom (or top) of the fork tube is sharp. The plastic wrap is thin enough to get the new seal over, but tough enough to protect the new seal from getting sliced during installation.
FRANKEN Z!
1978 KZ1000 A2A with 08'Speed Triple SSSA and '06 GSXR1000 front end
1978 KZ1000 A2A with 08'Speed Triple SSSA and '06 GSXR1000 front end
Last edit: 14 Mar 2010 12:48 by porchev914.
Please Log in or Create an account to join the conversation.
- mark1122
-
- Offline
- User
-
Registered
- Keep twisting it
- Posts: 5359
- Thanks: 109
Re: Upside Down Fork Rebuild 2.0
14 Mar 2010 16:59
I see, so u just slide it all the way over the bag, onto the leg,then remove the bag. Thanks.
76 KZ, frame gusset work,1200CC.Ported by Larry Cavanaugh, 1.5mm.over intakes, Carron Pipe, ZRX12 rear end, and seat,96zx9 front end.
01 CBR600F4i Track bike.
Cobourg, Ont. Can.
~ ~ ~_@
~ ~ _- \,
~ (k) / (z)
01 CBR600F4i Track bike.
Cobourg, Ont. Can.
~ ~ ~_@
~ ~ _- \,
~ (k) / (z)
Please Log in or Create an account to join the conversation.
- testarossa
-
Topic Author
- Offline
- User
-
Registered
- Attack life, it's only trying to kill you.
- Posts: 3674
- Thanks: 82
Re: Upside Down Fork Rebuild 2.0
14 Mar 2010 18:34
Mark, did you every find a copy of the service manual for the zx-9 fork? I found the GSXR PDF for free online. I did have to pay for the one for my zx-10r, but that PDF was $9.99. Good luck, and don't hesitate to ask if something doesn't make sense. Just treat the fork teardown like a engine teardown. Keep track of the correct order of placement for all the pieces.
1978 KZ1000 A2 Click--->Build Thread
2004 ZX-10R
2007 Harley Sportster 1200
2020 Harley Street Glide Special
Angola, IN
2004 ZX-10R
2007 Harley Sportster 1200
2020 Harley Street Glide Special
Angola, IN
Please Log in or Create an account to join the conversation.
- mark1122
-
- Offline
- User
-
Registered
- Keep twisting it
- Posts: 5359
- Thanks: 109
Re: Upside Down Fork Rebuild 2.0
14 Mar 2010 18:57 - 14 Mar 2010 19:02
Yes . I found 1 on line too.
Thanks.
I bought some fork oil for the cbr track bike. man that stuff is like gold. $20. i bought fork,and brake fluid, ,chain lube and an oil filter.$82.i have some synthetic motor oil i bought for the KZ, but i will try it in the cbr, and buy some Shell Rotella syn oil ,for the kz.man the money goes fast.
The hardest part about the fork oil change on the cbr will be trying to figure out how i will hang the bike from the ceiling while i take the forks off.lol there is no good , obvious way to lift the bike from the bottom.i bought a universal bike stand set, but i guess i need 1 of the kind that fit under the bottom triple tree.:silly:
76 KZ, frame gusset work,1200CC.Ported by Larry Cavanaugh, 1.5mm.over intakes, Carron Pipe, ZRX12 rear end, and seat,96zx9 front end.
01 CBR600F4i Track bike.
Cobourg, Ont. Can.
~ ~ ~_@
~ ~ _- \,
~ (k) / (z)
01 CBR600F4i Track bike.
Cobourg, Ont. Can.
~ ~ ~_@
~ ~ _- \,
~ (k) / (z)
Last edit: 14 Mar 2010 19:02 by mark1122.
Please Log in or Create an account to join the conversation.
- testarossa
-
Topic Author
- Offline
- User
-
Registered
- Attack life, it's only trying to kill you.
- Posts: 3674
- Thanks: 82
Re: Upside Down Fork Rebuild 2.0
14 Mar 2010 19:28
I ain't gonna lie. When I did the forks on my zx-10r I picked up the front end with rachet straps on the frame. The FSM says to put a jack under the header and pick it up that way. Once I finally got the balls to try it I was surprised how well it worked. I mean that header is freakin titanium. I was scared to death.
Those front stands that put a pin in the steering head can be a pain in the ass.
I run the Rotella synthetic diesel oil in my zx-10r and I like it. Shifts nicer than with the Mobil 1 racing 4T at half the price.
Those front stands that put a pin in the steering head can be a pain in the ass.
I run the Rotella synthetic diesel oil in my zx-10r and I like it. Shifts nicer than with the Mobil 1 racing 4T at half the price.
1978 KZ1000 A2 Click--->Build Thread
2004 ZX-10R
2007 Harley Sportster 1200
2020 Harley Street Glide Special
Angola, IN
2004 ZX-10R
2007 Harley Sportster 1200
2020 Harley Street Glide Special
Angola, IN
Please Log in or Create an account to join the conversation.
- mark1122
-
- Offline
- User
-
Registered
- Keep twisting it
- Posts: 5359
- Thanks: 109
Re: Upside Down Fork Rebuild 2.0
15 Mar 2010 08:38
I'll have to check the man on the lifting advice. the cbr pipe is not made of Ti.
i was thinking about using ratchet straps myself.
I have read a lot of contraversy about synthetics in old bikes. Jeff at Z1e, says he's heard enough complaints about it causing oil leaks, to believe it.
Maybe it has something to do with how well u put it together in the first place.
I will try and see for myself.
76 KZ, frame gusset work,1200CC.Ported by Larry Cavanaugh, 1.5mm.over intakes, Carron Pipe, ZRX12 rear end, and seat,96zx9 front end.
01 CBR600F4i Track bike.
Cobourg, Ont. Can.
~ ~ ~_@
~ ~ _- \,
~ (k) / (z)
01 CBR600F4i Track bike.
Cobourg, Ont. Can.
~ ~ ~_@
~ ~ _- \,
~ (k) / (z)
Please Log in or Create an account to join the conversation.
Moderators: Street Fighter LTD