
Sportbike Swingarm How To: All input/help welcome
- jordan
-
 Topic Author
- Offline
- User
-

Registered
- Posts: 965
- Thanks: 5
Sportbike Swingarm How To: All input/help welcome
17 Aug 2008 22:01
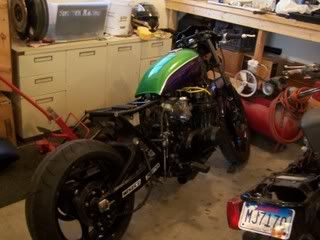
Finally a sportbike swingarm how to! This is for all of those who are in the process of, thinking about doing, or just curious about the swap of a sportbike swingarm/wheel/monoshock setup.
Personally i think that this project was alot of work, but it was definately worth it. With this thread i hope to encourage many others to take up this project, and remove any of their fears on it being doable.
First of all i will give you a little background information of which sportbike parts i used and to which frame I attached it to. Not all swaps are going to be the same but should be fairly close.
Frame- 1978 kz650
Swingam/wheel/monoshock- 2004 suzuki gsxr1000
Front sprocket offset- 5/8"
Chain/sprocket size- 530
Tire size- 190
This process can be broke up into a few major areas
1. pivot area
2. monoshock/dogbones mounting
3. wheel spacing/ lining up sprockets
4. chain clearance
5. rear brake system
1. PIVOT AREA-
Well obviously a sportbike swingarm isnt going to just bolt up to the previous swingarm location. luckily most sportbike swingam pivot sections(part of swingarm where pivot bolt slides through and bolts to the frame) are narrower than the stock kz pivot section, which means no cutting of the sportbike swingarm to make it fit should be necessary. Although this does mean that a spacer will be needed on each side of the pivot section. I found it easiest to use the stock kz swingarm pivot bolt since it is the right length, and no modification to the frame is necessary to slide it in. your spacers will probably need to be made at a machine shop because they need to be very accurate. I do not have an example picture, but i will explain their construction as close as possible. Your spacers should be the right width so that they slide perfectly into each end of the swingarm. Then they shold become wider keeping them from sliding all the way through the frame. This raised edge also acts as your spacer, it should be equal in length for each side. this length will be half of the gap you have between your swingarm and the inside of the frame. With these spacers in place your swingarm should now fit smoothly between the frame, and be exactly as wide at the pivot point as the kz swingarm. Although these spacers still need to have a hole running through them so that the kz swingarm bolt can slide through bolting the swingarm to the frame. Obviously this hole should be only wide enough to slide the swingarm bolt through.
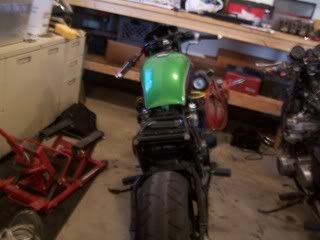
2. MONOSHOCK/ DOG BONES MOUNTING
Many new sportbike swingarms use a monoshock setup, meaning there is a single shock usually found in the middle of the frame. There are a few dual shock swingarms out there if you want to maintain a somewhat classic look such as the zrx swingarms. You can also fabricate shock brackets on the outside of the swingarm so you can still utilize the dual shock system.
The dogbones bolt to the swingarm, frame, and the shock. The frame will need to have 2 mounting locations welded on which the dog bones/monoshock will bolt to. First, two mounting tabs will need to be welded on, spaced out just enough to bolt one side of the dog bones to. This location will be right where the center stand used to be located.
The next mounting location will need to be for the monoshock. There are many different methods of doing this, but you have to weld a strong mounting location in the middle of the frame down where the battery mounting location is. For mine i welded over from an inner frame rail and down from a frame rail I welded in above, giving plenty of strength.
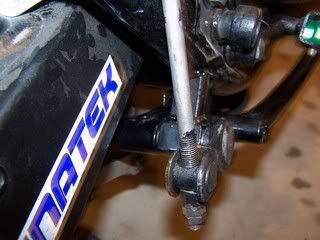
3. WHEEL SPACING/ LINING UP SPROCKETS
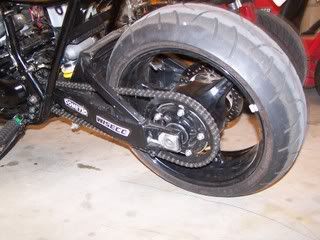
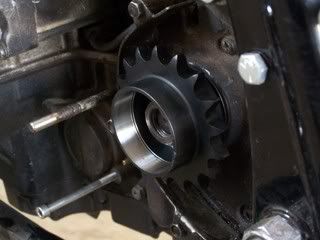
This is the part where it can get a little bit tricky. First of all you will need to purchase an offset sprocket from one of multiple locations. I got mine from www.pmfr.com . If it comes with a bearing support on the outside of the sprocket this can be machined off because it will just cause sprocket cover clearance problems(the bearing support in the picture is the whole spot under where the links end).
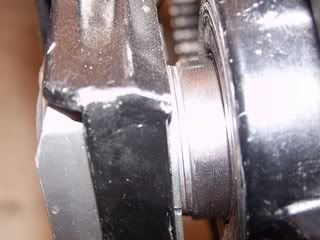
Next you will notice in most cases that the rear sprocket is still farther out than the front. They should be close, but the rear sprocket will need to be brought in(the plurry spot in the bottom of the picture is the rear sprocket).

This can be done by machining down the inner hub( the part that pulls away from the wheel itself), bringing the whole hub closer to the wheel. Conveniently there is about 1/2" of hub between the wheel and the sprocket. You can machine it down accordingly until the sprockets line up. Of course then you need to shave down the rubber boot deals that are inside the hub down the same amount. To be completely accurate this machining could also be done at a machine shop.
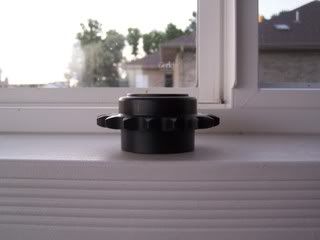
Now that you have your sprockets lined up and your chain on you may find that the factory wheel spacer on the left side of the wheel is no longer long enough. This gap should be equal to the amount you brought the hub in. Now you need to make a spacer for the left of the wheel that is the right length. I went to the machine shop with some measurements for the spacer. Make sure you get the right length and width because it needs to slide into the seal on the left side of the wheel a little ways. Also MAKE SURE when you measure for the length of the spacer you measure it with the axle tightened up enough to the point where it will be when you are riding it and enough to fit a cotter key into the hole on the axle through the castle nut, because the swingarm will pull in some when you tighten down the axle. Here is a picture of my spacer. You may notice two other pieces to the left of my spacer, these are thin washer like rings that i had made so i could get the fit just right by adding them until it was perfect.
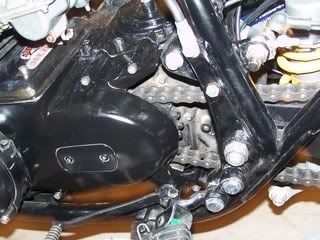
4. CHAIN CLEARANCE
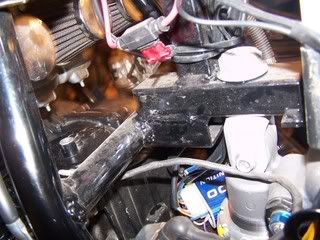
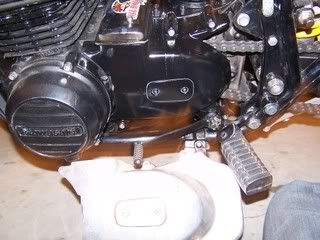
The first thing that you probably will notice after you get your wheel in place and the chain on is that you can hear the chain rubbing somewhere. The first problem spot is usually the sprocket cover on the left side of the motor. I could only think of one way of fixing this besides spacing it away from the motor and getting a longer clutch pushrod. I began cutting the cross braces on the inside of the cover, but after i put it back on it sitll rubbed. Eventually i did some major cutting, which can be seen in the picture. It didnt turn out as horrific as i thought it would, I actually kinda like the way it looks.
Many people have aslo had problems with the chain rubbing against the frame. Luckily i never ran into this problem and my chain clears the frame, but there are ways of handling this problem if you run into it. You can heat up the frame and clamp it in the areas where the chain is rubbing, bringing the frame out away from the chain. Or you can literally cut out the frame and reweld in a block like piece with an open end on the chain side.
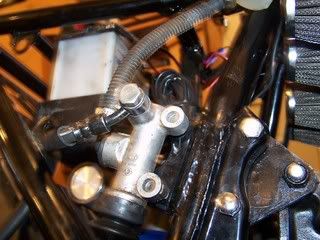
5. BRAKE SYSTEM
Last but not least the brake system. After your swingarm is in place you may soon realize that your previous braking system will not bolt back up inside the frame because of the width of the swingarm.

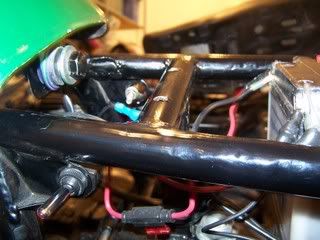
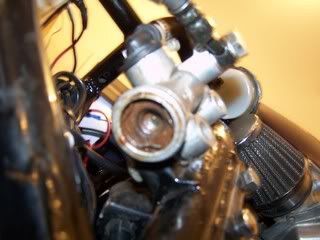
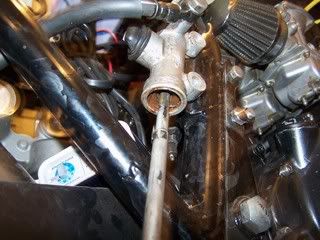
There are probably other ways of doing it, but my only idea was to move the braking system to the outside of the frame. I used a master cylinder from a 1982 kz750 because of the fact that it didnt have the fluid reservoir attached to the master cylinder and it looks more clean since it resides on the outside of the frame. I used the stock 650 mounting location, which meant that you have to put the bolts on from the inside because the threads are on the master cylinder body
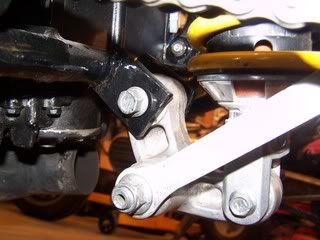
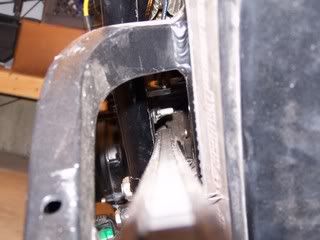
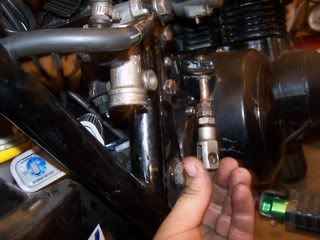
To still utilize the stock brake lever and linkage, some cutting and spacing of the brake lever was required which you can see in the next picture. This new method allows you to have the lever in the stock location with just a little mixing around.
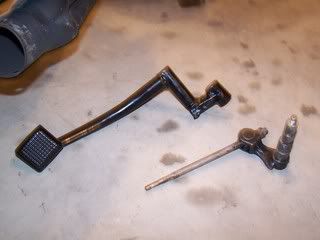
To get the 650 linkage/pushrod to work with the 750 master cylinder I had to disassemble the master cylinder. There is a snap ring on the bottom which must be removed allowing you to pull out the 750 linkage deal. After reassembly you can use the 650 pushrod in place of the 750 linkage.
I hope this thread is helpful to many as they complete their projects.
If anyone has anything to add to this please do.
If you have any questions please ask and me or one of the other members will help you through your problem.
")
Personally i think that this project was alot of work, but it was definately worth it. With this thread i hope to encourage many others to take up this project, and remove any of their fears on it being doable.
First of all i will give you a little background information of which sportbike parts i used and to which frame I attached it to. Not all swaps are going to be the same but should be fairly close.
Frame- 1978 kz650
Swingam/wheel/monoshock- 2004 suzuki gsxr1000
Front sprocket offset- 5/8"
Chain/sprocket size- 530
Tire size- 190
This process can be broke up into a few major areas
1. pivot area
2. monoshock/dogbones mounting
3. wheel spacing/ lining up sprockets
4. chain clearance
5. rear brake system
1. PIVOT AREA-
Well obviously a sportbike swingarm isnt going to just bolt up to the previous swingarm location. luckily most sportbike swingam pivot sections(part of swingarm where pivot bolt slides through and bolts to the frame) are narrower than the stock kz pivot section, which means no cutting of the sportbike swingarm to make it fit should be necessary. Although this does mean that a spacer will be needed on each side of the pivot section. I found it easiest to use the stock kz swingarm pivot bolt since it is the right length, and no modification to the frame is necessary to slide it in. your spacers will probably need to be made at a machine shop because they need to be very accurate. I do not have an example picture, but i will explain their construction as close as possible. Your spacers should be the right width so that they slide perfectly into each end of the swingarm. Then they shold become wider keeping them from sliding all the way through the frame. This raised edge also acts as your spacer, it should be equal in length for each side. this length will be half of the gap you have between your swingarm and the inside of the frame. With these spacers in place your swingarm should now fit smoothly between the frame, and be exactly as wide at the pivot point as the kz swingarm. Although these spacers still need to have a hole running through them so that the kz swingarm bolt can slide through bolting the swingarm to the frame. Obviously this hole should be only wide enough to slide the swingarm bolt through.
2. MONOSHOCK/ DOG BONES MOUNTING
Many new sportbike swingarms use a monoshock setup, meaning there is a single shock usually found in the middle of the frame. There are a few dual shock swingarms out there if you want to maintain a somewhat classic look such as the zrx swingarms. You can also fabricate shock brackets on the outside of the swingarm so you can still utilize the dual shock system.
The dogbones bolt to the swingarm, frame, and the shock. The frame will need to have 2 mounting locations welded on which the dog bones/monoshock will bolt to. First, two mounting tabs will need to be welded on, spaced out just enough to bolt one side of the dog bones to. This location will be right where the center stand used to be located.
The next mounting location will need to be for the monoshock. There are many different methods of doing this, but you have to weld a strong mounting location in the middle of the frame down where the battery mounting location is. For mine i welded over from an inner frame rail and down from a frame rail I welded in above, giving plenty of strength.
3. WHEEL SPACING/ LINING UP SPROCKETS
This is the part where it can get a little bit tricky. First of all you will need to purchase an offset sprocket from one of multiple locations. I got mine from www.pmfr.com . If it comes with a bearing support on the outside of the sprocket this can be machined off because it will just cause sprocket cover clearance problems(the bearing support in the picture is the whole spot under where the links end).
Next you will notice in most cases that the rear sprocket is still farther out than the front. They should be close, but the rear sprocket will need to be brought in(the plurry spot in the bottom of the picture is the rear sprocket).
This can be done by machining down the inner hub( the part that pulls away from the wheel itself), bringing the whole hub closer to the wheel. Conveniently there is about 1/2" of hub between the wheel and the sprocket. You can machine it down accordingly until the sprockets line up. Of course then you need to shave down the rubber boot deals that are inside the hub down the same amount. To be completely accurate this machining could also be done at a machine shop.
Now that you have your sprockets lined up and your chain on you may find that the factory wheel spacer on the left side of the wheel is no longer long enough. This gap should be equal to the amount you brought the hub in. Now you need to make a spacer for the left of the wheel that is the right length. I went to the machine shop with some measurements for the spacer. Make sure you get the right length and width because it needs to slide into the seal on the left side of the wheel a little ways. Also MAKE SURE when you measure for the length of the spacer you measure it with the axle tightened up enough to the point where it will be when you are riding it and enough to fit a cotter key into the hole on the axle through the castle nut, because the swingarm will pull in some when you tighten down the axle. Here is a picture of my spacer. You may notice two other pieces to the left of my spacer, these are thin washer like rings that i had made so i could get the fit just right by adding them until it was perfect.
4. CHAIN CLEARANCE
The first thing that you probably will notice after you get your wheel in place and the chain on is that you can hear the chain rubbing somewhere. The first problem spot is usually the sprocket cover on the left side of the motor. I could only think of one way of fixing this besides spacing it away from the motor and getting a longer clutch pushrod. I began cutting the cross braces on the inside of the cover, but after i put it back on it sitll rubbed. Eventually i did some major cutting, which can be seen in the picture. It didnt turn out as horrific as i thought it would, I actually kinda like the way it looks.
Many people have aslo had problems with the chain rubbing against the frame. Luckily i never ran into this problem and my chain clears the frame, but there are ways of handling this problem if you run into it. You can heat up the frame and clamp it in the areas where the chain is rubbing, bringing the frame out away from the chain. Or you can literally cut out the frame and reweld in a block like piece with an open end on the chain side.
5. BRAKE SYSTEM
Last but not least the brake system. After your swingarm is in place you may soon realize that your previous braking system will not bolt back up inside the frame because of the width of the swingarm.
There are probably other ways of doing it, but my only idea was to move the braking system to the outside of the frame. I used a master cylinder from a 1982 kz750 because of the fact that it didnt have the fluid reservoir attached to the master cylinder and it looks more clean since it resides on the outside of the frame. I used the stock 650 mounting location, which meant that you have to put the bolts on from the inside because the threads are on the master cylinder body
To still utilize the stock brake lever and linkage, some cutting and spacing of the brake lever was required which you can see in the next picture. This new method allows you to have the lever in the stock location with just a little mixing around.
To get the 650 linkage/pushrod to work with the 750 master cylinder I had to disassemble the master cylinder. There is a snap ring on the bottom which must be removed allowing you to pull out the 750 linkage deal. After reassembly you can use the 650 pushrod in place of the 750 linkage.
I hope this thread is helpful to many as they complete their projects.
If anyone has anything to add to this please do.
If you have any questions please ask and me or one of the other members will help you through your problem.
KZ810 streetfighter kz/gpz/gsxr
1983 gs1100e
1979 KZ 1000 1428 dragbike project
1974 kawasaki H1 500 sold
1972 Kawasaki s2 350-parted on ebay
1973 Kawasaki s2 350-parted on ebay
1982 kz750(sold)
1978 kz650 hardtail(sold)
1975 honda xl250-sold
1971 yamaha R5-sold
1982 yamaha xs400
1983 gs1100e
1979 KZ 1000 1428 dragbike project
1974 kawasaki H1 500 sold
1972 Kawasaki s2 350-parted on ebay
1973 Kawasaki s2 350-parted on ebay
1982 kz750(sold)
1978 kz650 hardtail(sold)
1975 honda xl250-sold
1971 yamaha R5-sold
1982 yamaha xs400
Please Log in or Create an account to join the conversation.
- Cutls67
-

- Offline
- User
-
Registered
- Posts: 3
- Thanks: 0
Re: Sportbike Swingarm How To: All input/help welcome
18 Aug 2008 09:21
i LOVED YOUR WRITE UP AND AM LOOKING FORWARD TO DOING A SWING ARM UPGRADE TO MY KZ650. I AM THINKING OF GOING A DIFFERENT WAY WITH MINE AND WAS CURIOUS IF YOU COULD ANSWER A COUPLE OF QUESTIONS FOR ME. I AM LOOKING FOR A EARLY GSXR SWING ARM FOR ME (I AM WANTING TO KEEP THE DUAL SHOCK SET-UP) BUT I WANT TO KEEP MY ORIGINAL SPOKE WHEEL AND DRUM SET-UP. I AM CURIOUS IF I CAN WIDEN MY WHEEL OR IF THE IS A WIDER WHEEL I CAN LOOK FOR TO FIT A WIDER TIRE ON IT. I WANT TO KEEP THESE PART CAUSE I LIKE TO ORIGINAL LOOK WITH AN UPDATED FEEL. ALSO IS THERE ANY OTHER SWING ARMS OUT THERE I CAN LOOK FOR THAT I CAOULD MODIFY TO USE THE DUAL SHOCK SET-UP.
THANKS STEPHAN
THANKS STEPHAN
Please Log in or Create an account to join the conversation.
- 531blackbanshee
-
- Offline
- Vendor
-

Vendors
- Posts: 7444
- Thanks: 796
Re: Sportbike Swingarm How To: All input/help welcome
18 Aug 2008 12:17
great write up jordan.more of us should take some time to do some little write ups fro different mods we do.
skiatook,oklahoma 1980 z1r,1978 kz 1000 z1r x 3,
1976 kz 900 x 3
i make what i can,and save the rest!
billybiltit.blogspot.com/
www.kzrider.com/forum/5-chassis/325862-triple-tree-custom-work
kzrider.com/forum/5-chassis/294594-frame-bracing?limitstart=0
1976 kz 900 x 3
i make what i can,and save the rest!
billybiltit.blogspot.com/
www.kzrider.com/forum/5-chassis/325862-triple-tree-custom-work
kzrider.com/forum/5-chassis/294594-frame-bracing?limitstart=0
Please Log in or Create an account to join the conversation.
- jordan
-
Topic Author
- Offline
- User
-
Registered
- Posts: 965
- Thanks: 5
Re: Sportbike Swingarm How To: All input/help welcome
18 Aug 2008 16:46
thanks alot! I really would have liked to find something like this when i was doing my project, haha. As for you Cutls67, with the correct spacers you should easily be able to use your original wheel/drum setup. Although there will be alot of space left in the swingarm and it may look out of place (unless you use an earlier GSXR swingarm like you suggested. I think they are much narrower but dont quote me on that). As for wider wheels that are still a spoke design, the only thing i can think of is a rear wheel from a newer Harley Davidson. For dual shock swingarms, the kawasaki zrx is one of few i believe.
KZ810 streetfighter kz/gpz/gsxr
1983 gs1100e
1979 KZ 1000 1428 dragbike project
1974 kawasaki H1 500 sold
1972 Kawasaki s2 350-parted on ebay
1973 Kawasaki s2 350-parted on ebay
1982 kz750(sold)
1978 kz650 hardtail(sold)
1975 honda xl250-sold
1971 yamaha R5-sold
1982 yamaha xs400
1983 gs1100e
1979 KZ 1000 1428 dragbike project
1974 kawasaki H1 500 sold
1972 Kawasaki s2 350-parted on ebay
1973 Kawasaki s2 350-parted on ebay
1982 kz750(sold)
1978 kz650 hardtail(sold)
1975 honda xl250-sold
1971 yamaha R5-sold
1982 yamaha xs400
Please Log in or Create an account to join the conversation.
- cherrymetal
-
- Offline
- User
-
Registered
- Posts: 95
- Thanks: 0
Re: Sportbike Swingarm How To: All input/help welcome
21 Aug 2008 03:50
Cutls67 wrote:
Best bet for you is a Zephyr swingarm, if you do a forum seach, it will come up with my how to, you could use standard wheels or, update with a wider rim.
i LOVED YOUR WRITE UP AND AM LOOKING FORWARD TO DOING A SWING ARM UPGRADE TO MY KZ650. I AM THINKING OF GOING A DIFFERENT WAY WITH MINE AND WAS CURIOUS IF YOU COULD ANSWER A COUPLE OF QUESTIONS FOR ME. I AM LOOKING FOR A EARLY GSXR SWING ARM FOR ME (I AM WANTING TO KEEP THE DUAL SHOCK SET-UP) BUT I WANT TO KEEP MY ORIGINAL SPOKE WHEEL AND DRUM SET-UP. I AM CURIOUS IF I CAN WIDEN MY WHEEL OR IF THE IS A WIDER WHEEL I CAN LOOK FOR TO FIT A WIDER TIRE ON IT. I WANT TO KEEP THESE PART CAUSE I LIKE TO ORIGINAL LOOK WITH AN UPDATED FEEL. ALSO IS THERE ANY OTHER SWING ARMS OUT THERE I CAN LOOK FOR THAT I CAOULD MODIFY TO USE THE DUAL SHOCK SET-UP.
THANKS STEPHAN
Best bet for you is a Zephyr swingarm, if you do a forum seach, it will come up with my how to, you could use standard wheels or, update with a wider rim.
_____________________________________________________
1977 Z650 (WIP - GPz750 Engine, RF400 Wheels & brakes, Bandit 600 Forks, Zephyr Swingarm)
1997 ZRX1100 - Stock - for now!(except for Hindle header with Micron carbon can)
1988 NTV600 Revere - Stock (work hack!)
1977 Z650 (WIP - GPz750 Engine, RF400 Wheels & brakes, Bandit 600 Forks, Zephyr Swingarm)
1997 ZRX1100 - Stock - for now!(except for Hindle header with Micron carbon can)
1988 NTV600 Revere - Stock (work hack!)
Please Log in or Create an account to join the conversation.
Moderators: Street Fighter LTD