
Where/how to start diagnosing electrical issues
- SirCanucklehead
-
 Topic Author
- Offline
- User
-

Registered
- Posts: 27
- Thanks: 2
Where/how to start diagnosing electrical issues
06 Jul 2023 16:51
I have a ZK550-F2 (1984, Canadian market). Last year I had to put it away because of a racing idle (suspected vacuum leak). Worked on it over the winter, new airbox, air ducts, carb rebuild, only to turn the key and have absolutley not electrical power. No lights, horn, etc.
Examining the harness, I discovered it was completely butchered by the previous owner. The ignition and a few other parts were hotwired into the main harness and many other parts were pretty beat up. So, i managed to snag a replacement harness for a good price, as well as a reproduction ignition barrel, a brand new gel-electrolyte battery, and... still nothing.
So, my question is, where do I go from here? I'm not great with electrical systems, and this is my first bike so my knowledge in this area is extremely limited at best. I also just moved into a new place so a lot of my money is tied up. I do have wiring diagrams, so what is my best course of action to hopefully narrow down the issue and figure out why my bike has no electrical power?
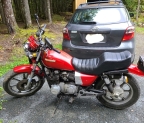
1984 KZ550 LTD Shaft
Please Log in or Create an account to join the conversation.
- Nerdy
-

- Online
- Sustaining Member
-

Registered
- Posts: 1131
- Thanks: 466
Re: Where/how to start diagnosing electrical issues
06 Jul 2023 19:57 - 06 Jul 2023 20:02
1) Get an inexpensive multimeter; you'll need it. ") Harbor Freight has one for about $6, which will be fine to get you started. Read the manual carefully and keep it handy.
Harbor Freight has one for about $6, which will be fine to get you started. Read the manual carefully and keep it handy.
1a) Get some [electrical] contact cleaner at your local auto parts store.
2) Use the meter to check continuity in the fuses; do one at a time, and take them out of the fuse folder to test them. Checking continuity visually is not sufficient.
3) Use the wiring diagrams to check all of your ground connections. Then check them again.
4) Check the connections to the ignition switch. One of them should be hot (12V DC); figure out which one it is and use the meter to see if you have power to the switch.
5) Check all of the other connections. The little waterproofing sleeves can hide broken wires and bad contact, so go through the whole harness and disconnect/clean/reconnect each pair of terminals. The contact cleaner will help with this.
And because I don't want to assume: do you have an appropriate charger for the new battery, and is the battery fully charged?
Edit: just checked and there are no Harbor Freight stores in Canada; you would need to go across the bridge into NY. Canadian Tire has one for $22, or you could use Amazon, etc.
Harbor Freight has one for about $6, which will be fine to get you started. Read the manual carefully and keep it handy.1a) Get some [electrical] contact cleaner at your local auto parts store.
2) Use the meter to check continuity in the fuses; do one at a time, and take them out of the fuse folder to test them. Checking continuity visually is not sufficient.
3) Use the wiring diagrams to check all of your ground connections. Then check them again.
4) Check the connections to the ignition switch. One of them should be hot (12V DC); figure out which one it is and use the meter to see if you have power to the switch.
5) Check all of the other connections. The little waterproofing sleeves can hide broken wires and bad contact, so go through the whole harness and disconnect/clean/reconnect each pair of terminals. The contact cleaner will help with this.
And because I don't want to assume: do you have an appropriate charger for the new battery, and is the battery fully charged?
Edit: just checked and there are no Harbor Freight stores in Canada; you would need to go across the bridge into NY. Canadian Tire has one for $22, or you could use Amazon, etc.
1967 Yamaha YCS1 Bonanza
1980 KZ440B
1981 Yamaha XT250H
1981 KZ440 LTD project bike
1981 GPz550
2013 Yamaha FZ6R
Last edit: 06 Jul 2023 20:02 by Nerdy. Reason: Geography
Please Log in or Create an account to join the conversation.
- MLMG
-

- Offline
- User
-
Registered
- See you in the wind.
- Posts: 127
- Thanks: 39
Re: Where/how to start diagnosing electrical issues
06 Jul 2023 21:30
Basically they have to get power to the coils, you can feed them directly to do tests and understand the circuit. then check the emergency switch and continue backwards if necessary.
1977 Kawasaki KZ1000 A1
Please Log in or Create an account to join the conversation.
- Wookie58
-

- Offline
- Moderator
-

Registered
- Posts: 6052
- Thanks: 3797
Re: Where/how to start diagnosing electrical issues
06 Jul 2023 23:28
The below guide will help you to get to the bottom of your issues in conjunction with a meter and a wiring diagram
kzrider.com/forum/forum-index/faq-wiki/6...-fault-finding-guide
kzrider.com/forum/forum-index/faq-wiki/6...-fault-finding-guide
1982 KZ1000 Ltd
www.kzrider.com/forum/11-projects/617631...-82-begins?start=192
kzrider.com/filebase-alias?view=download...d-fault-diagnosis&ca
www.kzrider.com/forum/11-projects/617631...-82-begins?start=192
kzrider.com/filebase-alias?view=download...d-fault-diagnosis&ca
Please Log in or Create an account to join the conversation.
- F64
-

- Offline
- User
-
Registered
- 81-KZ440D2
- Posts: 1147
- Thanks: 416
Re: Where/how to start diagnosing electrical issues
07 Jul 2023 20:40 - 08 Jul 2023 19:59
I'll give it a shot.
Grab your meter
set meter to DC V
Key switch on
kill switch set to run
make sure you leave everything connected
all fuses in place
red probe on positive battery post(post is the metal part of the battery)
black probe on negative battery post
what is your voltage to the tenth decimal place? (ex12.4v)
move your red probe to both sides of each fuse
you will have 2 readings per fuse.
What are they to the tenth decimal place?
Move your red probe to the ignition switch.
Probe each wire.
list voltage to the tenth decimal place and wire color
Move red probe to a bare metal place on the engine case.
The reading should be a STEADY 0.0V
If the reading bounces around, you have ghost voltage.
Which means there is no connection at that point to the negative battery post.
Any reading over 0.5v indicates too much resistance in the ground circuit.
Turn bike off and disconnect negative battery terminal.
I'm having you disconnect the terminal so your bike doesn't catch on fire because of a wiring issue.
81-KZ440-D2.
Louis Dudzik's GM HEI ignitor conversion installed 2015 s3.amazonaws.com/gpzweb/Ignition/GPZgmHEImod.html
Motogadget m-unit blue installed 2017.
LIC, NY
Louis Dudzik's GM HEI ignitor conversion installed 2015 s3.amazonaws.com/gpzweb/Ignition/GPZgmHEImod.html
Motogadget m-unit blue installed 2017.
LIC, NY
Last edit: 08 Jul 2023 19:59 by F64. Reason: changed my mind about spark plugs
The following user(s) said Thank You: chopper1963
Please Log in or Create an account to join the conversation.
- SirCanucklehead
-
Topic Author
- Offline
- User
-
Registered
- Posts: 27
- Thanks: 2
Re: Where/how to start diagnosing electrical issues
09 Jul 2023 11:54thank you very much for the detailed walkthrough. I will be moving my bike to my new place within the week, once it is here I'll go through these steps and come back with the results.I'll give it a shot.
Grab your meter
set meter to DC V
Key switch on
kill switch set to run
make sure you leave everything connected
all fuses in place
red probe on positive battery post(post is the metal part of the battery)
black probe on negative battery post
what is your voltage to the tenth decimal place? (ex12.4v)
move your red probe to both sides of each fuse
you will have 2 readings per fuse.
What are they to the tenth decimal place?
Move your red probe to the ignition switch.
Probe each wire.
list voltage to the tenth decimal place and wire color
Move red probe to a bare metal place on the engine case.
The reading should be a STEADY 0.0V
If the reading bounces around, you have ghost voltage.
Which means there is no connection at that point to the negative battery post.
Any reading over 0.5v indicates too much resistance in the ground circuit.
Turn bike off and disconnect negative battery terminal.
I'm having you disconnect the terminal so your bike doesn't catch on fire because of a wiring issue.
Just to clarify, when you say to test the ignition wires, do you mean i should unplug the ignition switch and test the pins in the plug? Or to strip some of the insinuation off and test while plugged into the rest of the harness? Or do you mean the actual spark plug wires(may be a dumb question but i am VERY stupid with anything electrical)?
1984 KZ550 LTD Shaft
Please Log in or Create an account to join the conversation.
- F64
-
- Offline
- User
-
Registered
- 81-KZ440D2
- Posts: 1147
- Thanks: 416
Re: Where/how to start diagnosing electrical issues
09 Jul 2023 14:07 - 10 Jul 2023 06:20
totally legitimate question.
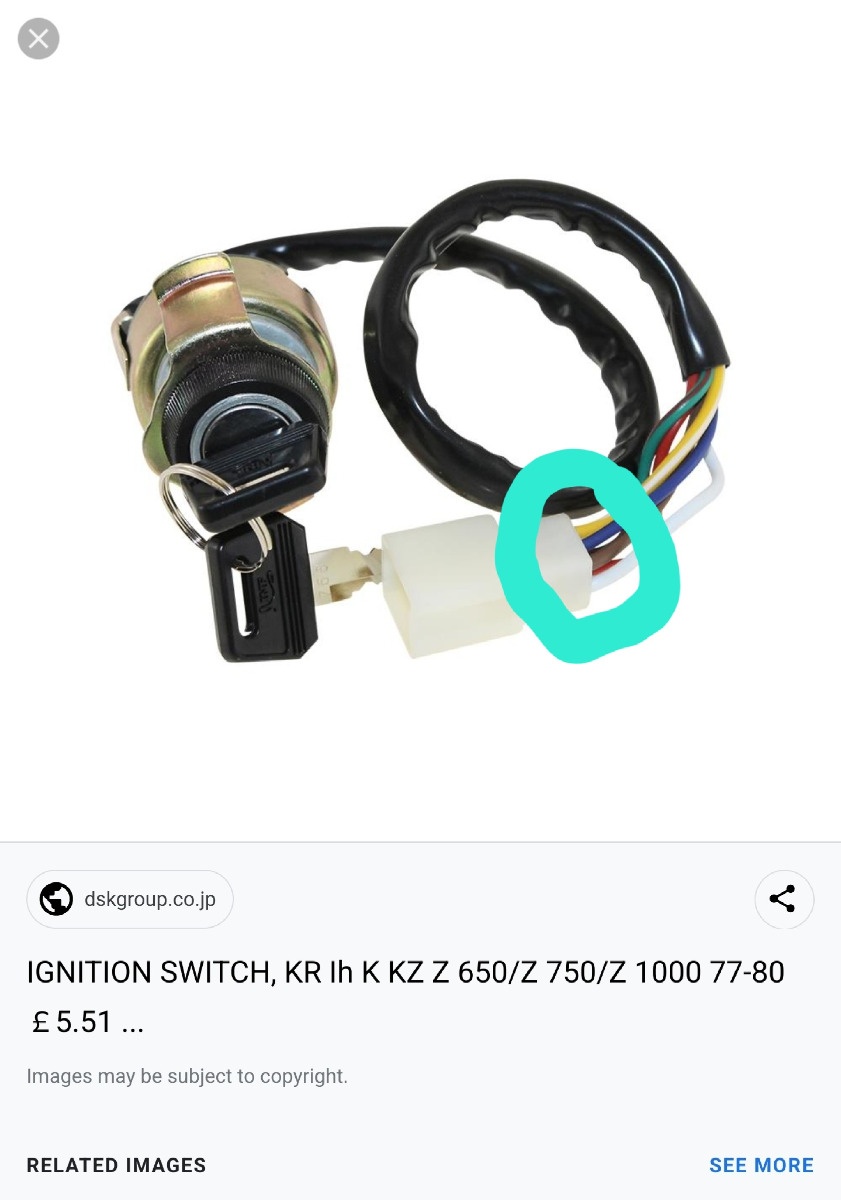
i'll have you backprobe the ignition switch connector.
When you do this testing you have to leave the connectors connected. If you disconnect connectors then the readings will be skewed.
i'll usually use a needle or T-pin to make contact with the wiring terminal inside the connector. Try not to pierce the wire as that can lead to corrosion later on.
And then you can touch your probe to the needle to get the reading. You do this because most meter probes are too big to backprobe with. They do make special probes that do this but theyaren't cheap(they are cheap but it's another thing to buy). A sewing needle, paper clip, safety pin, or any thin piece of metal or wire will usually work.
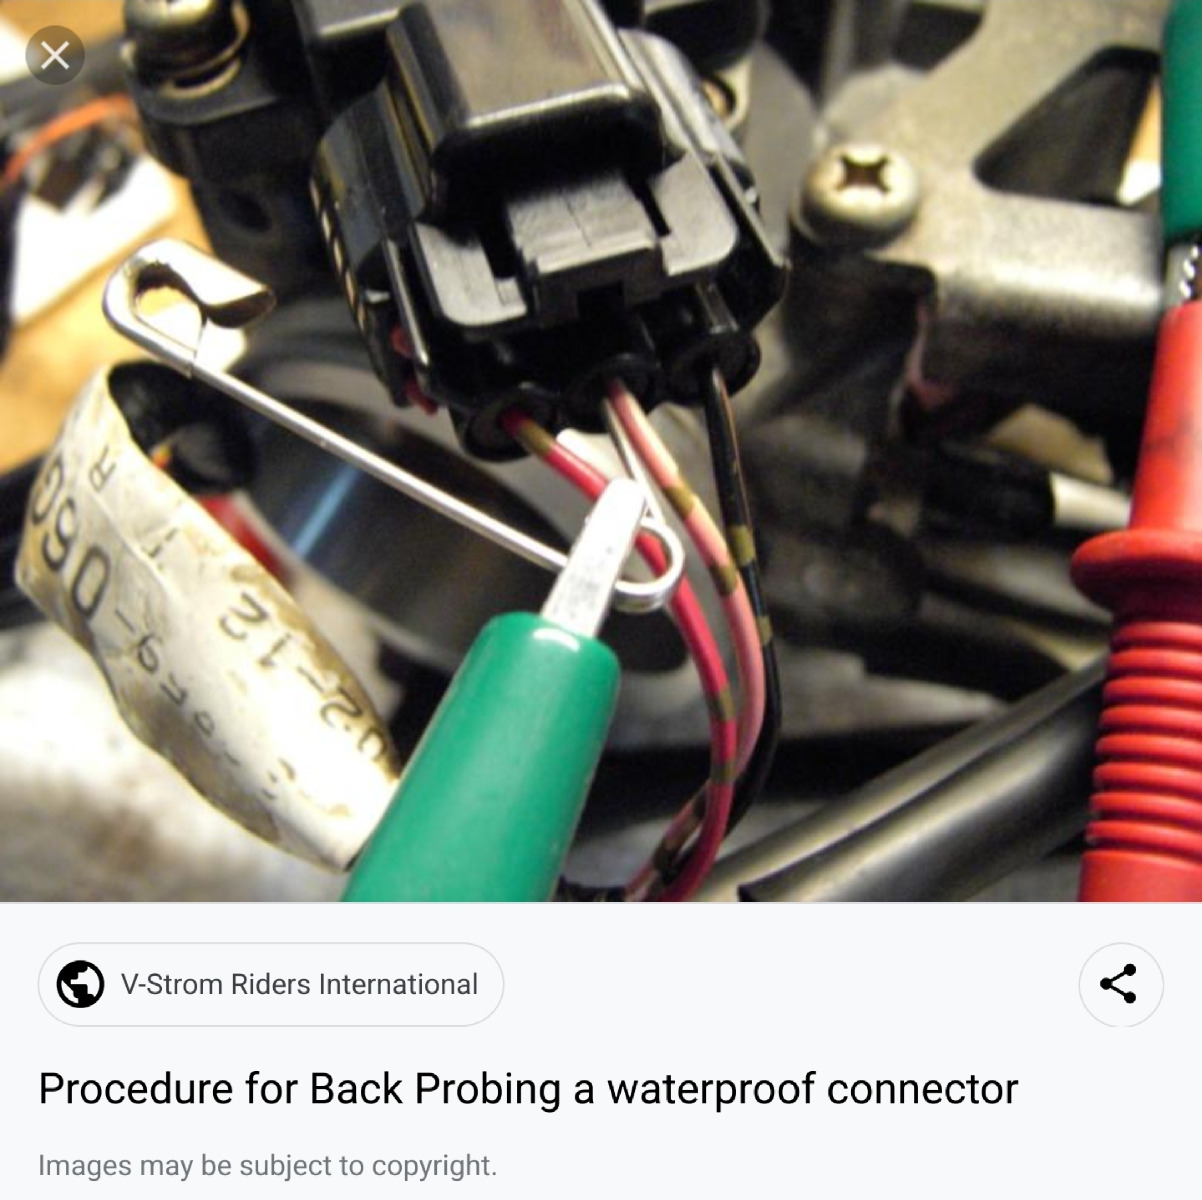
this is the connector you will be backprobing.
Remember, when you are probing the connector has to be connected to the main wiring loom.
i'll have you backprobe the ignition switch connector.
When you do this testing you have to leave the connectors connected. If you disconnect connectors then the readings will be skewed.
i'll usually use a needle or T-pin to make contact with the wiring terminal inside the connector. Try not to pierce the wire as that can lead to corrosion later on.
And then you can touch your probe to the needle to get the reading. You do this because most meter probes are too big to backprobe with. They do make special probes that do this but they
this is the connector you will be backprobing.
Remember, when you are probing the connector has to be connected to the main wiring loom.
81-KZ440-D2.
Louis Dudzik's GM HEI ignitor conversion installed 2015 s3.amazonaws.com/gpzweb/Ignition/GPZgmHEImod.html
Motogadget m-unit blue installed 2017.
LIC, NY
Louis Dudzik's GM HEI ignitor conversion installed 2015 s3.amazonaws.com/gpzweb/Ignition/GPZgmHEImod.html
Motogadget m-unit blue installed 2017.
LIC, NY
Last edit: 10 Jul 2023 06:20 by F64.
Please Log in or Create an account to join the conversation.
- SirCanucklehead
-
Topic Author
- Offline
- User
-
Registered
- Posts: 27
- Thanks: 2
Re: Where/how to start diagnosing electrical issues
02 Jun 2024 09:56 - 02 Jun 2024 09:59
Well... that was a long "week". Sorry about the radio silence. Life got very complicated and my bike ended up sitting in my shed untouched all winter. I now have a bit more time and money on my hands though, and a friend of mine was also nice enough to let me store/work on this ol gal in his garage. So, for the past few weekends I've doing some work on it. I stripped it down to basically just the bare frame plus engine and wheels, cleaned up any corrosion I could find, stripped, inspected, and re-wrapped my wiring harness while also replacing any broken connectors I could find. In a glorious moment, I turned the key, and have electrical power, finally after two years of nothing... Well, some electrical power. My gauges light up, as well as the running light function of my turn signals. My headlight wouldn't turn on, and my signals wouldn't actually flash when hitting the signal switch.
Also, when I kick it into neutral, I A; get no neutral light, and B; it won't turn over (could be a bad bulb, in which case, I guess the bigger issue would be with the starter, or, my neutral sensor could be bad which would prevent the bike from turning over. I'm hoping it's the latter).
Anywho, F64, I finally just got around to following your procedure, here are my results;
11.7~11.8. Definitely low (ideally 12.7ish from what I read?), but it is a battery that's been sitting for quite a while.
1. 11.7/11.7
2. 10.8/0.13
3. 11.8/11.8
4. 11.7/11.7
5. 11.7/11.7
Even with my limited electrical knowledge, #2 was a big red flag. I turned off and disconnected everything, cleaned up the contacts of the fuse box itself, put everything back together and tested it again, and this time the readings matched (unfortunately upon trying to double check, I was an idiot, didn't have the negative terminal tightly attached, and that fuse ended up blowing. I have a few spares but will have to search around to find them).
On the upside, after cleaning this up and before my bonehead move, my turn signals worked, as did my headlight, and my horn even wants to make some noise (they were very quiet and scratchy most of the time, but they let one good honk out). Anyway, onward;
White/Black - 11.42
Blue - 11.20
Pink/Salmon - 11.42
White - 11.38
Yellow - 11.38
Red - 11.20
I tested these a couple times each and they seemed to fluctuate slightly, don't know how significant that its. Also, just a note. I had to replace both sides of this connector. The harness side was basically shattered away, and the connectors I bought to replace it were incompatible with the one on the new ignition barrel (they were almost identical, but the "latch" was on the other side, and the female plugs I bough had the "tooth" while the male had the "keeper". The ignition I bought was a male with a tooth, therefor the female would need the keeper). So, they were both replaced, with the main harness getting new spade connectors as they were the original ones and were pretty grimy.
Thankfully, I am reading a steady 0.0V.
So, this is progress and overall I am optimistic about this thing, but still very much in the dark on how to proceed. Any advice on what my next steps should be would be hugely appreciated, and again, I apologize about the radio silence. I'll make sure I don't disappear again lol.
Also, when I kick it into neutral, I A; get no neutral light, and B; it won't turn over (could be a bad bulb, in which case, I guess the bigger issue would be with the starter, or, my neutral sensor could be bad which would prevent the bike from turning over. I'm hoping it's the latter).
Anywho, F64, I finally just got around to following your procedure, here are my results;
red probe on positive battery post(post is the metal part of the battery)
black probe on negative battery post
what is your voltage to the tenth decimal place? (ex12.4v)
11.7~11.8. Definitely low (ideally 12.7ish from what I read?), but it is a battery that's been sitting for quite a while.
move your red probe to both sides of each fuse
you will have 2 readings per fuse.
What are they to the tenth decimal place?
1. 11.7/11.7
2. 10.8/0.13
3. 11.8/11.8
4. 11.7/11.7
5. 11.7/11.7
Even with my limited electrical knowledge, #2 was a big red flag. I turned off and disconnected everything, cleaned up the contacts of the fuse box itself, put everything back together and tested it again, and this time the readings matched (unfortunately upon trying to double check, I was an idiot, didn't have the negative terminal tightly attached, and that fuse ended up blowing. I have a few spares but will have to search around to find them).
On the upside, after cleaning this up and before my bonehead move, my turn signals worked, as did my headlight, and my horn even wants to make some noise (they were very quiet and scratchy most of the time, but they let one good honk out). Anyway, onward;
Move your red probe to the ignition switch.
Probe each wire.
list voltage to the tenth decimal place and wire color
White/Black - 11.42
Blue - 11.20
Pink/Salmon - 11.42
White - 11.38
Yellow - 11.38
Red - 11.20
I tested these a couple times each and they seemed to fluctuate slightly, don't know how significant that its. Also, just a note. I had to replace both sides of this connector. The harness side was basically shattered away, and the connectors I bought to replace it were incompatible with the one on the new ignition barrel (they were almost identical, but the "latch" was on the other side, and the female plugs I bough had the "tooth" while the male had the "keeper". The ignition I bought was a male with a tooth, therefor the female would need the keeper). So, they were both replaced, with the main harness getting new spade connectors as they were the original ones and were pretty grimy.
Move red probe to a bare metal place on the engine case.
The reading should be a STEADY 0.0V
If the reading bounces around, you have ghost voltage.
Which means there is no connection at that point to the negative battery post.
Any reading over 0.5v indicates too much resistance in the ground circuit.
Thankfully, I am reading a steady 0.0V.
So, this is progress and overall I am optimistic about this thing, but still very much in the dark on how to proceed. Any advice on what my next steps should be would be hugely appreciated, and again, I apologize about the radio silence. I'll make sure I don't disappear again lol.
1984 KZ550 LTD Shaft
Last edit: 02 Jun 2024 09:59 by SirCanucklehead. Reason: Formatting issues
Please Log in or Create an account to join the conversation.
- F64
-
- Offline
- User
-
Registered
- 81-KZ440D2
- Posts: 1147
- Thanks: 416
Re: Where/how to start diagnosing electrical issues
02 Jun 2024 11:16
No worries.
I'll dig up a wiring schematic but it appears you are getting power to and through the ignition switch.
I'll dig up a wiring schematic but it appears you are getting power to and through the ignition switch.
81-KZ440-D2.
Louis Dudzik's GM HEI ignitor conversion installed 2015 s3.amazonaws.com/gpzweb/Ignition/GPZgmHEImod.html
Motogadget m-unit blue installed 2017.
LIC, NY
Louis Dudzik's GM HEI ignitor conversion installed 2015 s3.amazonaws.com/gpzweb/Ignition/GPZgmHEImod.html
Motogadget m-unit blue installed 2017.
LIC, NY
Please Log in or Create an account to join the conversation.
- SirCanucklehead
-
Topic Author
- Offline
- User
-
Registered
- Posts: 27
- Thanks: 2
Re: Where/how to start diagnosing electrical issues
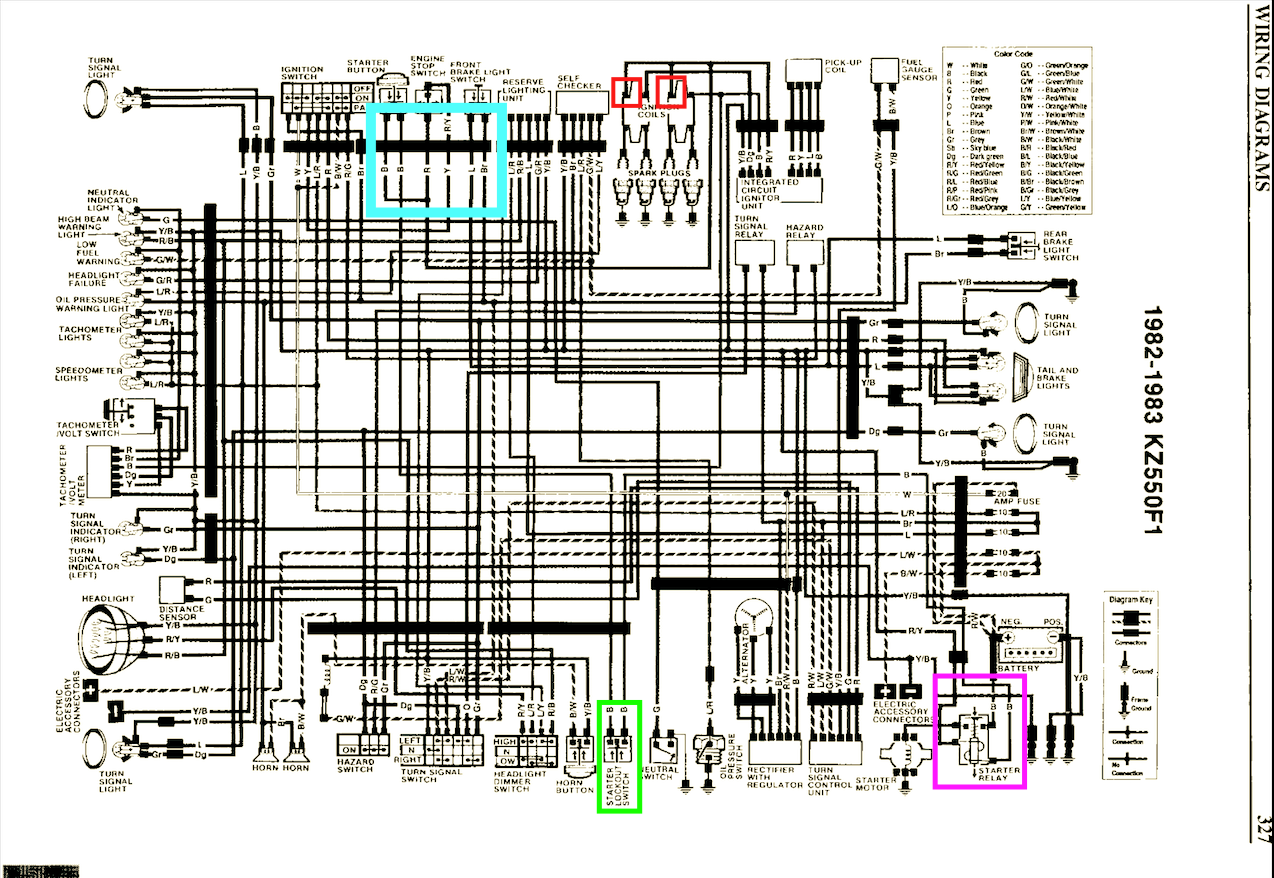
02 Jun 2024 12:40 - 02 Jun 2024 12:42I'll save you the trouble, I've attached a diagram for an F1 model. Unfortunately it's not exactly the same as mine which is an F2, but it's very very close.The F2 seems to be the black sheep of this entire family of bikes unfortunately; parts, resources, manuals, etc all seem to be pretty scarce compared to older models.No worries.I'll dig up a wiring schematic but it appears you are getting power to and through the ignition switch.
1984 KZ550 LTD Shaft
Last edit: 02 Jun 2024 12:42 by SirCanucklehead.
Please Log in or Create an account to join the conversation.
- F64
-
- Offline
- User
-
Registered
- 81-KZ440D2
- Posts: 1147
- Thanks: 416
Re: Where/how to start diagnosing electrical issues
03 Jun 2024 15:25 - 03 Jun 2024 15:45
Thanks for the schematic. I couldn't find anything on my end..
Grab your meter
Meter on DC V
Ignition key ON
Kill switch set to RUN
black probe on negative battery post
red probe on positive battery post
note voltage
Going to the teal square at the top.
You have a 6 wire connector
move your red probe and backprobe (do not disconnect the connector) all of the wires and note the color and the voltage.
You may need a paper clip, nail, t-pin to be able to backprobe the wires.
Go to the ignition coils (red squares).
Backprobe each wire at the coils and note voltage
Move your red probe to the safety switch---should be at the clutch.
Back probe each black wire while pulling in the clutch and pressing the starter button.
note voltage
I'll have you check the pink box after I see the results of the clutch switch.
turn off bike
81-KZ440-D2.
Louis Dudzik's GM HEI ignitor conversion installed 2015 s3.amazonaws.com/gpzweb/Ignition/GPZgmHEImod.html
Motogadget m-unit blue installed 2017.
LIC, NY
Louis Dudzik's GM HEI ignitor conversion installed 2015 s3.amazonaws.com/gpzweb/Ignition/GPZgmHEImod.html
Motogadget m-unit blue installed 2017.
LIC, NY
Last edit: 03 Jun 2024 15:45 by F64. Reason: not a spelling bee champion
Please Log in or Create an account to join the conversation.
- SirCanucklehead
-
Topic Author
- Offline
- User
-
Registered
- Posts: 27
- Thanks: 2
Re: Where/how to start diagnosing electrical issues
06 Jun 2024 17:07Thanks, I'm heading out to work on it again tomorrow/most of the weekend. I'll go through these steps and report back.Thanks for the schematic. I couldn't find anything on my end..
Grab your meter
Meter on DC V
Ignition key ON
Kill switch set to RUN
black probe on negative battery post
red probe on positive battery post
note voltage
Going to the teal square at the top.
You have a 6 wire connector
move your red probe and backprobe (do not disconnect the connector) all of the wires and note the color and the voltage.
You may need a paper clip, nail, t-pin to be able to backprobe the wires.
Go to the ignition coils (red squares).
Backprobe each wire at the coils and note voltage
Move your red probe to the safety switch---should be at the clutch.
Back probe each black wire while pulling in the clutch and pressing the starter button.
note voltage
I'll have you check the pink box after I see the results of the clutch switch.
turn off bike
1984 KZ550 LTD Shaft
The following user(s) said Thank You: F64
Please Log in or Create an account to join the conversation.
Moderators: Street Fighter LTD