
Open up Tach and Spedo on 77 KZ1000
- chconger
-
 Topic Author
- Offline
- User
-

Registered
- Posts: 111
- Thanks: 14
Open up Tach and Spedo on 77 KZ1000
18 Mar 2014 11:48
Hi Guys
I would like to be able to clean some crud on the inside glass of my "clocks" (as they say in the UK.)
Is there a trick to opening these things up? I have the backs off but that only exposes the connectors for the lamps. To go deep inside it appears I need to bend open the crimped ring on the outside? Looks impossible to open without damaging the ring...?
I hope there is a simple secret to this...?
Thanks
Chris
1977 KZ 1000-A
Please Log in or Create an account to join the conversation.
- Grumpy Ole Artist
-

- Offline
- User
-
Registered
- Eschew Obfuscation!
- Posts: 497
- Thanks: 62
Re: Open up Tach and Spedo on 77 KZ1000
18 Mar 2014 12:43
I have seen a few threads devoted to this subject....you might try a forum search...but yeah, you hafta carefully pry them open!
1978 KZ650 B2
Former rides...1976 CB360T, 1985 Shadow 700, 1985 GPZ750Turbo
Former rides...1976 CB360T, 1985 Shadow 700, 1985 GPZ750Turbo
Please Log in or Create an account to join the conversation.
- kaw-a-holic
-
- Offline
- User
-
Registered
- Posts: 1808
- Thanks: 249
Re: Open up Tach and Spedo on 77 KZ1000
18 Mar 2014 17:26chconger wrote: Hi Guys
I would like to be able to clean some crud on the inside glass of my "clocks" (as they say in the UK.)
Is there a trick to opening these things up? I have the backs off but that only exposes the connectors for the lamps. To go deep inside it appears I need to bend open the crimped ring on the outside? Looks impossible to open without damaging the ring...?
I hope there is a simple secret to this...?
Thanks
Chris
Chris,
Here is a link from a quick search in the forum.
www.kzrider.com/forum/5-chassis/592799-8...lens-cleaning#623132
There is a link on the last past on how to take them apart. From what I have read, it is not an easy job, lots of patience is required. Once you get them apart you have to be careful removing the needles. An old trick is using 2 spoons from the kitchen, one on each side. Caution! The needle and other bits may depart the gauge quite rapidly so a spotter is advised. The rings are never the same again. A special machine is used to put them on during manufacturing. Resto.com I believe will do this for you, but its not cheap. They do quality work.
Jon
1977 KZ1000a1
Mesa, AZ
Phoenix Fighter Project
1977 KZ1000a1
Mesa, AZ
Phoenix Fighter Project
Please Log in or Create an account to join the conversation.
- Patton
-

- Offline
- KZr Legend
-

Registered
- Posts: 18568
- Thanks: 2102
Re: Open up Tach and Spedo on 77 KZ1000
18 Mar 2014 19:24
This link may be of interest:
Click > www.zresto.com/
Here's a diy option from an earlier thread ---
duncan wrote:
i've taken the tach apart but not the speedo. it's real easy if you use a dremel to cut the chrome ring, and then some jweld and hose clamp to cement it back together.
apeman wrote:
The old article suggests removing the band around the gauges by levering it up from the underside. I have found that results in too much damage to the band to make it look good after it is put back on, and crimped down. Therefore, I instead took a dremel with a cut-off wheel to the band, and sliced through it, being carefull not to damage the gauge cover. Then I slipped off the band, and did my gauge clean-up. To reinstall, I assembled the cover onto the gauge, slipped the band on, and held it tightly in place with a rubber band. Then I placed a drop of JBweld epoxy onto the gap in the band, and let it dry. (Make sure you mount the gap in the band at an location that will not be readily visible when the gauge is remounted onto the bike.) That has been working well for over a year.
Good Fortune!")
Click > www.zresto.com/
Here's a diy option from an earlier thread ---
duncan wrote:
i've taken the tach apart but not the speedo. it's real easy if you use a dremel to cut the chrome ring, and then some jweld and hose clamp to cement it back together.
apeman wrote:
The old article suggests removing the band around the gauges by levering it up from the underside. I have found that results in too much damage to the band to make it look good after it is put back on, and crimped down. Therefore, I instead took a dremel with a cut-off wheel to the band, and sliced through it, being carefull not to damage the gauge cover. Then I slipped off the band, and did my gauge clean-up. To reinstall, I assembled the cover onto the gauge, slipped the band on, and held it tightly in place with a rubber band. Then I placed a drop of JBweld epoxy onto the gap in the band, and let it dry. (Make sure you mount the gap in the band at an location that will not be readily visible when the gauge is remounted onto the bike.) That has been working well for over a year.
Good Fortune!
1973 Z1
KZ900 LTD
KZ900 LTD
The following user(s) said Thank You: bikerguy
Please Log in or Create an account to join the conversation.
- chconger
-
Topic Author
- Offline
- User
-
Registered
- Posts: 111
- Thanks: 14
Re: Open up Tach and Spedo on 77 KZ1000
19 Mar 2014 04:42
Thanks Guys
As I feared, the problem is getting the ring off and back on without butchering it. Looks like z-resto has refined some tooling to do this properly; but $95 a pop is not in this years budget.
Crud on my glass is not looking so bad all of a sudden....
Cheers
Chris
As I feared, the problem is getting the ring off and back on without butchering it. Looks like z-resto has refined some tooling to do this properly; but $95 a pop is not in this years budget.
Crud on my glass is not looking so bad all of a sudden....
Cheers
Chris
1977 KZ 1000-A
Please Log in or Create an account to join the conversation.
- Z1Driver
-
- Offline
- User
-
Registered
- love the smell of triple smoke
- Posts: 301
- Thanks: 55
Re: Open up Tach and Spedo on 77 KZ1000
19 Mar 2014 10:25
I would spend the $95.00. I sent a set of Z1 gauges to Z-Resto and they came back looking and working like new. They had new glass, red line is not pink. :ohmy:
Blue 1975 Z1B
Red 2009 Concours 14
Red 2009 Concours 14
Please Log in or Create an account to join the conversation.
- spdygon
-

- Offline
- Platinum Member
-

Registered
- Posts: 1012
- Thanks: 117
Re: Open up Tach and Spedo on 77 KZ1000
19 Mar 2014 13:46
z1 enterprice has repo for 115 for the tech and 175 for the speedometer.....
most charge 90 for the restore and extra for extra parts and labor. if your gauges need parts it will total up preety quick.
most charge 90 for the restore and extra for extra parts and labor. if your gauges need parts it will total up preety quick.
1982 GS1000sz Katana ( #15...17K Miles)
1982 GS1000sz Katana ( # 297....7100k Miles)
1978 Kz1000 Z1R. 10K Miles1
1978 kz1000 z1r 27k miles
1977 KZ 1000 A ( Project ) 54K Miles
1976 Kz900A4 (Red)21K miles
1976 Kz900A4 ( Red)7500 miles
1974 Z1 900 project
1982 GS1000sz Katana ( # 297....7100k Miles)
1978 Kz1000 Z1R. 10K Miles1
1978 kz1000 z1r 27k miles
1977 KZ 1000 A ( Project ) 54K Miles
1976 Kz900A4 (Red)21K miles
1976 Kz900A4 ( Red)7500 miles
1974 Z1 900 project
Please Log in or Create an account to join the conversation.
- jakedude
-

- Offline
- User
-
Registered
- Posts: 201
- Thanks: 30
Re: Open up Tach and Spedo on 77 KZ1000
20 Mar 2014 13:46
I recently opened both my speedometer and tachometer to clean the inside of the glass lens on both gauges. I started out trying to pry the ring off the speedometer and quickly gave up on that path. instead I just cut across the ring on the bottom side with a dremel tool to slip the ring off. Then after cleaning the glass and reassembling the gauges, I drilled small holes on either side of the ring cut, inserted mechanics wire into the holes and then twisted the wire to make the rings snug again. After that I put on some RTV over the wire and cut gap. Since the wire job is on the bottom of each gauge someone would have to look for the repair to notice. Lots better than obviously dirty glass lenses.
Nothing lasts, nothing is finished, and nothing is perfect.
Please Log in or Create an account to join the conversation.
- asphalt900
-
- Offline
- User
-
Registered
- Posts: 1307
- Thanks: 808
Re: Open up Tach and Spedo on 77 KZ1000
24 Mar 2014 11:01
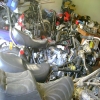
If it helps, here is another way to open the clocks. Simple hand tools modified to use for this practice. A piece of PVC 4" pipe milled out to hold instrument, needle-nose pliers, flatblade screwdriver, tape, old Kaw Sprocket and Patience. Been doing these for years, way before the aftermarket faces/overlays were available. Never have had to cut the ring. No Spoons to pull-up the needle. The spoon trick is actually a Bad idea. Two E-clips are all that hold the needle shaft in alignment. Loading these e-clips can cause unseen damage. Hold the Drag-Cup off its resting limiter and Twist to loosen while pulling away from face. If reusing face, trim your fingernails to prevent scratching face or use painters tape. The sprocket is actually a Perfect fit for the Upper Can. The cut-out notch is for the crimping tool. This might be a bit too involved if you are only doing a single set but it's on the cheap. Plus it's fun to experiment! Then you can start Painting your Original Faces! Clay
Attachments:
The following user(s) said Thank You: 650ed, undiablo
Please Log in or Create an account to join the conversation.
- pete greek1
-

- Offline
- User
-
Registered
- Posts: 1510
- Thanks: 185
Re: Open up Tach and Spedo on 77 KZ1000
24 Mar 2014 11:25
Had mine done at Z-Resto, & they look & work like New,

1980 LTD 1000..,1976 LTD 900, have the 1000&900 now. the rest are previous= 1978 KZ 650 B.., 1980 Yamaha XT 500..,1978 Yamaha DT 400.., 1977 Yamaha yz 80..,Honda trail ct 70.., Honda QA 50...5-1/2 hp brigs & straton CAT chopper mini bike...3-1/2 hp mini bike (WHEN GAS WAS ABOUT 45 CENTS A GALLON)!!!!
Attachments:
Please Log in or Create an account to join the conversation.
- undiablo
-

- Offline
- User
-
Registered
- Posts: 436
- Thanks: 64
Re: Open up Tach and Spedo on 77 KZ1000
24 Mar 2014 11:43asphalt900 wrote: If it helps, here is another way to open the clocks. Simple hand tools modified to use for this practice. A piece of PVC 4" pipe milled out to hold instrument, needle-nose pliers, flatblade screwdriver, tape, old Kaw Sprocket and Patience. Been doing these for years, way before the aftermarket faces/overlays were available. Never have had to cut the ring. No Spoons to pull-up the needle. The spoon trick is actually a Bad idea. Two E-clips are all that hold the needle shaft in alignment. Loading these e-clips can cause unseen damage. Hold the Drag-Cup off its resting limiter and Twist to loosen while pulling away from face. If reusing face, trim your fingernails to prevent scratching face or use painters tape. The sprocket is actually a Perfect fit for the Upper Can. The cut-out notch is for the crimping tool. This might be a bit too involved if you are only doing a single set but it's on the cheap. Plus it's fun to experiment! Then you can start Painting your Original Faces! Clay
Sorry, I don't understand what is the sprocket for. Could you explain a little mote?
Kawasaki KZ 750/4 LTD 1981
Kawasaki KLR 650 2011
Argentina - Buenos Aires
Kawasaki KLR 650 2011
Argentina - Buenos Aires
Please Log in or Create an account to join the conversation.
- asphalt900
-
- Offline
- User
-
Registered
- Posts: 1307
- Thanks: 808
Re: Open up Tach and Spedo on 77 KZ1000
24 Mar 2014 12:06
Hello! The Sprocket "holds" the clock while you crimp. It just provides a stable base for this procedure. There is just enough room, after you wrap upper can with tape, to spin the clock while crimping. This way you don't end-up with a ring that bunches/bulges because of uneven pressure while doing this. Think Clock 12:00, 6:00, 3:00 9:00 a bit at a time. Then 1:30, 7:30, 4;30, 10:30. NOT completely crimping on first pass, just slowly tightening with each pass. Hope this Helps, Clay
Attachments:
Please Log in or Create an account to join the conversation.
Moderators: Street Fighter LTD