
1983 KZ750 K1 LTD Starting Problems
- Salder69
-
 Topic Author
- Offline
- User
-

Registered
- Posts: 49
- Thanks: 0
1983 KZ750 K1 LTD Starting Problems
30 Jul 2012 15:14
A little history on the bike, bought it for 300, thought it would be a pretty straigtforward project after a good 30 minute inspection. We almost got it started then, but I'm now having the same problem. It turns over but no spark.
Now, I've never been one to trust a strangers word until they prove honest over time, but, I had a good feeling about the guy and I don't think he had any reason to bullshit me. It almost started. He said it used to fire right up.
He bought it from the 2nd owner (who was apparently the first riding owner). He had it for a while, and it last had its tags expired in april 2012, so even though the tag is old, its been road ready recently...or he just kept the tags up to date for no f***ing reason...
The gas tank was pretty bad, so dinked around on the web and found a method of filling the tank with aquarium gravel and then sealing off the tank with tape, then wrapping it in blankets, and throwing it in the dryer on no heat, like a rock tumbler.
That worked great, and I cleaned the petcock and rebuilt it using new o rings from the hardware store and using GOOP to fix a puncture in the filters. (GOOP is amazing stuff).
The last time I tried to start it, it never got spark. KEEP IN MIND, i am using my car to jump it. Considering I paid 300 for it, and a new battery costs $50 and other parts will add up quick too, I'm wanting to at least get it started before I dump ANY MORE MONEY into it.
The dude had put iridium plugs in in, and I really don't know what that means, but the plugs looked really bad and the guy at the auto store more or less said whoever did that was really stupid.
I took them out and put new ones in and fired it again. At first it did the same thing and just turned over and what not with no spark, but then it just stopped doing anything.
After seeing all the rust in the petcock and tank, I figured I would have to clean the carbs too, so I took them off and fixed them up. A lot of rust in the bowls, but other than that In decent shape.
So I put the carbs back on and am going to start it later tonight when it cools off.
I did some reading on a KZ550 or a GP550 post about the same issue, same situation. Trying to jump an old bike and it turns, but never gets spark. I think his post said that he didn't even get it to turn, but this bike turned at first, now it does nothing.
I read it may be the heat. So ill try at night (I live in OK and it is hot here in summer) and see what it does. But right now, it looks like, unless I want to buy a new wiring harness, battery, solenoid, ignition, ignition coil and plug wire all at once and throw em on and try again, I'll need to get a multimiter and measure I think it was 12.5-13 volts to the coil pack was it? I will find the post and link it, but until then any advice would be great.
PS it has a kickstart, but it is very hard to kick it and test the spark at the same time, jumping it would be better.
PPS I want to get this bike up and running as fast as possible. I am willing to do all the work needed, and reluctant but willing to buy new parts. I took a gamble with this bike and I lost. I'd like to get it at least running so I can either ride it to work and back, or sell it to some other jackass.
Thanks!
Please Log in or Create an account to join the conversation.
- MFolks
-

- Offline
- User
-
Registered
- Posts: 6650
- Thanks: 541
Re: 1983 KZ750 K1 LTD Starting Problems
30 Jul 2012 17:37
Do you have, or can borrow a multimeter? You'll need it for electrical troubleshooting. No spark to me means the IC Igniter may be bad, or the pick up coils may be gone too(not missing, but not working).
Look here for wiring diagrams and manuals:
kz.bike-night.com/manual.html
I'd do this too:
Cleaning Motorcycle Electrics
1. Get some of the De-Oxit electrical contact cleaner and figure on spending a good day going from the front of the bike to the back. It’s a plastic safe cleaner/preservative. www.deoxit.com is their website. It can be purchased at most Radio Shack Stores or any electronic supply places. Or use any plastic safe electrical contact cleaner(NOT WD-40 !).
2. On the older Kawasaki's, a majority of electrical connectors are inside the headlight housing requiring removal of the headlight, then the fun begins.
3. Do one set of electrical connectors at a time to avoid mixing up what connects to where. Usually disconnecting, spraying with De-Oxit and reconnecting is about all you'll need.
4. However, when encountering the green crud of corrosion, a brass wire brush may be needed on the pins you can reach. Some 400-600 grit wet and dry sandpaper strips rolled into a tube should reach the male and female pins in the more difficult to clean connectors.
5. Smoker’s pipe cleaners, cotton swabs and wooden toothpicks work as cleaning aids.
6. Really small electrical connectors may require the use of a welders tip cleaning tool assortment.
7. Most pins in the connectors are coated with a thin plating of tin, and others may be nothing more than copper or brass.
8. If moisture is added, the resulting corrosion lowers the voltage/current being carried causing dim lights, slow engine cranking, slow turn signal responce and lower input voltage to the ignition coils resulting in weak spark.
9. The left and right handlebar switch pods will need attention too as they have circuit functions like turn, horn, run/stop, and start. The older Kawasaki’s have reports of the soldered connections crumbling, if your bike has this problem, just ask, as I’ve got a repair procedure for this.
10. Usually a spritz or two with actuation of the switch is about all needed for these switches unless corrosion is detected and then careful disassembly is required.
11. The ignition switch may or may be not sealed to allow spraying the internal contacts. I urge caution if attempting to open this up as springs, and ball bearings may fly out never to be seen again!
12. If your bike has the older style glass tubed fuses, I suggest replacing them as vibration can cause internal failure. AGX is the type used, and most auto parts stores can get them for you, along with boating supply stores.
13. Clean the fuse holder clips, looking for signs of overheating(discolored insulation, signs of melting). I use metal polish on a cotton swab, followed by spraying another clean swab with the De-Oxit and then rubbing the inside of the fuse clip.
14. All battery cables must be clean and tight for maximum current transfer. Check the cables going from the Negative(-) battery terminal/post to the engine mounting bolt
15. Also the one going from the Positive(+) terminal to the starter solenoid and from there to the starter motor.
16. If any battery cable feels ”Crunchy” when flexed, replace it as possible corrosion is inside the insulation. Inspect all heavy duty battery cables and the smaller wire terminations(Bullet Connectors), for failed crimps, and those used in the electrical connectors, as they can fail over time.
17. Each "Bullet Connector" will have to be sprayed to ensure good connectivity, especially the ones going to the energizing coil of the starter solenoid.
18. The alternator output “Bullet Connectors” are usually behind the engine sprocket cover and will need inspecting and cleaning too.
20. The turn signal light sockets will benefit from a spritz from the contact cleaner along with the tail light/brake light socket.
21. Some brake light switches can be sprayed on the actuating rod, with the spray running down inside to the electrical contacts, others may be sealed requiring replacement if the switch is intermittent in operation.
22. Some people put the Di-Electric Grease on cleaned terminations/connectors, I don’t, as I’ve read/heard it can cause problems when it gets hot, actually insulating the connections, so the choice is yours to use or not.
I think I've covered about all of the electrical systems on the bike.........
“I spent a weekend going through every electrical connection and switch on the bike with a little scotchbrite pad and DeOxit - what a difference! Everything was brighter, gauge backlights, indicator lights, turn signals, I was getting a nicer spark, it fired up quicker, etc. Well worth my time. WELL worth it! “
From a forum member at www.kzrider.com
Why WD-40 Should Not Be Used On Motorcycle Electrical Items.
For many years, I was proponent of the use of WD-40 on fuse clips, fuses, switches and connectors. After hearing of other peoples experience with intermittent and sporadic activity, I shrugged it off as maybe they did something wrong in the application of the product.
It wasn’t until the time I rode my 1982 GPz1100 B2 model to downtown San Diego that I encountered the problems others had gone through.
After concluding my business downtown, I walked to where my bike was parked, turned the key to unlock the forks, and prepared to start the engine. The key was in the "On" position, yet I had no lights in the dash panel, the fuel pump was not running(I have FI), and the horn and tail light were not working.
Puzzled as to why nothing electrical was happening, I remember my earlier conversations about how WD-40 will over time become a non-conductor(more like an insulator). I had some pieces of 400 and 600 grit sandpaper in my tool kit and with them was able to scratch away the coating from the WD-40 on the fuses and clips.
After removing the insulating film, the bike started and ran like it should. Since that time, I’ve told people about the problem with WD-40. If you must use a contact cleaner, I recommend getting some "De-oxit" from Radio Shack Stores or any good electronic supply store.
1982 GPZ1100 B2
General Dynamics/Convair 1983-1993
GLCM BGM-109 Tomahawk, AGM-129A Advanced Cruise Missile (ACM)
General Dynamics/Convair 1983-1993
GLCM BGM-109 Tomahawk, AGM-129A Advanced Cruise Missile (ACM)
Please Log in or Create an account to join the conversation.
- MFolks
-
- Offline
- User
-
Registered
- Posts: 6650
- Thanks: 541
Re: 1983 KZ750 K1 LTD Starting Problems
30 Jul 2012 17:40
And, if while cleaning the electrical switches in the handle bar "Pods", you discover failed or failing solder connections(many of the older bikes are suffering this problem), here's a repair procedure:
Read this for a primer on hand soldering: technologyinterface.nmsu.edu/fall97/electronics/solder.html
Repairing Motorcycle Soldered Connections on the older bikes.
When repairing soldered wires on motorcycle switches or light bulbs sockets, have the following on hand:
1. A 25 Watt soldering iron or one that the wattage can be adjusted.
2. Rosin core solder of 60/40 type. SN60 or SN63 is preferred.
3. Rosin flux or soldering paste (Never use solder or soldering paste designed for plumbing work, as it contains an acid that will corrode the electrical joint, ruining it).
4. 91% rubbing Alcohol, or 70%. The lower percentage will clean up flux residue, but not as good as the higher percentage stuff. Acetone does a good job of removing excess solder flux too.
5. A cut down ½” paint brush, or acid brush for scrubbing the repaired solder joint.
6. Clean rags or paper towels
7. A damp sponge to keep the soldering iron tip clean.
8. Some “Solder Wick” a braided bare copper wire designed to collect heated excess solder, aiding in joint preperation, available at electronic supply stores.
9. Some wooden toothpicks.
10. Small Hemostats or clip on heatsinks.
A. Before soldering, “Tin” the soldering iron tip by plugging it in or turning the iron on, allowing it to get to operating temperature(2-3 minutes).
B. Unroll about 3” of solder from the roll of rosin core solder & then using a clean rag or paper towel moistened with Alcohol, wipe the unrolled solder, removing the finger print oils that will create a poor solder joint.
C. Apply a small amount of solder to the now heated soldering iron tip, wiping the excess off with the wet sponge, keeping a thin layer on the soldering iron.
D. The soldering iron is now ready for use, but before applying the heated tip to a wire, wipe the tip on the damp sponge, this removes any oxidized solder and makes for a much better connection.
E. If the joint to be repaired is grey in color or appears “Crumbled”, apply some rosin soldering paste or flux to the joint with a small toothpick or screwdriver, and then apply the soldering iron tip for a few seconds.
G. The fluxed joint should clean up, allowing for a better connection. If no luck, use the solder wick to remove all traces of the old solder by apply in it between the soldering iron tip and the bad joint.
H. Hemostats and clip on heatsinks will be used to prevent the wire insulation from burning, overheating & pulling away from the connection.
I. Apply a small amount of flux to the joint to be repaired & then a very short duration of heated soldering iron tip & solder(like a few seconds or so).
J. Clean off the repaired joint with the brush & rubbing Alcohol or Acetone, the newly repaired joint should appear clean and bright, almost as if it were polished, with no voids or holes.
K. When repairing the bad or "Cold Solder Joints" (as the Electronics industry calls them), it takes really no special skills, just patience, and a place to work(along with the mentioned tools. You've got to be sober, and not stoned, as the soldering tool can be at 700 F, possibly giving the impaired bike owner severe burns.
L. If you have fine muscle control problems, have a friend do the soldering for you. Moving a wire before the electrical joint has properly set up, can create "Cold Joints" too. If possible, practice on the bench top with some scrap wires before attempting repairs on the bike.
M. This information comes from years of missile test cable and equipment assembly, when I worked at General Dynamics/Convair Division in San Diego California, on the BGM-109 Tomahawk and later on the AGM-129 Advanced Cruise Missile. This was from 1983-1993. The company had a week long soldering school, where you learned to solder meeting “Mil-Spec” standards.
1982 GPZ1100 B2
General Dynamics/Convair 1983-1993
GLCM BGM-109 Tomahawk, AGM-129A Advanced Cruise Missile (ACM)
General Dynamics/Convair 1983-1993
GLCM BGM-109 Tomahawk, AGM-129A Advanced Cruise Missile (ACM)
The following user(s) said Thank You: Salder69
Please Log in or Create an account to join the conversation.
- MFolks
-
- Offline
- User
-
Registered
- Posts: 6650
- Thanks: 541
Re: 1983 KZ750 K1 LTD Starting Problems
30 Jul 2012 17:44
Ohm Checking Pickup(Pulsing) Coils
The pickup(Pulsing) coils on the Kawasaki’s with the factory supplied electronic ignition can sometimes fail or become intermittent due to heat and vibration.
1.Trace back from where the pick up coils are mounted,(BEHIND A RIGHT SIDE, CD SIZED COVER) locate and disconnect a small 4 pin connector. Using a multi-meter set on OHMS and range of 2K, check between the BLUE and BLACK wires(#1 and #4 sparkplug wires) for between 360- 540 OHMS.
2.For #2 and #3 sparkplugs the wire colors will be YELLOW and RED, again 360-540 OHMS. The 550’s,650’s & 750’s may be backwards to the Z1’s,Kz900’s,Kz1000’s & Kz1100’s.
3.If the pickup coils are suspect of failing due to heat, they can be stressed using a hair dryer without the need of the engine running.
4.A replacement set of pickup coils might be obtained from a dealer who serviced the police Kawasaki’s.
5. If replacement pickup coils are not available, your next choice would be to order a Dyna “S” electronic ignition system from www.z1enterprises.com It replaces the IC igniter with a smaller module located where the mechanical ignition advancer was mounted.
6. Checking with Kawasaki.com website has determined that the Pick up(pulsing) coils are available . The pulsing coil # is 59026-1133 and replaces the older # 1002, 1012 which were used from the MKII motors until the 2005 P24.
7.Check the small 4 pin connector that the pickup coils connect to for corrosion/loose pins too.
1982 GPZ1100 B2
General Dynamics/Convair 1983-1993
GLCM BGM-109 Tomahawk, AGM-129A Advanced Cruise Missile (ACM)
General Dynamics/Convair 1983-1993
GLCM BGM-109 Tomahawk, AGM-129A Advanced Cruise Missile (ACM)
The following user(s) said Thank You: Salder69
Please Log in or Create an account to join the conversation.
- Salder69
-
Topic Author
- Offline
- User
-
Registered
- Posts: 49
- Thanks: 0
Re: 1983 KZ750 K1 LTD Starting Problems
30 Jul 2012 22:33
Man, I'm glad I came here.
This is all awesome advice, and I'm going to reply to all three of your posts in one reply.
No, I don't have a multimeter, but I can buy one. It's been a long time but I was really into electronics when I was a kid, so I think I can hack that.
Another thing I needed to mention, was that the guy who drove it the majority of its life put an aftermarket fairing on it and didn't do a high quality job.
I will ultimately replace it with a real light, but it looks like a square headlight from a car.
THe only other bike I have ever rebuilt was a 1985 honda rebel, and i got it in similar condition, with a 1920's ford headlight on it.
I checked the fuse box and replaced a fuse, and when I put the jumpers on it, all the lights seem to work. I was shocked at first, but even though the fairing isn't pretty, it works...kind of...which is why the fuse was blown.
But the info on the electrical system is great. If i notice any broken circiuts (and it is obvious where they connect) I will do that. I have my soldering iron on the workbench at my folks house.
Other than that, I get paid tomorrow, and I'm not hurting for money right now, and I expected to need to put roughly $600 into it to get it road ready and look OK.
Getting it started is first. I want to do that as cheap as possible until I dump money into it, but I realize it may be a catch 22, so I'll have to give in and buy a battery and a multimeter for now.
Can a cheapo $20 multimeter from radio shack work? do they even sell real electrical equipment anymore?
And I found a cheap, apparently working, coil on ebay. 24 bucks.
Found a wiring harness for relatively cheap, 99 bucks, unused but old...
I'll dick around with it some more and give it one last chance tonight with some good gas.
I know it is foolish to be suprised by anything that happens in life, but I just thought (and really wanted) this to be a quicker fix...
I wanna ride this thing!
I don't have internet at my house, so I won't be able to read this again until tomorrow morning. Later tonight if I'm lucky.
Please Log in or Create an account to join the conversation.
- Tomolu5
-
- Offline
- User
-
Registered
- Posts: 421
- Thanks: 45
Re: 1983 KZ750 K1 LTD Starting Problems
30 Jul 2012 22:56
All is not lost, 300 bucks usually won't even get you a parts bike. I would do as suggested and go through all the electrical wiring, a harness would likely be a waste. A cheapo multimeter will get the job done for you, unless you are gonna get into complex procedures. Oh yeah, how bout some pics?
Mine:
04 Honda rebel 250(wifes)
04 GSXR 750(bolt on galore)
98 CBR 600F3(filter, pipe, adjustable cam sprokets, dyno tune)
76 KZ900A (LTD gauge pods, crash bars, LTD(style)pipes, dyna coils and ignition,headwork and mild port cleanup by cavanaugh racing, K&N filter pods, heck I dunno.
04 Honda rebel 250(wifes)
04 GSXR 750(bolt on galore)
98 CBR 600F3(filter, pipe, adjustable cam sprokets, dyno tune)
76 KZ900A (LTD gauge pods, crash bars, LTD(style)pipes, dyna coils and ignition,headwork and mild port cleanup by cavanaugh racing, K&N filter pods, heck I dunno.
Please Log in or Create an account to join the conversation.
- 650ed
-

- Offline
- User
-
Registered
- Posts: 15333
- Thanks: 2833
Re: 1983 KZ750 K1 LTD Starting Problems
30 Jul 2012 22:57Salder69 wrote:
......The last time I tried to start it, it never got spark. KEEP IN MIND, i am using my car to jump it. .....
Yikes!! I hope the car engine was not running when you tried this. Doing that can damage the electrics on these bikes. Ed
1977 KZ650-C1 Original Owner - Stock (with additional invisible FIAMM horn)
Please Log in or Create an account to join the conversation.
- Salder69
-
Topic Author
- Offline
- User
-
Registered
- Posts: 49
- Thanks: 0
Re: 1983 KZ750 K1 LTD Starting Problems
31 Jul 2012 12:50
I'll get some pics after I get a battery and some of that cleaner stuff today. It is gonna be a hot one. 110+. I have a nice spot in the shade to work on it. I have the next two days off too, so, with a little miracle, I think I might be able to get her started and taken for a ride.
Wish me luck!
Wish me luck!
Please Log in or Create an account to join the conversation.
- Salder69
-
Topic Author
- Offline
- User
-
Registered
- Posts: 49
- Thanks: 0
Re: 1983 KZ750 K1 LTD Starting Problems
31 Jul 2012 12:51
I had no idea. And yes, it was running. Hope I didn't ruin it. On my way to buy a battery now.
Please Log in or Create an account to join the conversation.
- MFolks
-
- Offline
- User
-
Registered
- Posts: 6650
- Thanks: 541
Re: 1983 KZ750 K1 LTD Starting Problems
31 Jul 2012 16:43
A car's charging system has voltage transients(fluctuations) that a bikes system does not do well with, so if you must jump a bike's battery, have the car's engine off or remove the car's battery.
Be careful too of polarity, as more than a few ridres have had the Positive(+) terminal going to the ground connection, as it should be the Negative(-) going to ground. The usual results,are smoke and burned wiring.
Be careful too of polarity, as more than a few ridres have had the Positive(+) terminal going to the ground connection, as it should be the Negative(-) going to ground. The usual results,are smoke and burned wiring.
1982 GPZ1100 B2
General Dynamics/Convair 1983-1993
GLCM BGM-109 Tomahawk, AGM-129A Advanced Cruise Missile (ACM)
General Dynamics/Convair 1983-1993
GLCM BGM-109 Tomahawk, AGM-129A Advanced Cruise Missile (ACM)
Please Log in or Create an account to join the conversation.
- Salder69
-
Topic Author
- Offline
- User
-
Registered
- Posts: 49
- Thanks: 0
Re: 1983 KZ750 K1 LTD Starting Problems
31 Jul 2012 20:08 - 31 Jul 2012 20:22
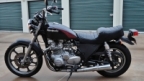
The first picture has some switch or transformer/transducer/trans-whatever on it that go to the ignition coil/plug wires as well as a wire that was originally on the positive terminal of the battery. It looks rusted and I need a new one. Why? because I think it needs to be replaced.
The others are just general pics of the bike so you know what I am working with.
After I checked the posts earlier I went and got some electrical component cleaner from radioshack. The only Deoxit brand they had was specifically for gold plated connectors...
When I started on it, I noticed, like someone had said, one of the fuses LOOKED OK, but pretty much crumbled when I took it out. So, I'll replace ALL fuses, just to be on the safe side (and it is cheap)
well, As far as taking caution when trying to start the bike...
I'll be honest with you, I've tried to jump it with the car a total of 4 times. So, if I'm F***ed, let me know what I need to replace.
Nothing smoked, nothing popped, etc.
When I go pick up the new battery from charging and get new fuses, I'll give it another go. If that
don't work, I guess I'll have to break down and buy the damn multimeter.
Again, Any other advice is very much appreciated. I bought this knowing I'd need to give it some TLC, but damn it, I want to ride it, i want it to fire up so the REAL transformation can begin!
its a good looking bike. I can only imagine what It will look like without the goofy fairing!
OH, one last thing...There are these identical holes, on either side of the head, just behind where the plugs go. Are they supposed to be there? what are they for? just curious
Thanks for all the help
Last edit: 31 Jul 2012 20:22 by Salder69. Reason: adding photos
Please Log in or Create an account to join the conversation.
- MFolks
-
- Offline
- User
-
Registered
- Posts: 6650
- Thanks: 541
Re: 1983 KZ750 K1 LTD Starting Problems
31 Jul 2012 20:26
Can you post a picture? I'm puzzeled on the holes by the sparkplugs,(maybe the previous owner added them for additional cooling).
Many of the riders here have(or going to) change the fuse holders to the type used in cars, as they are more durable. If it's too much work, figure on changing the glass tubed fuses at least once a year.
Fuse And Fuse Holder Designations
1. The older Kawasaki’s use a glass tubed fuse with the designation of AGX 1” long. Most good auto parts stores can get them for you. They are ¼” in diameter.
2. The more common AGC is 1 ¼” long and may not fit the smaller fuse clips. Again, ¼” in diameter.
3. To clean and polish the fuse clips, I use a cotton swab(Q- Tip) and some Brasso metal cleaner or Turtle Wax Chrome Polish. I suppose any good metal polish would work.
4. These fuses can fail internally but look good, only by using a multimeter to check for voltage going through the fuse, or when the fuse is removed for physical inspection for tight end caps & continuity checks,can it be determined if it’s serviceable.
5. Most modern motorcycles are now using the automobile “Blade” style fuse with the designation of ATC or ATO.
6. The reduced sized “Mini” Blade style fuse holder uses the ATM size of fuses.
7. If the fuse and fuse holder overheat, it could soften or anneal the grip of the clip, it might require squeezing the clip to restore the tightness.
8. A list of where to purchase “Blade” style fuses and holders:
www.waytekwire.com order.waytekwire.com/productdetail2/M50/...20%20%20%208%20FUSE/
www.rallylights.com www.rallylights.com/detail.aspx?ID=765
www.delcity.net/store/6!way-fuse-blocks/p_10822.a_1
www.easternbeaver.com/Main/Elec__Product...ers/fuseholders.html
www.autowiringsolutions.com/item.php?item_id=251&category_id=89 (ATO/ATC Fuse Holder)
9. A source for the glass tubed AGX fuses:
www.boatownerswarehouse.com/browse.cfm/2,4986.html
www.napaonline.com/Catalog/Result.aspx?N...&D=AGX&Dk=1&Dp=3&N=0
1982 GPZ1100 B2
General Dynamics/Convair 1983-1993
GLCM BGM-109 Tomahawk, AGM-129A Advanced Cruise Missile (ACM)
General Dynamics/Convair 1983-1993
GLCM BGM-109 Tomahawk, AGM-129A Advanced Cruise Missile (ACM)
Please Log in or Create an account to join the conversation.
Moderators: Street Fighter LTD