- Posts: 87
- Thank you received: 8
dead electrical
- TheFlyingFreemole
-
 Topic Author
- Offline
- User
Less
More
01 Feb 2012 00:27 - 02 Feb 2012 21:52 #501210
by TheFlyingFreemole
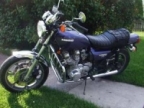
1977 KZ1000 LTD B1 (needs minor fine tuning)
dead electrical was created by TheFlyingFreemole
Hey guys,
So I bought my bike just about a month ago, it's my first ride. It's winter so I haven't been starting/riding the bike daily. I just went out to start the bike yesterday and it wouldn't start. I double checked and the petcock was on, there was gas, kill switch to run, key turned on. Tried to start it using the electric start, but it didn't make a noise. This made me think that my battery was dead. Well, dead battery or no dead battery I figured I could still start my bike like a man. The bike usually starts within the firsts couple kicks, but I kicked for long enough to know that it wasn't going to happen. I tossed the battery on a trickle charge and made sure it was at full charge so I could take a fresh stab at it today.
Today tried hooking the charged battery back up and starting the bike. This time I noticed that the "oil" warning lamp didn't come on when the key was turned. The headlight wouldn't come on either. It was like the bike were sitting there with the key turned to the off position. This made me think and I'm pretty sure that the lights wouldn't come on yesterday either. I checked the forum and there was a similar thread, turned out to be caused by the fuses. Went out and checked the fuses. My 20amp "main" fuse was missing and the wires were connected together, there was also a blown "rear" 10amp fuse. Spent most of the day running around looking for replacement fuses. I finally found some (I hope my bike doesn't try to reject the parts as they are Yamaha brand fuses...). Changed my 10amp and added the 20amp back into play. Patted myself on the shoulder for a job well done, replaced the battery, turn the key, and, NOTHING HAPPENED! I am now leaning to the ignition (keyed portion) not registering that the bike is being turned "on". I haven't pulled apart the ignition unit and examined the wiring yet as I reached my frustration threshold. That's where making beer at home comes in handy... Relax, Don't Worry, Have A Home Brew!
So...
I'm not 100% sure how to get into the ignition... thru the headlamp? remove the tach/speedo?
Should I check anything else before I try to tackle the ignition? I do have a continuity checker.
Anybody else ever run into something like this? Uggh so frustrating. RDWHAHB!
1977 KZ1000 LTD B1 (needs minor fine tuning)
Last edit: 02 Feb 2012 21:52 by TheFlyingFreemole.
Please Log in or Create an account to join the conversation.
- clutch
-
- Offline
- User
- I wish I had a tad more patience to do it better!
Less
More
- Posts: 1051
- Thank you received: 12
01 Feb 2012 00:35 #501212
by clutch
Southern Maryland, USA
1980 KZ250 LTD (traded, but still missed)
1982 KZ750 E3 (Cafe Project) (Dyna-S, Dyna Coils, V&H 4-1, K&N Pods, 6 Sigma Jet Kit, Acewell Computer, Woodcraft Clip-ons, Custom Rewire)
1966 A1 Samurai (Restoration Project)
Wish List:
KZ1000 P (For a "touring" bike)
Z1 (need I...
Replied by clutch on topic dead electrical, ignition to blame
The issue(s) could be in so many different places! Do you have a repair manual? If so, flip to the back and study the ignition circuit on your wiring diagram. I would start by checking the always hot wire on the ignition switch to see if t gets 12v ON or OFF, and then go from there. Most of the wiring is bundled up into the headlight housing, and tends to be a mess after collecting dust and moisture, and whatever else. Actually, I lied...the first thing I would check after the fuses would be to make sure the battery has a good ground to frame, and then go to the ignition. Keep us posted so we can suggest more places to check.
Southern Maryland, USA
1980 KZ250 LTD (traded, but still missed)
1982 KZ750 E3 (Cafe Project) (Dyna-S, Dyna Coils, V&H 4-1, K&N Pods, 6 Sigma Jet Kit, Acewell Computer, Woodcraft Clip-ons, Custom Rewire)
1966 A1 Samurai (Restoration Project)
Wish List:
KZ1000 P (For a "touring" bike)
Z1 (need I...
Please Log in or Create an account to join the conversation.
- ramtough_63
-
- Offline
- User
01 Feb 2012 00:38 #501214
by ramtough_63
1978 KZ1000 A2
Thrown Together To Ride Til Winter
Facebook Page
Free Range Custom Art
1982/83 750R/GPZ
1984 Goldwing 1200 Interstate
1982 Yamahopper QT50
Previous
2 79 HD sporty XLH
02 HD FLSTS Heritage
60's HD Hummer
70's Honda 550 Four
70 Yamaha 100
and various enduros dirtbikes minibikes...
Replied by ramtough_63 on topic dead electrical, ignition to blame
are you checking all this fuse replacing with a test light?
1978 KZ1000 A2
Thrown Together To Ride Til Winter
Facebook Page
Free Range Custom Art
1982/83 750R/GPZ
1984 Goldwing 1200 Interstate
1982 Yamahopper QT50
Previous
2 79 HD sporty XLH
02 HD FLSTS Heritage
60's HD Hummer
70's Honda 550 Four
70 Yamaha 100
and various enduros dirtbikes minibikes...
Please Log in or Create an account to join the conversation.
- clutch
-
- Offline
- User
- I wish I had a tad more patience to do it better!
Less
More
- Posts: 1051
- Thank you received: 12
01 Feb 2012 00:56 #501221
by clutch
Southern Maryland, USA
1980 KZ250 LTD (traded, but still missed)
1982 KZ750 E3 (Cafe Project) (Dyna-S, Dyna Coils, V&H 4-1, K&N Pods, 6 Sigma Jet Kit, Acewell Computer, Woodcraft Clip-ons, Custom Rewire)
1966 A1 Samurai (Restoration Project)
Wish List:
KZ1000 P (For a "touring" bike)
Z1 (need I...
Replied by clutch on topic dead electrical, ignition to blame
Blown lights bulbs could be the culprits in the headlight and oil light too...
Southern Maryland, USA
1980 KZ250 LTD (traded, but still missed)
1982 KZ750 E3 (Cafe Project) (Dyna-S, Dyna Coils, V&H 4-1, K&N Pods, 6 Sigma Jet Kit, Acewell Computer, Woodcraft Clip-ons, Custom Rewire)
1966 A1 Samurai (Restoration Project)
Wish List:
KZ1000 P (For a "touring" bike)
Z1 (need I...
Please Log in or Create an account to join the conversation.
- TheFlyingFreemole
-
Topic Author
- Offline
- User
Less
More
- Posts: 87
- Thank you received: 8
01 Feb 2012 03:44 #501259
by TheFlyingFreemole
1977 KZ1000 LTD B1 (needs minor fine tuning)
Replied by TheFlyingFreemole on topic dead electrical, ignition to blame
up until yesterday, all lights, signals, horn, blinkers, and brake light worked. now none of it works
no, i haven't checked fuses for continuity yet.
battery is grounded but haven't followed to where it grounds out at yet
opened the light panel and the only burned out bulb was the neutral indicator light, which i hope when replaced is still attached to neutral switch
neither high nor low beam work now (they both used to light up)
i'm pretty confident it is not battery, fuse, or bulb related
1977 KZ1000 LTD B1 (needs minor fine tuning)
Please Log in or Create an account to join the conversation.
- Old Man Rock
-
- Offline
- User
Less
More
- Posts: 6224
- Thank you received: 225
01 Feb 2012 07:48 #501267
by Old Man Rock
1976 KZ900-A4
MTC 1075cc.
Camshafts: Kawi GPZ-1100 .375 lift
Head: P&P via Larry Cavanaugh
ZX636 suspension
MIKUNI, RS-34'S...
Kerker 4-1, 1.5" comp baffle.
Dyna-S E.I.
Earls 10 row Oil Cooler
Acewell 2802 Series Speedo/Tach
Innovate LC1 Wideband 02 AFR meter
Phoenix, Az
Replied by Old Man Rock on topic dead electrical, ignition to blame
Unfortunately there's no easy answer in electrical issues... Either open or shorted conductors/components in the wiring. Start with the bare bone basics and go from there...
Based on your info, most likely ignition switch but open wiring/disconnected/corroded/burned up terminations (connectors) are possible as well especially considering fuse had been bypassed.
With volt meter, frame ground properly or black meter probe to battery (-).
Measure for Battery voltage ~ (12Vdc) on good charge.
Measure voltage input to ignition switch, 12Vdc?
Key turned on, ~12Vdc on out put of ignition switch?
Then follow to headlight switch -> headlight bulbs...
Do the same for other components such as horn,
In case you need... Z1, KZ900 and 77-80 KZ1000 95% the same...
Z1 service manual.... Z1/900 OEM Kawi Service Manual
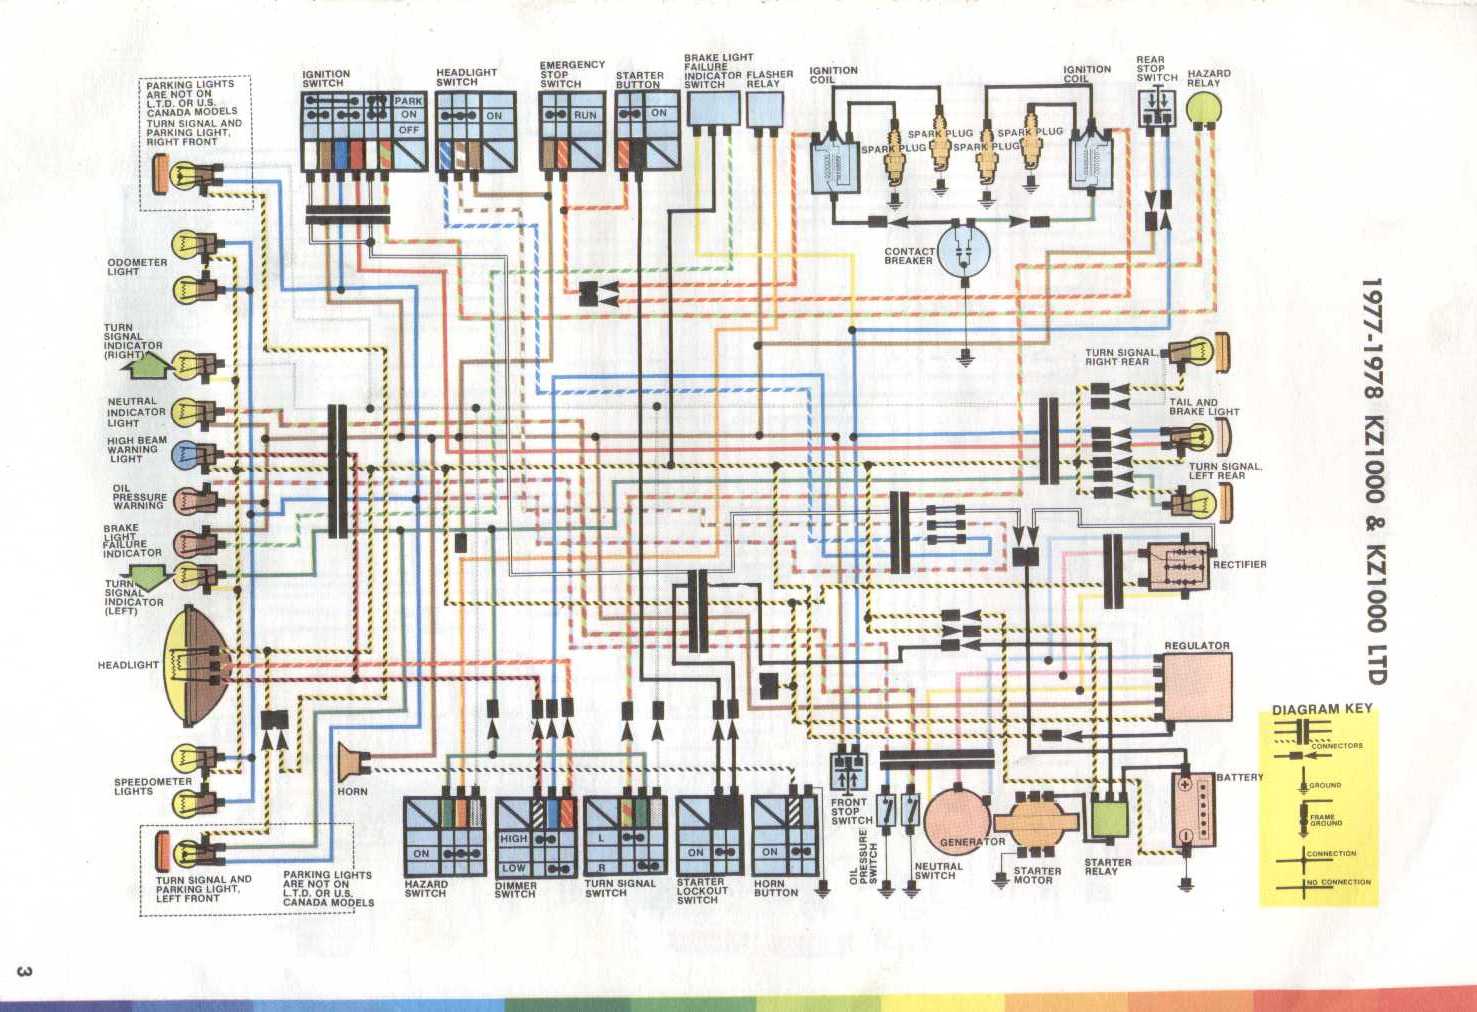
1977/78 KZ1000 Wiring Diagram...
Electrical Testing...
Based on your info, most likely ignition switch but open wiring/disconnected/corroded/burned up terminations (connectors) are possible as well especially considering fuse had been bypassed.
With volt meter, frame ground properly or black meter probe to battery (-).
Measure for Battery voltage ~ (12Vdc) on good charge.
Measure voltage input to ignition switch, 12Vdc?
Key turned on, ~12Vdc on out put of ignition switch?
Then follow to headlight switch -> headlight bulbs...
Do the same for other components such as horn,
In case you need... Z1, KZ900 and 77-80 KZ1000 95% the same...
Z1 service manual.... Z1/900 OEM Kawi Service Manual
1977/78 KZ1000 Wiring Diagram...
Electrical Testing...
1976 KZ900-A4
MTC 1075cc.
Camshafts: Kawi GPZ-1100 .375 lift
Head: P&P via Larry Cavanaugh
ZX636 suspension
MIKUNI, RS-34'S...
Kerker 4-1, 1.5" comp baffle.
Dyna-S E.I.
Earls 10 row Oil Cooler
Acewell 2802 Series Speedo/Tach
Innovate LC1 Wideband 02 AFR meter
Phoenix, Az
Please Log in or Create an account to join the conversation.
- Old Man Rock
-
- Offline
- User
Less
More
- Posts: 6224
- Thank you received: 225
01 Feb 2012 08:38 - 01 Feb 2012 08:42 #501271
by Old Man Rock
1976 KZ900-A4
MTC 1075cc.
Camshafts: Kawi GPZ-1100 .375 lift
Head: P&P via Larry Cavanaugh
ZX636 suspension
MIKUNI, RS-34'S...
Kerker 4-1, 1.5" comp baffle.
Dyna-S E.I.
Earls 10 row Oil Cooler
Acewell 2802 Series Speedo/Tach
Innovate LC1 Wideband 02 AFR meter
Phoenix, Az
Replied by Old Man Rock on topic dead electrical, ignition to blame
Maybe this will help, bare bones with exception of leaving the horn in to test ignition switch....
Okay, emergency stop switch isn't required as well and can be bypassed....
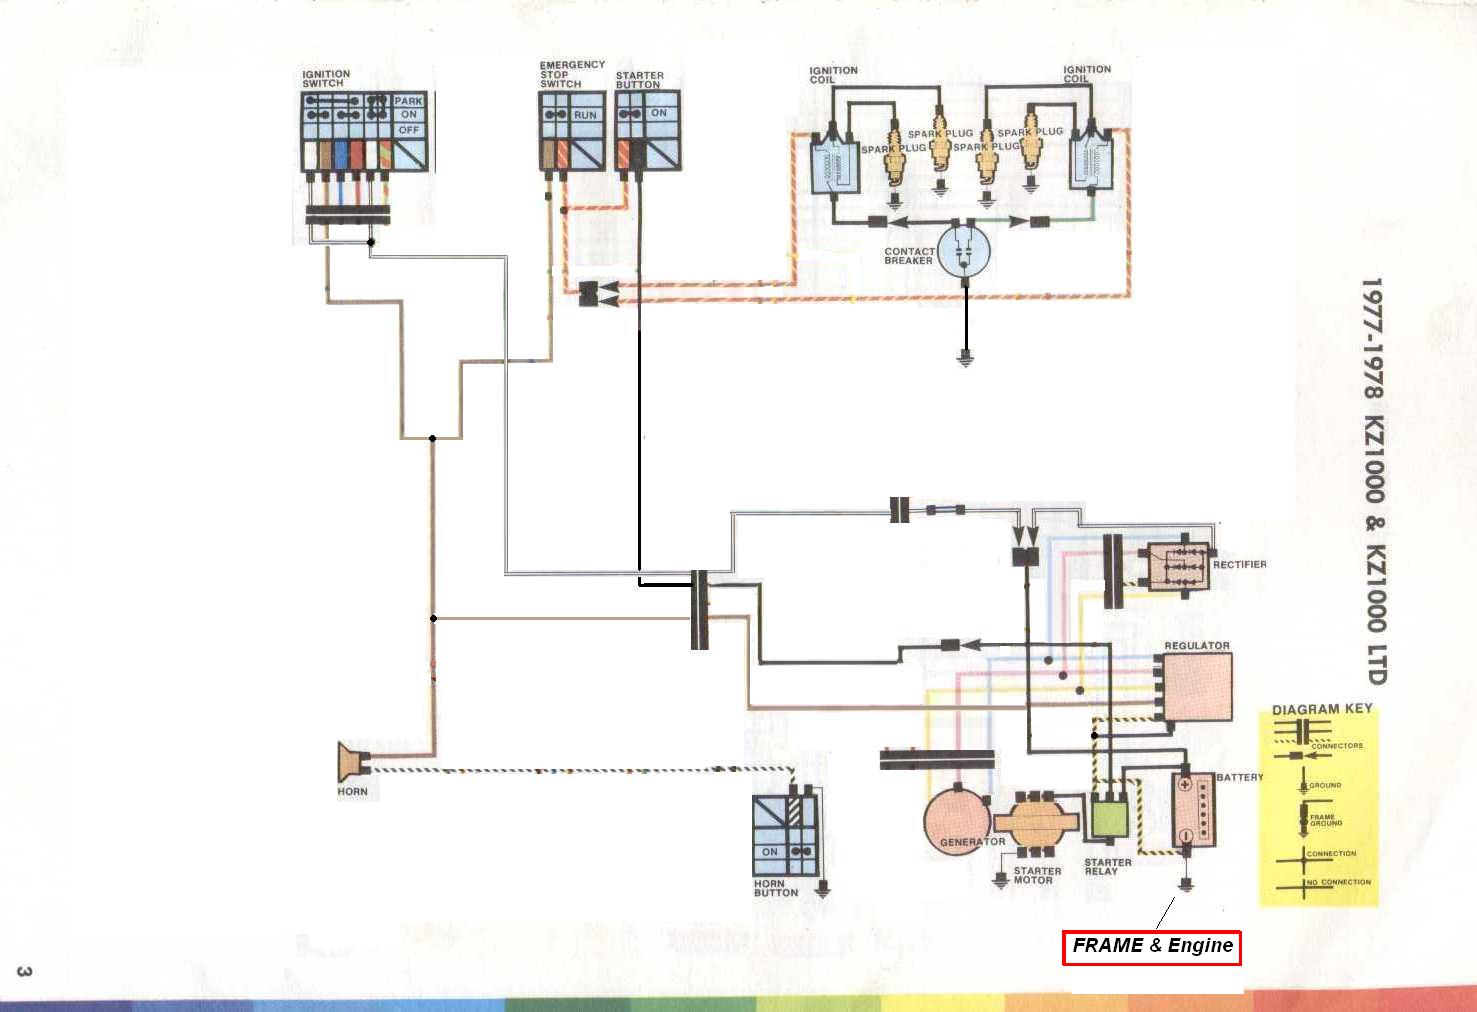
Okay, emergency stop switch isn't required as well and can be bypassed....
1976 KZ900-A4
MTC 1075cc.
Camshafts: Kawi GPZ-1100 .375 lift
Head: P&P via Larry Cavanaugh
ZX636 suspension
MIKUNI, RS-34'S...
Kerker 4-1, 1.5" comp baffle.
Dyna-S E.I.
Earls 10 row Oil Cooler
Acewell 2802 Series Speedo/Tach
Innovate LC1 Wideband 02 AFR meter
Phoenix, Az
Last edit: 01 Feb 2012 08:42 by Old Man Rock.
Please Log in or Create an account to join the conversation.
- MFolks
-

- Offline
- User
Less
More
- Posts: 6650
- Thank you received: 540
01 Feb 2012 13:18 #501311
by MFolks
1982 GPZ1100 B2
General Dynamics/Convair 1983-1993
GLCM BGM-109 Tomahawk, AGM-129A Advanced Cruise Missile (ACM)
Replied by MFolks on topic dead electrical, ignition to blame
This is another method of troubleshooting electrical problems in motorcycles:
The Dreaded Shorting/Intermittent Electrical Problem!
Here is the most basic method I know(Taken from www.kzrider.com by member Patton)
1. Charge your battery and have it load tested if you can. The floating ball hydrometer can be used to check the specific gravity of the charged cells in the battery.
2. Disconnect the Black lead from the (-) Battery terminal... or Red from the (+) Battery terminal, it does not matter which one. Just 1, not both!
3. Connect one of the following test setups in series with the Battery terminal and lead:
3.1 A 12 V light bulb,
3.2 A 12 V test light,
3.3 A 12 V test buzzer or,
3.4 A 12 V horn... you get the idea.
4. With the Ignition Switch OFF, go through your harness and wiggle the wires while looking/listening for the test setup to go on/start buzzing.
5.With the Ignition Switch ON, repeat the test except this time the looking/listening for the test setup to go off/stop buzzing.
6. Be prepared to open the Ignition switch and check/test for solder joint failure and or circuit board micro breaks (don't ask how I know this ).
7. Be prepared to pull the wires out of the Head Light to test for failures at or near the grommet.
8. Be prepared to open the harness at or near the Steering Neck for failures. This is where wires tend to exhibit fatigue due to repetitive movement.
9. Be prepared to open the left and right switch gear to search for rust and or broken parts. CAUTION: watch out for flying springs, ball bearings and stuff. Do indoors on White sheet (again don't ask ).
10. Be prepared to follow the heavy gauge wire from the Starter Solenoid (Relay) to the starter for bare wire exposure. Especially near bends and grommets.
11. If you can reproduce the fault symptom your are pretty much home free. Be prepare to find and repair/replace any internal wire breaks, insulation break downs, exposed wires, rubber grommet failures, etc. Often, shrink tubing will solve the problem temporarily until something better can be done.
12. I use a very good electrical contact cleaner/preservative called De-oxit made by Caig Labs in San Diego Ca. Their website is www.deoxit.com It can be purchased at Radio Shack and any other electronic supply store. I use it on all of my motorcycle’s electrical connectors , in my home entertainment center’s stereo patch cords and cordless phones charging cradles.
1982 GPZ1100 B2
General Dynamics/Convair 1983-1993
GLCM BGM-109 Tomahawk, AGM-129A Advanced Cruise Missile (ACM)
Please Log in or Create an account to join the conversation.
- MFolks
-
- Offline
- User
Less
More
- Posts: 6650
- Thank you received: 540
01 Feb 2012 13:19 #501312
by MFolks
1982 GPZ1100 B2
General Dynamics/Convair 1983-1993
GLCM BGM-109 Tomahawk, AGM-129A Advanced Cruise Missile (ACM)
Replied by MFolks on topic dead electrical, ignition to blame
Fuse And Fuse Holder Designations
1. The older Kawasaki’s use a glass tubed fuse with the designation of AGX 1” long. Most good auto parts stores can get them for you. They are ¼” in diameter.
2. The more common AGC is 1 ¼” long and may not fit the smaller fuse clips. Again, ¼” in diameter.
3. To clean and polish the fuse clips, I use a cotton swab(Q- Tip) and some Brasso metal cleaner or Turtle Wax Chrome Polish. I suppose any good metal polish would work.
4. These fuses can fail internally but look good, only by using a multimeter to check for voltage going through the fuse, or when the fuse is removed for physical inspection for tight end caps & continuity checks,can it be determined if it’s serviceable.
5. Most modern motorcycles are now using the automobile “Blade” style fuse with the designation of ATC or ATO.
6. The reduced sized “Mini” Blade style fuse holder uses the ATM size of fuses.
7. If the fuse and fuse holder overheat, it could soften or anneal the grip of the clip, it might require squeezing the clip to restore the tightness.
8. A list of where to purchase “Blade” style fuses and holders:
www.waytekwire.com order.waytekwire.com/productdetail2/M50/...20%20%20%208%20FUSE/
www.rallylights.com www.rallylights.com/detail.aspx?ID=765
www.delcity.net/store/6!way-fuse-blocks/p_10822.a_1
www.easternbeaver.com/Main/Elec__Product...ers/fuseholders.html
www.autowiringsolutions.com/item.php?item_id=251&category_id=89 (ATO/ATC Fuse Holder)
9. A source for the glass tubed AGX fuses:
www.boatownerswarehouse.com/browse.cfm/2,4986.html
www.napaonline.com/Catalog/Result.aspx?N...&D=AGX&Dk=1&Dp=3&N=0
1982 GPZ1100 B2
General Dynamics/Convair 1983-1993
GLCM BGM-109 Tomahawk, AGM-129A Advanced Cruise Missile (ACM)
Please Log in or Create an account to join the conversation.
- TheFlyingFreemole
-
Topic Author
- Offline
- User
Less
More
- Posts: 87
- Thank you received: 8
02 Feb 2012 15:38 #501554
by TheFlyingFreemole
1977 KZ1000 LTD B1 (needs minor fine tuning)
Replied by TheFlyingFreemole on topic dead electrical, ignition to blame
I used a multimeter and checked the battery today. 11.9V
Then I went into the fuse box and checked all the fuses for resistance. The fuses (newly replaced) all measured near zero resistance found from fuse end to end. Ok, the fuses are good.
Then checked resistance from fuse holder to fuse holder. The front and rear 10 amp fuse wiring measured ok. On the main 20 amp fuse I was unable to get the resistance to drop from 1 (1 signifying no conductivity). This was the set of wires that was 'hardwired' together without a fuse before.
Took each fuse holder and bent it so it would hold the fuse more snug but that didn't do anything.
Frustrated I took the two fuse holders and put them back together. Pulled out my key, and sure as shit, hazards and oil lamp came on. Huh? Turned off and on key several times and it worked as though it should.
Pulled the clamps apart, put the fuse back in. Turn the key, nothing. Hardwired fuse holders back together, works again.
So the fuse is good, the bike electrical works without the fuse, but the system won't run with a fuse in place. Am I missing something here?
1977 KZ1000 LTD B1 (needs minor fine tuning)
Please Log in or Create an account to join the conversation.
- TheFlyingFreemole
-
Topic Author
- Offline
- User
Less
More
- Posts: 87
- Thank you received: 8
02 Feb 2012 15:42 #501555
by TheFlyingFreemole
1977 KZ1000 LTD B1 (needs minor fine tuning)
Replied by TheFlyingFreemole on topic dead electrical, ignition to blame
oh, and before i made this discovery I pulled off the headlight, tach and speedo cover, and checked the ignition. All wires looked ok, none were burned or cracked looking. All solder points were solid and attached to wires. I'm thanking the high heavens that I don't have to do anything other than clean things up and attempt to get my wiring back into the headlight harness. I was fretting having to change out the key(s).
1977 KZ1000 LTD B1 (needs minor fine tuning)
Please Log in or Create an account to join the conversation.