
Blowing 20a Main fuse.
- xbmxxx
-
 Topic Author
- Offline
- User
-

Registered
- Posts: 83
- Thanks: 0
Blowing 20a Main fuse.
06 Nov 2011 23:48
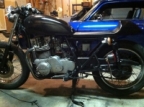
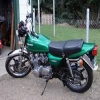
76 KZ750.
I could use some help finding my short.
My bike doesnt have the side panel, most all the electrical components are under the seat now.
One day I was riding my bike and the main fuse blew. I hotwired across it to get home (very bad idea) and ended up melting the white wire with the main fuse in it.
Replaced all damaged parts of the wire, replaced the burnt glass fuse with a ATO 20a blade fuse, replaced regulator with a kawi part and the rec with an oregon cycle parts unit.
Bike ran long enough to get me around the block enough times to get me confident enough to load it in the truck and take it to TX to ride with some friends for the weekend. Unload it, ride it about 30 miles and bam, fuse blows again. Have a friend bring my truck and some fuses. Put a new one in, as soon as the key is turned it blows.
Get it back home, and now the fuse will blow the second I turn the key. Pull the seat and tank, fuse doesn't blow with key on. put them back on, bike starts, fuse blows after a few minutes, then goes back to blowing the instant you turn the key.
Is there a flow chart of how to diagnose this problem or anything? I am on the verge of making a completely new harness from scratch.
76 KZ750B Twin
Please Log in or Create an account to join the conversation.
- MFolks
-

- Offline
- User
-
Registered
- Posts: 6650
- Thanks: 541
Re: Blowing 20a Main fuse.
06 Nov 2011 23:53
The Dreaded Shorting/Intermittent Electrical Problem!
Here is the most basic method I know(Taken from www.kzrider.com by member Patton)
1. Charge your battery and have it load tested if you can. The floating ball hydrometer can be used to check the specific gravity of the charged cells in the battery.
2. Disconnect the Black lead from the (-) Battery terminal... or Red from the (+) Battery terminal, it does not matter which one. Just 1, not both!
3. Connect one of the following test setups in series with the Battery terminal and lead:
3.1 A 12 V light bulb,
3.2 A 12 V test light,
3.3 A 12 V test buzzer or,
3.4 A 12 V horn... you get the idea.
4. With the Ignition Switch OFF, go through your harness and wiggle the wires while looking/listening for the test setup to go on/start buzzing.
5.With the Ignition Switch ON, repeat the test except this time the looking/listening for the test setup to go off/stop buzzing.
6. Be prepared to open the Ignition switch and check/test for solder joint failure and or circuit board micro breaks (don't ask how I know this ).
7. Be prepared to pull the wires out of the Head Light to test for failures at or near the grommet.
8. Be prepared to open the harness at or near the Steering Neck for failures. This is where wires tend to exhibit fatigue due to repetitive movement.
9. Be prepared to open the left and right switch gear to search for rust and or broken parts. CAUTION: watch out for flying springs, ball bearings and stuff. Do indoors on White sheet (again don't ask ).
10. Be prepared to follow the heavy gauge wire from the Starter Solenoid (Relay) to the starter for bare wire exposure. Especially near bends and grommets.
11. If you can reproduce the fault symptom your are pretty much home free. Be prepare to find and repair/replace any internal wire breaks, insulation break downs, exposed wires, rubber grommet failures, etc. Often, shrink tubing will solve the problem temporarily until something better can be done.
12. I use a very good electrical contact cleaner/preservative called De-oxit made by Caig Labs in San Diego Ca. Their website is www.deoxit.com It can be purchased at Radio Shack and any other electronic supply store. I use it on all of my motorcycle’s electrical connectors , in my home entertainment center’s stereo patch cords and cordless phones charging cradles.
13. Look inside the left and right handlebar switch pods as on some of the older Kawasaki's the soldered electrical connections may be crumbling requiring re-soldering.
1982 GPZ1100 B2
General Dynamics/Convair 1983-1993
GLCM BGM-109 Tomahawk, AGM-129A Advanced Cruise Missile (ACM)
General Dynamics/Convair 1983-1993
GLCM BGM-109 Tomahawk, AGM-129A Advanced Cruise Missile (ACM)
Please Log in or Create an account to join the conversation.
- Motor Head
-
- Offline
- User
-
Registered
- FIX UP YOUR BIKE RIGHT AND CHEAP
- Posts: 5137
- Thanks: 393
Re: Blowing 20a Main fuse.
06 Nov 2011 23:56
From your post it sounds very much like where you have moved the wiring components under the seat, has a short. Wire rubbed through, connector touching ground, etc. If it happens as soon as key is turned to on, then take out all fuses, then try key on. If it still blows, then it is on the leg from from the ignition switch back to fuse panel. Did you move the fuse panel to?
1982 KZ1000LTD K2 Vance & Hines 4-1 ACCEL COILS Added Vetter fairing & Bags. FOX Racing rear Shocks, Braced Swing-arm, Fork Brace, Progressive Fork Springs RT Gold Emulators, APE Valve Springs, 1166 Big Bore kit, RS34's, GPZ cams.
1980 KZ550LTD C1 Stock SOLD Miss it
1979 MAZDA RX7 in the works, 13B...
1980 KZ550LTD C1 Stock SOLD Miss it
1979 MAZDA RX7 in the works, 13B...
Please Log in or Create an account to join the conversation.
- xbmxxx
-
Topic Author
- Offline
- User
-
Registered
- Posts: 83
- Thanks: 0
Re: Blowing 20a Main fuse.
07 Nov 2011 00:02
When the seat is off and the fuse isn't blowing, ive gone through and wiggled, pinched, bent every inch of the harness and it doesnt cause it to blow. right now the seat pan is off the and whole harness is hanging off the side of the bike, and it is still blowing.
I should also mention that the insturment cluster is no longer there, and where I have the ign switch right now is grounded. I tested the switch as per the shop manual, and all tests good, so I think its ok that the case of it is touching frame.
I should also mention that the insturment cluster is no longer there, and where I have the ign switch right now is grounded. I tested the switch as per the shop manual, and all tests good, so I think its ok that the case of it is touching frame.
76 KZ750B Twin
Please Log in or Create an account to join the conversation.
- bountyhunter
-

- Offline
- User
-
Registered
- Posts: 7245
- Thanks: 338
Re: Blowing 20a Main fuse.
07 Nov 2011 00:33
Look for wires getting squashed, rubbed on, turning corners, etc. You have a hard short to ground to blow a 20 fuse.
1979 KZ-750 Twin
Please Log in or Create an account to join the conversation.
- xbmxxx
-
Topic Author
- Offline
- User
-
Registered
- Posts: 83
- Thanks: 0
Re: Blowing 20a Main fuse.
07 Nov 2011 00:42
I just disconnected the LH side controls, the healdlight, and the flasher. Fuse didnt blow right away, started, then blew within three seconds.
76 KZ750B Twin
Please Log in or Create an account to join the conversation.
- Motor Head
-
- Offline
- User
-
Registered
- FIX UP YOUR BIKE RIGHT AND CHEAP
- Posts: 5137
- Thanks: 393
Re: Blowing 20a Main fuse.
07 Nov 2011 01:18
Did you read through Mfolks post? If you use a test light or buzzer, in loop to the battery, up the circuit. Then when you wiggle the light/ buzzer will show you the short. This will only put power through the bulb/ buzzer, but always connect with a in-line fuse for safety.
1982 KZ1000LTD K2 Vance & Hines 4-1 ACCEL COILS Added Vetter fairing & Bags. FOX Racing rear Shocks, Braced Swing-arm, Fork Brace, Progressive Fork Springs RT Gold Emulators, APE Valve Springs, 1166 Big Bore kit, RS34's, GPZ cams.
1980 KZ550LTD C1 Stock SOLD Miss it
1979 MAZDA RX7 in the works, 13B...
1980 KZ550LTD C1 Stock SOLD Miss it
1979 MAZDA RX7 in the works, 13B...
Please Log in or Create an account to join the conversation.
- xbmxxx
-
Topic Author
- Offline
- User
-
Registered
- Posts: 83
- Thanks: 0
Re: Blowing 20a Main fuse.
07 Nov 2011 21:58MFolks wrote: The Dreaded Shorting/Intermittent Electrical Problem!
Here is the most basic method I know(Taken from www.kzrider.com by member Patton)
1. Charge your battery and have it load tested if you can. The floating ball hydrometer can be used to check the specific gravity of the charged cells in the battery.
2. Disconnect the Black lead from the (-) Battery terminal... or Red from the (+) Battery terminal, it does not matter which one. Just 1, not both!
3. Connect one of the following test setups in series with the Battery terminal and lead:
3.1 A 12 V light bulb,
3.2 A 12 V test light,
3.3 A 12 V test buzzer or,
3.4 A 12 V horn... you get the idea.
4. With the Ignition Switch OFF, go through your harness and wiggle the wires while looking/listening for the test setup to go on/start buzzing.
5.With the Ignition Switch ON, repeat the test except this time the looking/listening for the test setup to go off/stop buzzing.
6. Be prepared to open the Ignition switch and check/test for solder joint failure and or circuit board micro breaks (don't ask how I know this ).
7. Be prepared to pull the wires out of the Head Light to test for failures at or near the grommet.
8. Be prepared to open the harness at or near the Steering Neck for failures. This is where wires tend to exhibit fatigue due to repetitive movement.
9. Be prepared to open the left and right switch gear to search for rust and or broken parts. CAUTION: watch out for flying springs, ball bearings and stuff. Do indoors on White sheet (again don't ask ).
10. Be prepared to follow the heavy gauge wire from the Starter Solenoid (Relay) to the starter for bare wire exposure. Especially near bends and grommets.
11. If you can reproduce the fault symptom your are pretty much home free. Be prepare to find and repair/replace any internal wire breaks, insulation break downs, exposed wires, rubber grommet failures, etc. Often, shrink tubing will solve the problem temporarily until something better can be done.
12. I use a very good electrical contact cleaner/preservative called De-oxit made by Caig Labs in San Diego Ca. Their website is www.deoxit.com It can be purchased at Radio Shack and any other electronic supply store. I use it on all of my motorcycle’s electrical connectors , in my home entertainment center’s stereo patch cords and cordless phones charging cradles.
13. Look inside the left and right handlebar switch pods as on some of the older Kawasaki's the soldered electrical connections may be crumbling requiring re-soldering.
I missed this somehow before, thanks for all the info! I'll run out and give this a try after dinner.
76 KZ750B Twin
Please Log in or Create an account to join the conversation.
- clutch
-

- Offline
- User
-
Registered
- I wish I had a tad more patience to do it better!
- Posts: 1051
- Thanks: 12
Re: Blowing 20a Main fuse.
07 Nov 2011 23:04xbmxxx wrote:MFolks wrote: The Dreaded Shorting/Intermittent Electrical Problem!
Here is the most basic method I know(Taken from www.kzrider.com by member Patton)
1. Charge your battery and have it load tested if you can. The floating ball hydrometer can be used to check the specific gravity of the charged cells in the battery.
2. Disconnect the Black lead from the (-) Battery terminal... or Red from the (+) Battery terminal, it does not matter which one. Just 1, not both!
3. Connect one of the following test setups in series with the Battery terminal and lead:
3.1 A 12 V light bulb,
3.2 A 12 V test light,
3.3 A 12 V test buzzer or,
3.4 A 12 V horn... you get the idea.
4. With the Ignition Switch OFF, go through your harness and wiggle the wires while looking/listening for the test setup to go on/start buzzing.
5.With the Ignition Switch ON, repeat the test except this time the looking/listening for the test setup to go off/stop buzzing.
6. Be prepared to open the Ignition switch and check/test for solder joint failure and or circuit board micro breaks (don't ask how I know this ).
7. Be prepared to pull the wires out of the Head Light to test for failures at or near the grommet.
8. Be prepared to open the harness at or near the Steering Neck for failures. This is where wires tend to exhibit fatigue due to repetitive movement.
9. Be prepared to open the left and right switch gear to search for rust and or broken parts. CAUTION: watch out for flying springs, ball bearings and stuff. Do indoors on White sheet (again don't ask ).
10. Be prepared to follow the heavy gauge wire from the Starter Solenoid (Relay) to the starter for bare wire exposure. Especially near bends and grommets.
11. If you can reproduce the fault symptom your are pretty much home free. Be prepare to find and repair/replace any internal wire breaks, insulation break downs, exposed wires, rubber grommet failures, etc. Often, shrink tubing will solve the problem temporarily until something better can be done.
12. I use a very good electrical contact cleaner/preservative called De-oxit made by Caig Labs in San Diego Ca. Their website is www.deoxit.com It can be purchased at Radio Shack and any other electronic supply store. I use it on all of my motorcycle’s electrical connectors , in my home entertainment center’s stereo patch cords and cordless phones charging cradles.
13. Look inside the left and right handlebar switch pods as on some of the older Kawasaki's the soldered electrical connections may be crumbling requiring re-soldering.
I missed this somehow before, thanks for all the info! I'll run out and give this a try after dinner.
This is definitely a good method to hunt down shorts. IMO your short may be near the seat, since you said the fuse does not blow with the seat off. I would start the testing there.
")
Southern Maryland, USA
1980 KZ250 LTD (traded, but still missed)
1982 KZ750 E3 (Cafe Project) (Dyna-S, Dyna Coils, V&H 4-1, K&N Pods, 6 Sigma Jet Kit, Acewell Computer, Woodcraft Clip-ons, Custom Rewire)
1966 A1 Samurai (Restoration Project)
Wish List:
KZ1000 P (For a "touring" bike)
Z1 (need I...
1980 KZ250 LTD (traded, but still missed)
1982 KZ750 E3 (Cafe Project) (Dyna-S, Dyna Coils, V&H 4-1, K&N Pods, 6 Sigma Jet Kit, Acewell Computer, Woodcraft Clip-ons, Custom Rewire)
1966 A1 Samurai (Restoration Project)
Wish List:
KZ1000 P (For a "touring" bike)
Z1 (need I...
Please Log in or Create an account to join the conversation.
- RonKZ650
-
- Offline
- User
-
Registered
- Posts: 3713
- Thanks: 250
Re: Blowing 20a Main fuse.
08 Nov 2011 01:17
You can do the same procedure even more simpfified by just removing the 20a fuse and using your test lamp, buzzer ect right at the fuse terminals. I tracked down my short by wiring an old headlight across the fuse terminals and a meter with min/max capability set to DC volts across the headlight. Turned on the key and the headlight lights to a dim glow and a certain DC volt reading. Enable the min/max on the meter and start wiggling wires. The moment the short happens the headlight will light bright and the meter buzz indicating a new max volt. My short was in the headlight bucket, wiring had worn through the insulation.
321,000 miles on KZ's that I can remember. Not going to see any more.
Please Log in or Create an account to join the conversation.
Moderators: Street Fighter LTD