
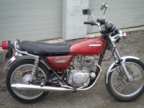
1978 kz200 no electrical power at all
- csmart30
-
 Topic Author
- Offline
- User
-

Registered
- Posts: 7
- Thanks: 0
1978 kz200 no electrical power at all
28 Apr 2011 04:04
Sorry if this is a repeat post or there is a step guide to find out my problem, but i've searched for the past hour and haven't been able to find one like mine.
I have a 1978 KZ200 that I got from my dad that i'm trying to fix up, I got a brand new battery, filled it properly (fill, wait an hour, fill again, charge to full) I put it in the bike, hooked it up, was very dissapointed when I turned the key and there was no power at all no lights, no gauges, no nothing. I checked all the connectors, fuses, wires, I can't find anything that would cause absolutely no power.
Anyone have any ideas what it could be? (I'm not incompetent mechanically by any means, I'm just stumped)
Any other tips to get me started? I've already drained and cleaned out the tank, dipped and cleaned the carb, got a new plug and obviously got a new battery.
Please Log in or Create an account to join the conversation.
- Motor Head
-
- Offline
- User
-
Registered
- FIX UP YOUR BIKE RIGHT AND CHEAP
- Posts: 5137
- Thanks: 393
Re: 1978 kz200 no electrical power at all
28 Apr 2011 09:34 - 28 Apr 2011 09:36
Good to here you followed the correct battery charging procedure, that should ensure the battery will work correctly. Now do you have a Multimeter/ Volt meter/ or test light? Start at the battery and follow the wiring from the positive post, it will go to the fuse block. First through the Main fuse then up to the Ignition key switch then back to your fuse panel. Then through another fuse for the ignition, then up to you coil, lights, etc. Make sure that all red/ white wires are hooked up at the battery and Regulator, then all Black/ yellow wires with a ring end should be bolted to the frame at a clean paint free connection.
There is a KZ200 manual available for download on KZR, I'll add the link once I find it.
Here it is, thanks to member loudhvx, home.comcast.net/~loudgpz/KawKZ200Man.pdf
There is a KZ200 manual available for download on KZR, I'll add the link once I find it.
Here it is, thanks to member loudhvx, home.comcast.net/~loudgpz/KawKZ200Man.pdf
1982 KZ1000LTD K2 Vance & Hines 4-1 ACCEL COILS Added Vetter fairing & Bags. FOX Racing rear Shocks, Braced Swing-arm, Fork Brace, Progressive Fork Springs RT Gold Emulators, APE Valve Springs, 1166 Big Bore kit, RS34's, GPZ cams.
1980 KZ550LTD C1 Stock SOLD Miss it
1979 MAZDA RX7 in the works, 13B...
1980 KZ550LTD C1 Stock SOLD Miss it
1979 MAZDA RX7 in the works, 13B...
Last edit: 28 Apr 2011 09:36 by Motor Head.
Please Log in or Create an account to join the conversation.
- loudhvx
-

- Offline
- KZr Legend
-

Registered
- Posts: 10864
- Thanks: 1619
Re: 1978 kz200 no electrical power at all
28 Apr 2011 11:43 - 28 Apr 2011 11:46
Here's the link MotorHead posted.
This one is for a 1976 KZ200, but it may still be of use to you.
1976 kz 200 manual
This one is for a 1976 KZ200, but it may still be of use to you.
1976 kz 200 manual
1981 KZ550 D1 gpz.
Kz550 valve train warning.
Other links.
Kz550 valve train warning.
Other links.
Last edit: 28 Apr 2011 11:46 by loudhvx.
Please Log in or Create an account to join the conversation.
- 650ed
-

- Offline
- User
-
Registered
- Posts: 15333
- Thanks: 2833
Re: 1978 kz200 no electrical power at all
28 Apr 2011 14:28
How did you check the fuses? If they are the original glass tube type use a meter to check continuity from one end of the fuse holder to the other. The glass fuses can sometimes fail where the filiment attaches to the inside of the tube end, so even though the fuse looks fine (because it did not blow) it still won't carry current. Also, be sure to check the ground cable from battery to engine to ensure both ends make a good connection. Ed
1977 KZ650-C1 Original Owner - Stock (with additional invisible FIAMM horn)
Please Log in or Create an account to join the conversation.
- csmart30
-
Topic Author
- Offline
- User
-
Registered
- Posts: 7
- Thanks: 0
Re: 1978 kz200 no electrical power at all
29 Apr 2011 02:54 - 29 Apr 2011 04:05
Thanks for the input, so I went and picked up a multimeter, I have power past the main fuse,checked both sides, but I can't find where it stops yet. Also thanks for the link to the manual, but for some reason its not loading up on my computer, hopefully it does soon (Finally got it to open up). Anyways I traced the wire from the main fuse up to the front of the bike and couldn't find a place to test the voltage, I'll take a look again tomorrow because daylight ran out.
Thanks for the responses guys, much appreciated.
Thanks for the responses guys, much appreciated.
Last edit: 29 Apr 2011 04:05 by csmart30.
Please Log in or Create an account to join the conversation.
- MFolks
-

- Offline
- User
-
Registered
- Posts: 6650
- Thanks: 541
Re: 1978 kz200 no electrical power at all
29 Apr 2011 03:10
On most bikes, the Negative(-) battery post goes to an engine mounting bolt, so testing for voltage means the Black meter lead can clip to a good frame ground or the Negative battery terminal.
The red meter lead is the one to be used to probe where voltage is and isn't. Put the meter on VDC(Volts, Direct Current) range of 20, this is the usual range for a 12 volt battery.
When doing a continuity check of fuses, I remove the fuse from the clip, and visually inspect the element inside the glass tube for signs of breaking while trying to see if the metal end caps are secure. If the fuse looks good, then I test it with the multimeter set on the lowest range in the ohm settings. Some meters have a built in buzzer/beeper for continuity checks.
Never test for voltages with the meter set on ohms as it can destroy the meter. In continuity checking, the meter is using an internal battery for measurement. Applying enternal voltage can cause meters to potentially catch fire.
1982 GPZ1100 B2
General Dynamics/Convair 1983-1993
GLCM BGM-109 Tomahawk, AGM-129A Advanced Cruise Missile (ACM)
General Dynamics/Convair 1983-1993
GLCM BGM-109 Tomahawk, AGM-129A Advanced Cruise Missile (ACM)
Please Log in or Create an account to join the conversation.
- Motor Head
-
- Offline
- User
-
Registered
- FIX UP YOUR BIKE RIGHT AND CHEAP
- Posts: 5137
- Thanks: 393
Re: 1978 kz200 no electrical power at all
29 Apr 2011 10:07
If your hot, 12v, across the main fuse then turn on the Ignition switch. Then check to see that you have power coming back to the fuse panel, and at the ignition coil under the fuel tank, probably a red/ yellow at the coil.
1982 KZ1000LTD K2 Vance & Hines 4-1 ACCEL COILS Added Vetter fairing & Bags. FOX Racing rear Shocks, Braced Swing-arm, Fork Brace, Progressive Fork Springs RT Gold Emulators, APE Valve Springs, 1166 Big Bore kit, RS34's, GPZ cams.
1980 KZ550LTD C1 Stock SOLD Miss it
1979 MAZDA RX7 in the works, 13B...
1980 KZ550LTD C1 Stock SOLD Miss it
1979 MAZDA RX7 in the works, 13B...
Please Log in or Create an account to join the conversation.
- csmart30
-
Topic Author
- Offline
- User
-
Registered
- Posts: 7
- Thanks: 0
Re: 1978 kz200 no electrical power at all
30 Apr 2011 02:42
So as it turns out after cleaning some of the connections, I now have power through all the fuses, but still no lights, or power to any of the switches. I did notice there was a loss of one volt from the ignition back to the fuse box, which I can't find the spot where the loss is coming from, but maybe this is normal?? I haven't dealt a whole lot with electrical issues I'm more of a mechanical guy, so this is all pretty new to me. So is a 1 volt loss normal?
Please Log in or Create an account to join the conversation.
- bountyhunter
-

- Offline
- User
-
Registered
- Posts: 7245
- Thanks: 338
Re: 1978 kz200 no electrical power at all
30 Apr 2011 03:04
Here's how I test a fuse: if it's more than a year old, I chuck it.
If it is stone dead, check ignition switch, ground lugs, and harness connections. Always check fuse box connections as they tend to oxidize over time.
If it is stone dead, check ignition switch, ground lugs, and harness connections. Always check fuse box connections as they tend to oxidize over time.
1979 KZ-750 Twin
Please Log in or Create an account to join the conversation.
- MFolks
-
- Offline
- User
-
Registered
- Posts: 6650
- Thanks: 541
Re: 1978 kz200 no electrical power at all
30 Apr 2011 03:09
Cleaning Motorcycle Electrics
Get some of the De-Oxit electrical contact cleaner and figure on spending a good day going from the front of the bike to the back. It’s a plastic safe cleaner/preservative. www.deoxit.com is their website.
On the older Kawasaki's, a majority of electrical connectors are inside the headlight housing requiring removal of the headlight, then the fun begins.
Do one set of electrical connectors at a time to avoid mixing up what connects to where. Usually disconnecting, spraying with De-Oxit and reconnecting is about all you'll need.
However, when encountering the green crud of corrosion, a brass wire brush may be needed on the pins you can reach. Some 400-600 grit wet and dry sandpaper strips rolled into a tube should reach the male and female pins in the more difficult to clean connectors.
Smoker’s pipe cleaners, cotton swabs and wooden toothpicks work as cleaning aids.
Really small electrical connectors may require the use of a welders tip cleaning tool assortment.
Most pins in the connectors are coated with a thin plating of tin, and others may be nothing more than copper or brass.
If moisture is added, the resulting corrosion lowers the voltage/current being carried causing dim lights, slow engine cranking, slow turn signal responce and lower input voltage to the ignition coils resulting in weak spark.
The left and right handlebar switch pods will need attention too as they have circuit functions like turn, horn, run/stop, and start.
Usually a spritz or two with actuation of the switch is about all needed for these switches unless corrosion is detected and then careful disassembly is required.
The ignition switch may or may be not sealed to allow spraying the internal contacts. I urge caution if attempting to open this up as springs, and ball bearings may fly out never to be seen again!
If your bike has the older style glass tubed fuses, I suggest replacing them as vibration can cause internal failure. AGX is the type used, and most auto parts stores can get them for you.
Clean the fuse holder clips, looking for signs of overheating(discolored insulation, signs of melting). I use metal polish on a cotton swab, followed by spraying another clean swab with the De-Oxit and then rubbing the inside of the fuse clip.
Each "Bullet Connector" will have to be sprayed to ensure good connectivity, especially the ones going to the energizing coil of the starter solenoid.
The alternator output “Bullet Connectors” are usually behind the engine sprocket cover and will need inspecting and cleaning too.
The turn signal light sockets will benefit from a spritz from the contact cleaner along with the tail light/brake light socket.
Some brake light switches can be sprayed on the actuating rod, with the spray running down inside to the electrical contacts, others may be sealed requiring replacement if the switch is intermittent in operation.
I think I've covered about all of the electrical systems on the bike.........
1982 GPZ1100 B2
General Dynamics/Convair 1983-1993
GLCM BGM-109 Tomahawk, AGM-129A Advanced Cruise Missile (ACM)
General Dynamics/Convair 1983-1993
GLCM BGM-109 Tomahawk, AGM-129A Advanced Cruise Missile (ACM)
Please Log in or Create an account to join the conversation.
- csmart30
-
Topic Author
- Offline
- User
-
Registered
- Posts: 7
- Thanks: 0
Re: 1978 kz200 no electrical power at all
30 Apr 2011 23:54 - 30 Apr 2011 23:55
Success!! I have power to everything! Well I'm assuming that I have power to the headlight and I just need a new headlight since everything else works. I just ended up using some CRC contact cleaner and cleaning each one for a total of about 2 hours. Thanks for all your help guys. I'm very impressed with the quick replies. Now just to fine tune everything and hopefully get this thing moving again.
Last edit: 30 Apr 2011 23:55 by csmart30.
Please Log in or Create an account to join the conversation.
- MFolks
-
- Offline
- User
-
Registered
- Posts: 6650
- Thanks: 541
Re: 1978 kz200 no electrical power at all
01 May 2011 00:16
To check headlight power,remove the headlight from the housing, turn the ignition on, the high/low switch to high and using your meter, check the three prong plug where the headlight bulb went. One should be ground(usually Black with yellow stripe) the other two will be high and low beam circuits.
Check these by putting the black meter probe on the ground prong of the plug, the red probe will check for voltage in high or low(depending on which way the high/low beam switch is set).
Check these by putting the black meter probe on the ground prong of the plug, the red probe will check for voltage in high or low(depending on which way the high/low beam switch is set).
1982 GPZ1100 B2
General Dynamics/Convair 1983-1993
GLCM BGM-109 Tomahawk, AGM-129A Advanced Cruise Missile (ACM)
General Dynamics/Convair 1983-1993
GLCM BGM-109 Tomahawk, AGM-129A Advanced Cruise Missile (ACM)
Please Log in or Create an account to join the conversation.
Moderators: Street Fighter LTD