
1981 GPz 550 D1 misfire above 4000 rpm4
- howardhb
-
 Topic Author
- Offline
- Sustaining Member
- God, I trust
- Posts: 459
- Thanks: 488
1981 GPz 550 D1 misfire above 4000 rpm4
30 Jul 2020 03:31 - 30 Jul 2020 03:41
Hi everyone.
I recently acquired a 1981 GPz 550 D1 ( No. 2921 ) in pretty OK condition. Visually, nothing has been butchered. The seat is split in 2 places, about 2 inches long but apart from that it's pretty fine. (ordered a replacement seat cover from Z1 a couple days ago )
All Phillips-head screws seem to not have been touched, and bolt heads all look good. There is visual evidence (some type of grey sealer) that the cam cover has been off . A quite noticeable cam-chain noise is evident, so I have new guides on order. It has pod filters (which I don't particularly like and will try to find an original airibox) mounted on mechanical round slide carbs (TK22 ??? ).
It was running quite ok, but didn't idle well, so I sync'd the carbs yesterday, using my home-made (3D printed) 4-tube manometer filled with green Motul 2-stroke oil. (works a treat!) Idle is now quite satisfactory But, now, when riding normally (not hard acceleration) , it starts to splutter at about 4000 rpm and wont rev past 5k. I have checked the the mechanical advance mechanism, which is free to rotate against it's spring, and returns positively - seems OK ( I sprayed some WD-40 on the mechanism to be sure)
I checked that the 4 carb. sync nipple caps are installed and seated correctly. I didn't adjust anything else.
Any pointers would be appreciated!
Attached is a pic of it.
Attachment not found
Attachment not found
Attachment not found
'81 GPz 550 D1
'81 GPz 1100 B1 ELR "Tribute" www.kzrider.com/11-projects/617040-1981-...-rstomod-elr-tribute
'82 Yamaha YB100 Fizzie
'79 Suzuki GT200 X5 TWO STROKE TWIN - SMOKER!
'81 GPz 1100 B1 ELR "Tribute" www.kzrider.com/11-projects/617040-1981-...-rstomod-elr-tribute
'82 Yamaha YB100 Fizzie
'79 Suzuki GT200 X5 TWO STROKE TWIN - SMOKER!
Last edit: 30 Jul 2020 03:41 by howardhb.
Please Log in or Create an account to join the conversation.
- Nessism
-

- Away
- Sustaining Member
- Posts: 7632
- Thanks: 2997
Re: 1981 GPz 550 D1 misfire above 4000 rpm4
30 Jul 2020 04:48
You might want to pull the carbs and take inventory of the jets installed and make sure everything is clean. Unless the carbs are rejetted for the pods and pipe the bike won't run right.
Ed
Carb O-ring Kits : www.kzrider.com/forum/3-carburetor/61807...-o-ring-kits?start=0
www.kzrider.com/forum/faq-wiki/618026-new-owner-things-to-know
1981 KZ750E2
www.kzrider.com/forum/11-projects/604901...z750e-project-thread
Carb O-ring Kits : www.kzrider.com/forum/3-carburetor/61807...-o-ring-kits?start=0
www.kzrider.com/forum/faq-wiki/618026-new-owner-things-to-know
1981 KZ750E2
www.kzrider.com/forum/11-projects/604901...z750e-project-thread
The following user(s) said Thank You: howardhb
Please Log in or Create an account to join the conversation.
- 650ed
-

- Offline
- User
- Posts: 15343
- Thanks: 2830
Re: 1981 GPz 550 D1 misfire above 4000 rpm4
30 Jul 2020 06:02 - 30 Jul 2020 06:05howardhb wrote: ........
All Phillips-head screws seem to not have been touched, and bolt heads all look good. ..........
WARNING! There are NO Phillips head screws on any Kawasaki motorcycle! Those screws that look like Phillips head type are actually Japanese Industrial Standard (JIS). Using a Phillips head screwdriver on them will damage them and lead you to much frustration. You need to use JIS screwdriver bits on them. JIS bits can be bought or very easily made from Phillips bits. If you need more info just ask and I can provide. Believe me, you do NOT want to use Phillips screwdrivers on those screws because they do not fit properly and absolutely will damage the screw heads. Ed
1977 KZ650-C1 Original Owner - Stock (with additional invisible FIAMM horn)
Last edit: 30 Jul 2020 06:05 by 650ed.
The following user(s) said Thank You: howardhb
Please Log in or Create an account to join the conversation.
- howardhb
-
Topic Author
- Offline
- Sustaining Member
- God, I trust
- Posts: 459
- Thanks: 488
Re: 1981 GPz 550 D1 misfire above 4000 rpm4
30 Jul 2020 07:12
Thanks for your replies! Much appreciated.
My bad for calling JIS cross-head screws Phillips.
I believe I do have the correct impact driver bits though, identified by their "snub noses" and more pronounced "cross" as opposed to pointy ended and radius'd Phillips?.
Removing the carb. bank and inspecting them was my next "to do" step.
Regards
Howard
'81 GPz 550 D1
'81 GPz 1100 B1 ELR "Tribute" www.kzrider.com/11-projects/617040-1981-...-rstomod-elr-tribute
'82 Yamaha YB100 Fizzie
'79 Suzuki GT200 X5 TWO STROKE TWIN - SMOKER!
'81 GPz 1100 B1 ELR "Tribute" www.kzrider.com/11-projects/617040-1981-...-rstomod-elr-tribute
'82 Yamaha YB100 Fizzie
'79 Suzuki GT200 X5 TWO STROKE TWIN - SMOKER!
Please Log in or Create an account to join the conversation.
- TexasKZ
-

- Offline
- Platinum Member
- Posts: 7810
- Thanks: 2411
Re: 1981 GPz 550 D1 misfire above 4000 rpm4
30 Jul 2020 07:40
How about a pic of your home made manometer?
1982 KZ1000 LTD parts donor
1981 KZ1000 LTD awaiting resurrection
2000 ZRX1100 not ridden enough
www.kzrider.com/11-projects/620336-anoth...uild-thread?start=24
1981 KZ1000 LTD awaiting resurrection
2000 ZRX1100 not ridden enough
www.kzrider.com/11-projects/620336-anoth...uild-thread?start=24
Please Log in or Create an account to join the conversation.
- loudhvx
-

- Offline
- KZr Legend
- Posts: 10864
- Thanks: 1618
Re: 1981 GPz 550 D1 misfire above 4000 rpm4
30 Jul 2020 08:27 - 30 Jul 2020 08:32
They should be Tk22 carbs on that bike, and they are pretty simple and normally tune very easily with pods.
So it was running ok as far as revving, before the sync, then after the sync it stopped being able to rev past 4000?
Since the sync requires opening the carb tops and the accessing the throttle linkage, is it possible something is hanging up the throttle? If you pull a pod off, does the slide go all the way up?
Can you check that all four choke plates go all the way up. They don't normally ever drop down, but if their linkages were played with for cleaning etc. maybe one or two dropped. They can be seen by pulling the pods off.
Does it rev fully if you simply pull the pods off? Some pods can block intake passages, but I've never seen that on the pods you have (which look similar to the ones I use).
The symptom of not fully revving can have quite a few causes. One simple one can be the gaps on the spark plugs are open beyond the stock spec, but that wouldn't change with carb work.
Since you will need to do valve train work, you may want to read the warning in my signature if you haven't already. Also, if you follow the links you will find multiple manuals for the bike and a website for the Tk22's.
1981 KZ550 D1 gpz.
Kz550 valve train warning.
Other links.
Kz550 valve train warning.
Other links.
Last edit: 30 Jul 2020 08:32 by loudhvx.
The following user(s) said Thank You: howardhb
Please Log in or Create an account to join the conversation.
- 650ed
-
- Offline
- User
- Posts: 15343
- Thanks: 2830
Re: 1981 GPz 550 D1 misfire above 4000 rpm4
30 Jul 2020 08:32 - 30 Jul 2020 08:32howardhb wrote: ............I believe I do have the correct impact driver bits though, identified by their "snub noses" and more pronounced "cross" as opposed to pointy ended and radius'd Phillips?. ...........
Howard
Just in case; take a look at the link below as it describes how to easily make JIS bits. Ed
www.kzrider.com/forum/10-new-members/609...uy-signing-in#791293
1977 KZ650-C1 Original Owner - Stock (with additional invisible FIAMM horn)
Last edit: 30 Jul 2020 08:32 by 650ed.
The following user(s) said Thank You: howardhb
Please Log in or Create an account to join the conversation.
- howardhb
-
Topic Author
- Offline
- Sustaining Member
- God, I trust
- Posts: 459
- Thanks: 488
Re: 1981 GPz 550 D1 misfire above 4000 rpm4
30 Jul 2020 08:37 - 31 Jul 2020 02:37
....How about a pic of your home made manometer?
Sure!
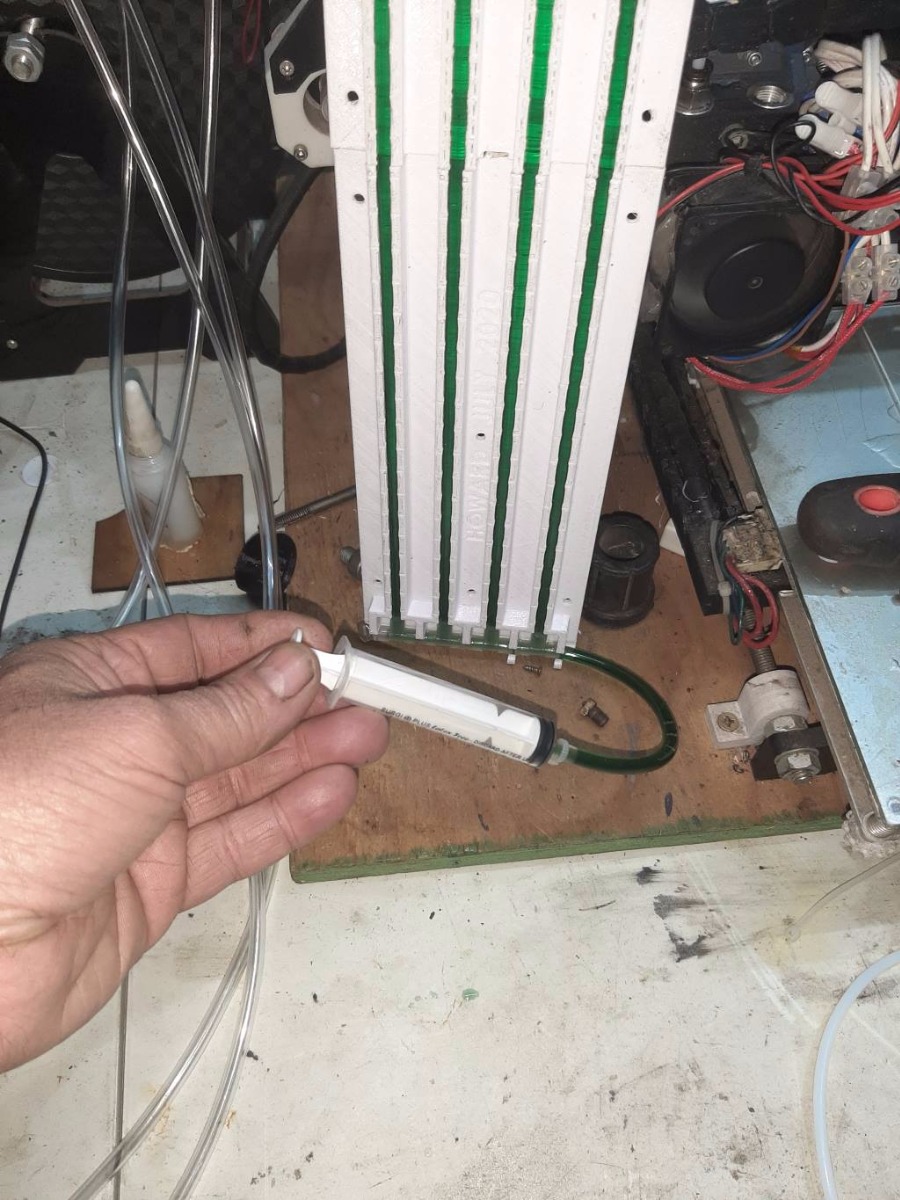
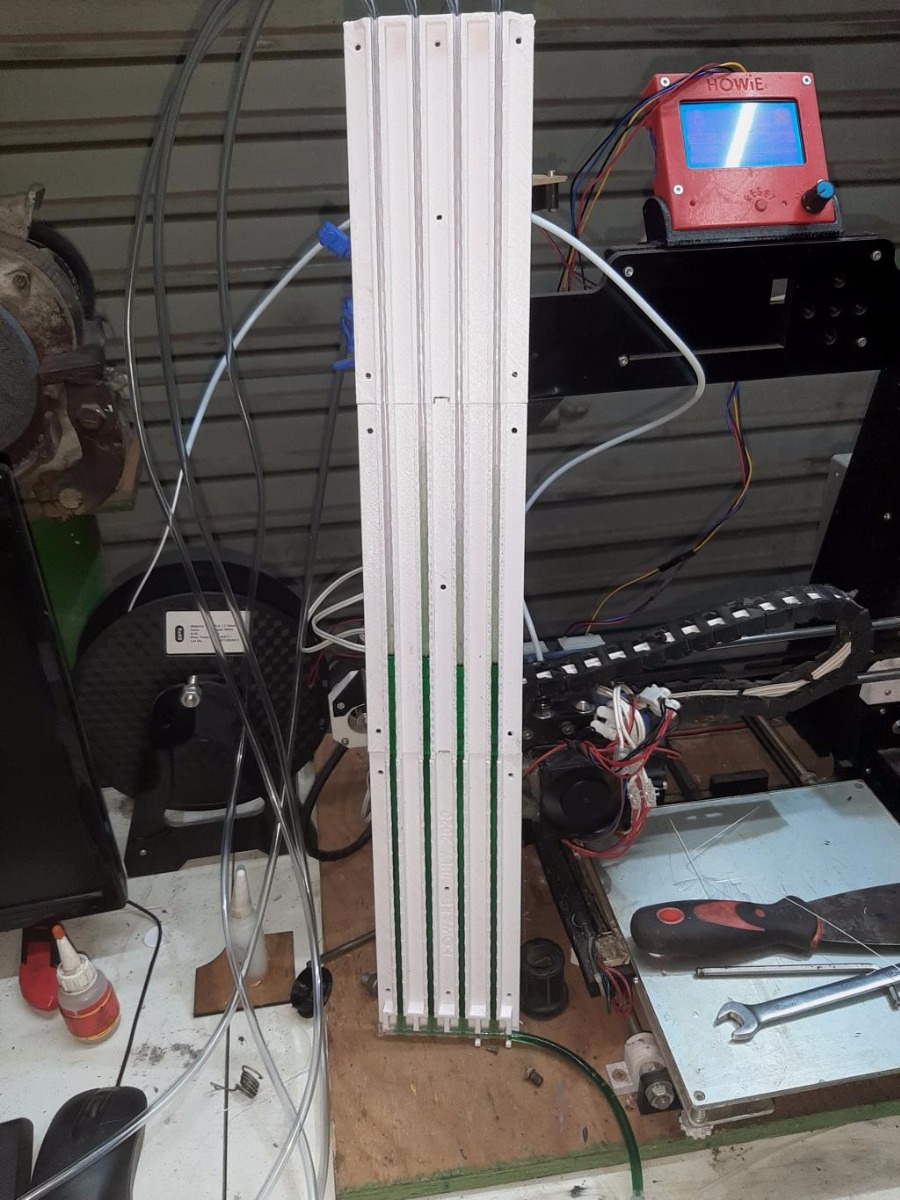
I designed the Manometer in Solidworks.
3D printed it at home using white PLA.
5mm O.D. fish-tank tubing is "T"'d together at the bottom .
Attached is a 3D PDF.
If anyone needs the STL and Solidworks files I can send (Email) them too.
What is not shown are the "restrictions" I placed in-line each of the tubes , close to the carbs. This serves to "clam" the pulsing effect.
The restrictions are 2-inch lengths of smaller id tubing that is inserted snugly into the fish-tank tubing.
The tubing is stretched slightly (to reduce its O.D. and pushed into the "C" shaped "tracks" in the printed parts.
10 ml of 2-stroke oil (or ATF) in the syringe is enough to put the level at half-way up the tubes.
(I was loath to use mercury, as, if it gets ingested into the mill it will dissolve aluminium!)
(When done, simply retract the syringe and all the oil is safely stored 'till next use)
Sure!
I designed the Manometer in Solidworks.
3D printed it at home using white PLA.
5mm O.D. fish-tank tubing is "T"'d together at the bottom .
Attached is a 3D PDF.
If anyone needs the STL and Solidworks files I can send (Email) them too.
What is not shown are the "restrictions" I placed in-line each of the tubes , close to the carbs. This serves to "clam" the pulsing effect.
The restrictions are 2-inch lengths of smaller id tubing that is inserted snugly into the fish-tank tubing.
The tubing is stretched slightly (to reduce its O.D. and pushed into the "C" shaped "tracks" in the printed parts.
10 ml of 2-stroke oil (or ATF) in the syringe is enough to put the level at half-way up the tubes.
(I was loath to use mercury, as, if it gets ingested into the mill it will dissolve aluminium!)
(When done, simply retract the syringe and all the oil is safely stored 'till next use)
'81 GPz 550 D1
'81 GPz 1100 B1 ELR "Tribute" www.kzrider.com/11-projects/617040-1981-...-rstomod-elr-tribute
'82 Yamaha YB100 Fizzie
'79 Suzuki GT200 X5 TWO STROKE TWIN - SMOKER!
'81 GPz 1100 B1 ELR "Tribute" www.kzrider.com/11-projects/617040-1981-...-rstomod-elr-tribute
'82 Yamaha YB100 Fizzie
'79 Suzuki GT200 X5 TWO STROKE TWIN - SMOKER!
Last edit: 31 Jul 2020 02:37 by howardhb. Reason: Added 3D PDF
The following user(s) said Thank You: TexasKZ
Please Log in or Create an account to join the conversation.
- howardhb
-
Topic Author
- Offline
- Sustaining Member
- God, I trust
- Posts: 459
- Thanks: 488
Re: 1981 GPz 550 D1 misfire above 4000 rpm4
30 Jul 2020 09:22
Thanks for the heads up! I have downloaded and studied the workshop manual (re the chain tensioner) and understand how the two "slant cut" rods placed 90 degrees apart function to prevent backward movement of the tensioner rod.
'81 GPz 550 D1
'81 GPz 1100 B1 ELR "Tribute" www.kzrider.com/11-projects/617040-1981-...-rstomod-elr-tribute
'82 Yamaha YB100 Fizzie
'79 Suzuki GT200 X5 TWO STROKE TWIN - SMOKER!
'81 GPz 1100 B1 ELR "Tribute" www.kzrider.com/11-projects/617040-1981-...-rstomod-elr-tribute
'82 Yamaha YB100 Fizzie
'79 Suzuki GT200 X5 TWO STROKE TWIN - SMOKER!
Please Log in or Create an account to join the conversation.
- howardhb
-
Topic Author
- Offline
- Sustaining Member
- God, I trust
- Posts: 459
- Thanks: 488
Re: 1981 GPz 550 D1 misfire above 4000 rpm4
11 Aug 2020 03:02 - 11 Aug 2020 04:50
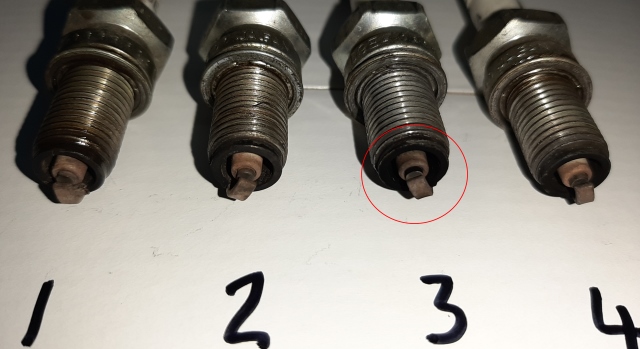
Looking at the colour of cylinder #3 plug, clearly it was running way richer than the other cylinders.... more on this later.
Anyway, last weekend I did a compression test (using a brand new tester) and discovered that all 4 cylinders were "low", ranging between 60 and 82psi.
What to do? Off with her head!!!
On Friday, having just taken delivery of a full gasket set and new cam chain guides, I dove right in and set about overhauling the top end.
Upon removal of the cam cover, I was suitably surprised to find everything in pristine condition.
I carefully measured and tabulated the cam clearances. All were towards the upper end of the tolerance - good news to be sure!
I removed the cylinder-head and dissembled it down to its constituent pieces, taking care to keep each cylinders "bits" together in a group, using an egg box!
I used "oven cleaner" to de-grease and clean off 40 years of carbon build-up, aided by a brass bristled brush.
The most stubborn deposits were remnant of the leaded petrol era. (tetra ethyl lead was added to petrol as an upper cylinder lubricant for valve guides and seats) Removing these deposits required judicial brushing with a brass wire brush in my cordless drill.
I must say, lapping each valve is quite therapeutic, as one imagines returning the seal to it's original glory!
I was quite happy with the result - a dull grey continuous line around each seat and valve.
Ensuring that absolutely no valve lapping paste remained) I masked up the mating faces and studs, ready for a coat of satin black high temperature paint.
After curing the paint (in my kitchen oven) for 6 hours at 150 degrees C. (302 F) I set about re-assembly, not forgetting to install new valve stem seals.
I installed a new head gasket and torqued up the head nuts according to the prescribed spec. and pattern.
Next, I installed the exhaust cam, followed by intake cam, being very careful to line up the "T" mark (Top Dead Centre) on the crank right hand side (visible through a slot in the timing plate behind the right hand side lower crank end cover.
I was very careful in performing the cam timing as per the manual, as one tooth out could spell disaster!
Once I was done, I rotated the crank a couple of times using the 17 mm bolt head on the right hand side of the crank, feeling carefully for any "resistance" which would indicate incorrect timing... all good!
I re-checked the cam clearances.
I was surprised to find that all but cylinder one's exhaust valve clearances were now almost dead in the middle of the clearance spec.
I recalled that cylinder one's exhaust valve required just a bit more lapping to provide a good seal pattern.
The resulting clearance was 0.1 mm, which is 0.05 mm under the lower limit of 0.15 mm. So, not having any spare shims, I carefully surface ground 0.05 off each side of the shim, which should put the resulting clearance at exactly 0.2 mm, bang in the centre of the tolerance.
On the 550, the shims reside UNDER the cam-followers, which requires cam removal in order to perform any "adjustment" :ohmy:
I subsequently re-assembled the exhaust cam into the head: again, carefully timing the cams. I re-measured the clearance: spot on: 0.2 mm!
Time to "close up" the open heart surgery!
Application of new cam cover gasket, including a bit of silicone sealer applied to the cam end half-moon rubbers: I closed her up...
After having done all the above, I turned my attention to the flaky black paint on the carbs:
I started by removing the float bowls to inspect...
Lo and behold, I found cylinder #3's main jet languishing in the bottom of the float bowl: ....
Ahaaaa, the source of the misfire and evidence of rich mixture by sooty black spark-plug! duh!
Everything else was in order - float levels were damn near 4.5 mm below the float-bowl joint line. Sweet!
I re-installed the carb. bank and pod filters, followed by ignition coils and then the 4 into 1 exhaust (with new copper sealing bushes)
Upon application of the compression tester, I rejoiced that the compression was now up near the 130 psi mark on each cylinder
with very little variance between cylinders!
Plugs in, ignition on, choke on..... deep breath - crank....
"pop, pop" she sounded as fresh fuel permeated the carburetors for the first time in a few weeks...
On the second application of the starter motor she fired right up to a very pleasing idle at 1500 rpm. Success!
I stood back, admiring my handiwork, letting her warm up for a good few minutes... eventually setting the (off choke) idle at 1000 rpm,
with my previous carb. syncing efforts clearly evident!
A couple of blips of the throttle showed pick-up to be good, and the idle rpm returning after a second or two.
Using the tried and test "screw-driver in the ear" method of "stethescoping" unnatural engine noises, I inspected the upper cylinder...
none could be heard except a very satisfying "tic tic tic" of closing valves and cam lobes leaving their followers! Nice!
I checked for signs of oil leaks....
None!
I suited up and took her for a ride...
I am so pleased, the bottom end is crisp, with meaty grunt (for a half-litre) low down in the revs.
Out on the freeway I opened her up and was properly surprised at the surge of power as revs pass 7000!
Marvellous!
Next on my list is a full paint refresh....
Thanks everyone for valuable contributions to this very satisfying endeavour!
'81 GPz 550 D1
'81 GPz 1100 B1 ELR "Tribute" www.kzrider.com/11-projects/617040-1981-...-rstomod-elr-tribute
'82 Yamaha YB100 Fizzie
'79 Suzuki GT200 X5 TWO STROKE TWIN - SMOKER!
'81 GPz 1100 B1 ELR "Tribute" www.kzrider.com/11-projects/617040-1981-...-rstomod-elr-tribute
'82 Yamaha YB100 Fizzie
'79 Suzuki GT200 X5 TWO STROKE TWIN - SMOKER!
Last edit: 11 Aug 2020 04:50 by howardhb.
Please Log in or Create an account to join the conversation.
- Nessism
-
- Away
- Sustaining Member
- Posts: 7632
- Thanks: 2997
Re: 1981 GPz 550 D1 misfire above 4000 rpm4
11 Aug 2020 05:02
Great job on the engine.
Just a quick reminder (in case you don't know) that the cam chain tensioner wedge needs to be reset after the cam cover is installed. You can do this by pulling the cap on the spring to release tension on the wedge after the cover is on. 550 gugu loud has a page on his website about this if you want more info.
Good luck
Ed
Carb O-ring Kits : www.kzrider.com/forum/3-carburetor/61807...-o-ring-kits?start=0
www.kzrider.com/forum/faq-wiki/618026-new-owner-things-to-know
1981 KZ750E2
www.kzrider.com/forum/11-projects/604901...z750e-project-thread
Carb O-ring Kits : www.kzrider.com/forum/3-carburetor/61807...-o-ring-kits?start=0
www.kzrider.com/forum/faq-wiki/618026-new-owner-things-to-know
1981 KZ750E2
www.kzrider.com/forum/11-projects/604901...z750e-project-thread
Please Log in or Create an account to join the conversation.
- howardhb
-
Topic Author
- Offline
- Sustaining Member
- God, I trust
- Posts: 459
- Thanks: 488
Re: 1981 GPz 550 D1 misfire above 4000 rpm4
11 Aug 2020 06:46
Your very important point is noted Nessim.
I initially installed the tensioner without it's transverse wedge, spring and cap, having read the many warnings concerning this.
After finally tightening down the cam cover (which adds to chain tension as a result of the upper chain "guide" in the cover), I installed the tensioner transverse wedge shaft, aluminum washer, spring and cap.
I verified that the tensioner "stick-out" was within the prescribed distance of 11 to 12 mm, after rotating the crank forward a couple of times, and rocking it backwards and forwards "a bit" to ensure that the cam chain slack is taken up by the tensioner travel.
(Beware, the starter motor clutch drags the starter motor when the crank is rotated backwards, so be careful!)
H.
'81 GPz 550 D1
'81 GPz 1100 B1 ELR "Tribute" www.kzrider.com/11-projects/617040-1981-...-rstomod-elr-tribute
'82 Yamaha YB100 Fizzie
'79 Suzuki GT200 X5 TWO STROKE TWIN - SMOKER!
'81 GPz 1100 B1 ELR "Tribute" www.kzrider.com/11-projects/617040-1981-...-rstomod-elr-tribute
'82 Yamaha YB100 Fizzie
'79 Suzuki GT200 X5 TWO STROKE TWIN - SMOKER!
The following user(s) said Thank You: Nessism
Please Log in or Create an account to join the conversation.