
DIY: Use the Kawasaki Factory Shim Tool
- Move0ver
-
 Topic Author
- Offline
- User
- Posts: 273
- Thanks: 71
DIY: Use the Kawasaki Factory Shim Tool
04 Jun 2018 08:25
I picked up this tool a few weeks ago and finally got around to using it.
I searched the internet for pictures on how to use it, but there weren't any easily available.
It took about 5 minutes to figure out/get the technique right, but I thought I'd put up pictures so others can see the way it works:
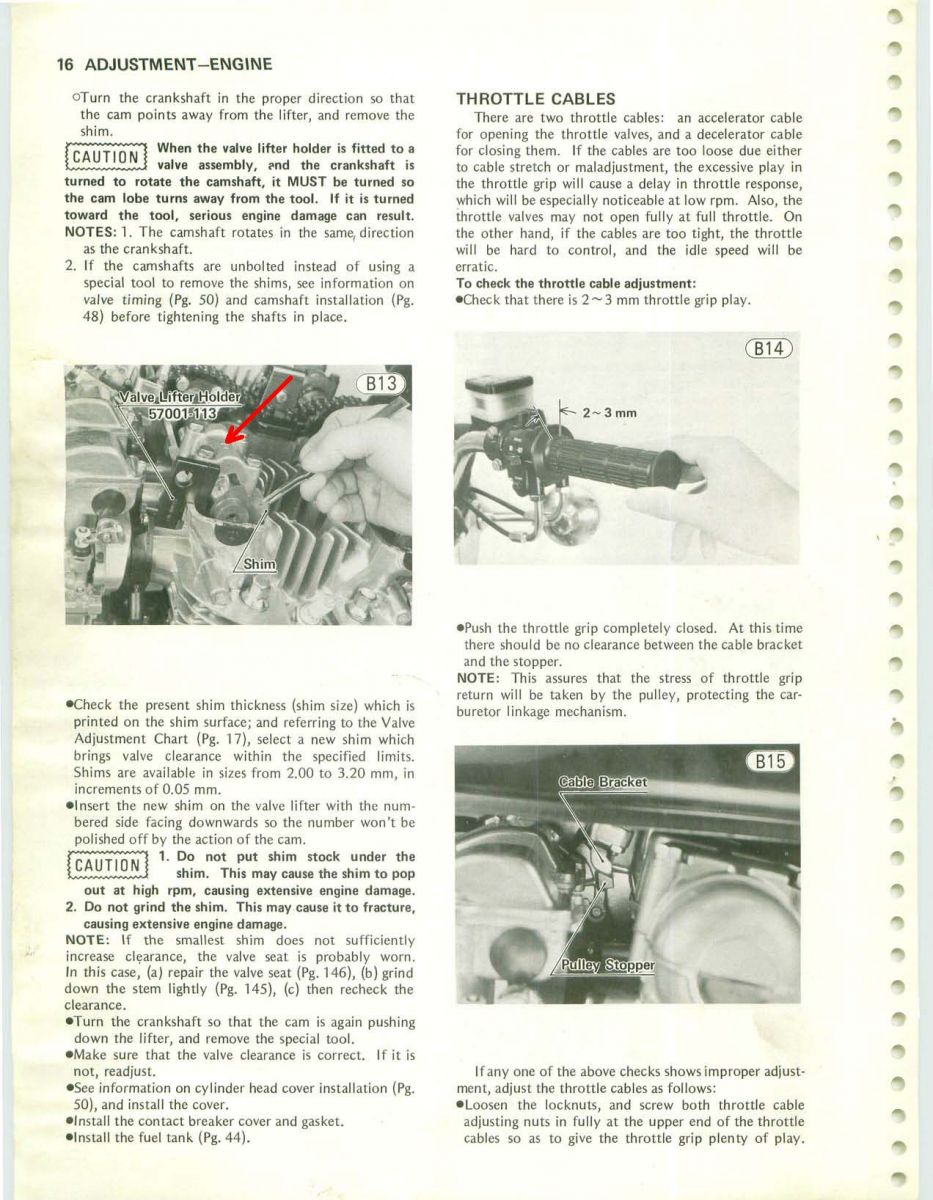
The tool slips over the lip on the head. You can adjust it as well as lock it in place with the set screw. Be careful using the set screw that you don't scratch the aluminum head... An improvement to the tool may be putting a rubber nub on the end of the screw.

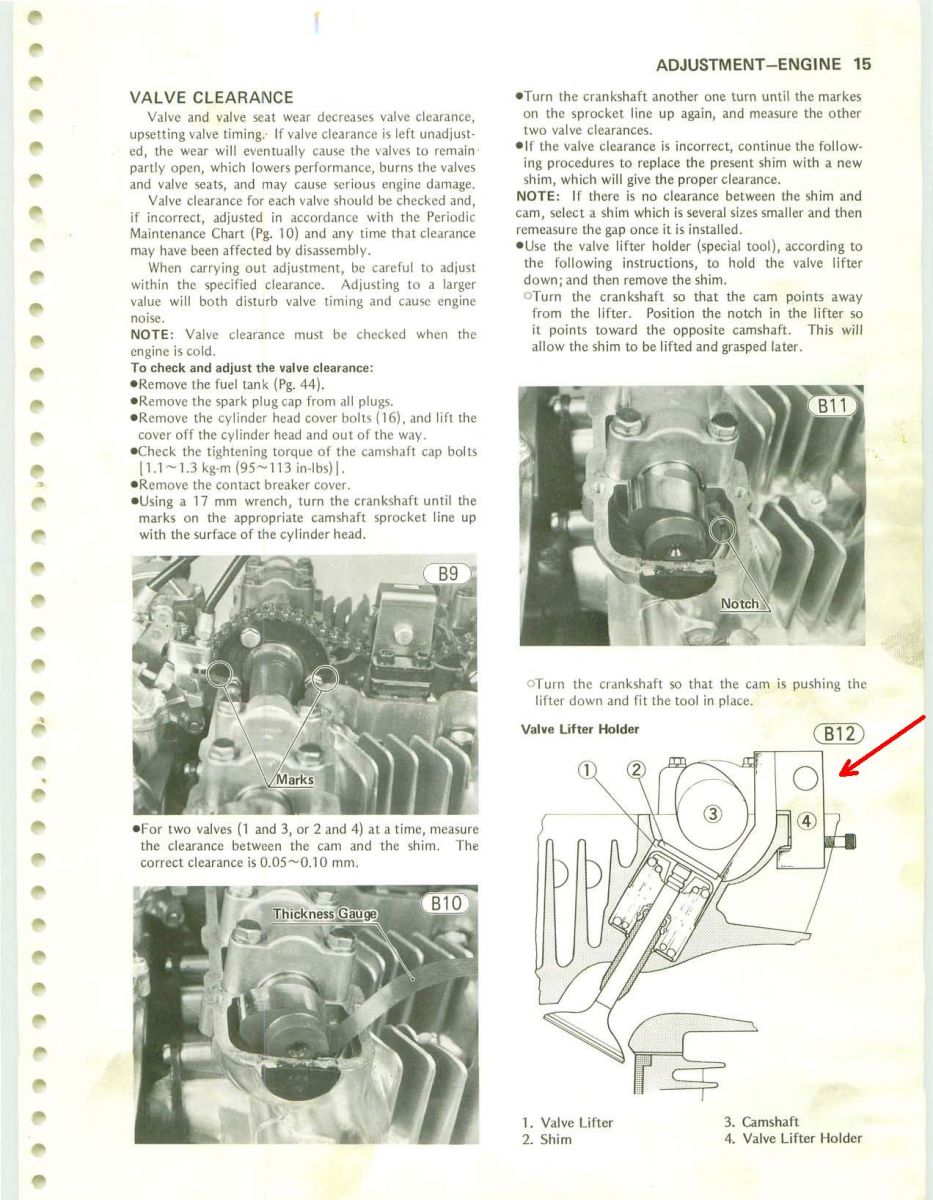
You want to insert the tool when the cam is depressing the bucket all the way down (with the notch in the bucket facing up).
***Make sure you have the tool sitting far enough back on the lip of the bucket that you can get the shim out and back in.*** I noticed that if it wasn't placed correctly, the shim would come out, but didn't want to go back.

After installing the tool, you need to rotate the cam off the bucket.... MAKE SURE YOU PAY ATTENTION TO THE DIRECTION YOU'RE ROTATING THE CAM SO YOU DON'T HIT THE TOOL.

This tool is considerably more expensive than the "batwing" but it's fantastic. It keeps everything secure and is simple to use. I highly recommend it!
I searched the internet for pictures on how to use it, but there weren't any easily available.
It took about 5 minutes to figure out/get the technique right, but I thought I'd put up pictures so others can see the way it works:
The tool slips over the lip on the head. You can adjust it as well as lock it in place with the set screw. Be careful using the set screw that you don't scratch the aluminum head... An improvement to the tool may be putting a rubber nub on the end of the screw.
You want to insert the tool when the cam is depressing the bucket all the way down (with the notch in the bucket facing up).
***Make sure you have the tool sitting far enough back on the lip of the bucket that you can get the shim out and back in.*** I noticed that if it wasn't placed correctly, the shim would come out, but didn't want to go back.
After installing the tool, you need to rotate the cam off the bucket.... MAKE SURE YOU PAY ATTENTION TO THE DIRECTION YOU'RE ROTATING THE CAM SO YOU DON'T HIT THE TOOL.
This tool is considerably more expensive than the "batwing" but it's fantastic. It keeps everything secure and is simple to use. I highly recommend it!
The following user(s) said Thank You: gordone, Ronnie_D
Please Log in or Create an account to join the conversation.
- Ronnie_D
-

- Offline
- User
- 1978 KZ1000 A2
- Posts: 67
- Thanks: 6
Re: DIY: Use the Kawasaki Factory Shim Tool
04 Jun 2018 08:48
Thank you MoveOver for the info.
I hope you don't mind, I made a PDF for anyone who wants a local copy. I like to keep these jewels of info as I build my bike.
cheers,
Ron.
I hope you don't mind, I made a PDF for anyone who wants a local copy. I like to keep these jewels of info as I build my bike.
cheers,
Ron.
Please Log in or Create an account to join the conversation.
- Ronnie_D
-
- Offline
- User
- 1978 KZ1000 A2
- Posts: 67
- Thanks: 6
Re: DIY: Use the Kawasaki Factory Shim Tool
04 Jun 2018 08:51 - 04 Jun 2018 08:55Ronnie_D wrote: Thank you MoveOver for the info.
I hope you don't mind, I made a PDF for anyone who wants a local copy. I like to keep these jewels of info as I build my bike.
cheers,
Ron.
The file did not attach to this reply. I will try to upload it to the Filebase.
UPDATE:
I cannot find an option in the filebase or tips area to upload a file. Any one know how to get a file on here?
Last edit: 04 Jun 2018 08:55 by Ronnie_D.
Please Log in or Create an account to join the conversation.
- Dr. Gamma
-

- Offline
- Sustaining Member
- Posts: 1228
- Thanks: 682
Re: DIY: Use the Kawasaki Factory Shim Tool
04 Jun 2018 09:57
The Kawasaki shim tool is vastly superior to those other shim tools.
Remove the spark plugs to make it easier rotating the motor over.
I use the kickstarter to move the motor over to the next cam lobe position you want to check. I check my valve clearance the old fashion way with the toe of the cam 90 degrees to the bucket. It only takes me two minutes or so to check the valve clearance on all eight valves this way.
1972 H2 750 Cafe Racer built in 1974.
1976 KH400 Production Road Racer.
1979 Kz1000 MK. II Old AMA/WERA Superbike.
1986 RG500G 2 stroke terror.
1986 GSXR750RG The one with the clutch that rattles!
Up in the hills near Prescott, Az.
1976 KH400 Production Road Racer.
1979 Kz1000 MK. II Old AMA/WERA Superbike.
1986 RG500G 2 stroke terror.
1986 GSXR750RG The one with the clutch that rattles!
Up in the hills near Prescott, Az.
Please Log in or Create an account to join the conversation.
- Scirocco
-

- Offline
- Premium Member
- Never change a running system
- Posts: 4240
- Thanks: 2102
Re: DIY: Use the Kawasaki Factory Shim Tool
04 Jun 2018 13:05
I don´t like the Kawasaki tool, it leaves bad imprints from the screw in the Aluminum.
I lift the cams if a shim(s) must be changed.
I lift the cams if a shim(s) must be changed.
My 1975 Z 1 B 900 Project
www.kzrider.com/forum/11-projects/605133...ears-deep-sleep-mode
www.kzrider.com/forum/11-projects/605133...ears-deep-sleep-mode
Please Log in or Create an account to join the conversation.