
Refinishing the KZ engine to look like new
- joehooper
-
 Topic Author
- Offline
- User
-

Vendors
- Posts: 16
- Thanks: 39
Refinishing the KZ engine to look like new
30 Mar 2015 14:27
This is my first ever post to this forum.
I am posting this procedure as I have been asked about a thousand times how my engine refinishing is done.
As I have never done this, I do not know how it will come through.
I have attached a Word file that describes in detail, the steps taken to perform refinishing.
I hope this is of some use to someone out there.
If there are questions, I will try to answer them.
But, I am in poor health and my time is limited.
The following user(s) said Thank You: 79MKII, bluej58, fitscott, bneedy
Please Log in or Create an account to join the conversation.
- Randombeat
-
- Offline
- User
-
Registered
- 0 to 100 real quick...
- Posts: 274
- Thanks: 23
Re: Refinishing the KZ engine to look like new
30 Mar 2015 14:29joehooper wrote: This is my first ever post to this forum.
I am posting this procedure as I have been asked about a thousand times how my engine refinishing is done.
As I have never done this, I do not know how it will come through.
I have attached a Word file that describes in detail, the steps taken to perform refinishing.
I hope this is of some use to someone out there.
If there are questions, I will try to answer them.
But, I am in poor health and my time is limited.
interested, but dont see the attachment? hope your health improves, miracles do happen...
1980 KZ750H LTD-- pods-- vance & hines 4-1 --speedo/tach/blinker/switch deletes -- brat style
Please Log in or Create an account to join the conversation.
- KZQ
-

- Away
- Administrator
-

Registered
- Walking Behind the Corn May Not Be All That!
- Posts: 4818
- Thanks: 1594
Re: Refinishing the KZ engine to look like new
30 Mar 2015 14:33
Hi Joe,
Sorry to hear about your health.
If you'll send a PM to me I'll tell you where to send the file. I'll post it and be sure to give you the credit.
Regards
Bill
Sorry to hear about your health.
If you'll send a PM to me I'll tell you where to send the file. I'll post it and be sure to give you the credit.
Regards
Bill
www.KZ1300.com
Riders:
1968 BSA 441 Shooting Star, 1970 BSA 650 Lightning, 1974 W3, 1976 KZ900, 1979 KZ750 Twin, 1979 KZ750 Twin Trike, 1981 KZ1300, 1982 KZ1100 Spectre, 2000 Valkyrie, 2009 Yamaha Roadliner S. 1983 GL 1100
Projects:
1985 ZN1300
Riders:
1968 BSA 441 Shooting Star, 1970 BSA 650 Lightning, 1974 W3, 1976 KZ900, 1979 KZ750 Twin, 1979 KZ750 Twin Trike, 1981 KZ1300, 1982 KZ1100 Spectre, 2000 Valkyrie, 2009 Yamaha Roadliner S. 1983 GL 1100
Projects:
1985 ZN1300
Please Log in or Create an account to join the conversation.
- tomsbadkz
-
- Offline
- User
-
Registered
- Posts: 229
- Thanks: 44
Re: Refinishing the KZ engine to look like new
30 Mar 2015 16:08
Joe. i wish you well. you did some work for me and i do appreciate the work you did. My mom is going through treatments for illness. She is doing incredible and getting better. not sure whats going on with you, but be positve and spirits high. tom
1977 kz1327
Cavanaugh Head 38.6/33
38mm Flatslides
MRE racecut trans
300mm rear tire
Web Cams 435/465
Cavanaugh Head 38.6/33
38mm Flatslides
MRE racecut trans
300mm rear tire
Web Cams 435/465
Please Log in or Create an account to join the conversation.
- bluezbike
-
- Offline
- Sustaining Member
-

Registered
- Posts: 593
- Thanks: 104
Re: Refinishing the KZ engine to look like new
30 Mar 2015 16:24
Keep plugging away Joe......hope you get better.......I send you positive vibes
79 KZ 1000 LTD
77 KZ 1000 B1 LTD (awaiting electrical resurrection)
77 KZ 1000 B1 LTD (awaiting electrical resurrection)
Please Log in or Create an account to join the conversation.
- KZQ
-
- Away
- Administrator
-
Registered
- Walking Behind the Corn May Not Be All That!
- Posts: 4818
- Thanks: 1594
Re: Refinishing the KZ engine to look like new
30 Mar 2015 18:45
Joe,
Check your Private Messages.
Bill
Check your Private Messages.
Bill
www.KZ1300.com
Riders:
1968 BSA 441 Shooting Star, 1970 BSA 650 Lightning, 1974 W3, 1976 KZ900, 1979 KZ750 Twin, 1979 KZ750 Twin Trike, 1981 KZ1300, 1982 KZ1100 Spectre, 2000 Valkyrie, 2009 Yamaha Roadliner S. 1983 GL 1100
Projects:
1985 ZN1300
Riders:
1968 BSA 441 Shooting Star, 1970 BSA 650 Lightning, 1974 W3, 1976 KZ900, 1979 KZ750 Twin, 1979 KZ750 Twin Trike, 1981 KZ1300, 1982 KZ1100 Spectre, 2000 Valkyrie, 2009 Yamaha Roadliner S. 1983 GL 1100
Projects:
1985 ZN1300
Please Log in or Create an account to join the conversation.
- fastdave
-

- Offline
- User
-
Registered
- Posts: 74
- Thanks: 4
Re: Refinishing the KZ engine to look like new
31 Mar 2015 16:27
Wow, I would love to see your information. I have been restoring a kz550. My thread is in projects under 1983 kz550 by fastdave. I have all of the holes in my engine plugged and ready for me to go to work. I was going to start sandblasting. Any tips would be great.
Faster is more fun
Please Log in or Create an account to join the conversation.
- KzChop82
-

- Offline
- User
-
Registered
- Posts: 145
- Thanks: 7
Re: Re:Refinishing the KZ engine to look like new
31 Mar 2015 16:59
Joe,
Can you please pm me the info? I would love to read through your process
I will say some prayers for you and your health.
Thank you
-Arthur
Can you please pm me the info? I would love to read through your process
I will say some prayers for you and your health.
Thank you
-Arthur
Clinton, NJ
Custom chopper, 1982 KZ 1000 M2 CSR engine, K&N Pod Filters
PICTURES AND GOPRO VIDEOS!! :
www.dropbox.com/sh/jipz3l8nhzr4jge/AABbm...OC3sqlhCSLxH5Fa?dl=0
Custom chopper, 1982 KZ 1000 M2 CSR engine, K&N Pod Filters
PICTURES AND GOPRO VIDEOS!! :
www.dropbox.com/sh/jipz3l8nhzr4jge/AABbm...OC3sqlhCSLxH5Fa?dl=0
Please Log in or Create an account to join the conversation.
- 79MKII
-
- Offline
- User
-
Registered
- Love Them Kaws!
- Posts: 2487
- Thanks: 43
Re: Re:Refinishing the KZ engine to look like new
31 Mar 2015 20:18
I'd love to read your procedure too. Is it available somewhere? I'm ready to paint / polish an engine right now....just not sure where to start.
The Kaw List:
Current: 79 KZ1000 A3 MKII, 78 KZ1000 A2, 78 KZ1000 Z1-R, 78 KZ650 SR, 80 KE175
Former: 03 KLX400SR, 99 ZRX1000, 82 KZ750 LTD, 80 KZ1000 A4 MKII, 80 KZ1000 LTD, 78 KZ1000 A2, 74 H-2 750 Triple, 78 KL250
Current: 79 KZ1000 A3 MKII, 78 KZ1000 A2, 78 KZ1000 Z1-R, 78 KZ650 SR, 80 KE175
Former: 03 KLX400SR, 99 ZRX1000, 82 KZ750 LTD, 80 KZ1000 A4 MKII, 80 KZ1000 LTD, 78 KZ1000 A2, 74 H-2 750 Triple, 78 KL250
Attachments:
Please Log in or Create an account to join the conversation.
- KZQ
-
- Away
- Administrator
-
Registered
- Walking Behind the Corn May Not Be All That!
- Posts: 4818
- Thanks: 1594
Re: Re:Refinishing the KZ engine to look like new
01 Apr 2015 08:23
Here's Joe's technique. We'll add it to the FileBase once it's restored.
Regards
Bill
The parts are first cleaned thoroughly to remove any grease, dirt and oil.
Following cleaning, all holes are blown out with compressed air.
In preparation for bead blasting, all of the threaded holes must have bolts installed. This is to keep glass beads from being packed into the holes. All parts of the oiling system must also be blocked off. There are a number of steps required to accomplish this. The head has the most places that must be blocked off, so I will describe that. We install a set of cam end plugs, bolt a valve cover on the head and then attach a special fixture to the valve cover to cover the chain galley opening from the bottom.
Four other special fixtures are installed on the outside head stud holes where the oil runs. On early style heads with a tach drive, a plug must be installed there. Finally, since it is assumed the head is to receive a complete valve job, the valve guides are tapped to 5/16 X 18 TPI and two inch bolts inserted in each guide from the cam side. The bolts are installed to facilitate valve guide removal. The oiling system is now protected as good as is possible. However, make no mistake about it, glass beads will find their way into the tightest spots, so careful cleaning is required when done.
Next the part is bead blasted using a coarse bead, I use Skat Magic which leaves a pretty rough finish. This will remove what is left of the factory paint and provide a clean porous surface for painting.
Next all the bolts and blockoff fixtures are removed and the part is solvent cleaned again. While in the cleaning solvent, a tap (the correct size for each thread) is run into each threaded hole. This will loosen any glass beads which found their way into the holes, as well as clean up any slightly damaged threads.
Following the thread chasing, WD40 is used with a tube on the nozzle to clean out the threaded holes. Push the tube all the way to the bottom of the holes several times to completely clean out the holes.
Continue cleaning with solvent to remove all traces of the WD40.
When the solvent cleaning is finished, remove the solvent using soapy water. I like to use Dawn dishwashing detergent. It cuts grease and oil well. Once this is complete, the part should be rinsed with water. Finally, the part is dried using compressed air. Each threaded hole should be blown out. A thin blower extension should be used so that the compressed air can be introduced at the bottom of the threaded holes. That way the loose material can be forced out the holes from the bottom. If you feel a lot of small particulate hitting the hand holding the air nozzle while doing this, a second cleaning may be called for.
Once this cleaning is complete, the part is ready for painting.
Heat the part to 500 degrees Fahrenheit, I used to use a gas grill with a thermometer.
In my new shop I used a standard kitchen range that is no longer used in the preparation of food.
While still hot, apply Harley Davidson high temperature silver paint, part number 98660-78. This paint has been referred to by a number of different names including “obsolete Harley paint”. I prefer to refer to it as “the most expensive aerosol paint on the planet”. If the desired color is Satin Black or Semi-Gloss black, then apply PJ1 Fast Black, part number PJ1-16-SAT. This is very critical. By applying the paint hot, the adhesion is vastly improved. This coat of paint will look similar to a bead blasted surface when finishing Silver, it will retain a porous appearance. The paint should be applied in very light amounts to prevent bubbling from the high temperature. You can go over the same area lightly as many times as required to get good coverage.
Allow the part to cool to room temperature.
The second coat of paint is applied at room temperature. For Silver, apply a second coat of Harley Davidson high temperature silver. This application will give you the shiny deep silver finish that you desire. For Satin Black to match a 1973 Z1 factory color, apply a second coat of PJ1 Fast Black. For a Semi-Gloss Black finish like a 1978 Z1R, apply the second coat using Dupli-Color Ford Semi Gloss Black, part number DE1635. Do not use this paint for the first, hot coat, use the PJ1 paint for that.
Allow 24 hours to pass.
Finally, heat the part to 350 degrees Fahrenheit for two hours. This final step will cure the paint somewhat and toughen it.
It is important to note that the paint is not fully cured at this point.
Gasoline will not hurt it unless the engine is hot, so try not to do anything dumb.
If you are jetting the carbs, wait until the engine is completely cool and place a shop towel under the carbs just to be sure.
If you ride the bike every day and get it up to operating temperature and then allow it to cool, it should be fully cured in a month or less.
After the part cools, it is ready for assembly.
Regards
Joe
Regards
Bill
Pit Stop Performance
Cylinder, Head and Case refinishing procedure:
Last updated 3-30-2015
Cylinder, Head and Case refinishing procedure:
Last updated 3-30-2015
The parts are first cleaned thoroughly to remove any grease, dirt and oil.
Following cleaning, all holes are blown out with compressed air.
In preparation for bead blasting, all of the threaded holes must have bolts installed. This is to keep glass beads from being packed into the holes. All parts of the oiling system must also be blocked off. There are a number of steps required to accomplish this. The head has the most places that must be blocked off, so I will describe that. We install a set of cam end plugs, bolt a valve cover on the head and then attach a special fixture to the valve cover to cover the chain galley opening from the bottom.
Four other special fixtures are installed on the outside head stud holes where the oil runs. On early style heads with a tach drive, a plug must be installed there. Finally, since it is assumed the head is to receive a complete valve job, the valve guides are tapped to 5/16 X 18 TPI and two inch bolts inserted in each guide from the cam side. The bolts are installed to facilitate valve guide removal. The oiling system is now protected as good as is possible. However, make no mistake about it, glass beads will find their way into the tightest spots, so careful cleaning is required when done.
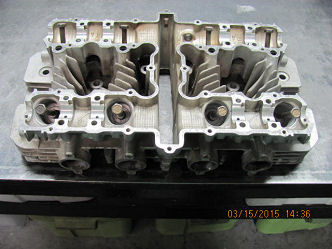
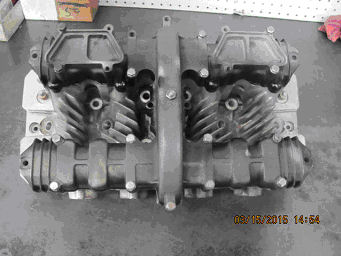
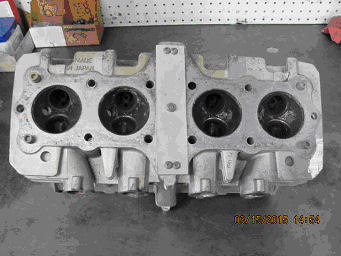
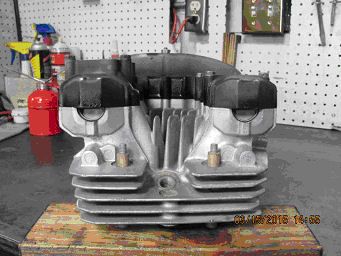
Below are some pictures of a head prepped for bead blasting.
5/16” bolts installed in valve guides from cam side for guide removal.
5/16” bolts installed in valve guides from cam side for guide removal.
H-cover (cam cover) installed.
Note ¼” nut in the middle of cover.
Note ¼” nut in the middle of cover.
Chain galley blockoff plate.
Held in place with threaded rod to H-cover.
Held in place with threaded rod to H-cover.
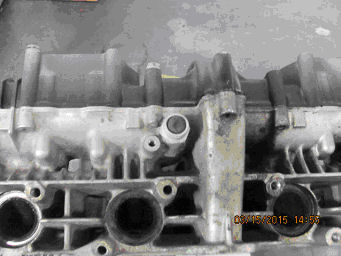
Cam end plugs installed.
Four outside oil passages blocked off with 5/16”
threaded rod and used valve guides.
Four outside oil passages blocked off with 5/16”
threaded rod and used valve guides.
If the head has a tach drive, that is also blocked off.
Bottom of head, ready for bead blasting.
Next the part is bead blasted using a coarse bead, I use Skat Magic which leaves a pretty rough finish. This will remove what is left of the factory paint and provide a clean porous surface for painting.
Next all the bolts and blockoff fixtures are removed and the part is solvent cleaned again. While in the cleaning solvent, a tap (the correct size for each thread) is run into each threaded hole. This will loosen any glass beads which found their way into the holes, as well as clean up any slightly damaged threads.
Following the thread chasing, WD40 is used with a tube on the nozzle to clean out the threaded holes. Push the tube all the way to the bottom of the holes several times to completely clean out the holes.
Continue cleaning with solvent to remove all traces of the WD40.
When the solvent cleaning is finished, remove the solvent using soapy water. I like to use Dawn dishwashing detergent. It cuts grease and oil well. Once this is complete, the part should be rinsed with water. Finally, the part is dried using compressed air. Each threaded hole should be blown out. A thin blower extension should be used so that the compressed air can be introduced at the bottom of the threaded holes. That way the loose material can be forced out the holes from the bottom. If you feel a lot of small particulate hitting the hand holding the air nozzle while doing this, a second cleaning may be called for.
Once this cleaning is complete, the part is ready for painting.
Heat the part to 500 degrees Fahrenheit, I used to use a gas grill with a thermometer.
In my new shop I used a standard kitchen range that is no longer used in the preparation of food.
While still hot, apply Harley Davidson high temperature silver paint, part number 98660-78. This paint has been referred to by a number of different names including “obsolete Harley paint”. I prefer to refer to it as “the most expensive aerosol paint on the planet”. If the desired color is Satin Black or Semi-Gloss black, then apply PJ1 Fast Black, part number PJ1-16-SAT. This is very critical. By applying the paint hot, the adhesion is vastly improved. This coat of paint will look similar to a bead blasted surface when finishing Silver, it will retain a porous appearance. The paint should be applied in very light amounts to prevent bubbling from the high temperature. You can go over the same area lightly as many times as required to get good coverage.
Allow the part to cool to room temperature.
The second coat of paint is applied at room temperature. For Silver, apply a second coat of Harley Davidson high temperature silver. This application will give you the shiny deep silver finish that you desire. For Satin Black to match a 1973 Z1 factory color, apply a second coat of PJ1 Fast Black. For a Semi-Gloss Black finish like a 1978 Z1R, apply the second coat using Dupli-Color Ford Semi Gloss Black, part number DE1635. Do not use this paint for the first, hot coat, use the PJ1 paint for that.
Allow 24 hours to pass.
Finally, heat the part to 350 degrees Fahrenheit for two hours. This final step will cure the paint somewhat and toughen it.
It is important to note that the paint is not fully cured at this point.
Gasoline will not hurt it unless the engine is hot, so try not to do anything dumb.
If you are jetting the carbs, wait until the engine is completely cool and place a shop towel under the carbs just to be sure.
If you ride the bike every day and get it up to operating temperature and then allow it to cool, it should be fully cured in a month or less.
After the part cools, it is ready for assembly.
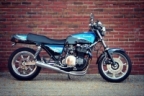
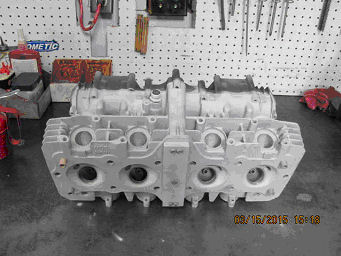
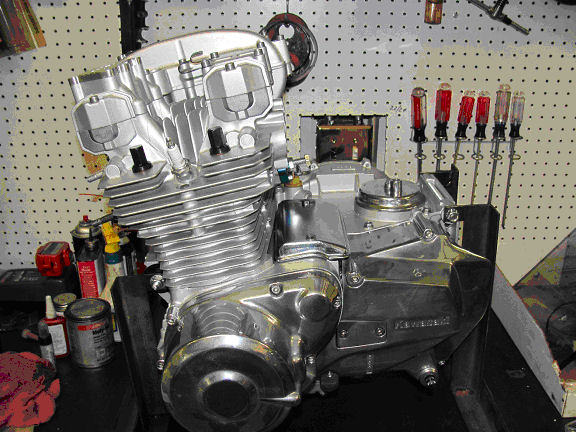
Here is the finished product:
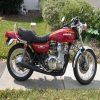
KZ1000J left side.
Finished in Silver.
KZ1000J left side.
Finished in Silver.
Regards
Joe
www.KZ1300.com
Riders:
1968 BSA 441 Shooting Star, 1970 BSA 650 Lightning, 1974 W3, 1976 KZ900, 1979 KZ750 Twin, 1979 KZ750 Twin Trike, 1981 KZ1300, 1982 KZ1100 Spectre, 2000 Valkyrie, 2009 Yamaha Roadliner S. 1983 GL 1100
Projects:
1985 ZN1300
Riders:
1968 BSA 441 Shooting Star, 1970 BSA 650 Lightning, 1974 W3, 1976 KZ900, 1979 KZ750 Twin, 1979 KZ750 Twin Trike, 1981 KZ1300, 1982 KZ1100 Spectre, 2000 Valkyrie, 2009 Yamaha Roadliner S. 1983 GL 1100
Projects:
1985 ZN1300
Attachments:
The following user(s) said Thank You: 79MKII, fitscott, bluezbike, bneedy
Please Log in or Create an account to join the conversation.
- 79MKII
-
- Offline
- User
-
Registered
- Love Them Kaws!
- Posts: 2487
- Thanks: 43
Re: Re:Refinishing the KZ engine to look like new
01 Apr 2015 10:26
Thank you Joe and Bill! ")
The Kaw List:
Current: 79 KZ1000 A3 MKII, 78 KZ1000 A2, 78 KZ1000 Z1-R, 78 KZ650 SR, 80 KE175
Former: 03 KLX400SR, 99 ZRX1000, 82 KZ750 LTD, 80 KZ1000 A4 MKII, 80 KZ1000 LTD, 78 KZ1000 A2, 74 H-2 750 Triple, 78 KL250
Current: 79 KZ1000 A3 MKII, 78 KZ1000 A2, 78 KZ1000 Z1-R, 78 KZ650 SR, 80 KE175
Former: 03 KLX400SR, 99 ZRX1000, 82 KZ750 LTD, 80 KZ1000 A4 MKII, 80 KZ1000 LTD, 78 KZ1000 A2, 74 H-2 750 Triple, 78 KL250
Please Log in or Create an account to join the conversation.
- DOHC
-
- Offline
- Sustaining Member
-
Registered
- Those Doe-Hawks really go!
- Posts: 1269
- Thanks: 593
Re: Re:Refinishing the KZ engine to look like new
12 Apr 2015 21:30KZCSI wrote: Here's Joe's technique. We'll add it to the FileBase once it's restored.
This is a really great write-up. But I went to check to see if the file made it to the file database, and I found that there is no file database any longer.
Is there a way to download this info as a file?
'78 Z1-R in blue
, '78 Z1-R in black,
'78 Z1-R in pieces
My dad's '74 Z1
'00 ZRX1100
My dad's '74 Z1
'00 ZRX1100
Please Log in or Create an account to join the conversation.
Moderators: Street Fighter LTD