
replacing base gasket on a 550
- Zaddict
-
 Topic Author
- Offline
- User
-

Registered
- Enjoying my Zaddiction!
- Posts: 345
- Thanks: 70
replacing base gasket on a 550
05 Oct 2014 22:58
As long as I've got the head off to do some repairs I'm thinking I'll take the opportunity to replace the base gasket to fix a small leak that's been there since I've had my bike. The problem is that despite reading a bunch of threads and looking at the manual I still don't really understand what to expect. When I remove the block should the pistons slide right out? Will they flop around or stay in position? Will the sleeves come out? And what about the rings? I know I'm supposed to use some hose clamps or something similar to compress the rings. Does that mean without that compression the rings would expand too wide to fit back into the sleeves when putting the cylinder block back on?
Clearly I don't have a clue but I'm trying to get one. Thanks very much for any tips!
Clearly I don't have a clue but I'm trying to get one. Thanks very much for any tips!
1990 Zephyr zr550 B1
Wiseco 615cc kit
zx550 cams
SPII ignition system
Kerker stainless steel race exhaust with 1.5" competition baffle
K&N Air Filter...
Wiseco 615cc kit
zx550 cams
SPII ignition system
Kerker stainless steel race exhaust with 1.5" competition baffle
K&N Air Filter...
Please Log in or Create an account to join the conversation.
- loudhvx
-

- Offline
- KZr Legend
-

Registered
- Posts: 10864
- Thanks: 1619
Re: replacing base gasket on a 550
05 Oct 2014 23:10
I thought there was a way to remove the block with pistons still inside so you wouldn't have to mess with the rings etc, just to replace the base gasket. maybe I just imagined it.
1981 KZ550 D1 gpz.
Kz550 valve train warning.
Other links.
Kz550 valve train warning.
Other links.
Please Log in or Create an account to join the conversation.
- Tyler
-
- Offline
- User
-
Registered
- Posts: 845
- Thanks: 92
Re: replacing base gasket on a 550
06 Oct 2014 08:17 - 06 Oct 2014 08:22
Ok, you have to take it all apart because you need to clean botht eh top of the cases and the bottom of the cylinder block to make sure it doesn't leak again.
Your carbs, exhaust, and ignition coils have to come off, then the valve cover, cam chain tensioner and cams. Then remove the head, followed by the cam chain tensioner parts and the idlers. (You are already that far) Lift off the cylinders, the liners will stay put. Its best to remove the pistons at this point because you will be doing a lot of scraping and scrubbing to get the old gasket material off. You may need a piston pin pulling tool to do this. You can also pull all of the cylinder studs out, if they come without a fight, otherwise you may have to leave them and work around it all (that sucks).
You need to try and stuff rags around the connecting rods to keep the gasket material out of the crank case, I would pull the oil pan after you have cleaned up the base gasket area and flush the bottom end with oil or ATF to clean up as much debris as possible before re-assembly. Yup hose clamps work great as ring compressors.
A factory shop manual is HIGHLY recommended for this job. And take you time cleaning up the gasket surfaces, that is the single most time consuming part of the job.
Attachment IMG_47841.jpg not found
If I knew what I was doing all the time life wouldn't be any fun.
'80 KZ650 E 700cc, dyna ignition and coils, frame up restoration, daily driver
'81 KZ1300 A3 full restoration, custom big bore pistons, 1400cc 6 cylinder super bike
"77 KZ650 B1 - Barn Find, work in progeress
"74 Yamaha DT 400 Enduro
'80 KZ650 E 700cc, dyna ignition and coils, frame up restoration, daily driver
'81 KZ1300 A3 full restoration, custom big bore pistons, 1400cc 6 cylinder super bike
"77 KZ650 B1 - Barn Find, work in progeress
"74 Yamaha DT 400 Enduro
Attachments:
Last edit: 06 Oct 2014 08:22 by Tyler.
The following user(s) said Thank You: Zaddict
Please Log in or Create an account to join the conversation.
- Tyrell Corp
-

- Offline
- User
-
Registered
- "You were made as well as we could make you"
- Posts: 1650
- Thanks: 261
Re: replacing base gasket on a 550
06 Oct 2014 12:23
When you removed the head, where all the studs equally tight? The oil pressure on the 550/650/750 series is much higher than the z900/100/1100's so leaks in this area are not uncommon.
If you replace the base gasket you need also to replace the rubber seals on the oil feed nozzles at the bottom of the block. Maybe get a complete top end gasket set which will include these and the valve stem oil seals.
You really need a manual at this stage, the later CV carb kz550 / GPz550 /zx550 motors are all very similar mechanically.
1980 Gpz550 D1, 1981 GPz550 D1. 1982 GPz750R1. 1983 z1000R R2. all four aces
Please Log in or Create an account to join the conversation.
- bountyhunter
-

- Offline
- User
-
Registered
- Posts: 7245
- Thanks: 338
Re: replacing base gasket on a 550
06 Oct 2014 12:26
Be very careful about blocking the scrapings from falling into the crank case. I borrowed the wife's vacuum and would suck up the debris about every two inches of work. Use a single edged razor blade to scrape it. Took a couple of hours to do the whole thing. Mine was bonded at the factory with some kind of very strong gasket bond, so I would use similar for new assembly (like yamabond or 3-bond).
The reason the factory service manual is a must is to get the cam timing right it has diagrams showing chain pin count and other critical items highlighted.
The reason the factory service manual is a must is to get the cam timing right it has diagrams showing chain pin count and other critical items highlighted.
1979 KZ-750 Twin
The following user(s) said Thank You: Zaddict
Please Log in or Create an account to join the conversation.
- MDZ1rider
-

- Offline
- User
-
Registered
- Posts: 381
- Thanks: 118
Re: replacing base gasket on a 550
06 Oct 2014 13:15
You don't have to remove the piston pins or studs to replace the base gasket. It makes it easier to clean the case gasket surface, but the time saved is less than the time spent removing/installing the pistons/studs. If you do decide to remove the pistons, never reuse the c-clips. New ones are less than $2.00 for all 8. Make sure the opening is at the top or bottom when installing them.
The cylinder typically won't lift right off. Gentle taps with rubber mallet at a slight upward angle on each side will eventually break it loose. Stay away from any fins. It doesn't take much to break one. Gentle is the key word. Rocking the crank back and forth can also help. As soon as the cylinder is free, shove shop rags into the cases around the rods. While rare, you don't want a broken ring falling down into the cases when you remove the cylinder.
Your biggest challenge will be compressing the rings when reinstalling the cylinder. Hose clamps work, Try to avoid the type with slots cut in the band. You want a smooth inner surface. Look for Marine hose clamps. The piston/rings will slide across this surface and you don't want scratches. If the slotted type is all you can find, wrap the piston/rings with strips cut from a soda can. Make them just wide enough to cover all 3 rings. The cylinder sleeve has a slight chamfer at the bottom. You need to keep the rings compressed until they are into the chamfer. The base of the cylinder sleeve will push the clamp down the piston as it slides up into the cylinder. Use lots of oil on the piston/rings. Remove the clamp once the rings are inside cylinder.
The following user(s) said Thank You: Zaddict
Please Log in or Create an account to join the conversation.
- loudhvx
-
- Offline
- KZr Legend
-
Registered
- Posts: 10864
- Thanks: 1619
Re: replacing base gasket on a 550
06 Oct 2014 17:48 - 06 Oct 2014 17:50Great tips.MDZ1rider wrote: You don't have to remove the piston pins or studs to replace the base gasket. It makes it easier to clean the case gasket surface, but the time saved is less than the time spent removing/installing the pistons/studs. If you do decide to remove the pistons, never reuse the c-clips. New ones are less than $2.00 for all 8. Make sure the opening is at the top or bottom when installing them.
The cylinder typically won't lift right off. Gentle taps with rubber mallet at a slight upward angle on each side will eventually break it loose. Stay away from any fins. It doesn't take much to break one. Gentle is the key word. Rocking the crank back and forth can also help. As soon as the cylinder is free, shove shop rags into the cases around the rods. While rare, you don't want a broken ring falling down into the cases when you remove the cylinder.
Your biggest challenge will be compressing the rings when reinstalling the cylinder. Hose clamps work, Try to avoid the type with slots cut in the band. You want a smooth inner surface. Look for Marine hose clamps. The piston/rings will slide across this surface and you don't want scratches. If the slotted type is all you can find, wrap the piston/rings with strips cut from a soda can. Make them just wide enough to cover all 3 rings. The cylinder sleeve has a slight chamfer at the bottom. You need to keep the rings compressed until they are into the chamfer. The base of the cylinder sleeve will push the clamp down the piston as it slides up into the cylinder. Use lots of oil on the piston/rings. Remove the clamp once the rings are inside cylinder.
1981 KZ550 D1 gpz.
Kz550 valve train warning.
Other links.
Kz550 valve train warning.
Other links.
Last edit: 06 Oct 2014 17:50 by loudhvx.
Please Log in or Create an account to join the conversation.
- daveo
-

- Offline
- Premium Member
-

Registered
- Posts: 2928
- Thanks: 752
Re: replacing base gasket on a 550
06 Oct 2014 18:22 - 06 Oct 2014 18:24bountyhunter wrote: Be very careful about blocking the scrapings from falling into the crank case. I borrowed the wife's vacuum and would suck up the debris about every two inches of work. Use a single edged razor blade to scrape it. Took a couple of hours to do the whole thing. Mine was bonded at the factory with some kind of very strong gasket bond, so I would use similar for new assembly (like yamabond or 3-bond).
The reason the factory service manual is a must is to get the cam timing right it has diagrams showing chain pin count and other critical items highlighted.
It's nice having wives that let us abuse (and oil) their tools... :whistle:
1982 KZ1100-A2
Last edit: 06 Oct 2014 18:24 by daveo.
Please Log in or Create an account to join the conversation.
- Tyrell Corp
-
- Offline
- User
-
Registered
- "You were made as well as we could make you"
- Posts: 1650
- Thanks: 261
Re: replacing base gasket on a 550
07 Oct 2014 07:53
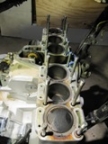
There is a couple of pry points on the block for gentle leverage, you can see the cut outs in the base gasket.
If the block is stuck solid, use a coupe of 1 inch lengths of 2 inch plastic pipe, or wooden blocks put in a couple of the inner pots. Secure cylinder head to block but with only the 5 m6 studs at the front and rear of the cylinder head, turn motor and block is forced off by the pistons upward pressure on the cylinder head - which is bolted to the block with no risk of fin damage.
If the block is stuck solid, use a coupe of 1 inch lengths of 2 inch plastic pipe, or wooden blocks put in a couple of the inner pots. Secure cylinder head to block but with only the 5 m6 studs at the front and rear of the cylinder head, turn motor and block is forced off by the pistons upward pressure on the cylinder head - which is bolted to the block with no risk of fin damage.
1980 Gpz550 D1, 1981 GPz550 D1. 1982 GPz750R1. 1983 z1000R R2. all four aces
The following user(s) said Thank You: Zaddict
Please Log in or Create an account to join the conversation.
- Zaddict
-
Topic Author
- Offline
- User
-
Registered
- Enjoying my Zaddiction!
- Posts: 345
- Thanks: 70
Re: replacing base gasket on a 550
07 Oct 2014 11:41
Such good suggestions, it's like a highlight reel of the all the threads of I've read plus a bunch of other good info. Thanks very much!
I do have one question - Bounty hunter suggested using an adhesive on the gasket. First I've heard of that. I haven't doublechecked with the manual (I do have it), but I'm pretty sure I read other threads recommending that I not put anything on but the gasket. Anybody else have opinions/experience about that?
I do have one question - Bounty hunter suggested using an adhesive on the gasket. First I've heard of that. I haven't doublechecked with the manual (I do have it), but I'm pretty sure I read other threads recommending that I not put anything on but the gasket. Anybody else have opinions/experience about that?
1990 Zephyr zr550 B1
Wiseco 615cc kit
zx550 cams
SPII ignition system
Kerker stainless steel race exhaust with 1.5" competition baffle
K&N Air Filter...
Wiseco 615cc kit
zx550 cams
SPII ignition system
Kerker stainless steel race exhaust with 1.5" competition baffle
K&N Air Filter...
Please Log in or Create an account to join the conversation.
- bountyhunter
-
- Offline
- User
-
Registered
- Posts: 7245
- Thanks: 338
Re: replacing base gasket on a 550
07 Oct 2014 15:14 - 07 Oct 2014 15:16
My manual does not say sealer is required, but they used it at the factory. I bought the bike new and I had to scrape it off so I guess the factory uses it. My philosophy is that there will be decades until I have to pull the cylinder again, so I am going to prevent leaks.
I recall that when I put the cylinder on, I set the head on and pulled it down lightly to set the base gasket and squeeze out the excess sealer. Let it set overnight.
I recall that when I put the cylinder on, I set the head on and pulled it down lightly to set the base gasket and squeeze out the excess sealer. Let it set overnight.
1979 KZ-750 Twin
Last edit: 07 Oct 2014 15:16 by bountyhunter.
Please Log in or Create an account to join the conversation.
- 650ed
-

- Offline
- User
-
Registered
- Posts: 15333
- Thanks: 2833
Re: replacing base gasket on a 550
07 Oct 2014 15:18
Just curious - did the bike have the sealer on the engine case (under the gasket) or the bottom of the cylinders (above the gasket)? I ask because I wonder if they used sealer to hold the gasket in place during assembly rather than to prevent a leak. Ed
1977 KZ650-C1 Original Owner - Stock (with additional invisible FIAMM horn)
Please Log in or Create an account to join the conversation.
Moderators: Street Fighter LTD