
Backfires and misses...
- mtbspeedfreak
-
 Topic Author
- Offline
- User
-

Registered
- Posts: 1413
- Thanks: 36
Backfires and misses...
30 Dec 2013 09:14
I'm almost to the end of the line here, I've tried some things to no avail. My '76 900 is running like crap. It has always been a tad rich, but since moving to Houston, TX from Redlands, CA, it seems extremely rich.
I haven't been riding it nearly as much as I used to. I'd warm it up in the morning, ride 1.5 miles to and from work a few times a week and that'd be it. When warming it up, I try to avoid using the choke to hold the RPMs above idle, but sometimes I do. I know this makes my rich tune even more rich. Anyhow, up until this morning I thought that I had carburetor/fuel issues. Plugs fouled black as night, minor backfires were somewhat common, etc. A few days ago, the sharp crack backfires started... the rifleshot kind.
On Saturday, I was planning on dumping a bottle of Seafoam in my tank and riding around at 5-7k to clean out the cylinders, but she fired up and ran so perfectly that I didn't stop to get Seafoam, just got on the highway and cruised.
The carburetors were clean. Surprisingly clean. I've been meaning to rebuild my set of smoothbores to put on, so instead of working out carburetion issues with two sets, I'll just rebuild those and bolt them on and go from there.
Anyhow, this morning, the bike was missing pretty often. The engine was warmed up and I was at a red light, holding the RPMs to about 1,800. To me, this indicates ignition/electrical issues instead of carburetor/fuel issues. It was not backfiring, just missing. Am I correct?
Here's my course of action:
1) order new jets as a stopgap solution so I can continue riding while rebuilding my smoothbores
2) replace the plugs with cleaned up used ones (I have quite a few on hand) and run some of GM's Top Engine Cleaner through to clean up the worst of the carbon deposits then ride out on the highway at speed
3) replace the plugs for new ones
4) start troubleshooting the electrical system
Sound good? Any comments or suggestions?
- There is roughly a 1,200' elevation decrease (just above sea level here) as well as a drastic humidity increase.
- Internally stock 903cc motor. I have a K&N airbox filter and a Kerker with the street baffle [most restrictive]
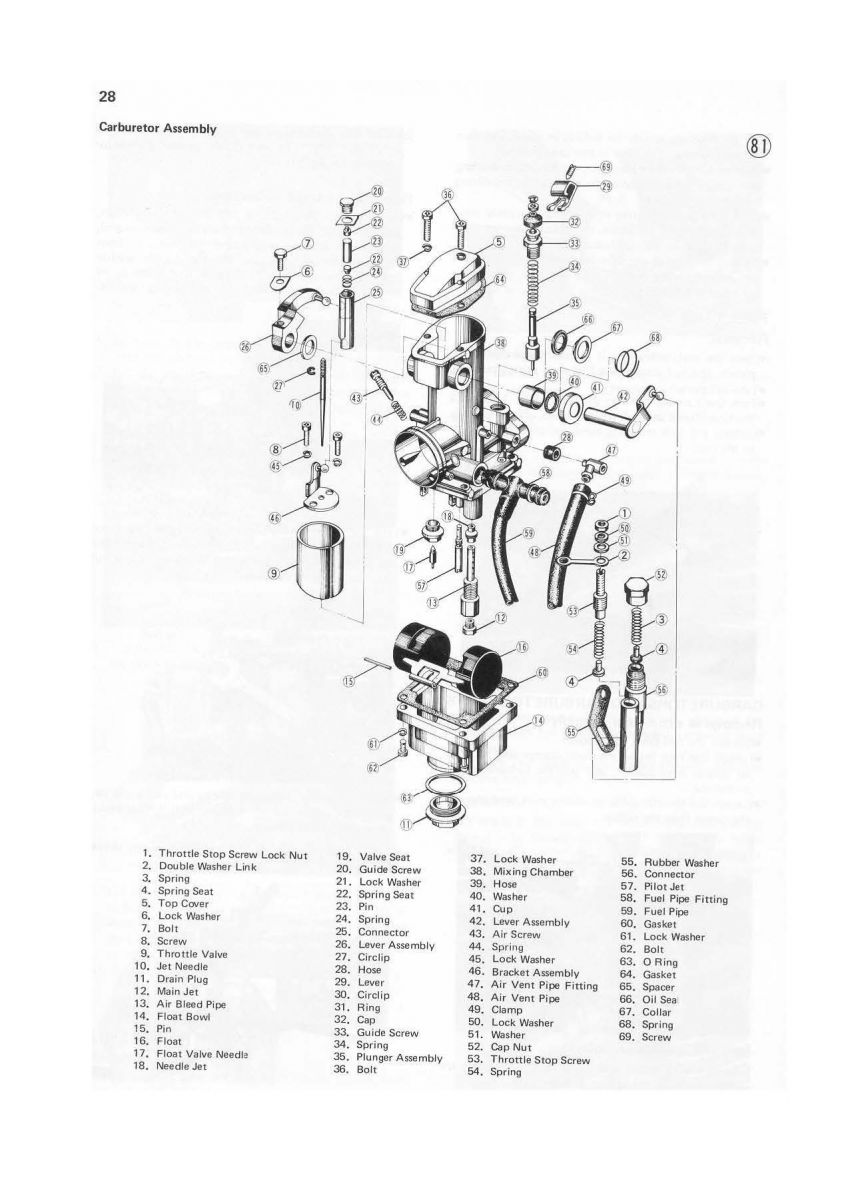
- I have a hunch that my needle jet (the orifice the jet needle slides in and out of) [how's that for a proper set up?] is elongated, #18 on the schematic below
- Also have a Dyna S with the green coils and hotter than stock Denso plugs with MSD 8.5mm wires.
- I have the stock VM26SS's but do not know the main jet sizes (17.5 pilots)
- I do not know what size main jets I'm running at the moment (worn too much that I can't make the numbers out), but they will be replaced soon. I wrote down what size I need and will post that when I get home from work today.
I haven't been riding it nearly as much as I used to. I'd warm it up in the morning, ride 1.5 miles to and from work a few times a week and that'd be it. When warming it up, I try to avoid using the choke to hold the RPMs above idle, but sometimes I do. I know this makes my rich tune even more rich. Anyhow, up until this morning I thought that I had carburetor/fuel issues. Plugs fouled black as night, minor backfires were somewhat common, etc. A few days ago, the sharp crack backfires started... the rifleshot kind.
On Saturday, I was planning on dumping a bottle of Seafoam in my tank and riding around at 5-7k to clean out the cylinders, but she fired up and ran so perfectly that I didn't stop to get Seafoam, just got on the highway and cruised.
The carburetors were clean. Surprisingly clean. I've been meaning to rebuild my set of smoothbores to put on, so instead of working out carburetion issues with two sets, I'll just rebuild those and bolt them on and go from there.
Anyhow, this morning, the bike was missing pretty often. The engine was warmed up and I was at a red light, holding the RPMs to about 1,800. To me, this indicates ignition/electrical issues instead of carburetor/fuel issues. It was not backfiring, just missing. Am I correct?
Here's my course of action:
1) order new jets as a stopgap solution so I can continue riding while rebuilding my smoothbores
2) replace the plugs with cleaned up used ones (I have quite a few on hand) and run some of GM's Top Engine Cleaner through to clean up the worst of the carbon deposits then ride out on the highway at speed
3) replace the plugs for new ones
4) start troubleshooting the electrical system
Sound good? Any comments or suggestions?
2000 ZRX 1100
1976 KZ 900- Daily Driver
1980 LTD 550- Dalton Highway survivor!
If it has tits or tires, it'll give you problems!
1976 KZ 900- Daily Driver
1980 LTD 550- Dalton Highway survivor!
If it has tits or tires, it'll give you problems!
Please Log in or Create an account to join the conversation.
- mtbspeedfreak
-
Topic Author
- Offline
- User
-
Registered
- Posts: 1413
- Thanks: 36
Re: Backfires and misses...
30 Dec 2013 09:17
Also, I've asked this question before, but I'll ask it again - if anyone knows a shop in the Houston area that works on these old bikes, please let me know!
2000 ZRX 1100
1976 KZ 900- Daily Driver
1980 LTD 550- Dalton Highway survivor!
If it has tits or tires, it'll give you problems!
1976 KZ 900- Daily Driver
1980 LTD 550- Dalton Highway survivor!
If it has tits or tires, it'll give you problems!
Please Log in or Create an account to join the conversation.
- MFolks
-

- Offline
- User
-
Registered
- Posts: 6650
- Thanks: 541
Re: Backfires and misses...
30 Dec 2013 11:09
As for the backfiring, tried cleaning the many, and various electrical switches and connectors? Also, inspect the handlebar switch pods, for failed or failing solder joints. These older bikes are starting to show the factory really didn't have good soldering procedures. I'll post soldering repair in another follow on post, but here's the electrical cleaning procedure(print this out for future references):
Cleaning Motorcycle Electrics
Get some of the De-Oxit DN5 electrical contact cleaner and figure on spending a good day going from the front of the bike to the back. It’s a plastic safe cleaner/preservative. www.deoxit.com is their website, and can be purchased at most electronic supply stores.
On the older Kawasaki's, a majority of electrical connectors are inside the headlight housing requiring removal of the headlight, then the fun begins.
Do one set of electrical connectors at a time to avoid mixing up what connects to where. Usually disconnecting, spraying with De-Oxit DN5 and reconnecting is about all you'll need.
However, when encountering the green crud of corrosion, a brass wire brush may be needed on the pins you can reach. Some 400-600 grit wet and dry sandpaper strips rolled into a tube should reach the male and female pins in the more difficult to clean connectors.
Smoker’s pipe cleaners, cotton swabs and wooden toothpicks work as cleaning aids.
Really small electrical connectors may require the use of a welders tip cleaning tool assortment.
Most pins in the connectors are coated with a thin plating of tin, and others may be nothing more than copper or brass.
If moisture is added, the resulting corrosion lowers the voltage/current being carried causing dim lights, slow engine cranking, slow turn signal response and lower input voltage to the ignition coils resulting in weak spark.
The left and right handlebar switch pods will need attention too as they have circuit functions like turn, horn, run/stop, and start. If you discover the soldered connections at the switches are crumbling, I’ve got a repair procedure for this, just ask.
Usually a spritz or two with actuation of the switch is about all needed for these switches unless corrosion is detected and then careful disassembly is required.
The ignition switch may or may be not sealed to allow spraying the internal contacts. I urge caution if attempting to open this up as springs, and ball bearings may fly out never to be seen again!
If your bike has the older style glass tubed fuses, I suggest replacing them as vibration can cause internal failure. AGX is the type used, and most auto parts stores can get them for you.
Clean the fuse holder clips, looking for signs of overheating(discolored insulation, signs of melting). I use metal polish on a cotton swab, followed by spraying another clean swab with the De-Oxit DN5 and then rubbing the inside of the fuse clip.
All battery cables must be clean and tight for maximum current transfer. Check the cables going from the Negative(-) battery terminal/post to the engine mounting bolt
Also the one going from the Positive(+) terminal to the starter solenoid and from there to the starter motor.
If any battery cable feels ”Crunchy” when flexed, replace it as possible corrosion is inside the insulation.
Each "Bullet Connector" will have to be sprayed to ensure good connectivity, especially the ones going to the energizing coil of the starter solenoid.
The alternator output “Bullet Connectors” are usually behind the engine sprocket cover and will need inspecting and cleaning too.
The turn signal light sockets will benefit from a spritz from the contact cleaner along with the tail light/brake light socket.
Some brake light switches can be sprayed on the actuating rod, with the spray running down inside to the electrical contacts, others may be sealed requiring replacement if the switch is intermittent in operation.
Some people put the Di-Electric Grease on cleaned terminations/connectors, I don’t, as I’ve read/heard it can cause problems when it gets hot, actually insulating the connections, so the choice is yours to use or not.
I think I've covered about all of the electrical systems on the bike.........
“I spent a weekend going through every electrical connection and switch on the bike with a little scotchbrite pad and DeOxit - what a difference! Everything was brighter, gauge backlights, indicator lights, turn signals, I was getting a nicer spark, it fired up quicker, etc. Well worth my time. WELL worth it! “
From a forum member at www.kzrider.com
Re: Cleaning the many and various Motorcycle electrics.
I used the De-oxit D-5 spray on all the electrical connections of my 78 Kz1000 that had sat for twenty years .
When I parked the bike in 92 I was starting to have troubles with some of the electrical system, but after pulling everything apart and giving it a spray , reconnecting the connectors and working them back and forth a few times, then gave them another shot of spray to wash them off before the final reconnection.
Everything still works perfectly and has for over 7000 miles this year.
I am extremely happy with the results , a lot of the connectors were green when I started and after the cleaning they looked new ( shiny gold )
I found the Deoxit D-series, D-5 spray in a 4 oz can at a big electronics store called Frys in Illinois, don't get the small cans at Radio Shack , they are different and meant for computer type stuff.
store.caig.com/s.nl/sc.2/category.188/.f
Trust MFolks , the guy's a true rocket scientist and really knows what he's talking about.
JD
1982 GPZ1100 B2
General Dynamics/Convair 1983-1993
GLCM BGM-109 Tomahawk, AGM-129A Advanced Cruise Missile (ACM)
General Dynamics/Convair 1983-1993
GLCM BGM-109 Tomahawk, AGM-129A Advanced Cruise Missile (ACM)
Please Log in or Create an account to join the conversation.
- MFolks
-
- Offline
- User
-
Registered
- Posts: 6650
- Thanks: 541
Re: Backfires and misses...
30 Dec 2013 11:14
Some questions:
Stock ignition coils, sparkplug wires & sparkplug caps? If so, you should replace them all, as they do not age well, especially the coils & caps. Even when new, the coils were marginal, add years of cooking under the tank, and they will become intermittent when hot. The sparkplug caps have an internal, 5000 ohm resistor, and all caps should be replaced.
Ignition Coils And Sparkplug Wire Choices
What came with the bike, were ignition coils that even when new were marginal, add years of cooking under the tank in the stop and go traffic, and the ignition coils will probably fail when hot.
Replacement coils can be bought at www.z1enterprises.com
I believe “Emgo” is the brand. They also carry the popular Dyna 2.2 and 3 ohm coils, along with replacement sparkplug wires.
Now, you have a choice on sparkplug wires:
1.Copper plug wires with no supression caps (the best choice, but will produce audio noise on Radio’s and TV’s). Not only do the copper core wires deliver better spark, they will also deliver a much longer lifespan - carbon core wires are prone to erratic spark delivery and early breakdown, & short lifespan.
2.Copper plug wires with supression caps (a built in 5000 ohm resistor, that can sometimes fail, like what came with the bike). These should be checked with a multimeter now and then, as heat can cause them to become intermittent.
3.Copper plug wires with no supression caps, but using resistor plugs(the “R” in the plug number).
4.Supression plug wires with no supression caps.
NEVER use resistor plugs combined with supression caps along with supression plug wires, as now there will be possibly three (3) sources of resistance in the secondary windings of the ignition coils, greatly reducing the spark energy.
Another choice is the Accel 3 ohm coils, with a similar, primary(small wire)electrical connection, using ring terminals as the Dyna ignition coils do. Whatever brand of coil you go with, make sure the primary wires will clear the mounting hardware, as the spacers come close, possibly blowing a fuse. Some riders have replaced the metal spacers with non conductive Nylon spacers, reducing the chance of an electrical problem.
7mm sparkplug wires will fit the stock ignition coils(if they have replaceable wires, indicated by screw off caps on the coils with ridges). The sparkplug wires fit into a port with a brass ”Stinger” that goes into the sparkplug wire or lead(the Brit’s. Canadians, and other countries call the sparkplug wires (“High Tension Leads”).
1982 GPZ1100 B2
General Dynamics/Convair 1983-1993
GLCM BGM-109 Tomahawk, AGM-129A Advanced Cruise Missile (ACM)
General Dynamics/Convair 1983-1993
GLCM BGM-109 Tomahawk, AGM-129A Advanced Cruise Missile (ACM)
Please Log in or Create an account to join the conversation.
- MFolks
-
- Offline
- User
-
Registered
- Posts: 6650
- Thanks: 541
Re: Backfires and misses...
30 Dec 2013 11:17
Repairing crumbled switch and light bulb socket soldering.
Some of the older Kawasaki's, and possibly the other brands of motorcycles may be experiancing crumbled or failed switch and light bulb factory soldering jobs. Here's a repair procedure:
Repairing Motorcycle Soldered Connections
When repairing soldered wires on motorcycle switches or light bulbs sockets, have the following on hand:
1. A 25 Watt soldering iron or one that the wattage can be adjusted.
2. Rosin core solder.
3. Rosin flux or soldering paste (Never use solder or soldering paste designed for plumbing work, as it contains an acid that will corrode the electrical joint, ruining it).
4. 91% rubbing Alcohol, or 70%. The lower percentage will clean up flux residue, but not as good as the higher percentage stuff. Acetone is also a good soldered joint cleaner, but’s its very flammable.
5. A cut down ½” paint brush, or acid brush for scrubbing the repaired solder joint.
6. Clean rags or paper towels
7. A damp sponge to keep the soldering iron tip clean.
8. Some “Solder Wick” a braided bare copper wire designed to collect heated excess solder, aiding in joint preperation, available at electronic supply stores.
9. Some wooden toothpicks.
10. Small Hemostats or clip on heatsinks.
A. Before soldering, “Tin” the soldering iron tip by plugging it in or turning the iron on, allowing it to get to operating temperature(2-3 minutes).
B. Unroll about 3” of solder from the roll of rosin core solder & then using a clean rag or paper towel moistened with Alcohol, wipe the unrolled solder, removing the finger print oils that will create a poor solder joint.
C. Apply a small amount of solder to the now heated soldering iron tip, wiping the excess off with the wet sponge or rag, keeping a thin layer of solder on the soldering iron.
D. The soldering iron is now ready for use, but before applying the heated tip to a wire, wipe the tip on the damp sponge or rag, this removes any oxidized solder and makes for a much better connection.
E. If the joint to be repaired is grey in color or appears “Crumbled”, apply some rosin soldering paste or flux to the joint with a small toothpick of screwdriver, and then apply the soldering iron tip for a few seconds.
G. The fluxed joint should clean up, allowing for a better connection. If no luck, use the solder wick to remove all traces of the old solder by apply in it between the soldering iron tip and the bad joint.
H. Hemostats and clip on heatsinks will be used to prevent the wire insulation from burning, overheating & pulling away from the connection.
I. Apply a small amount of flux to the joint to be repaired & then a very short duration of heated soldering iron tip & solder(like a few seconds or so).
J. Clean off the repaired joint with the brush & rubbing Alcohol, the newly repaired joint should appear clean and bright, almost as if it were polished, with no voids or holes.
This information comes from years of missile test cable and equipment assembly, when I worked at General Dynamics/Convair division in San Diego California, on the BGM-109 Tomahawk and later on the AGM-129 Advanced Cruise Missile. This was from 1983-1993.
1982 GPZ1100 B2
General Dynamics/Convair 1983-1993
GLCM BGM-109 Tomahawk, AGM-129A Advanced Cruise Missile (ACM)
General Dynamics/Convair 1983-1993
GLCM BGM-109 Tomahawk, AGM-129A Advanced Cruise Missile (ACM)
Please Log in or Create an account to join the conversation.
- TexasKZ
-

- Offline
- Platinum Member
-

Registered
- Posts: 8193
- Thanks: 2675
Re: Backfires and misses...
30 Dec 2013 11:37
Cycle Sports Ltd, clay Road a bit east of Gessner.
1982 KZ1000 LTD parts donor
1981 KZ1000 LTD awaiting resurrection
2000 ZRX1100 not ridden enough
www.kzrider.com/11-projects/620336-anoth...uild-thread?start=24
1981 KZ1000 LTD awaiting resurrection
2000 ZRX1100 not ridden enough
www.kzrider.com/11-projects/620336-anoth...uild-thread?start=24
Please Log in or Create an account to join the conversation.
- bountyhunter
-

- Offline
- User
-
Registered
- Posts: 7245
- Thanks: 338
Re: Backfires and misses...
30 Dec 2013 12:23
First thing I would check is the timing advancer assembly. Mine was screwing up and caused hard starting, rough running and backfires.
A bad coil will also cause all of the above.
I would do the basic check of compression and valve clearances just to make sure they are OK.
You said you are running air filter pods? If so, a previous owner may have had to rich everything up to get it to run. The option of going to a stock airbox, stock jets and needle position could get you back to a place where it runs better.
1979 KZ-750 Twin
Please Log in or Create an account to join the conversation.
- sbc1320
-
- Offline
- User
-
Registered
- Posts: 373
- Thanks: 38
Re: Backfires and misses...
30 Dec 2013 12:25bountyhunter wrote:
You said you are running air filter pods? If so, a previous owner may have had to rich everything up to get it to run. The option of going to a stock airbox, stock jets and needle position could get you back to a place where it runs better.
K&N airbox filter.
1980 KZ1000 LTD-B4(MK II engine) - Progressive suspension, MTC pistons, Dynojet Stage III, all wear items replaced, WFO paint scheme(1978), etc..
Past bikes- 2 1976 Kz900's, 5 1975-76 Honda CB750's, Honda 500 -4, Honda 250, Honda 125, Honda 100, Suzuki RM 250, Honda XL350, Kawasaki KLR 650, etc..
Past bikes- 2 1976 Kz900's, 5 1975-76 Honda CB750's, Honda 500 -4, Honda 250, Honda 125, Honda 100, Suzuki RM 250, Honda XL350, Kawasaki KLR 650, etc..
Please Log in or Create an account to join the conversation.
- mtbspeedfreak
-
Topic Author
- Offline
- User
-
Registered
- Posts: 1413
- Thanks: 36
Re: Backfires and misses...
30 Dec 2013 21:14 - 30 Dec 2013 21:14MFolks wrote: “I spent a weekend going through every electrical connection and switch on the bike with a little scotchbrite pad and DeOxit - what a difference! Everything was brighter, gauge backlights, indicator lights, turn signals, I was getting a nicer spark, it fired up quicker, etc. Well worth my time. WELL worth it! “
From a forum member at www.kzrider.com
That is my quote! haha Totally forgot about that stuff (bought a new can a few months ago - it's been quite some time since I went through and "deoxitidized" everything). I'll do that on my day off on Wednesday then hopefully run the Top Engine Cleaner through over the weekend.
TexasKZ wrote: Cycle Sports Ltd, clay Road a bit east of Gessner.
Thank you, I will check them out soon.
bountyhunter wrote: First thing I would check is the timing advancer assembly. Mine was screwing up and caused hard starting, rough running and backfires.
A bad coil will also cause all of the above.
I would do the basic check of compression and valve clearances just to make sure they are OK.
Yeah, the ignition advancer is on my short list of things to check as well.
To give y'all a bit of history on this bike - I bought it in 2010 with 14k miles on it and have treated it very well since. I've ridden 30k miles in the last 3 years and know my way around it very well, which is why it's bugging me so much that I can't get this backfire/miss issue resolved.
2000 ZRX 1100
1976 KZ 900- Daily Driver
1980 LTD 550- Dalton Highway survivor!
If it has tits or tires, it'll give you problems!
1976 KZ 900- Daily Driver
1980 LTD 550- Dalton Highway survivor!
If it has tits or tires, it'll give you problems!
Last edit: 30 Dec 2013 21:14 by mtbspeedfreak.
Please Log in or Create an account to join the conversation.
- mtbspeedfreak
-
Topic Author
- Offline
- User
-
Registered
- Posts: 1413
- Thanks: 36
Re: Backfires and misses...
02 Jan 2014 17:54
Alright, so after a lot more thinking, a bit of talking, [and little doing, unfortunately], I am fairly certain that my valve guides are shot and oil is leaking down into cylinders #1 and #2. Only 2 cylinders really show any kind of fouling, the plugs read fine on #3 and #4 indicating that the fuel mixture is somewhat fine. Also ruled out is ignition coil issues as #1 and #4 run from a different coil than cylinders #2 and #3.
2000 ZRX 1100
1976 KZ 900- Daily Driver
1980 LTD 550- Dalton Highway survivor!
If it has tits or tires, it'll give you problems!
1976 KZ 900- Daily Driver
1980 LTD 550- Dalton Highway survivor!
If it has tits or tires, it'll give you problems!
Please Log in or Create an account to join the conversation.
- KennyJ
-

- Offline
- User
-
Registered
- Posts: 32
- Thanks: 3
Re: Backfires and misses...
13 May 2024 19:06
Greetings from Winnipeg. I have a 76 KZ 900 just recently finished the restoration which took me 3 years....I was in no hurry. Anyways, if you engine is running rich, lower the fuel level in the fuel bowels. If you find this does not resolve the issue, raise the clip on the needle jet to the second groove from the top as this will restrict the fuel from entering the cylinders. Do only one thing at a time and test drive the bike to see if the issue goes away. Sometimes it is a combination of several different things that causes problems. I have spent literally hours troubleshooting my engine and still get the odd backfire but all in all the engine runs very well . Running the engine a little bit Rich will not hurt it and will make the engine run a little bit cooler
However you will find that you will go through a lot of spark plugs. Better to try and find the cause of the problem and correct it. Be prepared to spend a lot of time troubleshooting. Also, keep a log book on what you have done and what the outcome was . It's easy to get confused and forget things..... Especially when frustration sets in. Good Luck
However you will find that you will go through a lot of spark plugs. Better to try and find the cause of the problem and correct it. Be prepared to spend a lot of time troubleshooting. Also, keep a log book on what you have done and what the outcome was . It's easy to get confused and forget things..... Especially when frustration sets in. Good Luck
Please Log in or Create an account to join the conversation.
Moderators: Street Fighter LTD