
How to..
- geerbangr
-

- Offline
- User
-

Registered
- Posts: 298
- Thanks: 4
Re: How to..
22 Nov 2013 11:58 - 22 Nov 2013 11:59Attachment image_2013-11-22.jpg not found
So what's the deal with the real McCoy as Patton showed a pic of ?? Nobody sells the proper ring compressor ?
1978 KZ 1000
I go by Jason
I go by Jason
Attachments:
Last edit: 22 Nov 2013 11:59 by geerbangr.
Please Log in or Create an account to join the conversation.
- guitargeek
-
- Offline
- User
-
Registered
- Elitist, arrogant, intolerant, self absorbed.
- Posts: 1183
- Thanks: 50
Re: How to..
22 Nov 2013 12:07I'd never even seen one of those before...geerbangr wrote: So what's the deal with the real McCoy as Patton showed a pic of ??
1980 KZ750-H1 (slightly altered)
1987 KZ1000-P6 "Ponch"
1979 GS1000 "Dadzuki"
1987 KZ1000-P6 "Ponch"
1979 GS1000 "Dadzuki"
Please Log in or Create an account to join the conversation.
- Patton
-

- Offline
- KZr Legend
-

Registered
- Posts: 18568
- Thanks: 2101
Re: How to..
22 Nov 2013 12:31
Special service tool "Piston Ring Compressor Set"
57001-112 for Z1/KZ900
57001-532 for KZ1000
Good Fortune!")
57001-112 for Z1/KZ900
57001-532 for KZ1000
Good Fortune!
1973 Z1
KZ900 LTD
KZ900 LTD
Please Log in or Create an account to join the conversation.
- geerbangr
-
- Offline
- User
-
Registered
- Posts: 298
- Thanks: 4
Re: How to..
22 Nov 2013 12:32 - 22 Nov 2013 12:33
I guess if you can't buy on like that maybe fabricating one is on order. :woohoo: Perhaps I could fab a couple and well you know.
It sure seems to me that any other method would be a pita.
It sure seems to me that any other method would be a pita.
1978 KZ 1000
I go by Jason
I go by Jason
Last edit: 22 Nov 2013 12:33 by geerbangr.
Please Log in or Create an account to join the conversation.
- guitargeek
-
- Offline
- User
-
Registered
- Elitist, arrogant, intolerant, self absorbed.
- Posts: 1183
- Thanks: 50
Re: How to..
22 Nov 2013 12:51
Eh, once you've done it a couple times, it becomes routine.
Caveat: When assembling the 1089 motor for Ponch, I had my niece install the wrist pin retainer clips. Young people with small, clever fingers are sometimes convenient to have around!")
Caveat: When assembling the 1089 motor for Ponch, I had my niece install the wrist pin retainer clips. Young people with small, clever fingers are sometimes convenient to have around!
1980 KZ750-H1 (slightly altered)
1987 KZ1000-P6 "Ponch"
1979 GS1000 "Dadzuki"
1987 KZ1000-P6 "Ponch"
1979 GS1000 "Dadzuki"
Please Log in or Create an account to join the conversation.
- koolaid_kid
-
- Offline
- User
-
Registered
- Posts: 783
- Thanks: 99
Re: How to..
22 Nov 2013 13:12
I made some long, thin wedges out of some scrap ABS plastic I had laying around. Took a while, and a few retries, but worked out well and did not score any metal like a ring compressor might.
You could use your fingers, but it might result in a bit of bleeding. :ohmy:
You could use your fingers, but it might result in a bit of bleeding. :ohmy:
1983 GPz 750
810 Wiseco, Kerker, K&N, DynoJet S3, Accel, Progressive, etc.
810 Wiseco, Kerker, K&N, DynoJet S3, Accel, Progressive, etc.
Please Log in or Create an account to join the conversation.
- Patton
-
- Offline
- KZr Legend
-
Registered
- Posts: 18568
- Thanks: 2101
Re: How to..
22 Nov 2013 13:31 - 22 Nov 2013 13:44timebomb33 wrote: the reason i like to use chop sticks is they are longer and its easier to get in around the cylinder stud with them also they don't come apart like popsicle sticks sometimes do.
That would be "bamboo" chop sticks.
Good Fortune!
1973 Z1
KZ900 LTD
KZ900 LTD
Last edit: 22 Nov 2013 13:44 by Patton.
Please Log in or Create an account to join the conversation.
- Patton
-
- Offline
- KZr Legend
-
Registered
- Posts: 18568
- Thanks: 2101
Re: How to..
22 Nov 2013 23:24 - 22 Nov 2013 23:27Patton wrote: Some folks use thin metal strips under the zip tie, whereby both slide down as the rings enter the bore. The strips may be cut from an aluminum can.)
The "strips" surround the rings, and are temporarily held snugly in position with zip ties.
Alternatively, the strips may be fashioned of sections cut from a plastic bottle or a biscuit tin.
The plastic is reportedly less prone to scratching or nicking any metal engine parts.
Good Fortune!
1973 Z1
KZ900 LTD
KZ900 LTD
Last edit: 22 Nov 2013 23:27 by Patton.
Please Log in or Create an account to join the conversation.
- KZB2 650
-

- Offline
- User
-
Registered
- Posts: 1475
- Thanks: 265
Re: How to..
23 Nov 2013 05:51OnkelB wrote: Assuming we're talking about a 4-cylinder engine (?) it's easier to install the two inside pistons first.
Install the base gasket and whatever o-rings, cam chain guides etc. you have there.
Rotate the crank until pistons 1 and 4 are all the way down and 2 and 3 are all the way up.
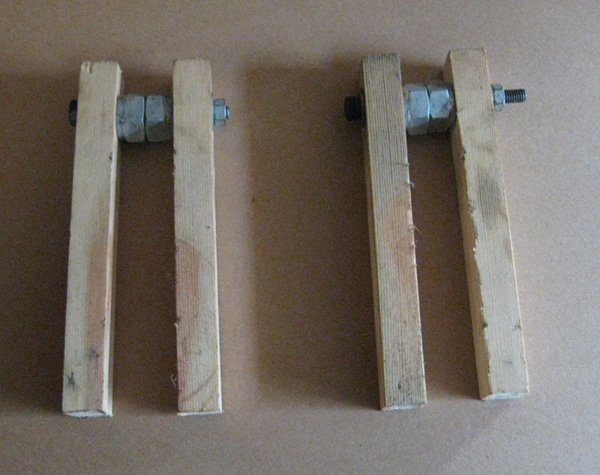
Insert wooden supports between the base gasket and pistons 2 and 3 (I made the supports pictured below in like 5 minutes) and rotate the crank until pistons 2 and 3 are resting against the supports and are as centered as possible.
Apply a thin coat of assembly lube or engine oil to the cylinder bores, slide the cylinder block onto the studs and insert the top of pistons 2 and 3 into their bores.
Compressing the rings with whatever you need (I've never used anything but my hands) gently slide/wiggle the block down over the rings - remember to space the ring gaps 120 degrees apart.
Once you have pistons 2 and 3 installed lift them off the supports by rotating the crank and remove the supports.
Rotate the crank so that 2 and 3 comes down and 1 and 4 comes up and repeat the above for pistons 1 and 4, there you go.
Edit: Btw, when installing the piston pin clips, DO NOT forget to stuff rags or whatever in the case holes around the rods, clips down the crank case is not a good thing. :whistle: :pinch:
I had excellent results doing it this way and just using pop cycle sticks to gently push the rings in and gently rocking the cyl. You'll feel it when you hit the sweet spot of the ring. Was scared to death (I swear I can't remember anything that ever worried me more ) as more than a few told me to be careful of the oil rings a they are easy to fold one of the thin oil rings out of the grove by my cyl went over them quite easily and have equal 160 psi all across all 4 cyl after 500 miles.
1978 KZ650 b-2
700cc Wiseco kit 10 to 1.
1980 KZ750 cam, ape springs, stock clutch/ Barnett springs.
Vance and Hines Header w/ comp baffle and Ape pods, Dyna S and green coils, copper wires.
29MM smooth bores W/ 17.5 pilots, 0-6s and 117.5 main
16/42 gearing X ring chain and alum rear JT sprocket.
700cc Wiseco kit 10 to 1.
1980 KZ750 cam, ape springs, stock clutch/ Barnett springs.
Vance and Hines Header w/ comp baffle and Ape pods, Dyna S and green coils, copper wires.
29MM smooth bores W/ 17.5 pilots, 0-6s and 117.5 main
16/42 gearing X ring chain and alum rear JT sprocket.
Please Log in or Create an account to join the conversation.
- Powerstroke_fan
-
- Offline
- User
-
Registered
- Posts: 1017
- Thanks: 83
Re: How to..
23 Nov 2013 12:07 - 23 Nov 2013 12:08
After i found some wide zip ties ( mine ended up coming from our local phone company via a friend) i wont use anything else. The ties i got are wide enough to cover all the rings. they even have a metal fang type deal instead of the standard plastic end so i can get a little screw driver in there to remove the tie without ruining them. I have used them the last four or five times. They work great. no fuss and no worries about the rings binding or bending or overlapping. Just make sure the tie is tight on the pistons.
1980 kz1000B4 LTD- 1327cc 9-1 comp
Ported J model head
Psp-3x cams
RS 36s
Welded MK11 crank
Back-cut MK11 trans
MTC 2 stage lock up
Stretched 4-6 over running Hayabusa rear rim with 190 rear tire
Complete frame brace kit installed
And Much Much more- SOLD
2014- ZX14R all stock for now
Ported J model head
Psp-3x cams
RS 36s
Welded MK11 crank
Back-cut MK11 trans
MTC 2 stage lock up
Stretched 4-6 over running Hayabusa rear rim with 190 rear tire
Complete frame brace kit installed
And Much Much more- SOLD
2014- ZX14R all stock for now
Last edit: 23 Nov 2013 12:08 by Powerstroke_fan.
Please Log in or Create an account to join the conversation.
- racer54
-

- Offline
- Sustaining Member
-

Registered
- Posts: 1903
- Thanks: 114
Re: How to..
23 Nov 2013 14:01
Sounds like a lot of backyard shadetree mechanics around these here parts! Chop sticks, pop-sickle sticks, 2x4's, tin cans, plastic tie wraps, etc. etc. etc.....Kawasaki makes all these tools especially for helping and you use peices of wood laying around instead? Wow! I feel right at home...I use sticks and 2x4's myself... :whistle: Get the pistons started in bores and then using sticks start working rings up into the cylinder on both pistons, working back and forth til the cylinder drops down onto piston and then work on 1 and 4 and repeat. We don't need no stinking tools!
Get the pistons started in bores and then using sticks start working rings up into the cylinder on both pistons, working back and forth til the cylinder drops down onto piston and then work on 1 and 4 and repeat. We don't need no stinking tools!
1980 LTD (changed over the years), 1979 LTD (being rebuilt), 1977 KZ turbo and various KZ's in various states of build. KLX110
Please Log in or Create an account to join the conversation.
- bountyhunter
-

- Offline
- User
-
Registered
- Posts: 7245
- Thanks: 338
Re: How to..
23 Nov 2013 14:54Paint stir sticks can be cut and stacked to make a lot of useful tools like the spacers to hold the pistons up.... and you can get them free at Home Depot.racer54 wrote: Sounds like a lot of backyard shadetree mechanics around these here parts! Chop sticks, pop-sickle sticks, 2x4's, tin cans, plastic tie wraps, etc. etc. etc.....Kawasaki makes all these tools especially for helping and you use peices of wood laying around instead? Wow! I feel right at home...I use sticks and 2x4's myself... :whistle:
1979 KZ-750 Twin
Please Log in or Create an account to join the conversation.
Moderators: Street Fighter LTD