
KZ650 B2 cam timing trouble
- bluej58
-
 Topic Author
- Offline
- Sustaining Member
-

Registered
- The chrome don't get you home
- Posts: 2481
- Thanks: 511
KZ650 B2 cam timing trouble
08 Jul 2013 00:25 - 08 Jul 2013 00:31
I screwed up !
While reinstalling the intake cam after replacing the shims I was having a hard time getting the cam to seat so I decided to loosen the bolt on the tensioner and it shot forward.
After that I ended up with too much slack so I turned the crank and was able to loose the extra slack in the chain but the exhaust cam mark does not line up even with top of the head when I have it set to the 1 and 4 TDC mark, neither does the intake cam mark.
Lou mentioned in one of the many posts I have been reading through that a loose cam chain sounds like something fell down there and was holding the tensioner back and I wonder if a part may have come off the tensioner when it shot forward ?
I don't want to create more trouble with out consulting you guys but I was wonder if I could remove the tensioner with out screwing things up more.
The way the cams are sitting in reference to each other maybe I jumped a tooth ???
Thanks for your help.
JD
Pictures of the cams are with the crank set at 1-4 TDC
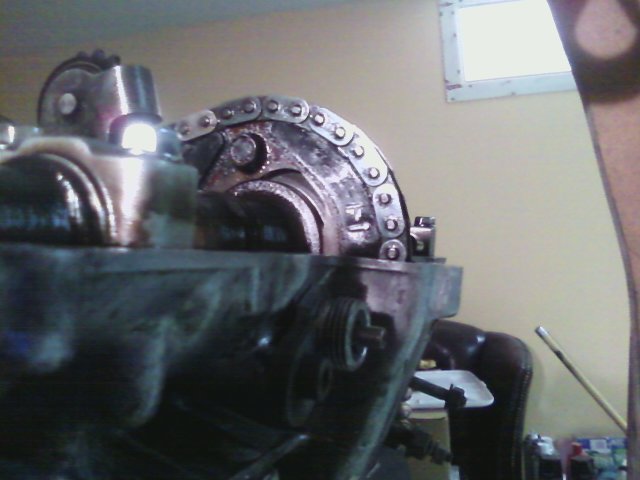
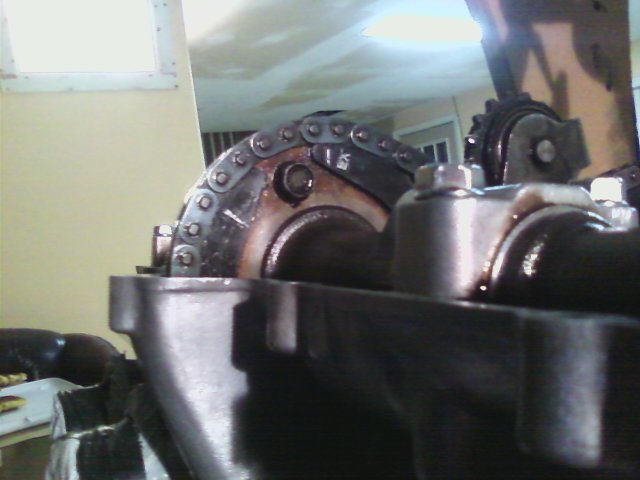
numbers 13 through 20 are the B2 model tensioner

While reinstalling the intake cam after replacing the shims I was having a hard time getting the cam to seat so I decided to loosen the bolt on the tensioner and it shot forward.
After that I ended up with too much slack so I turned the crank and was able to loose the extra slack in the chain but the exhaust cam mark does not line up even with top of the head when I have it set to the 1 and 4 TDC mark, neither does the intake cam mark.
Lou mentioned in one of the many posts I have been reading through that a loose cam chain sounds like something fell down there and was holding the tensioner back and I wonder if a part may have come off the tensioner when it shot forward ?
I don't want to create more trouble with out consulting you guys but I was wonder if I could remove the tensioner with out screwing things up more.
The way the cams are sitting in reference to each other maybe I jumped a tooth ???
Thanks for your help.
JD
Pictures of the cams are with the crank set at 1-4 TDC
numbers 13 through 20 are the B2 model tensioner
78 KZ1000 A2A
Attachments:
Last edit: 08 Jul 2013 00:31 by bluej58.
Please Log in or Create an account to join the conversation.
- 650ed
-

- Offline
- User
-

Registered
- Posts: 15343
- Thanks: 2832
Re: KZ650 B2 cam timing trouble
08 Jul 2013 08:55 - 08 Jul 2013 08:56
Regarding the possibility of it jumping a tooth - take a look in the Kawasaki Service Manual under the section marked "Disassembly - Engine Installed." If your manual is similar to mine, under the sub-section "Camshaft, Upper Chain Sprocket Guide" you will find a drawing showing cam chain timing; it explains how to position the cams and count the number of cam chain link pins between the marks on the cams to ensure the cam timing is correct. Let me know if you cannot find it. Ed
1977 KZ650-C1 Original Owner - Stock (with additional invisible FIAMM horn)
Last edit: 08 Jul 2013 08:56 by 650ed.
The following user(s) said Thank You: bluej58
Please Log in or Create an account to join the conversation.
- Patton
-

- Offline
- KZr Legend
-

Registered
- Posts: 18640
- Thanks: 2101
Re: KZ650 B2 cam timing trouble
08 Jul 2013 11:55
Due to non-functioning links posted in other threads, here for reference are the contents of some informative posts on this subject by RonKZ650:
Post #475461 by RonKZ650:
Yes, you need to lock the tensioner as you already know. This is the 6mm bolt on the side of the tensioner body. To lock the tensioner, simply remove that short bolt and thread in a longer bolt that will tighten against the tensioner to hold it in place. After this is done remove your valve cover. If you're careful and no moron has used gasket sealer you can remove the cover without ruining the gasket and it can be reused indefinately. Now to be safe turn the motor over clockwise with a 17mm socket on the right end of the crank until your timing marks for 1-4 indicate TDC. Now look at the cams and see the arrow on the exhaust sprocket pointing straight forward aligned with the top surface of the head and your intake facing straight back lining up with the top of the head. If the arrows are not this way, turn the motor over 1 complete revolution until 1-4 are again at TDC. Now you have cams in correct position should an accident happen during disassembly. Now the way to remove the cams as to not disturb the timing. Of course first remove the center idler sprocket from between the cams and now work on one cam at a time. Remove all 4 cam caps from one cam, push down on the chain where your center idler was and at the same time lift the cam towards the center of the engine. Be sure and keep the chain tight going down in the engine and keep all slack between the cams. Once the cam is in the center of the engine you can do your shim swaps, then carefully reposition the cam in place. The important part is keep all slack between the cams and the chain always tight going down into the engine. Bolt up the caps and you're done with that cam. Repeat for the other cam. Do it right and timing has not been goofed up. This is direct from Kawasaki 4/77 service bulletin. Get it all bolted up, reinstall your short bolt in the tensioner and you're done. Tighten cam caps to 8ft/lb or less.
Post #249136 by RonKZ650:
Of course you need to tighten the cam caps, and the cams will settle in place and you'll have your slack. No way the cam can ever lay flat until you fully install. So line the T mark up on your advancer, look at the arrow on the exhaust cam and visualize where it will line up when the bolts are tightened, torque the cam down enough for it to be fully seated, look at your arrow and if you've guessed wrong by a tooth or two, go back and redo. After the exhaust is lined up, count back your 36 teeth and line the intake cam there, torque the intake cam, then press down on the chain between the cams to get enough slack to install the center idler sprocket, turn the engine clockwise slightly to take slack out, then install the tensioner if it's been removed, turn the engine over 1 revolution to the T mark and see both arrows lining up correctly with the head. There is no reason to ever remove the tensioner when removing the cams because on pre 1979 manual tensioner it will stay set right where it was, on 79-up lock the tensioner as instructed in the manual.
Post #221680 by RonKZ650:
I'll post my method for checking clearances in case you haven't read it. I try for .10-.15 range on the clearances. The way I do it, and this came right from a factory Kawasaki mechanic is to turn the engine over slowly with your 17mm wrench on the end of the crank while constantly trying to insert a .10mm feeler between the cam and bucket. If anywhere throughout the entire rotation, it can be inserted, try a .15mm feeler and see if it can be inserted anywhere throughout the rotation. If the .10mm cannot be inserted, try the .05mm. The key here is to only use feelers in increments of .05mm because that's the size the shims are available in. When you find which feeler fits and which one doesn't we call that the clearance. So if a .10mm fits, a .15 does not, our clearance is considered .10mm. Do this for each valve. To me this is the only logical way to approach it, as I don't care if clearance is really .10mm, or .12mm or .13mm because shims are only available in .05mm increments. This way you really need only a .05, .10, .15 and .20mm feeler, none of the others do you one bit of good. This is all debatable and others don't like my procedure, and that's fine doing it by the book too.
The one thing I'm sure no one can contest though is to change shims on a KZ650 there is no need to ever completely remove the camshafts. This eliminates the need to even care where you position the engine, but it's still best to have the timing marks for the camshafts lined up with the front and rear of the engine in case of mishap. Doing it this way there is no need to retime the engine. The way to do it is to remove your center camchain sprocket from between the camshafts, then unbolt only one camshaft. Carefully lift it up keeping the chain tight going down in the engine and move the camshaft to the center of the engine. Be sure and keep chain tight down into the engine and keep all slack between the camshafts. Change your shims on those valves, carefully move the camshaft back into place keeping the chain tight down the engine. Bolt the camshaft back in and you're done. Repeat on the other cam. Now if you've kept the chain always tight going down into the engine the timing is exactly where you left it and you're job is done.
Post #146192 by RonKZ650:
Unfortunately the KZ650 is underbucket shims so the special tools for the KZ900-1000 do not apply. Camshaft removal is necessary. This issue has been discussed here quite a bit. Everyone has a different procedure. As I’d wager to bet I’m the highest mileage rider here on KZs I’ve done many a shim and this is my procedure and I’ve not read anyone else’s that works as well.
To check clearances only use feeler gauges in the same increments as shims are available, so you need a .05mm, .10mm, .15mm, and a .20mm for the most part, don’t bother with in-between sizes. Take off your right side points cover and turn the engine over slowly while constantly trying to fit a .10mm feeler between the bucket and cam. If at any point of cam rotation the feeler slides through, move up to .15mm and see if it slides through at any point of rotation. If .10mm did not fit, move down to .05mm. What you want to do is find the largest feeler that will fit anywhere in the rotation of the engine for each valve, but we only care in .05mm increments. Why is this? Because shims only come in .05mm size increments. I try to get my valves all where a .10mm feeler fits and a .15 does not fit. This means my clearance is between .10 and .15mm somewhere. I don’t care where in between. For example lets say a .05mm feeler fit, but a .10mm did not. This would mean you would go down one shim size in that valve and theoretically when you recheck you would be right where you want to be, a .10 fits, .15 does not. If you measure zero clearance go down 2 sizes of shim and recheck.
To take cams out of a KZ650 do only one cam at a time. After removing your center tensioner sprocket and the cam caps, lift up one cam while keeping constant tension on the chain where it goes down into the engine and move the cam out of position to the center of the engine. Make sure you keep all slack between the cams and the chain tight going down into the engine. Now your cam is out of the way and you swap your shims then carefully move the cam back into place making sure of keeping the chain tight down in the engine. Tighten the caps to 5.5 ft/lb or so. Repeat for other cam. Why do we do it one cam at a time using this procedure? No retime is needed! Works great. Don’t over tighten the cam caps, trust me, they will strip before you hit 8 ft/lb, particularly the exhaust ones.
Post #21185 by RonKZ650:
One more thing you probably already know but I'll reinterate. When you do valve shims only do one cam at a time, remove all the cam caps, pull the cam up while keeping the chain tight on the chain going down into the engine, let all slack stay between the cams, then simply lay that cam in the center of the engine with the chain still on its sprocket. Do your shim swap, then carefully move the cam back into position keeping the chain tight going down into the engine. Tighten that cam up, then do the same with the other cam. The timing will never need to be reset doing it this way. Makes it a lot nicer, faster and safer all the way around.
Good Fortune!")
Post #475461 by RonKZ650:
Yes, you need to lock the tensioner as you already know. This is the 6mm bolt on the side of the tensioner body. To lock the tensioner, simply remove that short bolt and thread in a longer bolt that will tighten against the tensioner to hold it in place. After this is done remove your valve cover. If you're careful and no moron has used gasket sealer you can remove the cover without ruining the gasket and it can be reused indefinately. Now to be safe turn the motor over clockwise with a 17mm socket on the right end of the crank until your timing marks for 1-4 indicate TDC. Now look at the cams and see the arrow on the exhaust sprocket pointing straight forward aligned with the top surface of the head and your intake facing straight back lining up with the top of the head. If the arrows are not this way, turn the motor over 1 complete revolution until 1-4 are again at TDC. Now you have cams in correct position should an accident happen during disassembly. Now the way to remove the cams as to not disturb the timing. Of course first remove the center idler sprocket from between the cams and now work on one cam at a time. Remove all 4 cam caps from one cam, push down on the chain where your center idler was and at the same time lift the cam towards the center of the engine. Be sure and keep the chain tight going down in the engine and keep all slack between the cams. Once the cam is in the center of the engine you can do your shim swaps, then carefully reposition the cam in place. The important part is keep all slack between the cams and the chain always tight going down into the engine. Bolt up the caps and you're done with that cam. Repeat for the other cam. Do it right and timing has not been goofed up. This is direct from Kawasaki 4/77 service bulletin. Get it all bolted up, reinstall your short bolt in the tensioner and you're done. Tighten cam caps to 8ft/lb or less.
Post #249136 by RonKZ650:
Of course you need to tighten the cam caps, and the cams will settle in place and you'll have your slack. No way the cam can ever lay flat until you fully install. So line the T mark up on your advancer, look at the arrow on the exhaust cam and visualize where it will line up when the bolts are tightened, torque the cam down enough for it to be fully seated, look at your arrow and if you've guessed wrong by a tooth or two, go back and redo. After the exhaust is lined up, count back your 36 teeth and line the intake cam there, torque the intake cam, then press down on the chain between the cams to get enough slack to install the center idler sprocket, turn the engine clockwise slightly to take slack out, then install the tensioner if it's been removed, turn the engine over 1 revolution to the T mark and see both arrows lining up correctly with the head. There is no reason to ever remove the tensioner when removing the cams because on pre 1979 manual tensioner it will stay set right where it was, on 79-up lock the tensioner as instructed in the manual.
Post #221680 by RonKZ650:
I'll post my method for checking clearances in case you haven't read it. I try for .10-.15 range on the clearances. The way I do it, and this came right from a factory Kawasaki mechanic is to turn the engine over slowly with your 17mm wrench on the end of the crank while constantly trying to insert a .10mm feeler between the cam and bucket. If anywhere throughout the entire rotation, it can be inserted, try a .15mm feeler and see if it can be inserted anywhere throughout the rotation. If the .10mm cannot be inserted, try the .05mm. The key here is to only use feelers in increments of .05mm because that's the size the shims are available in. When you find which feeler fits and which one doesn't we call that the clearance. So if a .10mm fits, a .15 does not, our clearance is considered .10mm. Do this for each valve. To me this is the only logical way to approach it, as I don't care if clearance is really .10mm, or .12mm or .13mm because shims are only available in .05mm increments. This way you really need only a .05, .10, .15 and .20mm feeler, none of the others do you one bit of good. This is all debatable and others don't like my procedure, and that's fine doing it by the book too.
The one thing I'm sure no one can contest though is to change shims on a KZ650 there is no need to ever completely remove the camshafts. This eliminates the need to even care where you position the engine, but it's still best to have the timing marks for the camshafts lined up with the front and rear of the engine in case of mishap. Doing it this way there is no need to retime the engine. The way to do it is to remove your center camchain sprocket from between the camshafts, then unbolt only one camshaft. Carefully lift it up keeping the chain tight going down in the engine and move the camshaft to the center of the engine. Be sure and keep chain tight down into the engine and keep all slack between the camshafts. Change your shims on those valves, carefully move the camshaft back into place keeping the chain tight down the engine. Bolt the camshaft back in and you're done. Repeat on the other cam. Now if you've kept the chain always tight going down into the engine the timing is exactly where you left it and you're job is done.
Post #146192 by RonKZ650:
Unfortunately the KZ650 is underbucket shims so the special tools for the KZ900-1000 do not apply. Camshaft removal is necessary. This issue has been discussed here quite a bit. Everyone has a different procedure. As I’d wager to bet I’m the highest mileage rider here on KZs I’ve done many a shim and this is my procedure and I’ve not read anyone else’s that works as well.
To check clearances only use feeler gauges in the same increments as shims are available, so you need a .05mm, .10mm, .15mm, and a .20mm for the most part, don’t bother with in-between sizes. Take off your right side points cover and turn the engine over slowly while constantly trying to fit a .10mm feeler between the bucket and cam. If at any point of cam rotation the feeler slides through, move up to .15mm and see if it slides through at any point of rotation. If .10mm did not fit, move down to .05mm. What you want to do is find the largest feeler that will fit anywhere in the rotation of the engine for each valve, but we only care in .05mm increments. Why is this? Because shims only come in .05mm size increments. I try to get my valves all where a .10mm feeler fits and a .15 does not fit. This means my clearance is between .10 and .15mm somewhere. I don’t care where in between. For example lets say a .05mm feeler fit, but a .10mm did not. This would mean you would go down one shim size in that valve and theoretically when you recheck you would be right where you want to be, a .10 fits, .15 does not. If you measure zero clearance go down 2 sizes of shim and recheck.
To take cams out of a KZ650 do only one cam at a time. After removing your center tensioner sprocket and the cam caps, lift up one cam while keeping constant tension on the chain where it goes down into the engine and move the cam out of position to the center of the engine. Make sure you keep all slack between the cams and the chain tight going down into the engine. Now your cam is out of the way and you swap your shims then carefully move the cam back into place making sure of keeping the chain tight down in the engine. Tighten the caps to 5.5 ft/lb or so. Repeat for other cam. Why do we do it one cam at a time using this procedure? No retime is needed! Works great. Don’t over tighten the cam caps, trust me, they will strip before you hit 8 ft/lb, particularly the exhaust ones.
Post #21185 by RonKZ650:
One more thing you probably already know but I'll reinterate. When you do valve shims only do one cam at a time, remove all the cam caps, pull the cam up while keeping the chain tight on the chain going down into the engine, let all slack stay between the cams, then simply lay that cam in the center of the engine with the chain still on its sprocket. Do your shim swap, then carefully move the cam back into position keeping the chain tight going down into the engine. Tighten that cam up, then do the same with the other cam. The timing will never need to be reset doing it this way. Makes it a lot nicer, faster and safer all the way around.
Good Fortune!
1973 Z1
KZ900 LTD
KZ900 LTD
The following user(s) said Thank You: bluej58
Please Log in or Create an account to join the conversation.
- bluej58
-
Topic Author
- Offline
- Sustaining Member
-
Registered
- The chrome don't get you home
- Posts: 2481
- Thanks: 511
Re: KZ650 B2 cam timing trouble
09 Jul 2013 09:48 - 09 Jul 2013 09:51
Thanks guys,
It looks like I'm going to have to start from the beginning to make sure everything is good.
That section of the manual is just what I needed Ed , it's kinda a tradition of mine to do rebuilds using a PDF file and eventually finding a beat up hard copy after I'm finished :blush: I've been going to the index and forgot about the quick reference page.
I appreciate you copying all those Ronkz650 posts for me Patton , they are a big help.
First thing I'm going to do is pull the tensioner and make sure that I haven't lost anything .
There are two arrows on the intake cam and I was referencing the one that doesn't have the upside down T , now it's starting to make sense, I guess I jumped a tooth when I screwed with the tensioner before, live and learn .
We have all the parts now and are hoping to get her rolling sometime this weekend.
JD
78 KZ1000 A2A
Last edit: 09 Jul 2013 09:51 by bluej58.
Please Log in or Create an account to join the conversation.
Moderators: Street Fighter LTD